
nestjs에서 multerS3와 @aws-sdk/client-s3을 사용한 유저 프로필 이미지 업로드 예제입니다. 그리고 aws의 s3와 완벽하게 호환되는 minio와 postman으로 테스트 하는 방법을 소개합니다.
구현
s3 업로드를 위해서 multerS3와 @aws-sdk/client-s3 를 설치
npm i @aws-sdk/client-s3 multer-s3 --save
npm i @types/multer-s3 --save-devFileInterceptor의 storage를 s3로 설정하면 FileInterceptor가 업로드를 처리하고 완료된 후에 업로드된 file 정보만 users controller로 넘겨준다. 매우 간단하다.
// src/users.contoller.ts

import {
  BadRequestException,
  Controller,
  FileTypeValidator,
  MaxFileSizeValidator,
  ParseFilePipe,
  Post,
  UploadedFile,
  UseInterceptors,
} from '@nestjs/common';
import { UsersService } from './users.service';
import { FileInterceptor } from '@nestjs/platform-express';
import * as multerS3 from 'multer-s3';
import { S3Client } from '@aws-sdk/client-s3';

const multerS3Config = multerS3({
  s3: new S3Client({
    endpoint: 'http://127.0.0.1:9000/',
    region: 'ap-northeast-2',
    credentials: {
      accessKeyId: 'KQQsW1NEMrfv7r8buxax',
      secretAccessKey: 'u4AAMddrra9Oa1QaM4pIw40VyiacFgCzz39Y99He',
    },
  }),
  bucket: 'test',
  acl: 'public-read',
  contentType: multerS3.AUTO_CONTENT_TYPE,
  key: (req, file, cb) => {
    cb(null, `${Date.now().toString()}-${file.originalname}`);
  },
});

@Controller('/users')
export class UsersController {
  constructor(private usersService: UsersService) {}

  // upload profile image
  @Post(':id/profile-image')
  @UseInterceptors(FileInterceptor('file', { storage: multerS3Config }))
  async uploadProfileImage(
    @UploadedFile(
      new ParseFilePipe({
        validators: [
          new FileTypeValidator({ fileType: '.(png|jpeg|jpg)' }),
          new MaxFileSizeValidator({
            maxSize: 1024 * 1024 * 1, // 1MB
            message: 'file size is too large',
          }),
        ],
      }),
    )
    file: Express.MulterS3.File,
  ) {
    if (!file) {
      throw new BadRequestException('file not found');
    }

    return { fileUrl: file.location };
  }
}
코드를 만들었으니 테스트를 해봐야지...
aws s3를 설정하고 쓰면 좋겠지만 당장 비용 때문에 쓸 수 없을 때 사용할 수 있는게 minio다.
minio는 오브젝트 스토리지 오픈소스이고 aws의 s3와 완벽하게 호환된다.
아래와 같이 minio를 실행하자.
services:
  minio:
    image: quay.io/minio/minio
    container_name: minio
    ports:
      - "9000:9000"
      - "9001:9001"
    environment:
      MINIO_ROOT_USER: root
      MINIO_ROOT_PASSWORD: root1234
    volumes:
      - ./docker_data/minio/data:/data
command: server /data --console-address ":9001"minio가 실행되면 브라우저에서 http://127.0.0.1:9001 로 접속한 후에 accessKey와 secretAccessKey를 생성해주고, bucket도 만들어 주면 된다. 그리고 이 정보는 위 코드에서 S3Client 생성코드의 endpoint, credentials, endpoint에 넣어주면 된다.
나중에 aws의 s3로 변경해도 s3 설정 외에는 코드를 바꿀 필요가 없다.
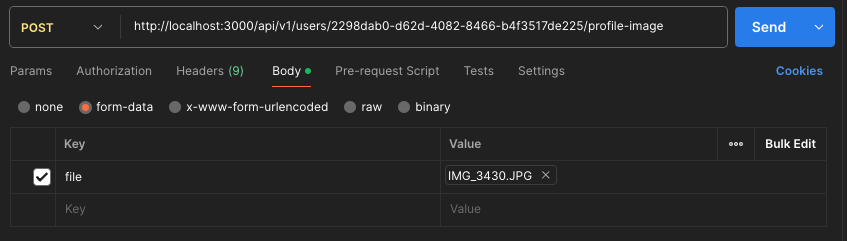
그리고, 검색해보니 postman로 이미지 업로드 테스트를 할 수가 있네요. body를 form-data로 선택한 후에 key의 타입을 File로 변경하고 아래처럼 key를 만들어주면 된다.
- key: "file"
- value: 테스트용 이미지

developer