CollectionView가 뭐야?!
요런 구조임. TableView도 있는데 비슷하다
차이점은 CollectionView는 인스타그램!
TableView는 메시지앱! 정도라 생각하면 된다
스토리보드에서 CollectionView를 드래그 해서 넣고
해당 ViewController에 IBOutlet으로 연결한 다음 datasource와 delegate 프로토콜을 채택해준다!
CollectionView의 Cell 파일 또한 생성해줘야함
1. UI구성
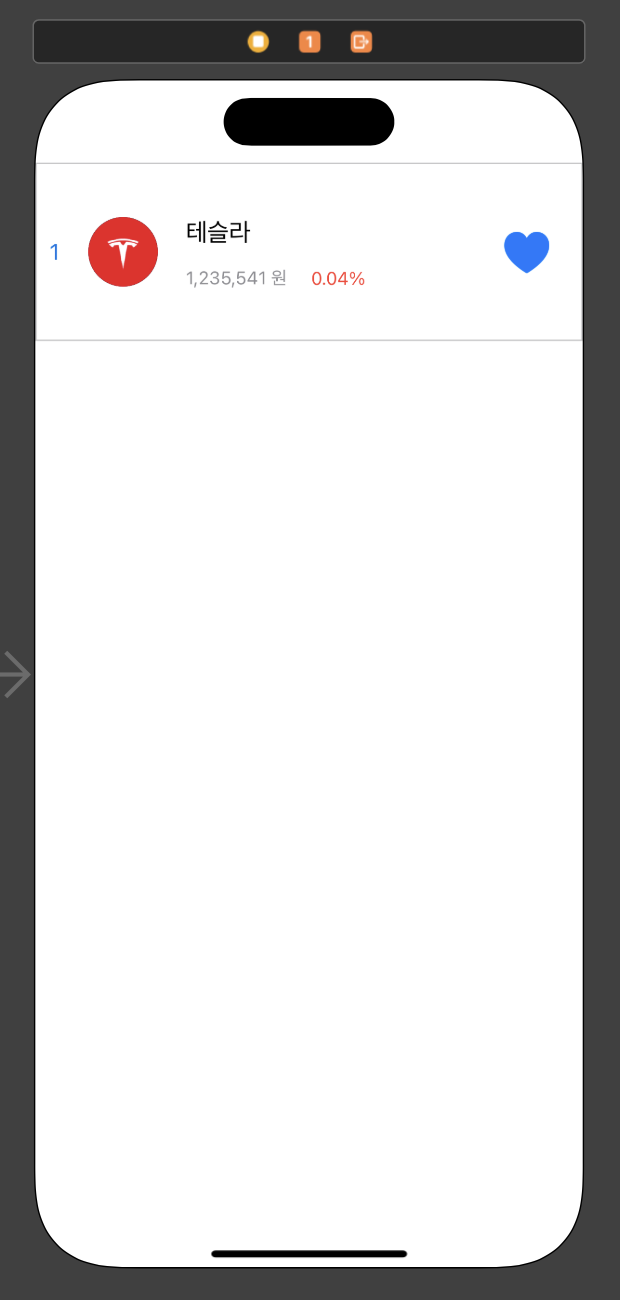
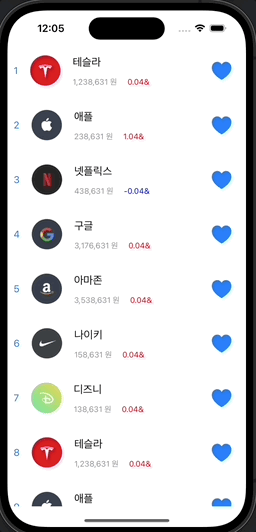
요런 형태로 만들어줬다
그리고 StockListViewController를 스토리보드와 연결하고 콜렉션뷰도 연결!
class StockListViewController: UIViewController {
@IBOutlet weak var collectionView: UICollectionView!
override func viewDidLoad() {
super.viewDidLoad()
collectionView.dataSource = self
collectionView.delegate = self
}
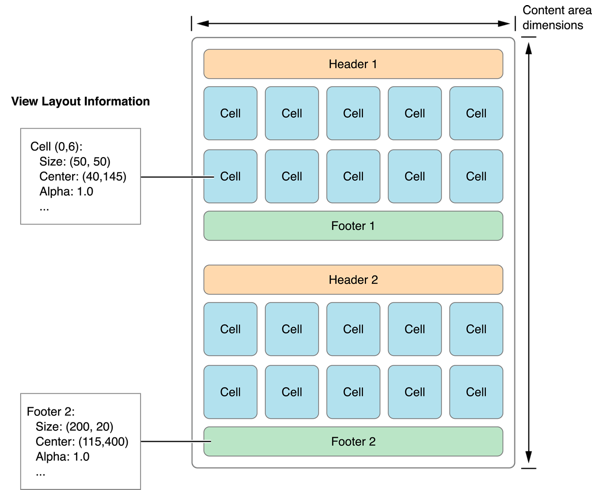
}collectionView는 Data, Presentation, Layout이 필요하다
이 과정에서 UICollectionViewDatasource와 UICollectionViewDelegateFlowLayout 프로토콜을 채택해줌.
extension으로 구현해보자
extension StockListViewController: UICollectionViewDataSource {
func collectionView(_ collectionView: UICollectionView, numberOfItemsInSection section: Int) -> Int {
return stockList.count
}
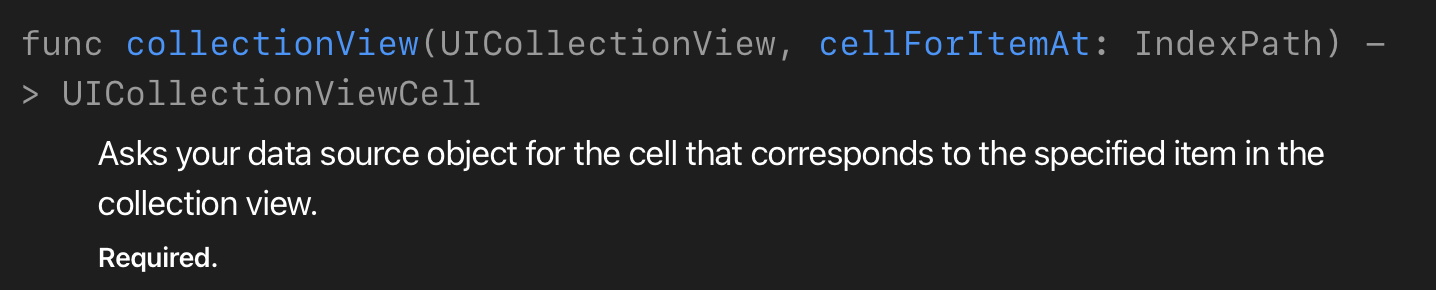
func collectionView(_ collectionView: UICollectionView, cellForItemAt indexPath: IndexPath) -> UICollectionViewCell {
guard let cell = collectionView.dequeueReusableCell(withReuseIdentifier: "StockCell", for: indexPath) as? StockCell else { return UICollectionViewCell()}
cell.configure(stockList[indexPath.item])
return cell
}
}
extension StockListViewController: UICollectionViewDelegateFlowLayout {
func collectionView(_ collectionView: UICollectionView, layout collectionViewLayout: UICollectionViewLayout, sizeForItemAt indexPath: IndexPath) -> CGSize {
return CGSize(width: collectionView.bounds.width, height: 80)
}
}여기서 잠깐!
UICollectionViewDataSource

데이터를 관리하고 cell에게 넘겨주는 프로토콜!

이렇게 두가지 메소드는 필수 구현해야함 (안 만들면 만들라고 빨갛게 알려주니까 걱정하지 말자!)
다시 돌아와서
이제 교체될 데이터 모델을 만들어 줘야겠죠?
StockModel이라는 struct 파일 새로 생성!
struct StockModel {
    let rank: Int
    let imageName: String
    let name: String
    let price: Int
    let diff: Double
}

extension StockModel {
    static let list: [StockModel] = [
        StockModel(rank: 1, imageName: "TSLA", name: "테슬라", price: 1_238_631, diff: 0.04),
        StockModel(rank: 2, imageName: "AAPL", name: "애플", price: 238_631, diff: 1.04),
        StockModel(rank: 3, imageName: "NFLX", name: "넷플릭스", price: 438_631, diff: -0.04),
        StockModel(rank: 4, imageName: "GOOG", name: "구글", price: 3_176_631, diff: 0.04),
        StockModel(rank: 5, imageName: "AMZN", name: "아마존", price: 3_538_631, diff: 0.04),
        StockModel(rank: 6, imageName: "NIKE", name: "나이키", price: 158_631, diff: 0.04),
        StockModel(rank: 7, imageName: "DIS", name: "디즈니", price: 138_631, diff: 0.04),
        StockModel(rank: 8, imageName: "TSLA", name: "테슬라", price: 1_238_631, diff: 0.04),
        StockModel(rank: 9, imageName: "AAPL", name: "애플", price: 238_631, diff: 1.04),
        StockModel(rank: 10, imageName: "NFLX", name: "넷플릭스", price: 438_631, diff: -0.04),
        StockModel(rank: 11, imageName: "GOOG", name: "구글", price: 3_176_631, diff: 0.04),
        StockModel(rank: 12, imageName: "AMZN", name: "아마존", price: 3_538_631, diff: 0.04),
        StockModel(rank: 13, imageName: "NIKE", name: "나이키", price: 158_631, diff: 0.04),
        StockModel(rank: 14, imageName: "DIS", name: "디즈니", price: 138_631, diff: 0.04),
    ]
}
static으로 선언하면 바아아로 접근 가능 . dot으로!
다시 VC로 돌아와서
let stockList: [StockModel] = StockModel.list스톡 리스트 추가해주고!
콜렉션뷰 datasource 메소드 numbersOfItemsInSection에 stockList에 담긴 갯수만큼만 섹션의 아이템이 될거라고 작성!
cellForItemAt 메소드엔 CollectionViewCell을 넘겨줘야하는데
그러려면 cell 파일도 만들어주자
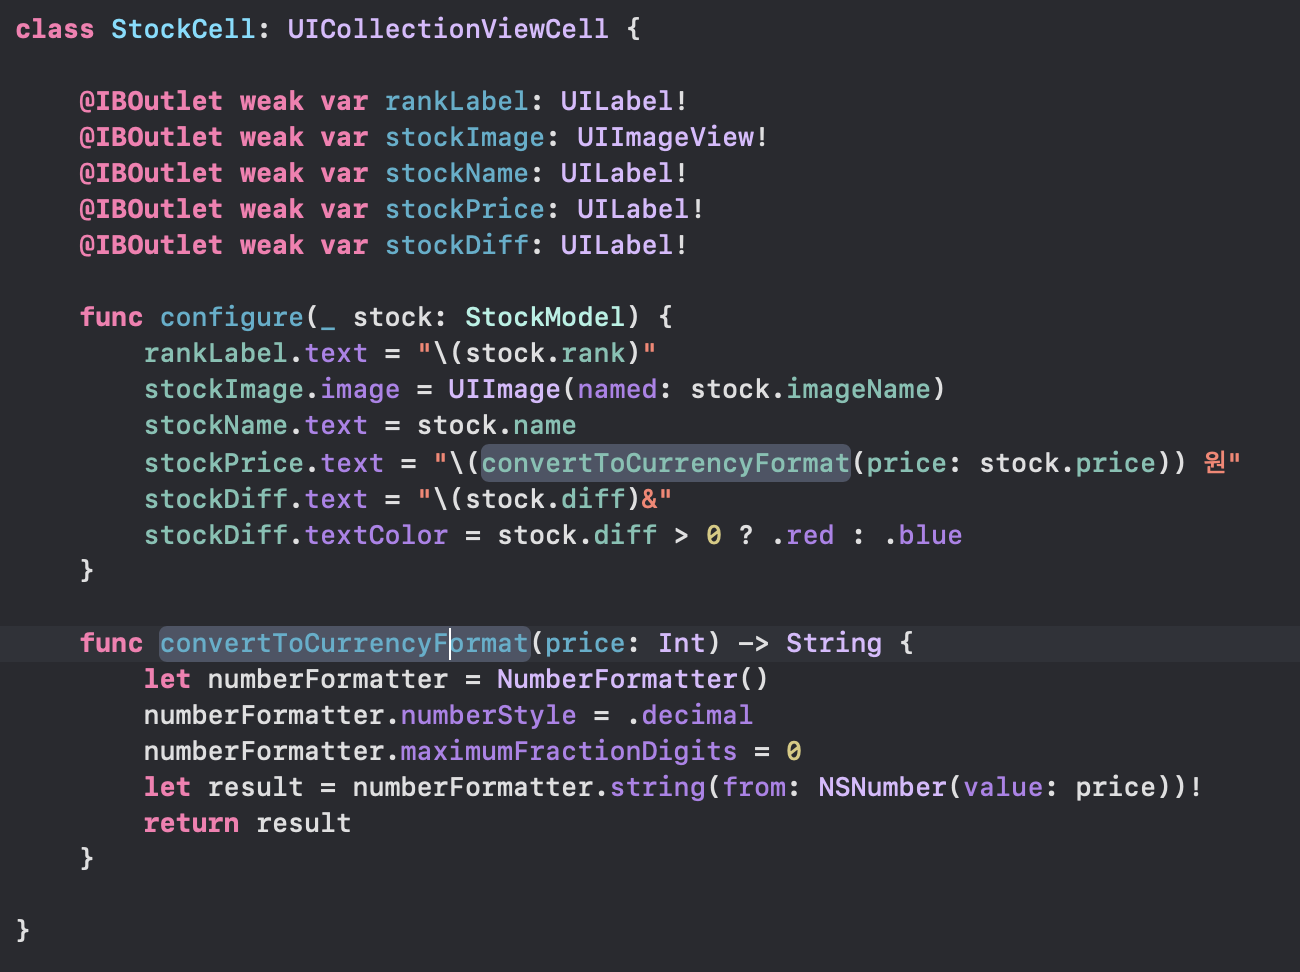
바껴야 하는 친구들 IBOutlet다 만들어주고
configure 라는 메소드를 만들어서 데이터 갈아낄 수 있게 해준다!
숫자 3개마다 콤마 변환해보기!
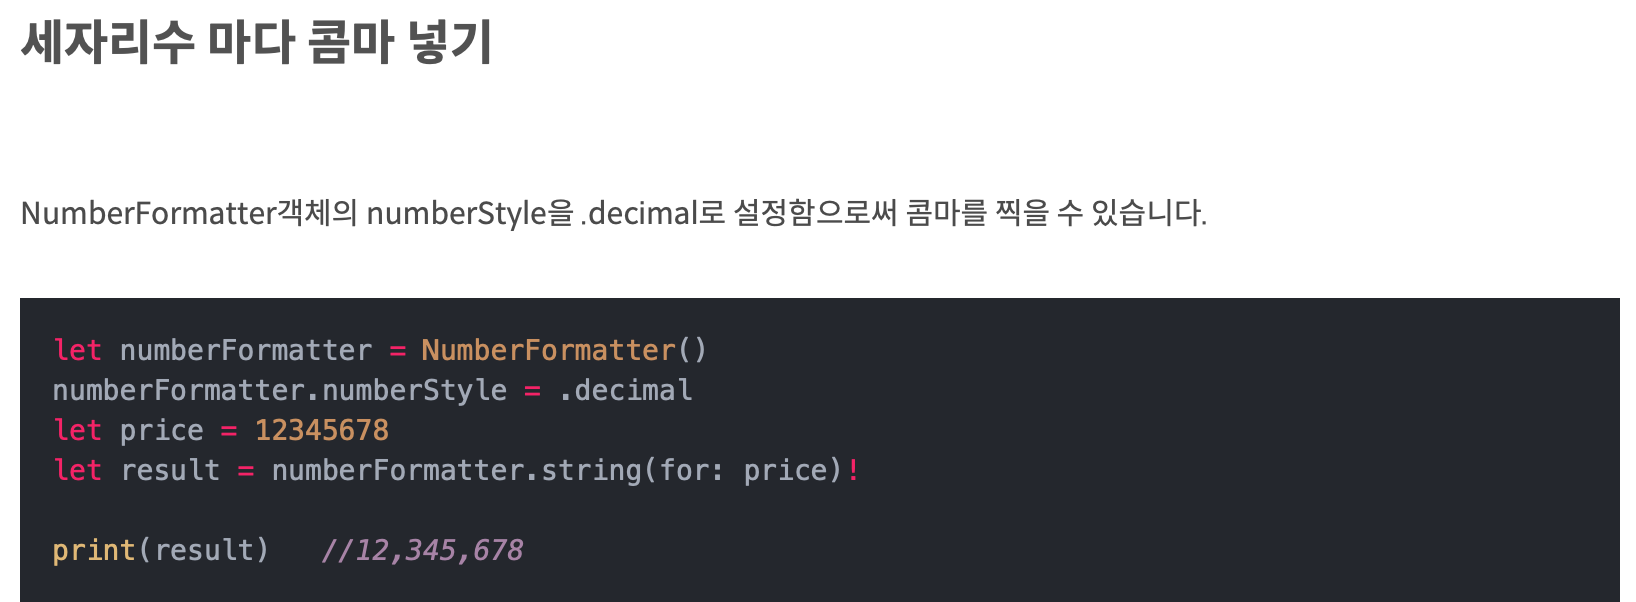
maximumFractionDigits는 소수점 몇자리까지 보여줄지 얘기하는거
그렇다고 합니다...
2. 데이터 갈아끼고 Cell 구성해주기
extension StockListViewController: UICollectionViewDataSource {
    func collectionView(_ collectionView: UICollectionView, numberOfItemsInSection section: Int) -> Int {
        return stockList.count
    }

    func collectionView(_ collectionView: UICollectionView, cellForItemAt indexPath: IndexPath) -> UICollectionViewCell {
        guard let cell = collectionView.dequeueReusableCell(withReuseIdentifier: "StockCell", for: indexPath) as? StockCell else { return UICollectionViewCell()}
        cell.configure(stockList[indexPath.item])
        return cell
    }
}

extension StockListViewController: UICollectionViewDelegateFlowLayout {
    func collectionView(_ collectionView: UICollectionView, layout collectionViewLayout: UICollectionViewLayout, sizeForItemAt indexPath: IndexPath) -> CGSize {
        return CGSize(width: collectionView.bounds.width, height: 80)
    }
}
다시 프로토콜들로 돌아와서
cellForItemAt 메소드를 보자.
파라미터로 콜렉션뷰가 필요하고,
인덱스 패스가 필요하다.
indexPath는 촤라라락 데이터들이 순서대로 들어가는 느낌이라고 생각하자!
index이긴한데 촤라라락임
3.UICollectionViewDelegateFlowLayout
촥촥촥촥 채워 나가는 레이아웃
스크롤 방향에 따라 촥촥촥촥 채워진다
collectionView의 아이템들의 사이즈를 정해줬음
collectionView의 width와 같게, height는 80정도로
CGSize를 내보냈다!
짜잔