[SwiftUI Documentation] App principles
Exploring the structure of a SwiftUI app
Section 1: App structure
import SwiftUI

@main
struct MyApp: App {
    var body: some Scene {
        WindowGroup {
            ContentView()
        }
    }
}
프로젝트를 만들게되면 MyApp.swift파일이 기본적으로 생성이 됨
코드를 보면 import SwiftUI 해줬고,
@main은 entry point를 나타낸거임
SwiftUI 앱은 단 하나의 entry point만 가져야한다!! 안 그럼 컴파일 에러남
MyApp structure는 App프로토콜을 준수하고 있고 앱의 콘텐트와 behavior를 기본적으로 제공하게 됨
그리고 computed property인 body를 가지게 되는데 App protocol의 요구사항임
이 프로퍼티는 Scene으로 표현되는 앱의 콘텐츠를 반환하게 됨
Scene에는 또 여러가지의 type들이 있는데
WindowGroup, Window, DocumentGroup, Settings 가 있다!
플랫폼 별로 어떻게 표현할지 대략적으로 나타낸다고 생각하면 좋을 거 같음
Section 2: Content view
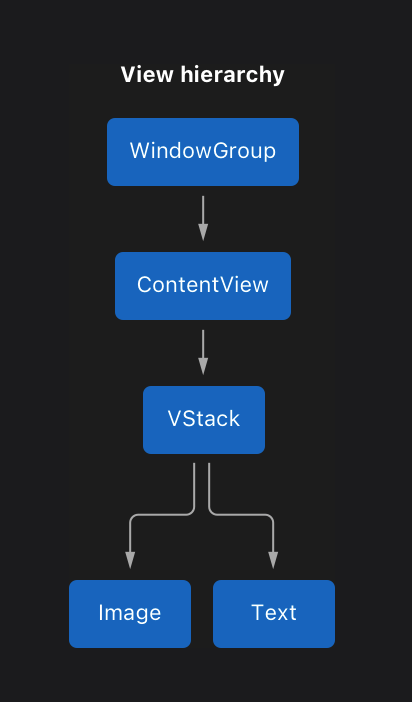
이렇게 뷰는 또 다른 뷰를 포함하게 되는 형식으로 계층을 구성하게 됨
import SwiftUI

struct ContentView: View {
    var body: some View {
        VStack {
            Image(systemName: "globe")
                .imageScale(.large)
                .foregroundColor(.accentColor)
            Text("Hello, world!")
        }
        .padding()
    }
}
스유 프로젝트 첨 만들면 자동으로 만들어지는 샘플 뷰죠
ContentView는 View 프로토콜을 준수하는 structure임
ContentView는 computed property인 body를 가지고 있음
그리고 이 안엔 VStack을 가지고 있는데 subview들을 vertical하게 정렬해줌
- VStack은 subview가 적을 때 사용하기 용이함.
- 만약에 subview가 너무 많을 경우에는 LazyVStack을 사용해보도록 하자
VStack 안엔 Image와 Text 뷰를 넣어준 걸 볼 수 있음
.imageScale로 대략적인 크기 조절 가능함
.foregroundColor는 뷰에 칼라를 추가하는거!
텍스트는 보는 것처럼 간단하니까 생략하겠음
그리고 VStack의 마지막에 .padding()이 있는데
플랫폼에 맞는 기본적인 양의 padding을 제공하게 됨
🤔 padding을 사용하다 보면 궁금한 점이 종종 생긴다.
뷰의 크기가 화면에 꽉 찰 경우에 패딩을 사용하면 edge들에서 부터 조금의 여유공간이 생기는데 작은 뷰일 경우엔 오히려 패딩을 사용하면 여유공간이 생기게 됨. 어떤 차이일까?
padding([.bottom, .trailing], 20) 이렇게 어디 부분들에 얼마만큼 주고 싶은지도 설정 가능함
Specifiying the view hierarchy of an app using a scene
Section1: Add a scene to the app
scene은 앱의 뷰 계층을 가지게 됨
import SwiftUI

@main
struct MyApp: App {
    var body: some Scene {
        WindowGroup {
            TabView {
                ContentView()
                    .tabItem {
                        Label("Journal", systemImage: "book")
                    }
                SettingsView()
                    .tabItem {
                        Label("Settings", systemImage: "gear")
                    }
            }
        }
    }
}
body는 computedProperty로 scene이 될거고
이 scene은 하나 아니면 그 이상의 primary 와 secondary scene들을 반환하게 됨
현재의 샘플 코드에선 primary scene 은 WindowGroup이 되게되는데
샘플의 메인 윈도우를 표현한다고 생각하면 됨
WindowGroup scene은 가장 자주 사용하게 되는 scene임.
멀티 플랫폼에 따른 특정된 behavior들을 제공해주는 녀석임
ipadOS나 macOS, 각각의 플랫폼에 최적화된 뷰를 보여준다고 생각하자
Group안에는 TabView를 가지게 되고, 이 탭뷰는 ContentView와 SettingsView를 포함하고 있음
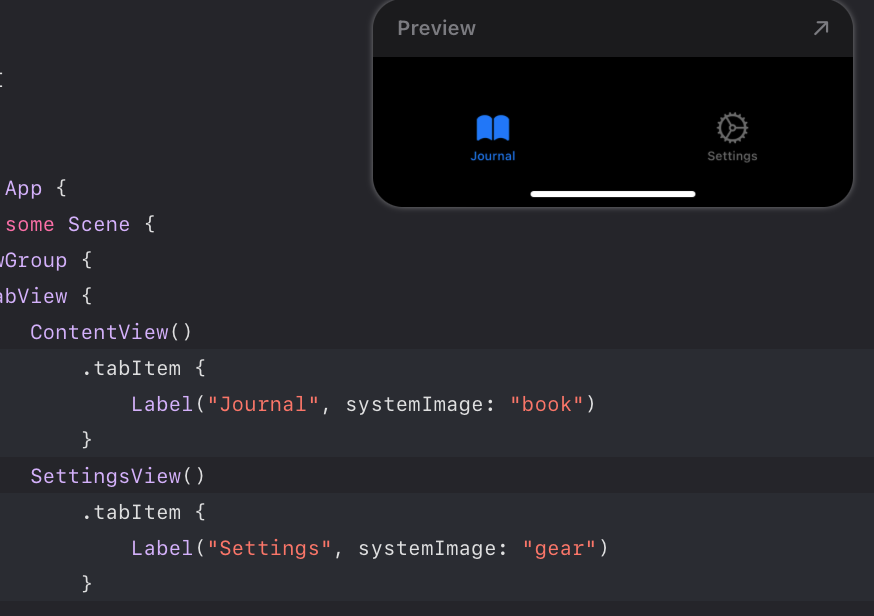
뷰들에 적용된 .tabItem은 탭바 아이템이 되게됨
Section2: Define another view hierarchy
아까 WindowGroup이 플랫폼에 맞춰서 보여주는 거랬는데 좀더 명확하게 이걸 설정해줄 수 있음
import SwiftUI

@main
struct MyApp: App {
    var body: some Scene {
        #if os(iOS)
        WindowGroup {
            TabView {
                ContentView()
                    .tabItem {
                        Label("Journal", systemImage: "book")
                    }

                SettingsView()
                    .tabItem {
                        Label("Settings", systemImage: "gear")
                    }
            }
        }
        #elseif os(macOS)
        WindowGroup {
            AlternativeContentView()
        }

        Settings {
            SettingsView()
        }
        #endif
    }
}
코드를 보면 iOS일 때는 기존에 작성한 것처럼 그대로 보여주고
만약에 플랫폼이 macOS일 때는 WindowGroup을 AlternativeContentView가 되게 해줬음
그리고 Settings는
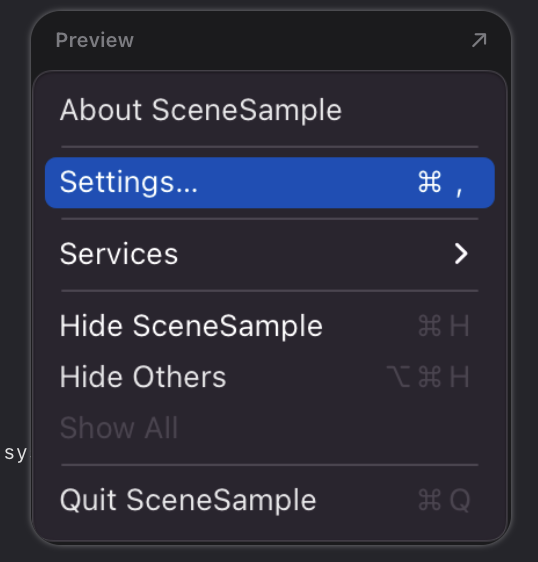
맥에서 요렇게 표현되게 만들어준 거!
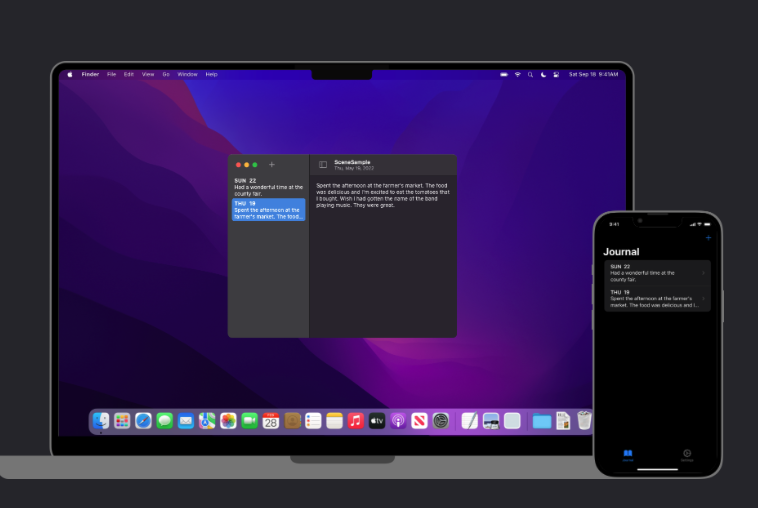
스유의 정말 큰 장점인 것 같음!!
플랫폼별로 새로 빌드 안해줘도 되고
Section 3: Create custom scenes
근데 App파일에 작성된 코드가 너무 길어져서 가독성이 안좋아지는 거 같음
Scene을 따로 빼서 구성해보자
import SwiftUI

struct MyScene: Scene {
    var body: some Scene {
        WindowGroup {
            TabView {
                ContentView()
                    .tabItem {
                        Label("Journal", systemImage: "book")
                    }

                SettingsView()
                    .tabItem {
                        Label("Settings", systemImage: "gear")
                    }
            }
        }
    }
}
struct MyAlternativeScene: Scene {
    var body: some Scene {
        WindowGroup {
            AlternativeContentView()
        }

        #if os(macOS)
        Settings {
            SettingsView()
        }
        #endif
    }
}
Section4: Refactor the code to use custom scenes
import SwiftUI

@main
struct MyApp: App {
    var body: some Scene {
        #if os(iOS)
        MyScene()
        #elseif os(macOS)
        MyAlternativeScene()
        #endif
    }
}
요호호 App파일이 상당히 깔끔해 졌습니다