1. 프로젝트 생성
npx create-next-app@latest 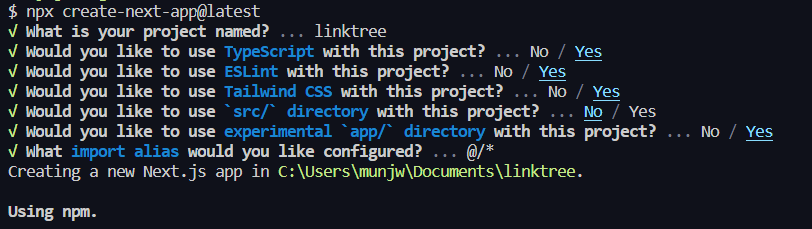
TypeScript를 사용했습니다.- 스타일은
TailwindCSS를 적용했습니다. app디렐토리를 사용하도록 설정했습니다.
2. 패키지 설치
// 소셜 아이콘을 위한 React Icons 패키지 설치
npm install react-icons --save
3. 구현
1) globals.css
@tailwind base;
@tailwind components;
@tailwind utilities;

body {
  margin: 0;
  padding: 0;
  background-image: linear-gradient(
    to right,
    rgb(125, 211, 252),
    rgb(14, 165, 233),
    rgb(5, 150, 105)
  );
}- Tailwindcss로 gradient 배경 쉽게 적용하는 법 ▶ hypercolor 이용
2) layout.tsx
import "./globals.css";
import { Noto_Sans_KR } from "next/font/google";

export const metadata = {
  title: "LinkTree",
  description: "Generated by create next app",
};

const inter = Noto_Sans_KR({
  variable: "--font-inter",
  display: "swap",
  subsets: ["latin"],
  weight: "100",
});

export default function RootLayout({
  children,
}: {
  children: React.ReactNode;
}) {
  return (
    <html lang="ko" className={`${inter.variable}`}>
      <body>{children}</body>
    </html>
  );
}
최신 버전의 NextJs의 경우,
- layout.tsx에서
metadata를 설정할 수 있습니다. - layout.tsx는 기존
pages디렉토리의_app.tsx와_document.tsx를 대체합니다. - 전체 페이지에 사용할 폰트를
layout.tsx에서 미리 설정할 수 있습니다. - 구글 폰트 중 Noto_Sans_KR을 적용했습니다.
- 폰트 적용에 대한 상세 정보는 여기를 참고해주세요.
3-1) page.tsx
page.tsx는 기존pages디렉토리의index.tsx를 대체합니다.
import Image from "next/image";
import data from "../data.json";
import {
  RiGithubFill,
  RiKakaoTalkFill,
  RiInstagramLine,
  RiLinkedinBoxFill,
} from "react-icons/ri";

function getSocialIcon(socialHref: string) {
  switch (true) {
    case socialHref.includes("github"):
      return <RiGithubFill size={32} />;
    case socialHref.includes("instagram"):
      return <RiInstagramLine size={32} />;
    case socialHref.includes("linkedin"):
      return <RiLinkedinBoxFill size={32} />;
    default:
      return <RiKakaoTalkFill size={32} />;
  }
}

export default function Home() {
  return (
    <main className="font-sans flex flex-col items-center justify-center mx-auto mt-16 px-8 md:px-20">
      <Image
        alt={data.name}
        src={data.avatar}
        width={96}
        height={96}
        priority
        className="rounded-full border p-2"
      />
      <h1 className="font-extrabold mt-4 text-2xl mb-8 text-white">
        {data.name}
      </h1>
      {data.links.map((link) => (
        <LinkCard key={link.href} {...link} />
      ))}
      <div className="flex items-center gap-8 mt-8 text-white">
        {data.socials.map((social) => (
          <a key={social.href} href={social.href}>
            {getSocialIcon(social.href)}
          </a>
        ))}
      </div>
    </main>
  );
}
3-2) LinkCard
interface Link {
  href: string;
  title: string;
  image?: string;
}

function LinkCard({ href, title, image }: Link) {
  return (
    <a
      href={href}
      className="flex items-center p-1 w-full rounded-md hover:scale-105 transition-all mb-3 bg-gray-100 max-w-3xl">
      <div className="flex text-center items-center justify-center w-full">
        <div className="w-10 h-10">
          {image && (
            <Image
              src={image}
              alt={title}
              width={48}
              height={48}
              className="rounded-sm"
            />
          )}
        </div>
        <h2 className="flex justify-center items-center font-bold w-full text-gray-800 -ml-10 text-lg">
          {title}
        </h2>
      </div>
    </a>
  );
}
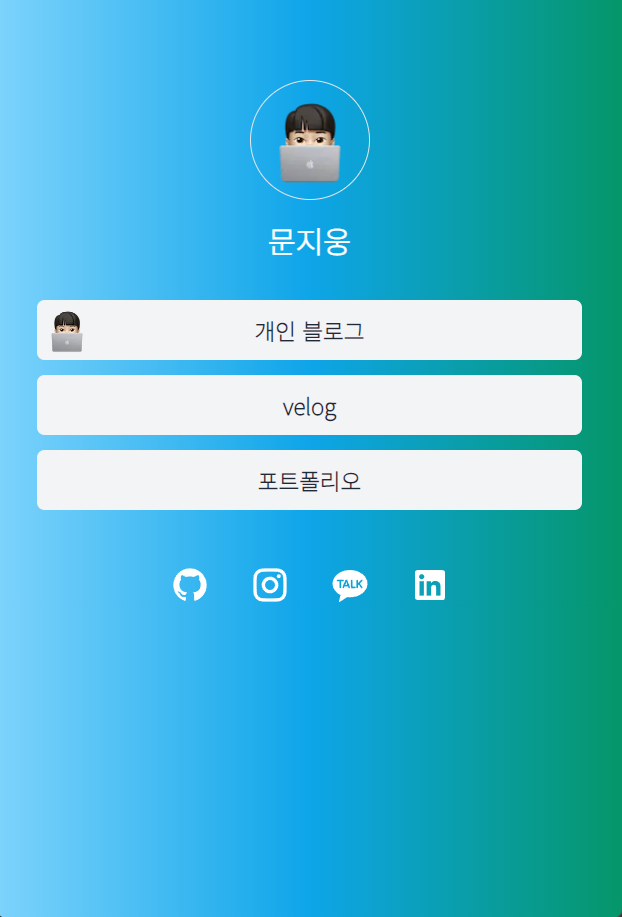
4.구현 결과
참고 자료
참고 영상

프론트엔드 개발자입니다.