Java.lang 패키지
=> 자바프로그래밍에 가장 기본이 되는 클래스들을 포함하고 있으며,
import 문 없이도 사용할 수 있게 되어 있다.
Object 클래스가 여기에 속해 있으며 이 클래스는 멤버 변수는 없고 11개의 메서드만 가지고 있다. (11개 중에서 생소한 것 알아보기)
1. hashCode()
-
특징
1) 해시코드가 같은 두객체가 존재하는 것이 가능하다.
2) String 클래스의 경우 문자열의 내용이 같으면 동일한 해시코드를 반환하도록hashCode()메서드가 오버라이딩 되어있다. -
예시 코드
public class HashCodeEx {
    public static void main(String[] args) {
        String str1 = new String("abc");
        String str2 = new String("abc");

        System.out.println(str1.equals(str2));
        // true, (String 클래스에서 오버라이딩 됨)

        System.out.println(str1.hashCode());
        System.out.println(str2.hashCode()); // 항상 동일한 값으로 나온다.

        System.out.println(System.identityHashCode(str1));
        System.out.println(System.identityHashCode(str2));
    }
}
결과 :

System.identityHashCode()메서드는 객체의 주소값을 통해서 hasCode 를 생성하기 때문에 항상 값이 다르게 나온다. (얕은 복사여도)
2. clone()
- 특징
1) 자신을 복제하여 새로운 인스턴스를 생성하는 일을 한다.
2) 단순히 인스터느 변수의 값만 복사하기 때문에 참조 타입의 인스턴스 변수가 있는 클래스는 완전한 인스턴스 복제가 이루어지지 않는다.
3) 오버라이딩을 통해 완전한 인스턴스 복제가 이루어 질 수 있다.
4)Cloneable인터페이스를 구현한 클래스에서만 clone() 을 호출 할 수 있으며 그렇지 않은 경우 예외가 발생한다.
class Point implements Cloneable {
    int x, y;
    public Point(int x, int y) {
        this.x = x;
        this.y = y;
    }

    public String toString(){ // 오버라이딩
        return "x=" + x + ", y=" + y;
    }

    public Object clone(){ // 구현
        Object obj = null;
        try{
            obj = super.clone(); // 반드시 예외 처리가 필요
        }
        catch(CloneNotSupportedException e){
            e.printStackTrace();
        }
        return obj;
    }
}

public class CloneEx {
    public static void main(String[] args) {
        Point original = new Point(3, 5);
        Point copy = (Point)original.clone();
        System.out.println(original);
        System.out.println(copy);


       // 만약 clone() 메서드를 return this; 를 통해서 하면
       //자기 자신의 참조가되므로 아래 두 결과 출력이 동일하게 된다.
        System.out.println(System.identityHashCode(original));
        System.out.println(System.identityHashCode(copy));
    }
}
결과 : 
Cloneable인터페이스가 구현되어 있다는 것은 클래스 작성자가 복제를 허용한다는 의미로서 사용된다. 이때 반드시 위처럼 예외 처리가 필요하며super.clone과 같이 불러 올 수 있다. (참고로 얕은 복사이다.)
3. 얕은 복사와 깊은 복사
=> 위에서 본 clone() 메서드를 통해 복사의 개념을 조금이나마 알 수 있었지만 확실하게 얕은 복사 와 깊은 복사 의 차이점이 무엇이고 어떤식으로 구현하는 지 알아보고 싶었다.
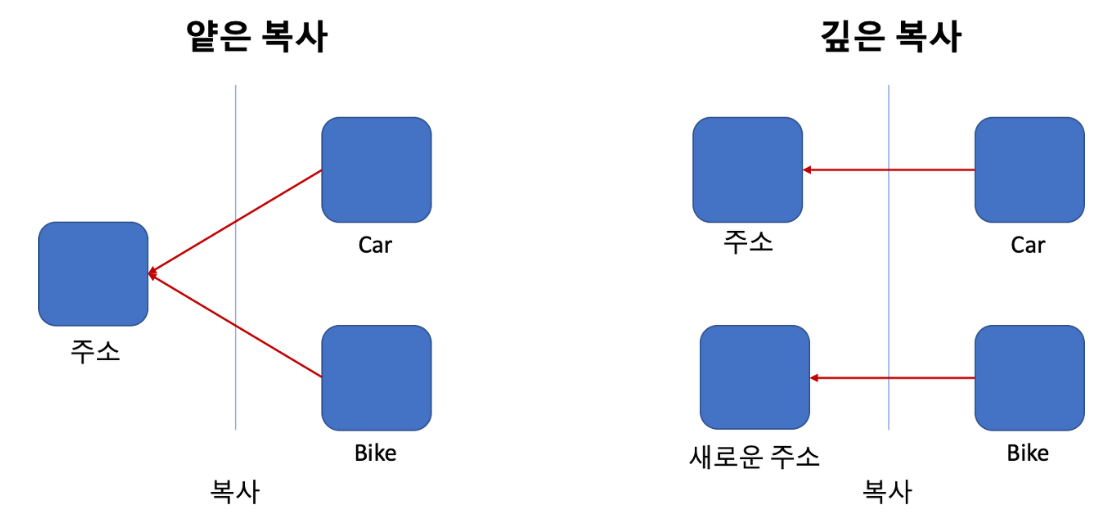
=> 차이점을 그림으로 설명하자면 얕은 복사의 경우 주소는 공유하면서 객체의 저장된 값만 복사되는 반면 깊은 복사의 경우는 주소또한 새로운 주소를 할당하고 객체의 저장된 값이 복사된다.
코드로 살펴보자!!
package ch09_java_lang_package;

class Circle implements Cloneable {
    Point p; // Point 클래스는 "CloneEx.java" 에 구현 되어 있다.
    double r;

    Circle(Point p, double r) {
        this.p = p;
        this.r = r;
    }

    public Circle shallowCopy() { // 얕은 복사
        Object obj = null;
        try {
            obj = super.clone(); // 단순한 복사로서
        } catch (CloneNotSupportedException e) {
            e.printStackTrace();
        }
        return (Circle) obj; // 공변 반환 타입을 이용함
    }

    public Circle deepCopy() {
        Object obj = null;
        try {
            obj = super.clone();
        } catch (CloneNotSupportedException e) {
            e.printStackTrace();
        }
        Circle c = (Circle) obj;
        c.p = new Point(this.p.x, this.p.y);
        return c;

    }

    public String toString() {
        return "[p = " + p + ", r = " + r + "]";
    }

}

public class ShallowDeepCopy {
    public static void main(String[] args) {
        Circle c1 = new Circle(new Point(1, 1), 2.0);
        Circle c2 = c1.shallowCopy(); // 얕은 복사
        Circle c3 = c1.deepCopy(); // 깊은 복사

        System.out.println("c1 = " + c1);
        System.out.println("c2 = " + c2);
        System.out.println("c3 = " + c3);

        c1.p.x = 9;
        c1.p.y = 9;

        System.out.println("= c1의 변경 후 = ");
        System.out.println("c1 = " + c1);
        System.out.println("c2 = " + c2);
        System.out.println("c3 = " + c3);

        // 다 다르게 나온다.
        System.out.println(System.identityHashCode(c1));
        System.out.println(System.identityHashCode(c2));
        System.out.println(System.identityHashCode(c3));

    }
}
결과 :

처음에
Circle클래스에 대한 인스턴스 c1을 만들고 c2 는 얕은 복사를 이용하여, c3는 깊은 복사를 이용하여 객체를 복사하였다.
차이점을 알아보자면 c2는 c1을얕은 복사즉 값만 복사 하였고 주소는 공유를 하기 때문에 c1 또는 c2 를 통해 값을 변경하면 두 인스턴스의 값이 모두 변하는 겻을 확인 가능한 반면
c3는 c1을깊은 복사즉 값과 주소(다른 주소)를 복사하여 독립적으로 존재하는 객체이기 때문에 c1이 변하든 말든 상관 없이 c3 만의 객체 값을 가지고 있게 되는 것이다.