문제
Render me If you can.
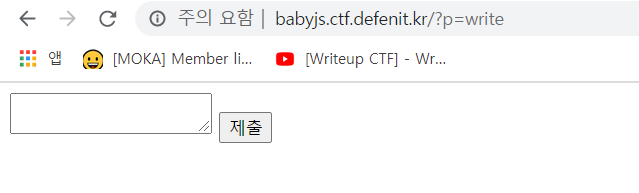
접속하면 write 링크가 있고, 해당 페이지로 이동하면 내용을 입력할 수 있는 폼이 주어진다.
풀이
🎏 소스
제공된 서버파일을 확인한다.
app.js
const express = require('express');
const path = require('path');
const crypto = require('crypto');
const fs = require('fs');
const app = express();

const SALT = crypto.randomBytes(64).toString('hex');
const FLAG = require('./config').FLAG;

app.set('view engine', 'html');
app.engine('html', require('hbs').__express);

if (!fs.existsSync(path.join('views', 'temp'))) {
    fs.mkdirSync(path.join('views', 'temp'));
}

app.use(express.urlencoded());
app.use((req, res, next) => {
    const { content } = req.body;

    req.userDir = crypto.createHash('md5').update(`${req.connection.remoteAddress}_${SALT}`).digest('hex');
    req.saveDir = path.join('views', 'temp', req.userDir);

    if (!fs.existsSync(req.saveDir)) {
        fs.mkdirSync(req.saveDir);
    }

    if (typeof content === 'string' && content.indexOf('FLAG') != -1 || typeof content === 'string' && content.length > 200) {
        res.end('Request blocked');
        return;
    }

    next();
});

app.get('/', (req, res) => {
    const { p } = req.query;
    if (!p) res.redirect('/?p=index');
    else res.render(p, { FLAG, 'apple': 'mint' });
});

app.post('/', (req, res) => {
    const { body: { content }, userDir, saveDir } = req;
    const filename = crypto.randomBytes(8).toString('hex');

    let p = path.join('temp', userDir, filename)

    fs.writeFile(`${path.join(saveDir, filename)}.html`, content, () => {
        res.redirect(`/?p=${p}`);
    })
});

app.listen(8080, '0.0.0.0');
백엔드는 express로 구현되어 있다.
동작을 보면 먼저 미들웨어에서 req.body의 content에 대해 필터링 한다.
그리고 get으로 루트에 접근했을 때는 p라는 쿼리 변수의 값을 갖는 웹 페이지를 렌더링해준다. 예를 들어 접근 url이 xx.com/?p=123.html일 경우 123.html 파일로 응답해주는 것이다.
post로 접근할 경우, 즉 문제 페이지에서 제공하는 폼으로 데이터를 전송할 경우 그 데이터(content)를 랜덤한 이름의 파일로 저장한다.
그리고 그 파일명을 url로 리다이렉트 시킨다.
리다이렉트된 클라이언트는 get으로 접근하게 되므로 앞서 얘기한 것처럼 해당 파일을 response로 받는다.
🎊템플릿 변수
중요한 것은 get에서 렌더링 해줄 때 FLAG라는 템플릿 엔진 변수를 설정한다는 것인데, 서버 파일을 확인하면 config.js에서 FLAG 변수의 값을 확인할 수 있다.
config.js
module.exports = {
    FLAG: 'Defenit{flag-in-here}'
};
censored 되어있지만 FLAG 변수를 출력시켜야 한다는 것을 알았다.
테스트로 {{apple}}을 전송해보면 렌더링한대로 "mint"가 출력된다.

하지만 {{FLAG}}를 입력할 경우 "request Block"이 출력된다.
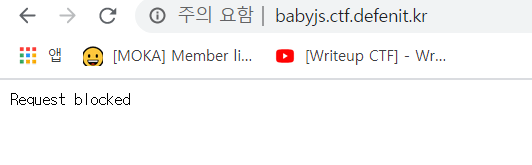
다음의 미들웨어 코드에서 필터링을 하기 때문이다.
app.use((req, res, next) => {
    const { content } = req.body;

    req.userDir = crypto.createHash('md5').update(`${req.connection.remoteAddress}_${SALT}`).digest('hex');
    req.saveDir = path.join('views', 'temp', req.userDir);

    if (!fs.existsSync(req.saveDir)) {
        fs.mkdirSync(req.saveDir);
    }

    if (typeof content === 'string' && content.indexOf('FLAG') != -1 || typeof content === 'string' && content.length > 200) {
        res.end('Request blocked');
        return;
    }

    next();
});
🧶우회
배열 전달
URL이나 Body 데이터의 파라미터를 전달할 때 중요한 특징이 있다.
변수명을 content에서 content[]로 전달할 경우 서버에서 배열로 값을 취급한다.
예를 들어 다음의 서버코드는
app.get('/', (res, req)=>{
	const v = req.query.param1
    console.log(v)
	...
...xx.com/?param1[]=123이라는 url이 처리한다면 v에 "['123']"이라는 값을 저장할 것이다.
이는 post 데이터로 body에 전달할 때도 마찬가지이다.
딕셔너리 값 저장
nodeJs에서는 딕셔너리의 값을 바로 저장할 수 있다.
const {content} = req.body위 코드는 req.body라는 딕셔너리 중 content라는 key를 찾아 그 값을 const content에 저장하는 것이다. 이후에 content라는 이름으로 사용할 수 있다.
적용
위의 두 가지 개념을 이용해 문제의 미들웨어 필터를 우회할 수 있다.
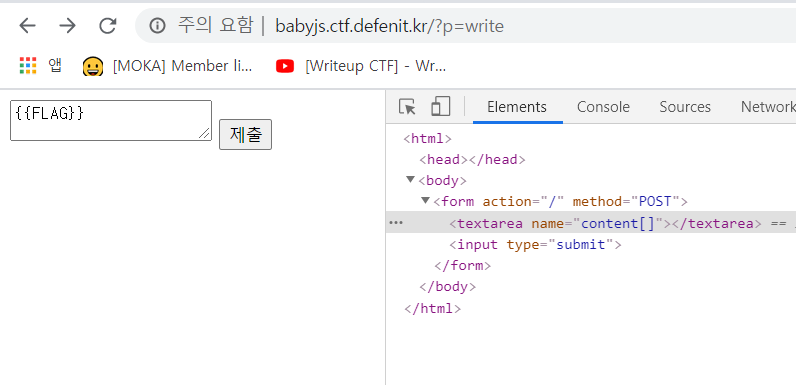
폼 데이터의 변수명을 content가 아닌 content[]로 전달한다면, 다음의 코드에서 content변수에 저장되는 값은 배열로 취급된다.
app.use((req, res, next) => {
	const { content } = req.body;
그래서 이후의 조건문이 우회된다.
if (typeof content === 'string' && content.indexOf('FLAG') != -1 || typeof content === 'string' && content.length > 200) {
🎎 증명
또한 파일로 저장할 때 fs 패키지를 사용하고 있는데
이 패키지는 배열인 값을 write할 때 단순한 value로 취급한다.
['123']을
fs로 write하면 '123'이 파일에 저장된다.
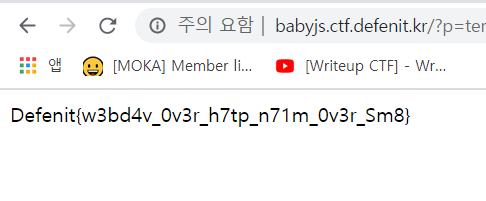
따라서 다음처럼 content 변수명을 수정해주고 {{FLAG}}를 전송하면
플래그를 확인할 수 있다.