개요
본 포스팅은 XPath Injection을 위한 선행지식을 습득하기 위함이다. 따라서 관련된 내용만을 정리하겠다.
XPath
정의
XPath는 XML에서 특정한 요소, 태그 등을 검색하기 위한 XML Path Language이며, 다음과 같은 특징을 갖는다.
- 표현식을 이용해 검색한다.
- 수학, 문자열 등의 처리를 위한 표준 함수 라이브러리를 내장하고 있다.
- SQL과 비슷하게 연산자가 존재한다.
한 마디로, JQuery에서 $("p"), $("#test")등의 문법은 HTML 태그를 검색하는 것이라면, XPath는 대상만 XML로 변경되었을 뿐인 것이다.
위 특징처럼, 경로를 이동하거나 연산자가 사용될 수 있기 때문에 XPath Injection 공격이 가능하다.
구성
XPath에서 사용하는 검색의 단위는 다음과 같다.
http://twinbraid.blogspot.com/2015/02/xpath.html
1. 루트 노드: XML 자체를 표현하는 가상노드
2. 요소 노드: 태그
3. 텍스트 노드: 태그 내용
4. 속성 노드
5. 주석 노드: 주석문
6. 네임스페이스(namespace) 노드
7. 처리 명령(processing instruction) 노드
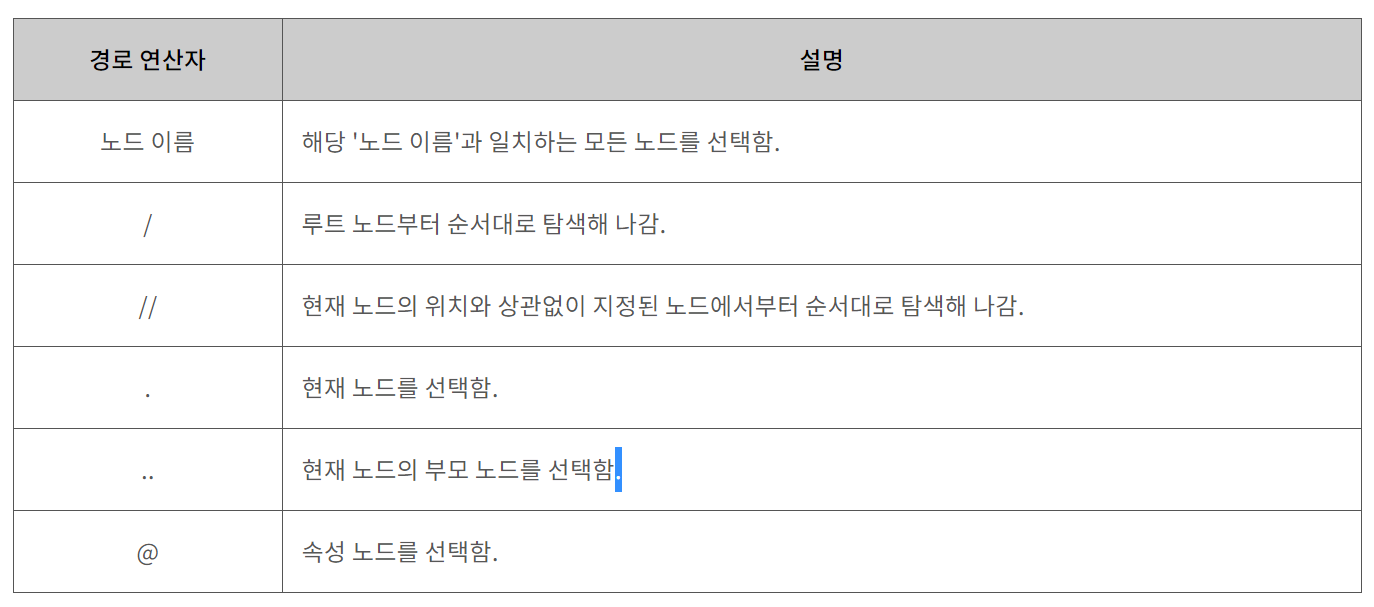
경로 접근
경로는 다음과 같이 표현한다.

주의할 점은, /Node 식으로 경로를 작성했을 때 Node가 루트 노드인지, 요소 노드인지, 텍스트 노드인지 모른다는 것이다.
다음의 블로그 내용을 참고하자.
http://twinbraid.blogspot.com/2015/02/xpath.html
여기서 날카로운 사람이면 의문을 가질 수 있을 것이다
위에서 7개의 노드가 있다고 했는데 이런식이면
저건 Element 노드만 찾는게 아닌가.. 라고..맞다. 앞서 말했듯이 xpath는 7개 노드 만들긴 했는데
딴건 워낙 잘 안쓰니까 가장 잘 쓰는 Element 노드는 위에처럼 걍 써도 되는 특권을 줬고
그 다음 잘 쓰는 Attribute 노드의 경우 앞에 @를 붙인다
//@lang
이럴 경우는 모든 곳에서 lang Attribute 노드를 찾는다
참고로 lang 속성을 가진 Element 노드를 찾는게 아니다
정확히 Atrribute 노드만 반환한다그럼 저 속성을 가진 Element 즉, 태그를 찾고 싶다면?
앞서의 조건을 걸려면 [] 대괄호를 쓴다고 했다 그대로 하면된다
//title[@lang]
이러면 lang 속성을 가진 title 태그 노드를 반환한다
경로 표현식
특정한 범위의 경로를 지정하기 위한 표현식이다.
당장의 공격기법에 활용되지 않아, 필요하면 링크를 참조하자.
필터 표현식(Predicates)
특정 노드를 선택하기 위한 표현식이다.
다음처럼 대괄호 안에 넣어 사용한다.
p_languages/language[표현식] 사용방법은 예제로 살펴보자.
p_languages/language[1]              : <p_languages>요소의 자식 노드 중 첫 번째 <language>요소를 선택함.

p_languages/language[position() < 3] : <p_languages>요소의 자식 노드 중 처음 두 개의 <language>요소를 선택함.

p_languages/language[last()]         : <p_languages>요소의 자식 노드 중 마지막 <language>요소를 선택함.

//priority[@rating]                  : rating 속성을 가지고 있는 <priority>요소를 모두 선택함.

//priority[@rating = 3]              : rating 속성의 속성값이 3인 <priority>요소를 모두 선택함.

count(//language)                    : 모든 <language>요소의 개수를 반환함.
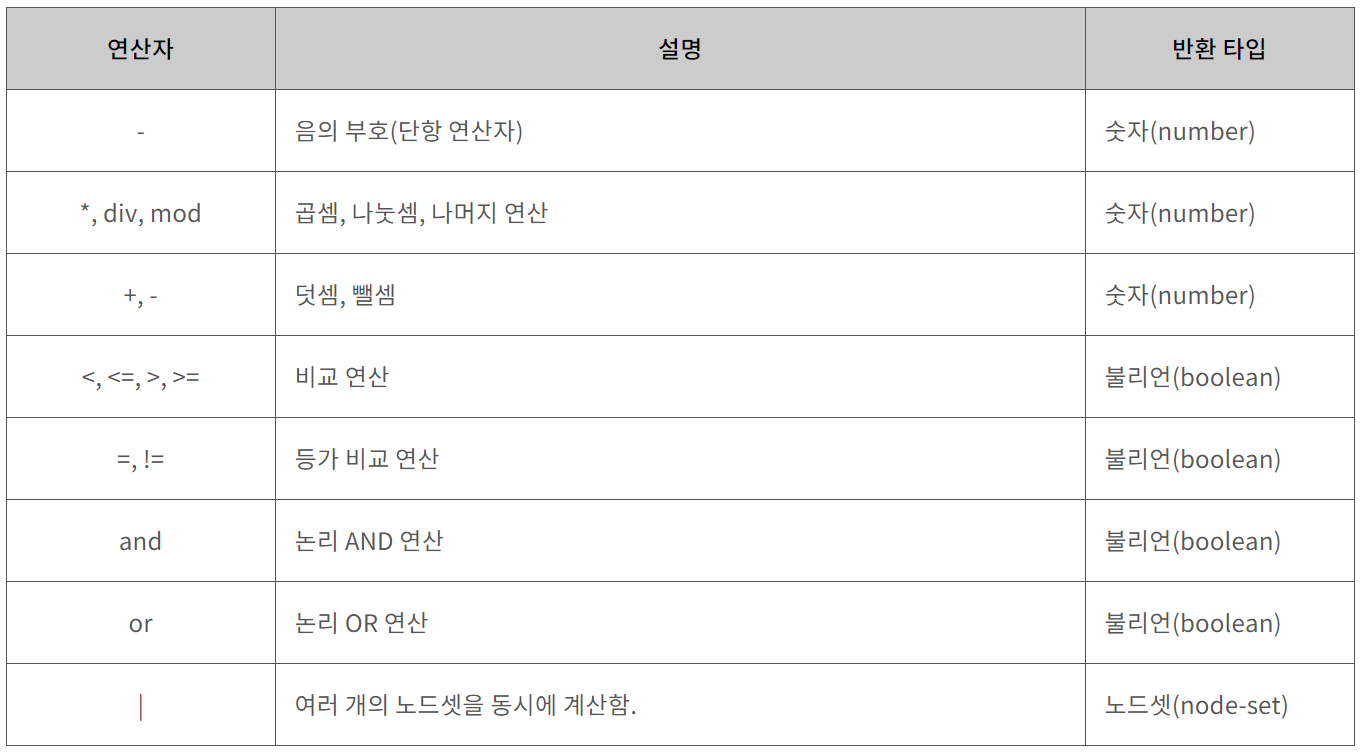
연산자(Operators)
SQL과 마찬가지로 연산자가 존재한다.

마찬가지로 예제를 통해 살펴보자.
//language/name | //language/version  : 모든 <language>요소의 <name>요소와 <version>요소를 모두 선택함.

//name | //version                    : 현재 문서의 <name>요소와 <version>요소를 모두 선택함.

/language/version/@status | //version : <language>요소의 <version>요소의 status 속성을 모두 선택하고,

                                        현재 문서의 <version>요소도 모두 선택함.
그 밖에...
앞서 설명한 함수와, 와일드 카드도 존재한다.
이것들 또한 공격에 유용하게 활용될 수 있다.
하지만, 본 포스팅의 목적인 개념이해에는 불필요할 수 있기 때문에 링크를 통해 참조하자.
예제
XPath의 내용을 참고하여 예제를 이해해보자.
books.xml
<?xml version="1.0" encoding="UTF-8"?>

<bookstore>

<book category="cooking">
  <title lang="en">Everyday Italian</title>
  <author>Giada De Laurentiis</author>
  <year>2005</year>
  <price>30.00</price>
</book>

<book category="children">
  <title lang="en">Harry Potter</title>
  <author>J K. Rowling</author>
  <year>2005</year>
  <price>29.99</price>
</book>

<book category="web">
  <title lang="en">XQuery Kick Start</title>
  <author>James McGovern</author>
  <author>Per Bothner</author>
  <author>Kurt Cagle</author>
  <author>James Linn</author>
  <author>Vaidyanathan Nagarajan</author>
  <year>2003</year>
  <price>49.99</price>
</book>

<book category="web">
  <title lang="en">Learning XML</title>
  <author>Erik T. Ray</author>
  <year>2003</year>
  <price>39.95</price>
</book>

</bookstore>
exam.html
<!DOCTYPE html>
<html>
<body>

<p id="demo"></p>

<script>
var xhttp = new XMLHttpRequest();
xhttp.onreadystatechange = function() {
    if (this.readyState == 4 && this.status == 200) {
        showResult(xhttp.responseXML);
    }
};
xhttp.open("GET", "books.xml", true); //XML 파일 로드
xhttp.send();

function showResult(xml) {
    var txt = "";
    path = "/bookstore/book/title"   //XPath 지정
    if (xml.evaluate) {   //IE가 아닌 브라우저에 대한 코드
        var nodes = xml.evaluate(path, xml, null, XPathResult.ANY_TYPE, null);
        var result = nodes.iterateNext();  //검색된 노드를 가져오기
        while (result) {
            txt += result.childNodes[0].nodeValue + "<br>";   //가져온 노드값을 변수에 저장
            result = nodes.iterateNext();
        }
    // IE에 대한 코드
    } else if (window.ActiveXObject || xhttp.responseType == "msxml-document") {
        xml.setProperty("SelectionLanguage", "XPath");
        nodes = xml.selectNodes(path);   //XPath를 이용해 노드 선택
        for (i = 0; i < nodes.length; i++) {   //가져온 노드값을 변수에 저장
            txt += nodes[i].childNodes[0].nodeValue + "<br>";
        }
    }
    document.getElementById("demo").innerHTML = txt;   //id가 demo인 요소에 결과 저장
}
</script>

</body>
</html>
참조
https://www.w3schools.com/xml/xpath_examples.asp
http://tcpschool.com/xml/xml_xpath_filterExpression
http://twinbraid.blogspot.com/2015/02/xpath.html
: 설명이 잘 되어있는 블로그

