
ssh로 EC2 접속하기
$ chmod 400 /path/to/your_key.pem
$ ssh -i /path/to/your_key.pem ubuntu@ip_address

or

$ ssh -i /path/to/your_key.pem ubuntu@PUBLIC_DNS
보안을 위해 key.pem의 권한을 변경한 후 ssh를 통해 접속할 수 있다. Public IPv4 address나 Public IPv4 DNS는 인스턴스 정보에서 확인할 수 있다.

Virtualenv, React, Django 설치하기
프로젝트가 React, Django로 만들어졌기 때문에 이를 먼저 설치한다.
Install virtualenv
$ sudo apt-get update
$ sudo apt install python3-pip
$ sudo pip3 install virtualenv
$ sudo apt install python3.7
$ virtualenv --python=python3.7 env_name
Install React
$ sudo apt-get install npm
$ sudo npm cache clean -f
$ sudo npm install -g n
$ sudo n stable # updating nodejs to newer version
$ sudo apt-get install npm
$ sudo npm install -g yarn
$ sudo npm install -g create-react-app
Install Django
$ source env_name/bin/activate
$ pip install django
설치 확인하기
- React
$ yarn starthttp:// your_dns :3000 을 열어 정상적으로 작동되는지 확인한다.
- Django
backend/settings.py에 ALLOWED_HOSTS = ['YOUR DNS'] 추가하기
$ python manage.py runserver 0.0.0.0:8000http:// your_dns :8000 을 열어 정상적으로 작동되는지 확인한다.
Error solutions
- install mysqlclient error
pip install --upgrade setuptools
sudo apt-get install python3.7-dev- yarn permission denied
cd ~/
sudo chown -R $(whoami) .config- (React) invalid host header
# in node_modules/react-scripts/config/webpackDevServer.config.js
disableHostCheck: true,
NGINX, UWSGI 설치하기
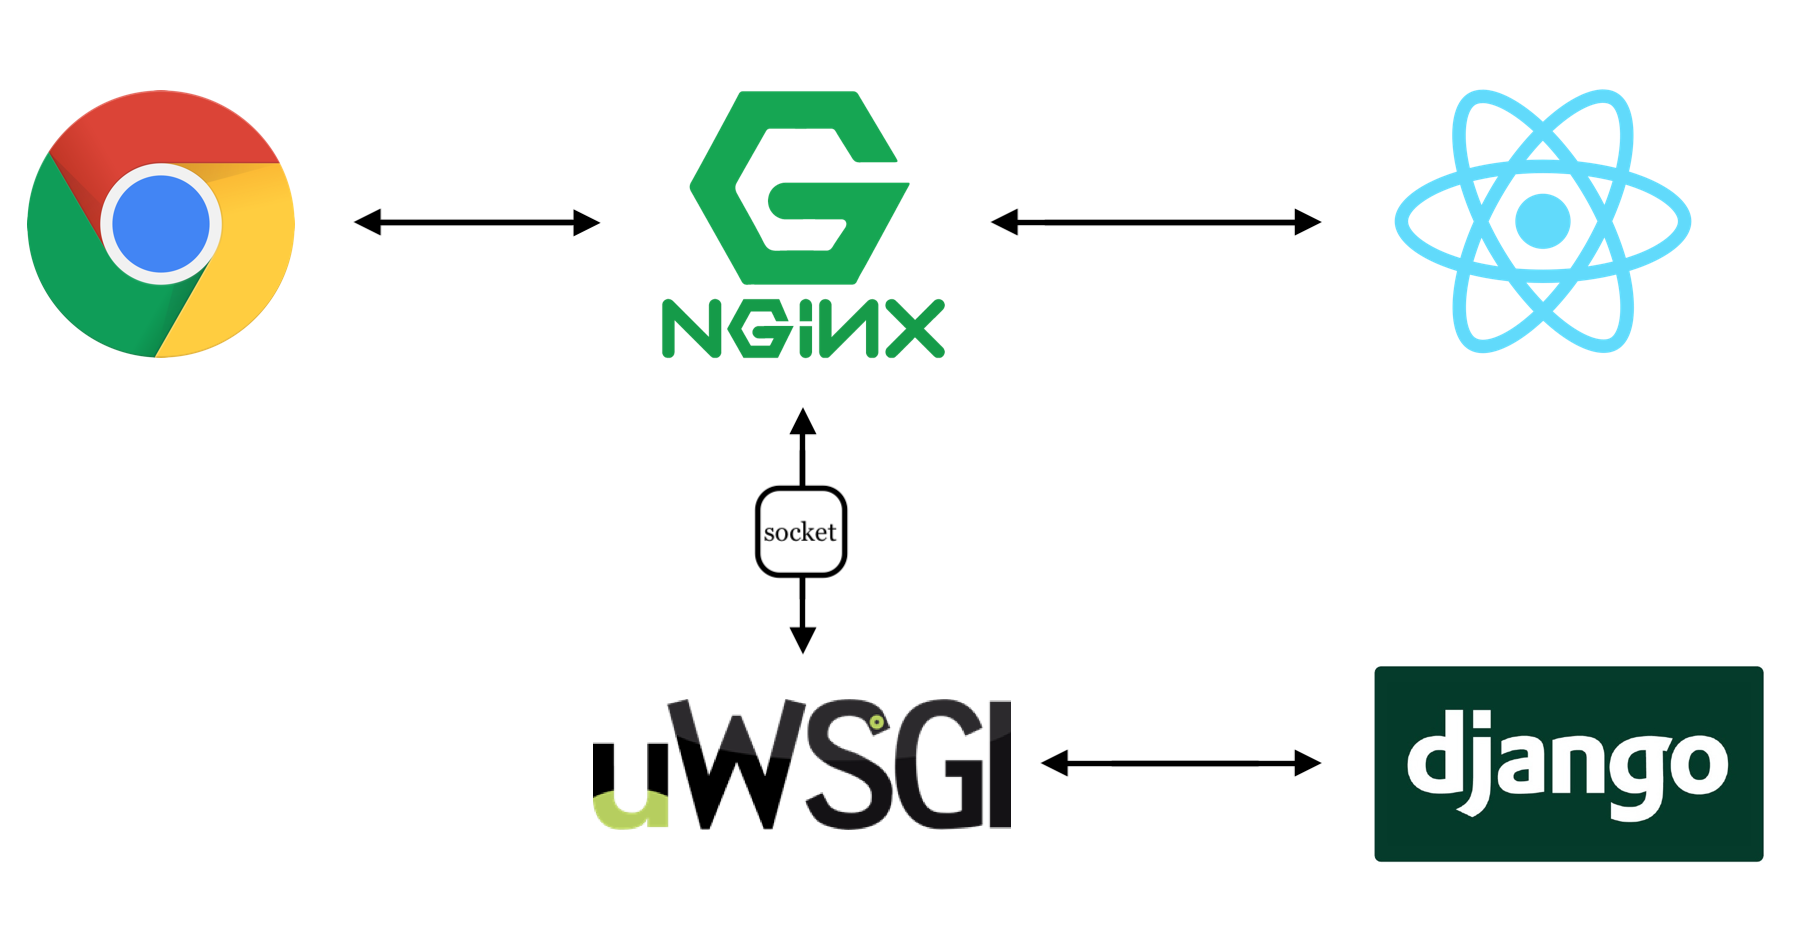
Nginx가 모든 request를 받아 처리한다. 클라이언트에게 온 요청을 React에게 전달하거나, React에서 온 api 요청을 소켓을 통해 uWSGI에 전달, 장고를 실행할 것이다.
nginx 설치
$ sudo apt install nginx
# on frontend Dir
$ npm run build --prod # make 'build' directory
uwsgi 설치
$ sudo apt-get install python3.7-dev
$ source venv/bin/activate
$ pip install uwsgi
설치 확인하기
$ sudo nginx -t # check nginx setting
$ sudo systemctl restart nginx (or sudo service nginx start)
http:// your_dns 를 열면 "Welcome to Nginx!" 가 보이는지 확인한다.
$ python manage.py check --deploy # check deployment checklist
$ uwsgi --http :8000 -H /path/to/virtualenv --wsgi-file project_root/backend/project_name/wsgi.py
http:// your_dns :8000 을 열어 정상적으로 작동되는지 확인한다.
NGINX, UWSGI 설정하기
nginx가 443포트(HTTPS), 80포트(HTTP), 8000포트(backend) 세 개의 포트를 듣고, 8000번 포트로 들어온 요청을 소켓을 통해 uwsgi에 전달해주는 구조로 설정해줄 것이다.
nginx 설정 파일을 작성해보자.
#/etc/nginx/sites-available/frontend.conf
server {
    listen 80;
    location / {
        root project_root/frontend/build;
        index index.html index.htm;
        try_files $uri $uri/ /index.html;
    }
    location /api {     # make connection to backend
        proxy_pass http://localhost:8000/api;
    }
}
# /etc/nginx/sites-enabled/backend.conf
upstream django {
server unix:/path/to/project/backend/run/uwsgi.sock;
}
server {
listen 8000;
server_name YOUR_DOMAIN_NAME;
charset utf-8;
client_max_body_size 75M;
location / {
uwsgi_pass django;
include /etc/nginx/uwsgi_params;
}
}위의 두 파일을 작성 후, 심볼릭 링크를 생성해주어야 한다.
$ sudo ln -s /etc/nginx/site-available/frontend.conf /etc/nginx/site-enabled/frontend.conf
$ sudo ln -s /etc/nginx/site-available/backend.conf /etc/nginx/site-enabled/backend.conf
$ sudo rm /etc/nginx/site-enabled/default
uwsgi 설정 파일도 작성해주자.
# /etc/systemd/system/uwsgi.service
[Unit]
Description=uWSGI Emperor service

[Service]
ExecStart= YOUR_VIRTUAL_ENV_PATH/bin/uwsgi --emperor /etc/uwsgi/sites
Restart=on-failure
KillSignal=SIGQUIT
Type=notify
NotifyAccess=all
StandardError=syslog

[Install]
WantedBy=multi-user.target
# /etc/uwsgi/sites/YOUR_SITE_DOMAIN.ini
[uwsgi]
home = /path/to/virtualenv/
chdir = /path/to/project/backend
module = YOUR_PROJECT_NAME.wsgi:application
env = DJANGO_SETTINGS_MODULE= YOUR_PROJECT_NAME.settings
master = 1
processes = 2
socket = %(chdir)/run/uwsgi.sock
logto = %(chdir)/logs/uwsgi.log
chmod-socket = 666
vacuum = true
plugins-dir = /usr/lib/uwsgi/plugins
plugin = python37
lazy-apps = true로컬에서 uwsgi를 설치하여 이를 이용하여 돌리기를 권고하지만, 파이썬 버전 차이로 제대로 실행되지 않았다. 그래서 uwsgi.service 파일에서 가상환경에 있는 uwsgi를 이용하여 돌리도록 설정하였다.
$ sudo systemctl (start, stop, status, restart ...) nginx
$ sudo systemctl (start, stop, status, restart ...) uwsgi
와 같은 명령어로 nginx와 uwsgi를 시작하거나 멈추고 상태를 확인할 수 있다.
HTTPS 설정하기
HTTPS 설정을 위해 certbot을 이용하여 인증서를 받을 것이다. 우선 구매한 도메인의 A 레코드에 인스턴스의 public ip address를 등록해두자.
$ sudo add-apt-repository ppa:certbot/certbot
$ sudo apt-get update
$ sudo apt-get install python-certbot-nginx
$ sudo certbot certonly --manual --preferred-challenges dns
	--server https://acme-v02.api.letsencrypt.org/directory -d 'YOUR_DOMAIN_NAME'
이후 등장하는 키를 DNS 관리 툴을 통해 등록해주면 된다. TXT 타입에 호스트를 _acme-challenge, 값을 표시된 키로 넣어주고 등록해준 뒤 다음 단계로 넘어가면 연결이 완료된다.
그럼 다시 프론트엔드 conf 파일을 수정해주자.
# /etc/nginx/sites-available/frontend.conf

server {
  server_name YOUR_DOMAIN_NAME;
  listen 443 ssl http2;
  ssl on;
  ssl_certificate   /etc/letsencrypt/live/YOUR_DOMAIN_NAME/fullchain.pem;
  ssl_certificate_key  /etc/letsencrypt/live/YOUR_DOMAIN_NAME/privkey.pem;

  location / {
    root project_root/frontend/build;
    index index.html index.htm;
    try_files $uri $uri/ /index.html;
  }

  location /api {
    proxy_pass http://localhost:8000/api;
  }
}

server {
  server_name YOUR_DOMAIN_NAME;
  listen 80;

  location / {
    return 301 https://$server_name$request_uri;
  }
}
이렇게 하면 완성이다. nginx를 재실행해주자!
certbot은 90일간 유효한데, 90일마다
$ certbot renew를 실행해주면 갱신된다.