
💡 Spring Security + JWT 구현
현재 진행 중인 웹 프로젝트를 진행하면서 프론트 영역과 통신 하기 위해서는 REST API방식으로 개발을 진행해야겠다는 생각이 들었다. 그렇기 때문에 Form로그인 방식과 같은 세션기반이 아닌 프론트엔드 영역으로부터 받은 JSON객체를 Spring Security에 적용하여 JWT Token을 발행하고, JWT Token을 통해 인증,인가하는 방식으로 Spring Security와 JWT를 함께 적용해보았다.
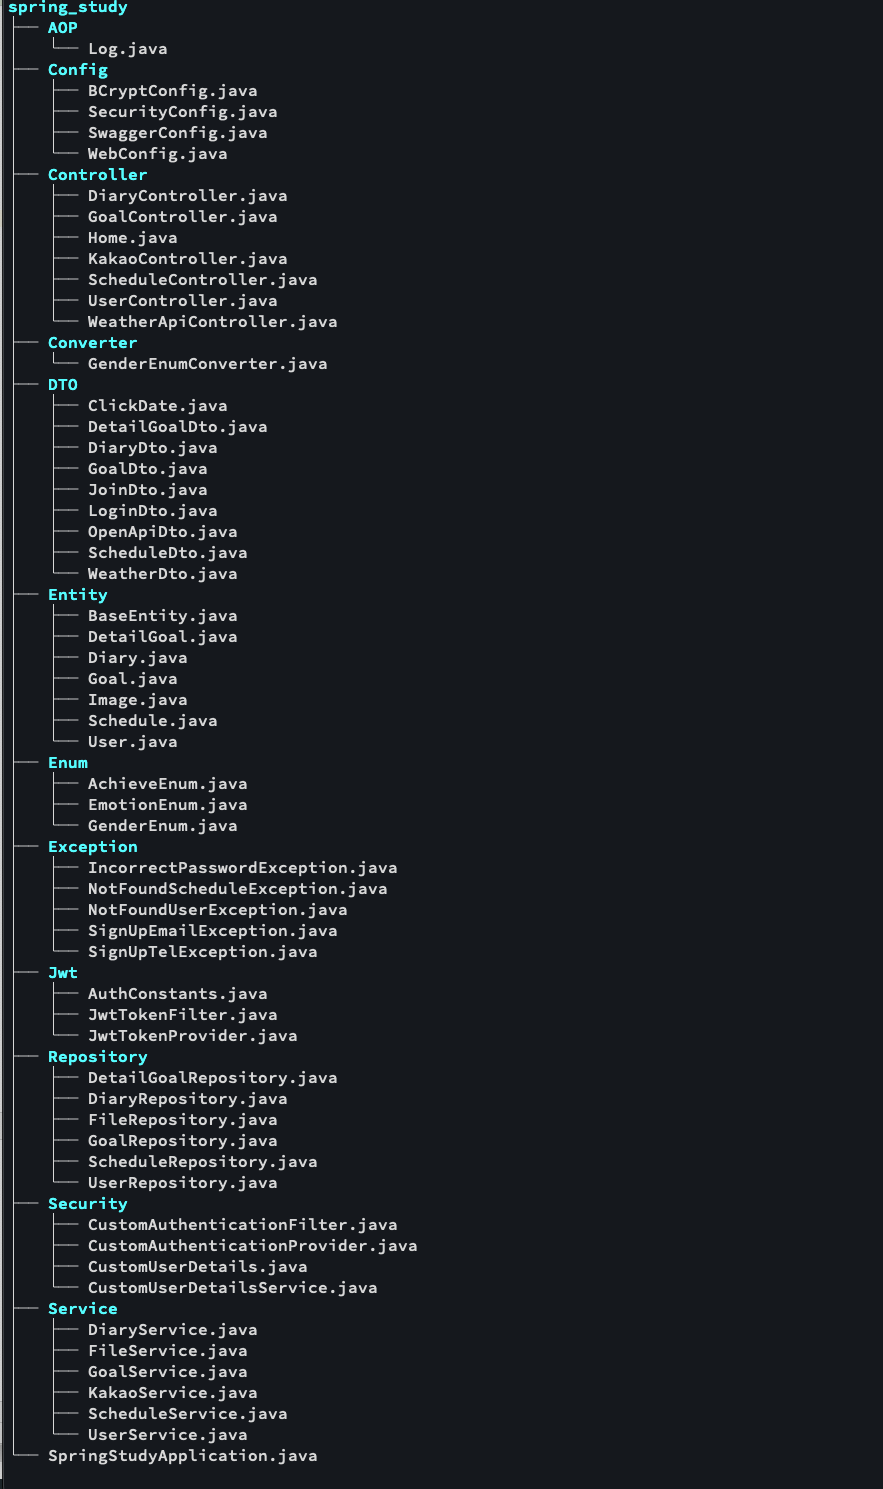
💡 디렉토리 구조
💡 구현방법
1️⃣ 의존성 라이브러리 추가
// JWT 기능을 위한 jjwt 라이브러리 ( Spring Security 기반의 애플리케이션에 JWT 적용하기 위해 )
    implementation 'io.jsonwebtoken:jjwt:0.9.1'
2️⃣ Security Config 파일 생성
@Configuration
@EnableWebSecurity
@RequiredArgsConstructor
public class SecurityConfig {
    private final JwtTokenProvider jwtTokenProvider;
    private final BCryptPasswordEncoder bCryptPasswordEncoder;

    private final UserRepository userRepository;

    @Value("${jwt.secretKey}")
    private String secretKey;

    @Bean
    public WebSecurityCustomizer webSecurityCustomizer(){
        return web -> web.ignoring().requestMatchers(PathRequest.toStaticResources().atCommonLocations());
    }

    @Bean
    SecurityFilterChain filterChain(HttpSecurity http) throws Exception{

        http.authorizeHttpRequests()
                .requestMatchers(
                        new AntPathRequestMatcher("/weather/api**")).hasRole("USER")
                .anyRequest().permitAll()
                .and()
                // 서버에 인증정보를 저장하지 않기에 csrf를 사용하지 않는다.
                .csrf().disable()
                // form 기반 로그인 방식을 비활성화하여 커스텀 필터를 사용
                .formLogin().disable()
                .httpBasic().disable()
                // 세션기반의 인증기반을 사용하지 않는다.
                .sessionManagement().sessionCreationPolicy(SessionCreationPolicy.STATELESS)
                .and()
                .addFilter(customAuthenticationFilter())
                .addFilterBefore(jwtTokenFilter(), UsernamePasswordAuthenticationFilter.class);
                // Spring Security Custom Filter 적용 - Form '인증'에 대해서 적용


        return http.build();
    }

    // 커스텀을 수행한 인증 필터로 접근 URL, 데이터 전달방식 등 인증과정 및 인증 후 처리에 대한 설정 구성하는 메소드
    @Bean
    public CustomAuthenticationFilter customAuthenticationFilter(){
        CustomAuthenticationFilter customAuthenticationFilter = new CustomAuthenticationFilter(authenticationManager());
        customAuthenticationFilter.setFilterProcessesUrl("/doLogin");
        customAuthenticationFilter.afterPropertiesSet();
        return customAuthenticationFilter;
    }

    @Bean
    public JwtTokenFilter jwtTokenFilter(){
        return new JwtTokenFilter(userRepository);
    }

    // authenticate의 인증 메서드를 제공하는 매니저로 Provider의 인터페이스를 의미
    @Bean
    public AuthenticationManager authenticationManager(){
        return new ProviderManager(customAuthenticationProvider());
    }

    // 인증 제공자로 사용자의 이름과 비밀번호가 요구된다.
    @Bean
    public CustomAuthenticationProvider customAuthenticationProvider(){
        return new CustomAuthenticationProvider(bCryptPasswordEncoder);
    }
}
✔︎ filterChain
- requestMatchers :
/weather/api경로는 User 역할만 접근 가능 - anyRequest().permitAll() : 그 외 모든 경로는 접근 가능
- csrf().disalbe() : csrf는 브라우저에 저장된 쿠키,세션 정보를 위조해 서버에 요청하는 것을 방지하는 것
- 🤔
그런데 왜 disalbe?
💬 JWT토큰을 이용하여 REST API형식으로 구현하기 위해 서버에 인증 정보를 저장하지 않기 때문에 인증정보를 포함시켜야한다
즉, REST API는 stateless하여 서버에 인증정보를 저장하지 않기때문에 불필요한 csrf코드를 작성할 필요가 없다.
- 🤔
- formLogin().disalbe() / httpBasic : formLogin은 Spring Security에서 기본적으로 제공하는 로그인 인증이다. 하지만 REST API방식으로 구현하기 위해서는 formLogin, httpBasic(Basic인증)은 비활성화해준다.
- httpBasic인증은 Header에 username, password를 실어 보내는 방식이다. 보안에 매우 취약하다.
📌 즉, JWT 인증은 Header에 JWT Token을 실어 보내기 때문에 disalbe하는 것이다.
- httpBasic인증은 Header에 username, password를 실어 보내는 방식이다. 보안에 매우 취약하다.
- sessionManagement().sessionCreationPolicy(SessionCreationPolicy.STATELESS) : 세션이 아니라 JWT Token을 사용하기 때문에 session을 stateless로 설정한다.
따라서, JWT를 사용할때는 formLogin, csrf, sessionManagemet는 비활성화해주어야한다.```
✔︎ customAuthenticationFilter
- setFilterProcessesUrl('/doLogin')경로 접근 시 request에 대해 인증을 수행하는 필터인
UsernamePasswordAuthenticationFilter를 커스텀한 CustomAuthenticationFilter를 Bean으로 등록해주는 메소드 - UsernamePasswordAuthenticationFilter는 아이디, 패스워드 데이터를 파싱하여 인증 요청을 위임하는 필터이다.
✔︎ jwtTokenFilter
- JWT 토큰으로 인증하고 SecurityContextHolder에 추가하는 필터를 Bean으로 등록하는 메소드
✔︎ authenticationManager
- 인증의 성공, 실패를 확인하는 authenticate 메소드를 제공하는 authenticationManager를 Bean으로 등록하는 메소드
- authenticationManager는 인터페이스이고 구현체가 authenticationProvider이기 때문에 생성자에 넣어준 것이다.
✔︎ customAuthenticationProvider
- authenticationManager를 구현하고 있으며, 아이디 패스워드에 대해서 직접적인 인증을 수행하는 클래스이다.
- 주요 메소드는
authenticate이며,authenticationProvider를 커스텀한 customAuthenticationProvider를 Bean으로 등록하는 메소드
3️⃣ CustomUserDetails & CustomUserDetailsService
✔︎ CustomUserDetails
- Spring Security에서 사용자의 정보를 담는 인터페이스이다.
즉, UsernamePasswordAuthenticationFilter가 가로챈 아이디, 패스워드 정보를 Spring Security에서 사용하기 위한 인터페이스이다.
- 필수 오버라이드
| 메소드 | 리턴타입 | 설명 | 기본값 |
|---|---|---|---|
| getAuthorities() | Collection<? extends GrantedAuthority> | ||
| getPassword() | String | 계정의 비밀번호를 리턴 | |
| getUsername() | String | 계정의 고유한 값을 리턴 | |
| isAccountNonExpired() | Boolean | 계정의 만료여부관련 | true (만료 안됨) |
| isAccountNonLocked() | Boolean | 계정 잠김 여부 리턴 | true(잠기지 않음) |
| isCredentialsNonExpired() | Boolean | 비밀번호 만료 여부 리턴 | true(만료안됨) |
| isEnabled() | Boolean | 2019.08.09. ~ | true(활성화) |
@Data
public class CustomUserDetails implements UserDetails {
    private User user;
    public CustomUserDetails(User user) { this.user = user; }
    @Override
    public Collection<? extends GrantedAuthority> getAuthorities() {
        ArrayList<GrantedAuthority> authorities = new ArrayList<GrantedAuthority>();
        user.getRoleList().forEach(r->{
            authorities.add(()->{return r;});
        });
        return authorities;
    }

    @Override
    public String getPassword() {
        return user.getPw();
    }

    @Override
    public String getUsername() {
        return user.getEmail();
    }

    @Override
    public boolean isAccountNonExpired() {
        return true;
    }

    @Override
    public boolean isAccountNonLocked() {
        return true;
    }

    @Override
    public boolean isCredentialsNonExpired() {
        return true;
    }

    @Override
    public boolean isEnabled() {
        return true;
    }
}
✔︎UserDetailsService
- Spring Security에서 유저의 정보를 가져오는 인터페이스이다.
- 해당 메소드는 직접 인증을 수행하는 authenticationProvider의 authenticate 메소드에서 실행되고, 전달받은 사용자 이름으로 userRepository에서 조회하고 없을 경우 Exception을 발생시키고, 존재하면 UserDetails를 생성하여 return해준다.
- authenticationProvider의 authenticate메소드에서 실행되는 코드
CustomUserDetails customUserDetails = (CustomUserDetails) userDetailsService.loadUserByUsername(user_email);
- 필수 오버라이드 메소드
| 메소드 | 리턴타입 | 설명 |
|---|---|---|
| loadUserByUsername() | UserDetails | 유저의 정보를 불러와서 UserDetails로 리턴 |
@Service
public class CustomUserDetailsService implements UserDetailsService {
    @Autowired
    private UserRepository userRepository;

    @Override
    public UserDetails loadUserByUsername(String username) throws UsernameNotFoundException {
        User user = userRepository.findByEmail(username)
                .orElseThrow(() -> {
                    throw new UsernameNotFoundException(String.format("%s은(는) 없는 이메일 입니다. 다시 확인해주세요.",username));
                });
        return new CustomUserDetails(user);
    }
}
4️⃣ CustomAuthenticationFilter & CustomAuthenticationProvider
✔︎ CustomAuthenticationFilter
- 사용자가 setFilterProcessUrl 경로에 접근하여 request한 인증 요청을 가로채고, Authentication 객체를 만든 뒤 AuthenticationManager에게 인증을 위임하는 필터이다.
- 주요 메소드
àttempAuthentication: UsernamePasswordAuthentication 구현 메소드, 인증을 위임하고 받은 UsernamePasswordAuthenticationToken을 returngetAuthRequest: 가로챈 요청을 User 객체로 매핑하는 메소드successfulAuthentication: 인증 성공시 , JWT Token 발급 메소드
- 여기서 주의 깊게 봐야하는 부분은
attempAuthentication메소드이다.
해당 메소드는 Spring Security FilterChain에 존재하는 UsernamePasswordAuthenticationFilter를 구현함으로써 Override한 메소드이다.
getRequest는 가로챈 요청 정보를 User객체와 매핑하고 UsernamePasswordAuthenticationToken을 생성하는 메소드이고, return된 값을attempAuthentication에서 사용하는 것이다.
successfulAuthentication은attempAuthentication가 정상적으로 인증 되었을때 실행되는 메소드이고, 정상적으로 인증이 되었다면, CustomUserDetails를 이용해 JWT Token을 생성해서 Header에 붙여 사용자에게 전달한다.
public class CustomAuthenticationFilter extends UsernamePasswordAuthenticationFilter {
    @Value("${jwt.secretKey}")
    private String secretKey;
    public CustomAuthenticationFilter(AuthenticationManager authenticationManager){
        super.setAuthenticationManager(authenticationManager);
    }
    // attemptAuthentication 인증이 정상적으로 이루어졌다면 해당 메소드 실행된다.
    // 즉, JWT토큰을 만들어서 request 요청한 사용자에게 reponse해주면된다.
    @Override
    protected void successfulAuthentication(HttpServletRequest request, HttpServletResponse response, FilterChain chain, Authentication authResult) throws IOException, ServletException {
        CustomUserDetails customUserDetails = (CustomUserDetails) authResult.getPrincipal();
        Claims claims = Jwts.claims().setSubject(customUserDetails.getUsername());
        String jwtToken = Jwts.builder()
                .setSubject(customUserDetails.getUsername())
                .setExpiration(new Date(System.currentTimeMillis() + (1000L*100)))
                .setClaims(claims)
                .setIssuedAt(new Date(System.currentTimeMillis()))
                .signWith(SignatureAlgorithm.HS256, secretKey)
                .compact();

        response.addHeader("Authorization", "Bearer "+jwtToken);
    }

    // 인증용 객체를 AuthenticationManager 구현체인 CustomAuthentication Provider에게 전달한다.
    @Override
    public Authentication attemptAuthentication(HttpServletRequest request, HttpServletResponse response) throws AuthenticationException {
        UsernamePasswordAuthenticationToken authRequest;
        try{
            authRequest = getAuthRequest(request);
        }catch(Exception e){
            throw new RuntimeException(e);
        }
        Authentication authentication = getAuthenticationManager().authenticate(authRequest);
        CustomUserDetails customUserDetails = (CustomUserDetails) authentication.getPrincipal();

        return this.getAuthenticationManager().authenticate(authRequest);
    }

    // 클라이언트로부터 받은 input값 User객체 매핑 후 UsernamePasswordAuthenticationToken 생성
    // 즉, CustomAuthenticationFilter가 요청을 가로채서, 객체로 매핑하고 인증용 토큰(UsernamePasswordAuthenticationToken)을 생성한다.
    public UsernamePasswordAuthenticationToken getAuthRequest(HttpServletRequest request) throws Exception{
        try{
            ObjectMapper om = new ObjectMapper();
            LoginDto loginDto = om.readValue(request.getInputStream(), LoginDto.class);

            return new UsernamePasswordAuthenticationToken(loginDto.getEmail(), loginDto.getPw());
        }catch(UsernameNotFoundException e){
            throw new UsernameNotFoundException(e.getMessage());
        }catch(Exception e){
            throw new Exception(e.getMessage(), e.getCause());
        }
    }
}
✔︎ CustomAuthenticationProvider
- 실제 인증 로직이 구현되어 있는 코드이다.
- CustomAuthenticationFilter의 authenticate메소드로부터 전달받은 authRequest를 이용해 UsernamePasswordAuthenticationToken으로 캐스팅
- 그리고
loadUserByUsername메소드를 통해 userRepository(DB)에서 user객체를 가져온다.
UsernamePasswordAuthenticationToken의 사용자 값과userRepository의 값을 비교하여 동일하다면 UsernamePasswordAuthenticationToken을 return 해준다.📌 주의사항
userRepository의 비밀번호 값은 회원가입 시 암호화 되었기 때문에 UsernamePasswordAuthenticationToken값과 비교할떄 복호화를 해주고 비교해야 올바른 값이 나온다.
@RequiredArgsConstructor
public class CustomAuthenticationProvider implements AuthenticationProvider {

    @NonNull
    private BCryptPasswordEncoder bCryptPasswordEncoder;
    @Resource
    private UserDetailsService userDetailsService;

    @Override
    public Authentication authenticate(Authentication authentication) throws AuthenticationException {
        UsernamePasswordAuthenticationToken token = (UsernamePasswordAuthenticationToken) authentication;

        String user_email = token.getName();

        String password = (String) token.getCredentials();

        CustomUserDetails customUserDetails = (CustomUserDetails) userDetailsService.loadUserByUsername(user_email);

        if(!(customUserDetails.getUsername().equals(user_email) && bCryptPasswordEncoder.matches(password, customUserDetails.getPassword()))){
            System.out.println("Provider 실패");
            throw new BadCredentialsException((customUserDetails.getUsername() + "Invalid password"));
        }
        return new UsernamePasswordAuthenticationToken(customUserDetails, password, customUserDetails.getAuthorities());
    }

    @Override
    public boolean supports(Class<?> authentication) {
        return authentication.equals(UsernamePasswordAuthenticationToken.class);
    }
}
5️⃣ JwtTokenFilter & JwtTokenProvider
✔︎ JwtTokenFilter
- 해당 Filter는 권한이 필요한 경로를 접근할때, 적용이되는 특성을 가지고 있다.
즉, 권한이 없는 경로는 적용이 안된다는 것이다.
- 주요 메소드를 살펴보면
doFilterInternal메소드가 실행되는데 Token값을 식별할 수 있는 Authorization Key값이 없거나, Value에 Beaerer이 붙어있지 않으면 접근을 막는다.
- 그릭고 JWT Token 구조 중 email값이 암호화된 Claim부분을 복호화하여 DB에 존재하는 사용자인지 비교 후, 존재한다면 시큐리티 세션에 JWT Token을 저장하고 다음 필터로 넘긴다.
📌 이때, 시큐리티 세션에 저장하는 코드가 바로
SecurityContextHolder.getContext().setAuthentication(authentication)이다.
public class JwtTokenFilter extends OncePerRequestFilter {
    @Value("${jwt.secretKey}")
    private String secretKey;
    private UserRepository userRepository;

    public JwtTokenFilter(UserRepository userRepository) {
        this.userRepository = userRepository;
    }

    @Override
    protected void doFilterInternal(HttpServletRequest request, HttpServletResponse response, FilterChain chain) throws IOException, ServletException {
        System.out.println("jwtfilter 실행");
        String jwtHeader = request.getHeader("Authorization");

        if(jwtHeader == null || !jwtHeader.startsWith("Bearer ")){
            chain.doFilter(request, response);
            return;
        }
        String token = request.getHeader("Authorization").replace("Bearer ", "");
        System.out.println(token);
        String email = Jwts.parser().setSigningKey(secretKey).parseClaimsJws(token).getBody().getSubject();

        if(email != null){
            User user = userRepository.findByEmail(email).get();

            CustomUserDetails customUserDetails = new CustomUserDetails(user);

            Authentication authentication = new UsernamePasswordAuthenticationToken(customUserDetails,customUserDetails.getPassword(),customUserDetails.getAuthorities());
            System.out.println(authentication);
            SecurityContextHolder.getContext().setAuthentication(authentication);

        }
        chain.doFilter(request,response);
    }
}
✔︎ JwtTokenProvider
- 해당 클래스는 JWT에서 사용되는 토큰 관련 유틸들을 관리하는 클래스이다.
- JWT를 생성하거나 유효성을 체크하는 등 전반적으로 처리되는 기능들을 모아둔 클래스이다.
@Component
@RequiredArgsConstructor
public class JwtTokenProvider {
    private final UserService userService;
    @Value("${jwt.secretKey}")
    private String secretkey;

    private static long expireTimeMs = 1000 * 10;

    // Jwt 토큰 생성 메소드
    public String createToken(LoginDto userDto){
        JwtBuilder builder = Jwts.builder()
                .setHeader(createHeader())
                .setClaims(createClaims(userDto))
                .setSubject(String.valueOf(userDto.getEmail()))
                .signWith(SignatureAlgorithm.HS256, createSignature())
                .setExpiration(createExpiredDate());
        return builder.compact();
    }

    // 1. Header값 생성해주는 메소드
    private Map<String, Object> createHeader(){
        Map<String, Object> header = new HashMap<>();
        header.put("typ", "JWT");
        header.put("alg", "HS256");
        header.put("regDate",System.currentTimeMillis());
        return header;
    }

    // 2. 사용자 정보를 기반으로 클래임 생성 메소드
    private Map<String, Object> createClaims(LoginDto userDto) {
        Map<String, Object> claims = new HashMap<>();

        claims.put("user_email", userDto.getEmail());
        claims.put("password", userDto.getPw());
        return claims;
    }

    // 3. JWT 서명 발급해주는 메소드
    public Key createSignature() {
        byte[] apiKeySecretBytes = DatatypeConverter.parseBase64Binary(secretkey);
        return new SecretKeySpec(apiKeySecretBytes, SignatureAlgorithm.HS256.getJcaName());
    }

    // 4. 토큰의 만료기간의 지정하는 메소드
    private Date createExpiredDate() {
        Calendar c = Calendar.getInstance();
        c.add(Calendar.HOUR, 8);
        return c.getTime();
    }

    // Claims에서 user_email 꺼내기
    public String getUserEmail(String token){
        return extractClaims(token, secretkey).get("user_email").toString();
    }

    // 발급된 Token이 만료 시간이 지났는지 체크
    public boolean isExpired(String token){
        Date expiredDate = extractClaims(token, secretkey).getExpiration();
        // Token 의 만료날까지 지금보다 이전인지 check
        return expiredDate.before(new Date());
    }

    // SecretKey를 통해서 Token Parsing
    public static Claims extractClaims(String token,String secretkey){
        return Jwts.parser().setSigningKey(secretkey).parseClaimsJws(token).getBody();
    }
    // Repository에서 user_email꺼내기
    public User getUserByEmail(String user_email) {
        return userService.getUserByEmail(user_email);
    }
}
🧑🏻💻 정리
팀 프로젝트를 시작하면서 프론트엔드와 데이터를 통신하기 위해서는 REST API형식으로 개발해야한다는 것을 알게되었다. 그리고 로그인 기능을 구현하기 위해서 JWT Token 방식을 사용하기로 결정했다. 마지막에는 구현을 거의 다 끝냈는데.. hasRole과 hasAuthority의 차이를 몰라서 계속 접근거부되는 이유를 찾지 못했었따 ..🤣
그리고 Spring Security와 JWT Token 방식을 동시에 적용하다보니 Custom해야하는 객체들이 많았고 이들을 Bean으로 등록해야했고, 의존성 주입해주기 위해서 @RequiredArgsConstructor어노테이션을 남발했다...🤣 그리고 결국에는 순환 참조 에러를 만나게 되었다..
그리고 FilterChain의 동작방식과 httpSecurity설정 부분도 정확히 숙지하지 못하고 있어서 접근이 원하는 곳에서 잘 안이루어지기도 했다...
현재까지는 Spring Security를 통해서 로그인이 정상적으로 이루어지면 JWT Token을 발행해주고, JWT Token을 통해 API 요청 시, 인증을 해주어서 접근을 허용하는 것까지 구현했다.
✏️ 다음 목표는 토큰의 유효시간 검증과 JwtTokenProvider를 수정해서 유효성과 검증에 초점을 맞추어 유지보수할 계획이다. 그리고 Oauth2방식 로그인도 구현해보고싶다 🔥🔥🔥