컴포넌트 단위 개발
Component Driven Development(CCD)
레고처럼 조립해나갈 수 있는 부품 단위로 UI 컴포넌트를 만들어 나가는 개발
Storybook이란?
- UI 개발, 즉 CCD를 하기 위한 도구
- 각각의 컴포넌트들을 따로 볼 수 있게 구성해주어 한 번에 하나의 컴포넌트에서 작업할 수 있다.
- 컴포넌트의 재사용성을 확대하기 위해 문서화하고, 컴포넌트를 자동으로 시각화하여 다양한 테스트 상태를 확인할 수 있다. ➡️ 버그 사전 방지
- 테스트 및 개발 속도 향상
- 애플리케이션의 다양한 상황에 구애받지 않고 UI 컴포넌트를 집중적으로 개발할 수 있다.
Storybook에서 지원하는 주요 기능
- UI 컴포넌트들의 카탈로그화
- 컴포넌트 변화를 Stories로 저장
- 핫 모듈 재로딩과 같은 개발 툴 경험 제공
- 리액트를 포함한 다양한 뷰 레이어 지원
Storybook 설치 및 세팅 방법
# Clone the template
npx degit chromaui/intro-storybook-react-template taskbox

cd taskbox

# Install dependencies
yarn
CSS in JS 방법론
구조적인 CSS 작성 방법의 발전
CSS ➡️ SASS ➡️ BEM ➡️ CSS Modules ➡️ Styled Components
구조화된 CSS가 필요하게 된 이유
- 프로젝트의 규모와 복잡도, 팀원 수의 증가
- 모바일이나 태블릿을 비롯한 다양한 디바이스의 등장 ➡️ CSS 복잡해짐
➡️ CSS 작업을 효율적으로 하기 위한 방법이 필요해짐
방법론들의 공통 지향점
- 코드의 재사용성
- 쉬운 유지보수
- 코드의 확장 가능성
- 클래스 명으로 의미 예측 가능
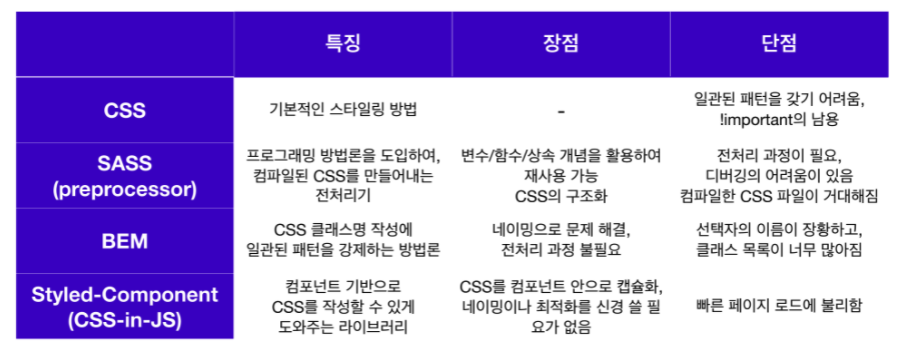
CSS 방법론들의 특징, 장단점

Styled-Component
- React 의 컴포넌트 기반 개발 환경에서 스타일링을 위한 CSS의 성능 향상을 위해 탄생
- CSS-in-JS 관련 React 라이브러리 중에서 현재 가장 인기 있는 라이브러리
- Styled Component 를 사용하면 기존 CSS 문법으로도 스타일 속성이 추가된 React 컴포넌트를 만들 수 있다.
const Button = styled.a`
  display: inline-block;
  border-radius: 3px;
  padding: 0.5rem 0;
  margin: 0.5rem 1rem;
  width: 11rem;
`;
➡️ JavaScript에서 변수를 선언하듯이 Button 을 만들고, tag의 속성을 정의하고 (여기서는 a tag), back-ticks (``) 안에 기존 CSS 문법을 이용하여 스타일 속성을 정의해줌.
특징
Automatic critical CSS
Styled Component는 화면에 어떤 컴포넌트가 렌더링 되었는지 추적해서 해당하는 컴포넌트에 대한 스타일을 자동으로 삽입한다. 따라서 코드를 적절히 분배해 놓으면 사용자가 어플리케이션을 사용할 때 최소한의 코드만으로 화면이 띄워지도록 할 수 있다.
No class name bugs
Styled Component는 스스로 유니크한 className을 생성한다. 이는 className의 중복이나 오타로 인한 버그를 줄여준다.
Easier deletion of CSS
Styled Component 는 모든 스타일 속성이 특정 컴포넌트와 연결되어 있기 때문에 만약 컴포넌트를 더 이상 사용하지 않아 삭제할 경우 이에 대한 스타일 속성도 함께 삭제된다. (찾을 필요 ㄴㄴ)
Simple dynamic styling
className을 일일이 수동으로 관리할 필요 없이 React 의 props 나 전역 속성을 기반으로 컴포넌트에 스타일 속성을 부여하기 때문에 간단하고 직관적이다.
Painless maintenance
컴포넌트에 스타일을 상속하는 속성을 찾아 다른 CSS 파일들을 검색하지 않아도 되기 때문에 코드의 크기가 커지더라도 유지보수가 어렵지 않다.
Automatic vendor prefixing
개별 컴포넌트마다 기존의 CSS 를 이용하여 스타일 속성을 정의하면 된다. 이외의 것들은 Styled Component 가 알아서 처리해 준다.
Installation
# with npm
$ npm install --save styled-components

# with yarn
$ yarn add styled-components
Styled Component 에서는 package.json에 다음 코드를 추가하도록 권장하고 있다.
아래의 코드를 추가하면 여러 버전의 Styled Component가 설치되어 발생하는 문제를 줄여준다.
{
  "resolutions": {
    "styled-components": "^5"
  }
}
예제 코드 1
import "./styles.css";
import styled from "styled-components";

const Button = styled.button`
  /* Adapt the colors based on primary prop */
  background: ${(props) => (props.primary ? "palevioletred" : "white")};
  color: ${(props) => (props.primary ? "white" : "palevioletred")};

  font-size: 1em;
  margin: 1em;
  padding: 0.25em 1em;
  border: 2px solid palevioletred;
  border-radius: 3px;
`;

const Tomato = styled(Button)`
  color: tomato;
  border-color: tomato;
`;

export default function App() {
  return (
    <div className="App">
      <Button>Normal</Button>
      <Button primary>Primary</Button>
      <Tomato>Tomato</Tomato>
    </div>
  );
}
예제 코드 2
import styled from "styled-components";

// Styled Component로 만들어진 Input 컴포넌트 입니다.
const Input = styled.input`
  padding: 0.5em;
  margin: 0.5em;
  color: ${(props) => props.inputColor || "red"};
  background: papayawhip;
  border: none;
  border-radius: 3px;
`;

export default function App() {
  return (
    <div>
      {/* 아래 Input 컴포넌트는 styled component인 Input 컴포넌트에 지정된 inputColor(red)가 적용되었습니다.  */}
      <Input defaultValue="김코딩" type="text" />
      {/* 아래 Input 컴포넌트는 props로 전달된 커스텀 inputColor(blue)가 적용되었습니다. */}
      <Input defaultValue="박해커" type="text" inputColor="blue" />
    </div>
  );
}
useRef로 특정 DOM 선택하기
1. focus
import React, { useRef } from "react";

const Focus = () => {
  const firstRef = useRef(null);
  const secondRef = useRef(null);
  const thirdRef = useRef(null);

  const handleInput = (e) => {
    console.log(e.key, e.target);
    if (e.key === "Enter") {
      if (e.target === firstRef.current) {
        secondRef.current.focus();
        e.target.value = "";
      } else if (e.target === secondRef.current) {
        thirdRef.current.focus();
        e.target.value = "";
      } else if (e.target === thirdRef.current) {
        firstRef.current.focus();
        e.target.value = "";
      } else {
        return;
      }
    }
  };

  return (
    <div>
      <h1> 타자연습 </h1>
      <h3> 각 단어를 바르게 입력하고 엔터를 누르세요 </h3>
      <div>
        <label> hello </label>
        <input ref={firstRef} onKeyUp={handleInput} />
      </div>
      <div>
        <label> world </label>
        <input ref={secondRef} onKeyUp={handleInput} />
      </div>
      <div>
        <label>codestates </label>
        <input ref={thirdRef} onKeyUp={handleInput} />
      </div>
    </div>
  );
};

export default Focus;
2. media playback
import { useRef } from "react";

export default function App() {
  const videoRef = useRef(null);

  const playVideo = () => {
    videoRef.current.play();
  };

  const pauseVideo = () => {
    videoRef.current.pause();
  };

  return (
    <div className="App">
      <div>
        <button onClick={playVideo}>Play</button>
        <button onClick={pauseVideo}>Pause</button>
      </div>
      <video ref={videoRef} width="320" height="240" controls>
        <source
          type="video/mp4"
          src="https://player.vimeo.com/external/544643152.sd.mp4?s=7dbf132a4774254dde51f4f9baabbd92f6941282&profile_id=165"
        />
      </video>
    </div>
  );
}