[Kubernetes] Scheduling (Labels, Selectors, Taints, Tolerations, Node Selectors, Node Affinity, Resource Limits, Admission Controllers, Security Contexts)
kubernetes
Udemy 강의 내용 정리
Manual Scheduling
Pod가 특정 Node에 배포되지 않으면 Pending 상태로 유지될 수 있다.
아래 명령어로 Kube-Scheduler가 존재하는 지 확인한다.
kubectl get pods -n kube-system
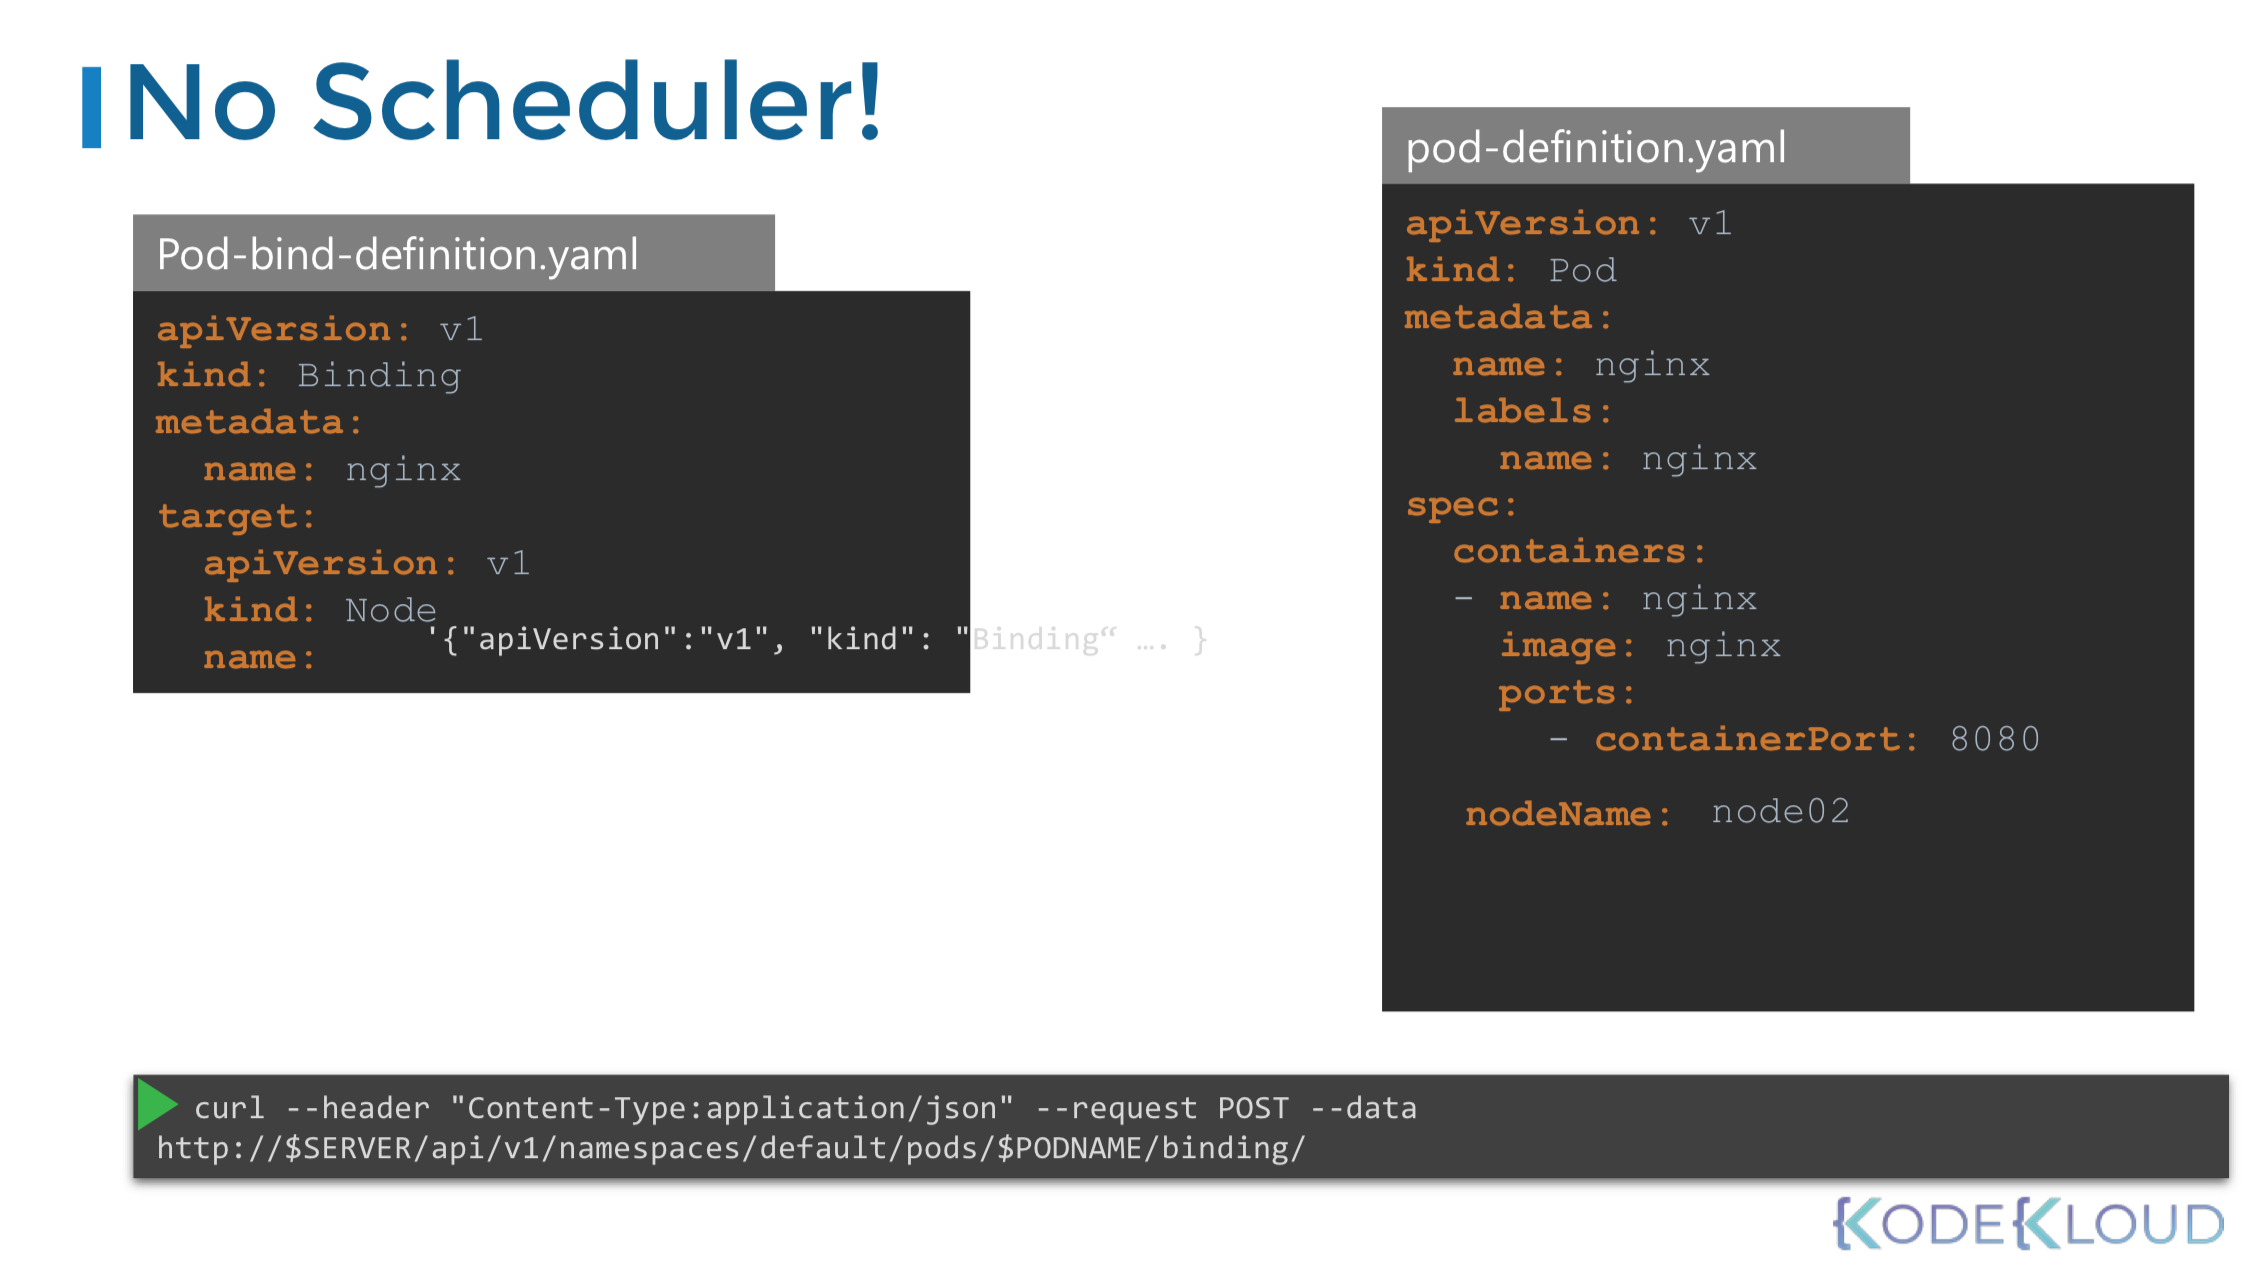
스케쥴러가 없는 경우 pod yaml 파일의 spec에 직접 node를 지정해 줌으로써 pod를 지정한 node에 직접 할당할 수 있다.
yaml > spec > nodeName:[할당할 노드명 기재]
Node name은 pod를 생성할 때만 지정할 수 있다.
이미 실행 중인 pod에 node를 변경해 할당하고 싶을 때에는 바인딩을 사용하여 스케쥴러가 하는 일을 대체할 수 있다.
Labels and Selectors
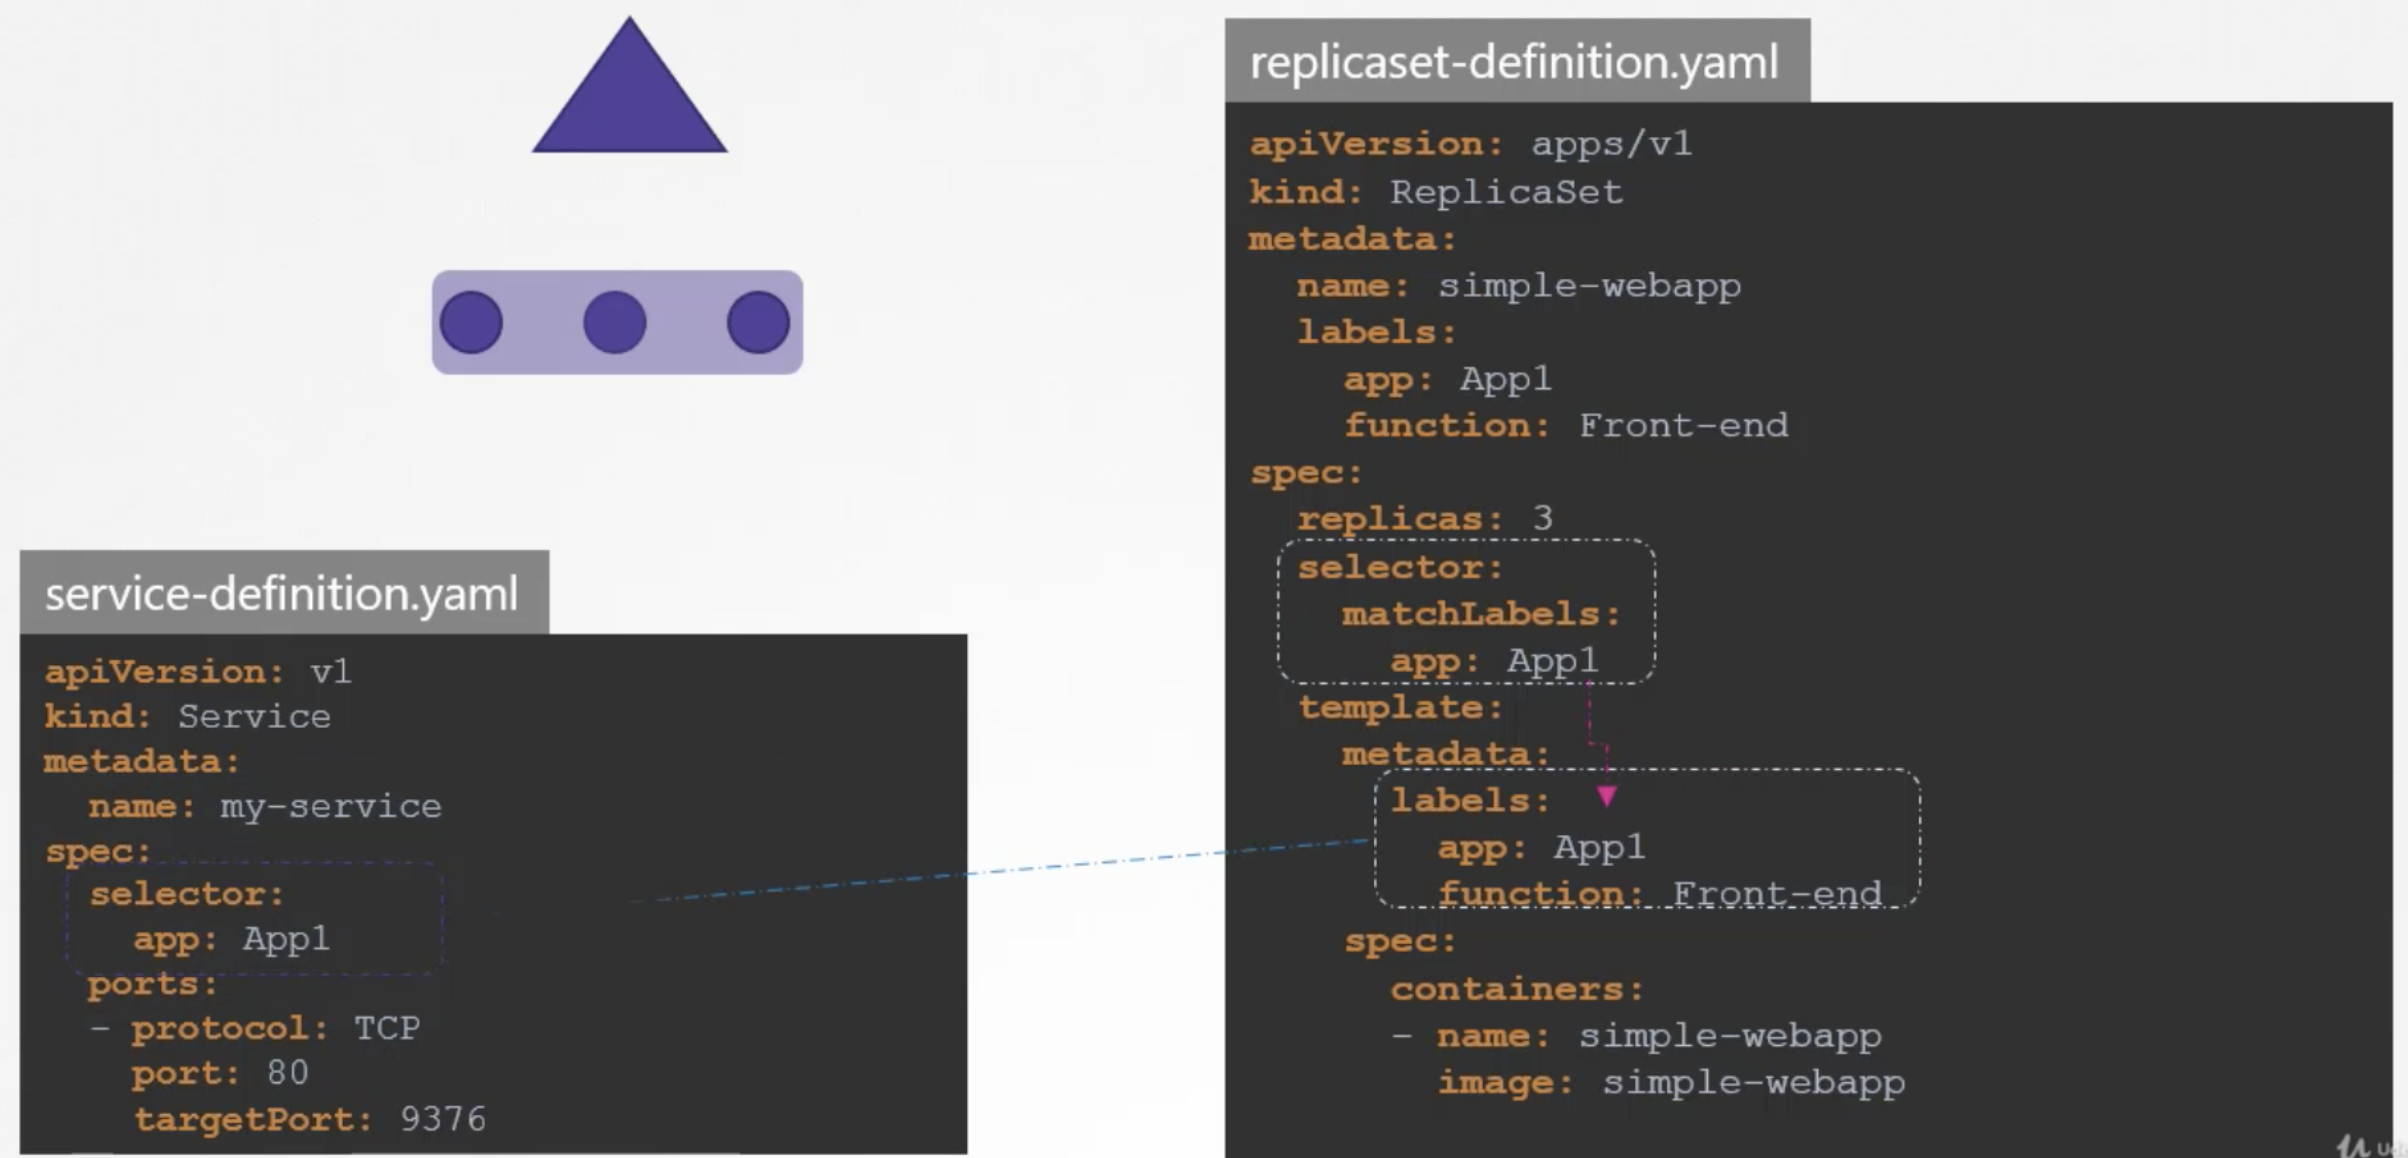
쿠버네티스에서는 내부에서 Label과 Selector를 이용해 서로 다른 오브젝트를 연결한다.
Labels은 key:value 형태로 내가 원하는 식별자를 원하는 붙이는 것이다.
yaml > metadata > labels > key:value
kubectl get pods --selector app=App1
kubectl get pods --selector env=dev --no-headers | wc -l
(헤더 빼고 실제 출력되는 pods의 갯수 세기)
kubectl get all --selector app=App1,tier=frontend
(모든 object = all)
예를 들어 3개의 다른 pod로 구성된 replica set을 만드려면 먼저 pod 정의를 labeling하고, replica set의 seletor를 이용해 pod를 그룹으로 묶는다.
yaml > spec > selector > matchLabels > key:value
Annotations은 정보 수집 목적으로 다른 세부사항을 기록하는 데 사용된다.
이름, 버전, 빌드 정보 등을 기재하는 데 사용할 수 있다.
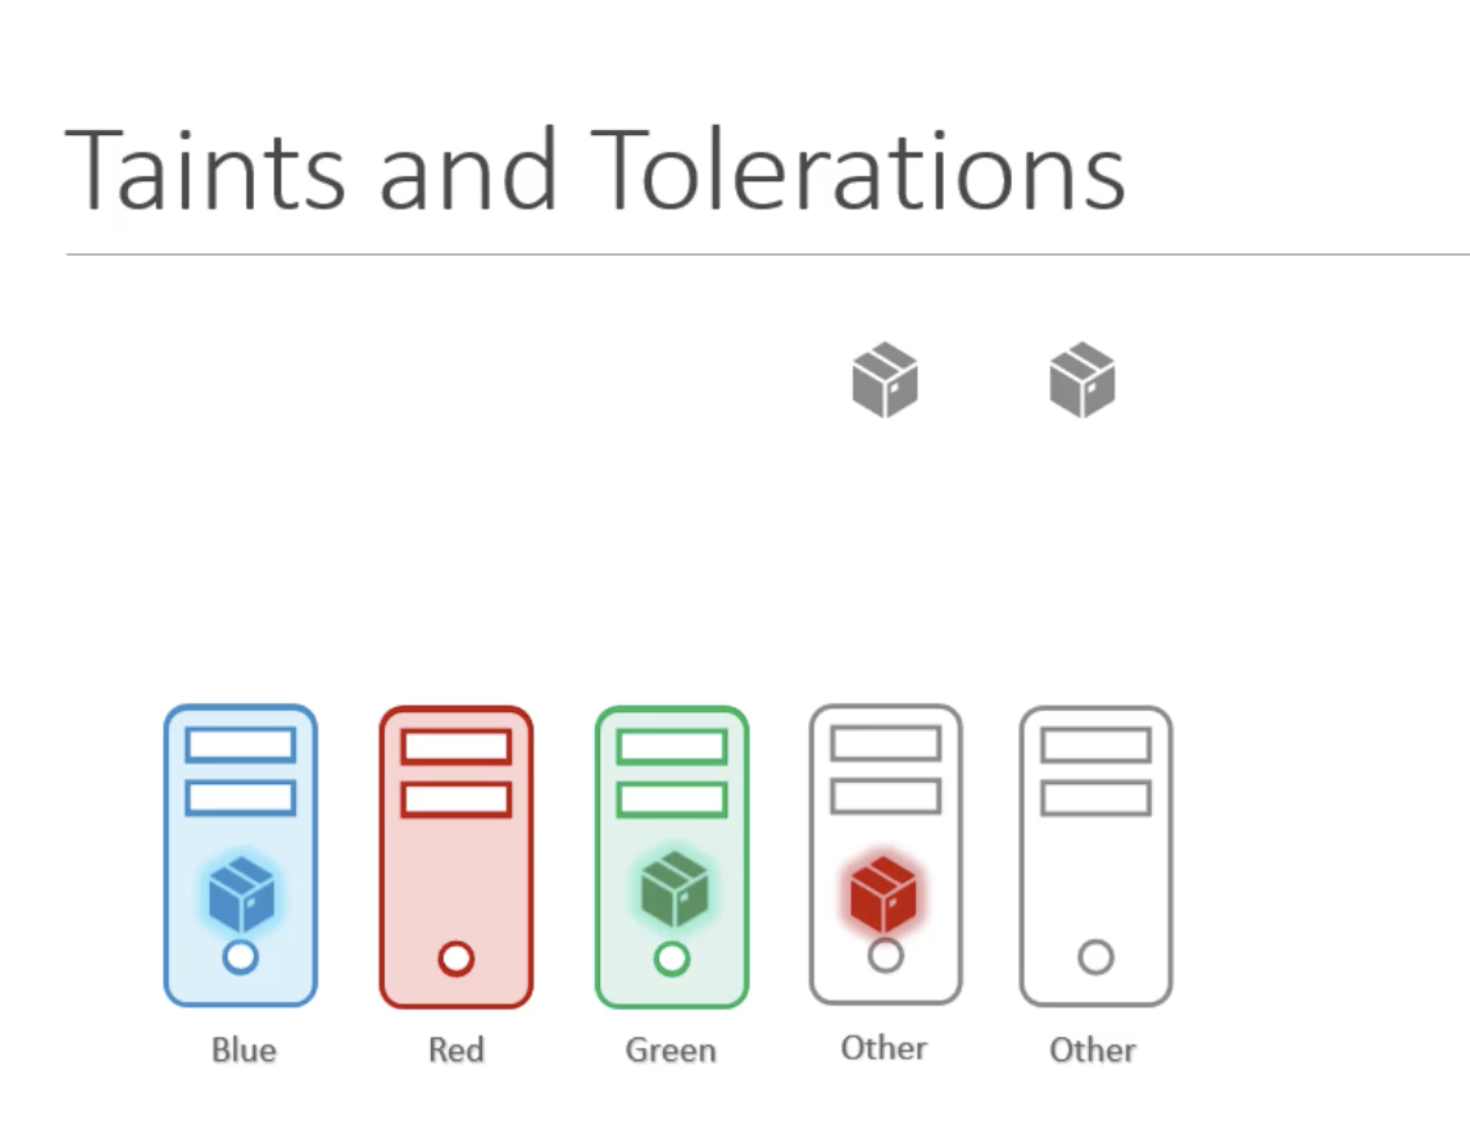
Taints and Tolerations
Taints는 버그 스프레이와 같고 Tolerations은 버그에 적용되는 면역성과 같다.
특정 Node에 Taints가 적용되어 있으면, Pod가 해당 Node에 할당되기 위해서는 Tolerations 적용이 필요하다. 그렇지 않으면, Taints에 의해 Pod는 할당되지 않는다.
특히, 컨트롤 플레인 노드에는 Taints가 적용 되어 있어 어떠한 pod도 배포되지 않는다.
kubectl describe node node01 | grep -i taints : 적용된 테인트 확인 or describe로 확인
kubectl taint nodes node-name key=value:taint-effect
- taint-effect : NoSchedule, PreferNoSchedule, NoExcute
kubectl run bee --image=nginx --dry-run=client -o yaml > bee.yaml
taint을 추가하기 위해서는 yaml 파일에서 수정 필요하다.
pod.yaml > spec > tolerations: > - key: spray value:mortein effect:NoSchedule operator: Equal
Taint를 제거하기 위해서는 아래와 같이 명령어를 수행한다.
Taint가 제거되면, 남는 Pending 상태의 Pod는 해당 Taint가 제거된 Node에 할당되어 running됨을 확인할 수 있다.
kubectl taint node controlplane node-role.kubernetes.io/master:NoSchedule-
Node Selectors
기본 설정상 기본 pod는 어느 node에든 배포할 수 있다.
특정 node에만 배포되도록 pod에 limit를 설정할 수 있다.
pod yaml > spec > nodeSelector: > size: (Large 등)
kubectl label nodes node-name key=value
kubectl get node node01 --show-labels
그러나 복잡한 연산식은 작성할 수 없다.
이 때 Node Affinity로 해결할 수 있다.
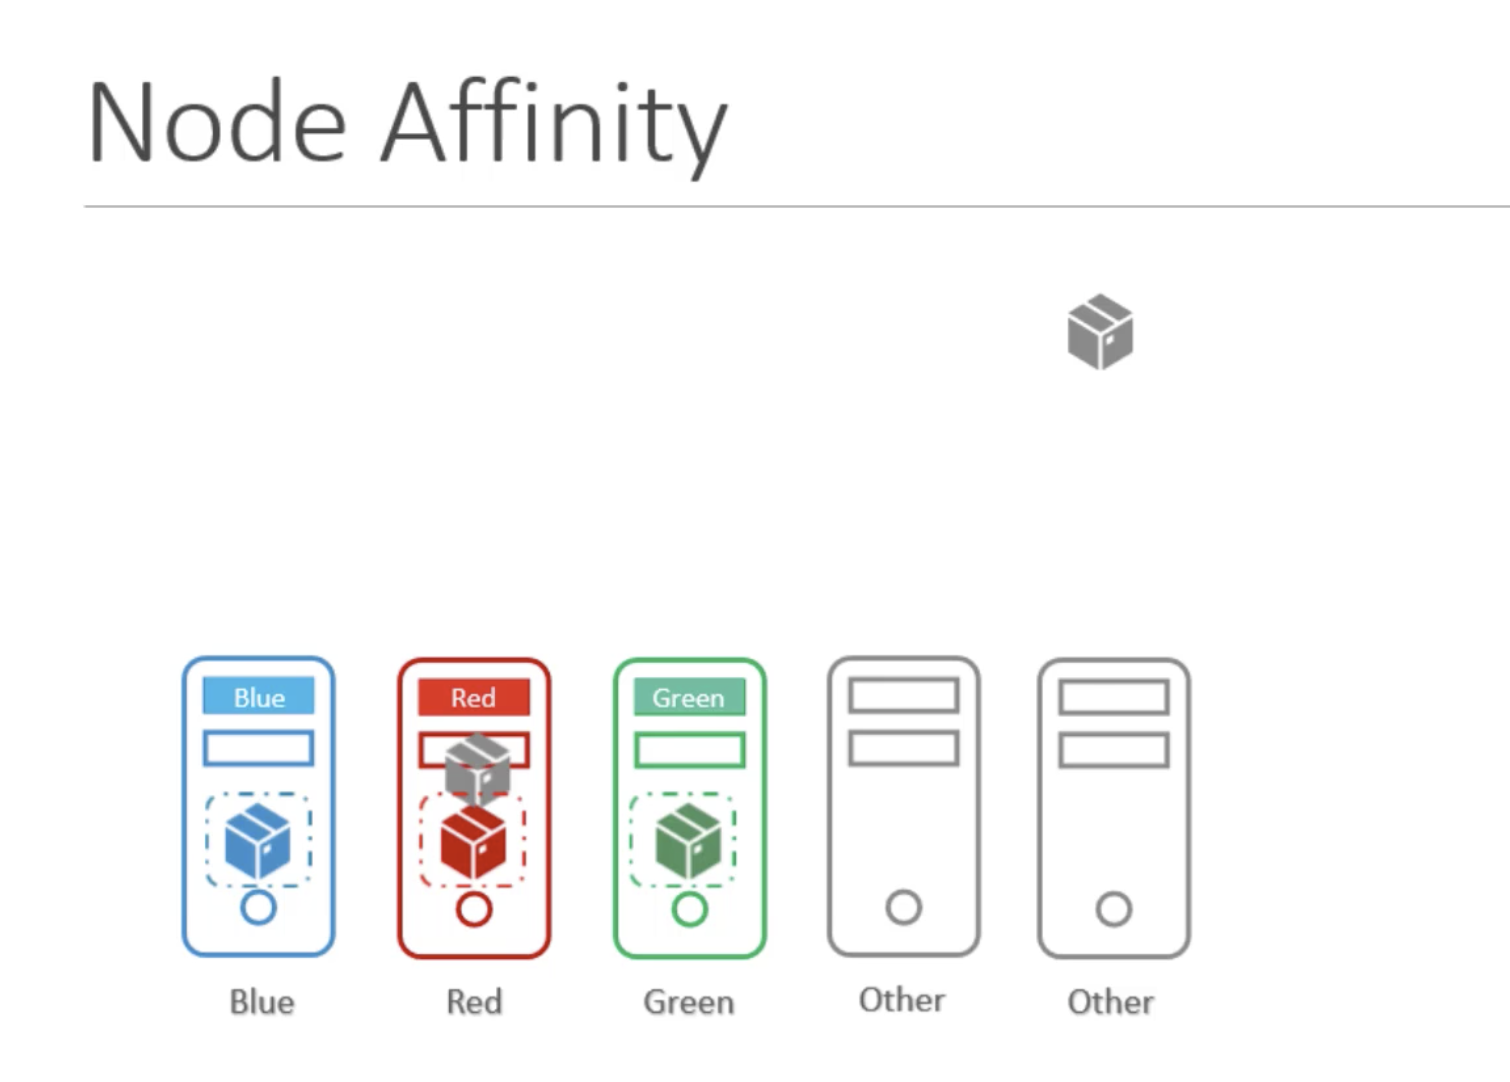
Node Affinity
Affinity란?
쿠버네티스(Kubernetes)에서 Affinity는 '내 파드를 어느 노드에 배치해줬으면 좋겠다!' 하는 배치 조건이다.
- Node Affinity: 어떤 노드에 파드가 배치될지 지정
- Pod Affinity/Anti-Affinity: 다른 파드와 같은 노드(혹은 다른 노드)에 배치할지 여부 지정
Assign Pods to Nodes using Node Affinity
Pod가 특정 node에 호스트할 수 있도록 하기 위한 기능이다.
특정 node에 pod 배치를 limit하는 고급 기능을 제공한다.
Pod가 어떤 노드에 배치될지를 제어하는 규칙 중 하나이다.
- “이 Pod는 특정 라벨을 가진 노드에서만 실행돼야 해” 같은 조건을 줄 수 있다.
- 예전의 nodeSelector보다 더 유연한 방식이다.
pod yaml > spec > affinity 작성
Node Affinity Types
-
requiredDuringSchedulingIgnoredDuringExecution
• 반드시 조건을 만족하는 노드에만 스케줄링 가능.
• 조건을 못 맞추면 Pod는 아예 Pending 상태로 남음.
• 강제 규칙 (필수 조건). -
preferredDuringSchedulingIgnoredDuringExecution
• 조건을 만족하는 노드에 스케줄링하려고 “노력”하지만,
• 조건을 못 맞추면 그냥 다른 노드에도 올라감.
• 선택 규칙 (선호 조건).
Operator Types
• In → 값이 일치해야 함
• NotIn → 값이 아니어야 함
• Exists → key만 존재하면 됨
• DoesNotExist → key가 없어야 함
• Gt/Lt → 숫자 비교
Pod가 Pending에 걸려 있으면 라벨 조건을 못 맞춘 경우일 수 있음 → kubectl describe pod 확인!
Node Affinity Types
| 정책 | 상태 | 의미 | 특징 |
|---|---|---|---|
| requiredDuringSchedulingIgnoredDuringExecution | Available | 스케줄링 시점에 반드시 조건을 만족해야만 Pod가 배치됨 | 조건 불만족 → Pod는 Pending 상태. 실행 중인 Pod는 조건이 바뀌어도 그대로 유지됨. |
| preferredDuringSchedulingIgnoredDuringExecution | Available | 스케줄링 시점에 조건을 만족하는 노드에 우선적으로 배치하려고 노력함 | 조건 만족 노드 없으면 다른 노드에도 배치됨 (소프트 규칙). |
| requiredDuringSchedulingRequiredDuringExecution | Planned (향후 예정) | 스케줄링뿐 아니라 실행 중에도 계속 조건을 만족해야 함 | 실행 중인 노드가 조건을 만족하지 않게 되면 Pod가 퇴출(evicted)될 수 있음. |
DuringScheduling : pod가 존재하지 않다가 처음 만들어지는 상태를 의미
requiredDuringScheduling : 스케쥴러는 지정된 규칙과 함께 pod를 node에 배포함. Pod를 못 찾으면 스케쥴링 되지 않는다.
preferredDuringScheduling : 일치하는 node가 없을 경우 스케쥴러는 규칙을 무시하고 해당 pod를 모든 가능한 node에 배치한다.
IgnoredDuringExecution: 이미 실행된 Pod에는 영향 없음
RequiredDuringExecution (Planned): 실행 중에도 조건을 지켜야 함 → 조건 깨지면 퇴출
Pod Affinity/Pod Anti-Affinity
| 구분 | Node Affinity | Pod Affinity | Pod Anti-Affinity |
|---|---|---|---|
| 대상 | 노드(Node) | 다른 Pod | 다른 Pod |
| 조건 | 노드의 라벨(Label)에 따라 스케줄링 | 특정 라벨을 가진 Pod와 같은 노드/같은 영역에 배치 | 특정 라벨을 가진 Pod와 다른 노드/다른 영역에 배치 |
| 대표 사용 예시 | disktype=ssd 노드에서만 실행 | app=frontend Pod와 같은 노드에 실행 (붙여서 배치) | app=frontend Pod와 다른 노드에 실행 (분산 배치) |
| 강제/선호 | requiredDuringSchedulingIgnoredDuringExecution (필수)preferredDuringSchedulingIgnoredDuringExecution (선호) | 동일 | 동일 |
| 적용 시점 | 스케줄링 시점만 고려 (이미 실행 중인 Pod에는 영향 없음) | 동일 | 동일 |
| 주요 Operator | In, NotIn, Exists, DoesNotExist, Gt, Lt | In, NotIn, Exists, DoesNotExist | In, NotIn, Exists, DoesNotExist |
Pod 기준 Affinity 사용 시 Topology Key란?
topology key는 "속성 기준" 또는 "배치 기준" 같은 것.
k8s 클러스터의 노드는 label(라벨)이 붙어 있는데,
대표적인 라벨은 예: kubernetes.io/hostname, topology.kubernetes.io/zone, topology.kubernetes.io/region
topology key란 이런 라벨 키를 배치 기준으로 사용하겠다!는 의미이다.
1) 같은 zone끼리만 파드 배치 (PodAffinity)
podAffinity:
  requiredDuringSchedulingIgnoredDuringExecution:
    - labelSelector:
        matchLabels:
          app: my-app
      topologyKey: topology.kubernetes.io/zone
→ "app: my-app"이라는 Pod가 있으면, 같은 zone(가용영역) 안의 node에 새로운 파드를 배치하겠다!
2) 다른 hostname(노드)에는 절대 배치하지 않기 (PodAntiAffinity)
podAntiAffinity:
  requiredDuringSchedulingIgnoredDuringExecution:
    - labelSelector:
        matchLabels:
          app: my-app
      topologyKey: kubernetes.io/hostname
→ 같은 hostname(=같은 노드)에는 두 파드가 함께 있지 않게 하겠다!
즉, 동일 목적의 파드들이 서로 다른 서버에 배치되도록 하기.
Topology Key 종류
- kubernetes.io/hostname : 호스트, 즉 서버명. (default)
- topology.kubernetes.io/zone : 클라우드에서 흔히 사용하는 'zone'별 배치.
- topology.kubernetes.io/region : 리전(지역별) 배치.
- 직접 만든 label(예: rack, datacenter 등도 사용 가능)
문제 예시
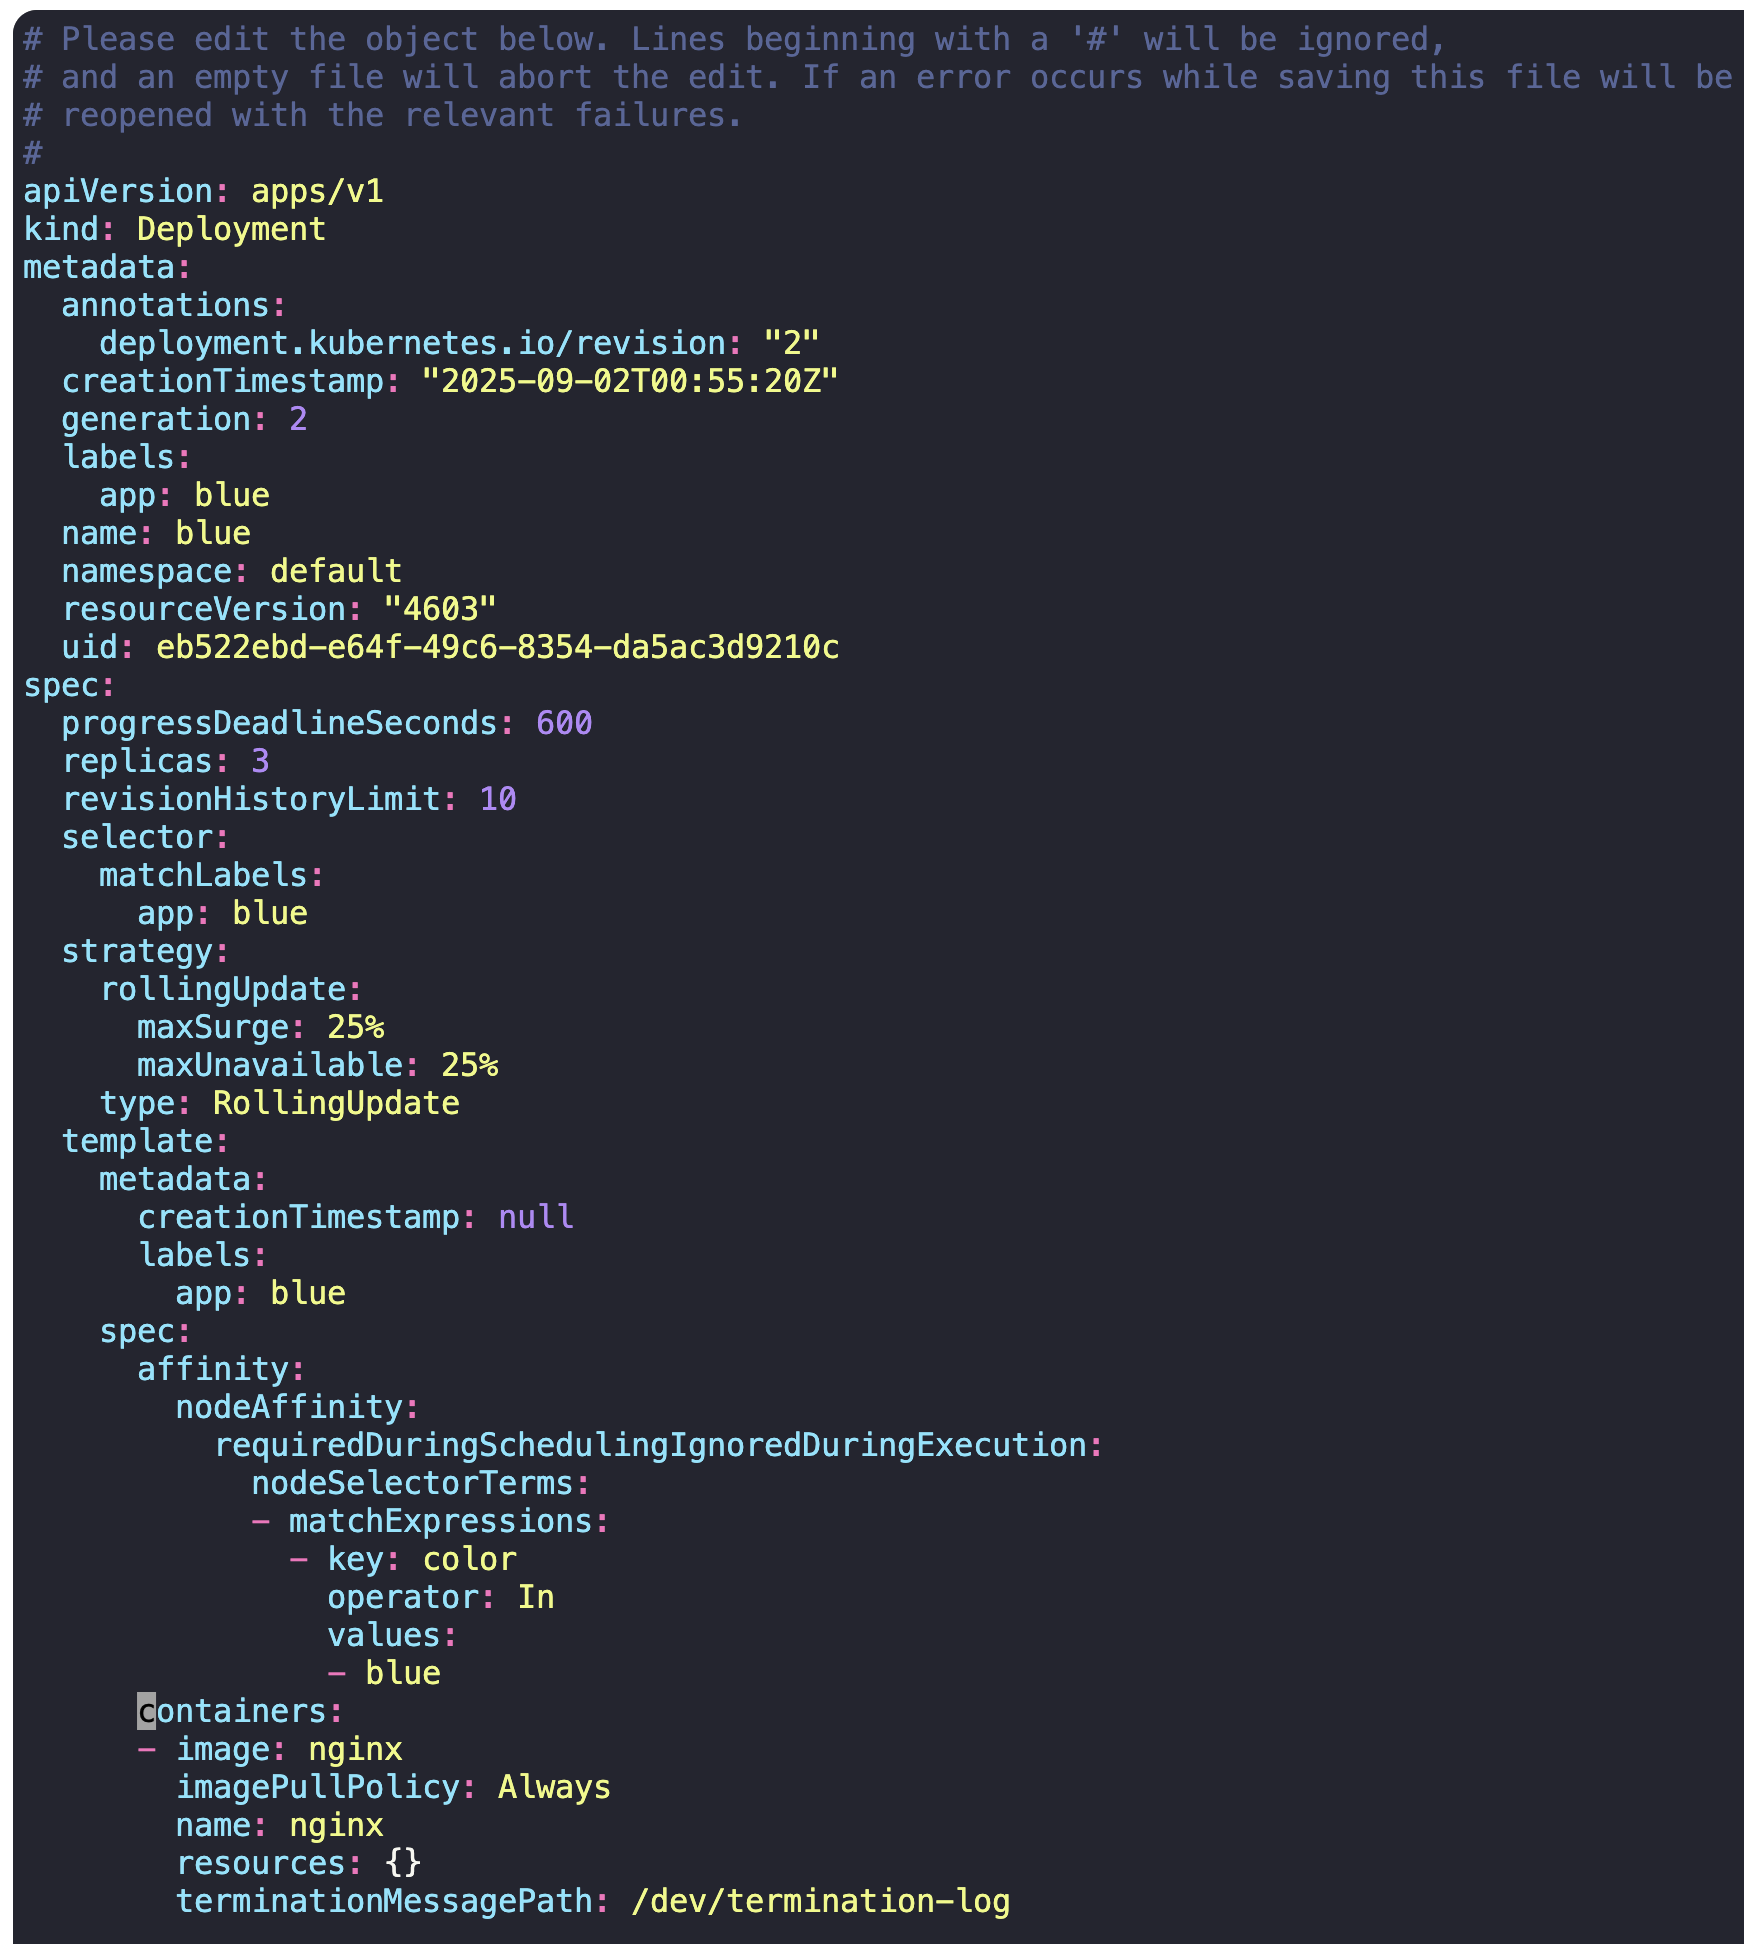
1) Set Node Affinity to the blue deployment
to place the pods on node01 only.
-> blue deployment 하위의 pods가 node01를 선택해 only 배포되게 하라.
-> requeired 옵션을 써야 한다.
kubectl edit deploy blue
2) Create a new deployment named red with the nginx image and 2 replicas, and ensure it gets placed on the controlplane node only.
Use the label key - node-role.kubernetes.io/control-plane - which is already set on the controlplane node.
-> controlplane node에 배포될 deployment를 생성해라.
-> label key는 controlplane의 value가 없는 key를 사용하므로 Exists operator 옵션을 사용하면 된다.
kubectl create deploy red --image=nginx --replicas=2 --dry-run=client -o yaml > red.yaml
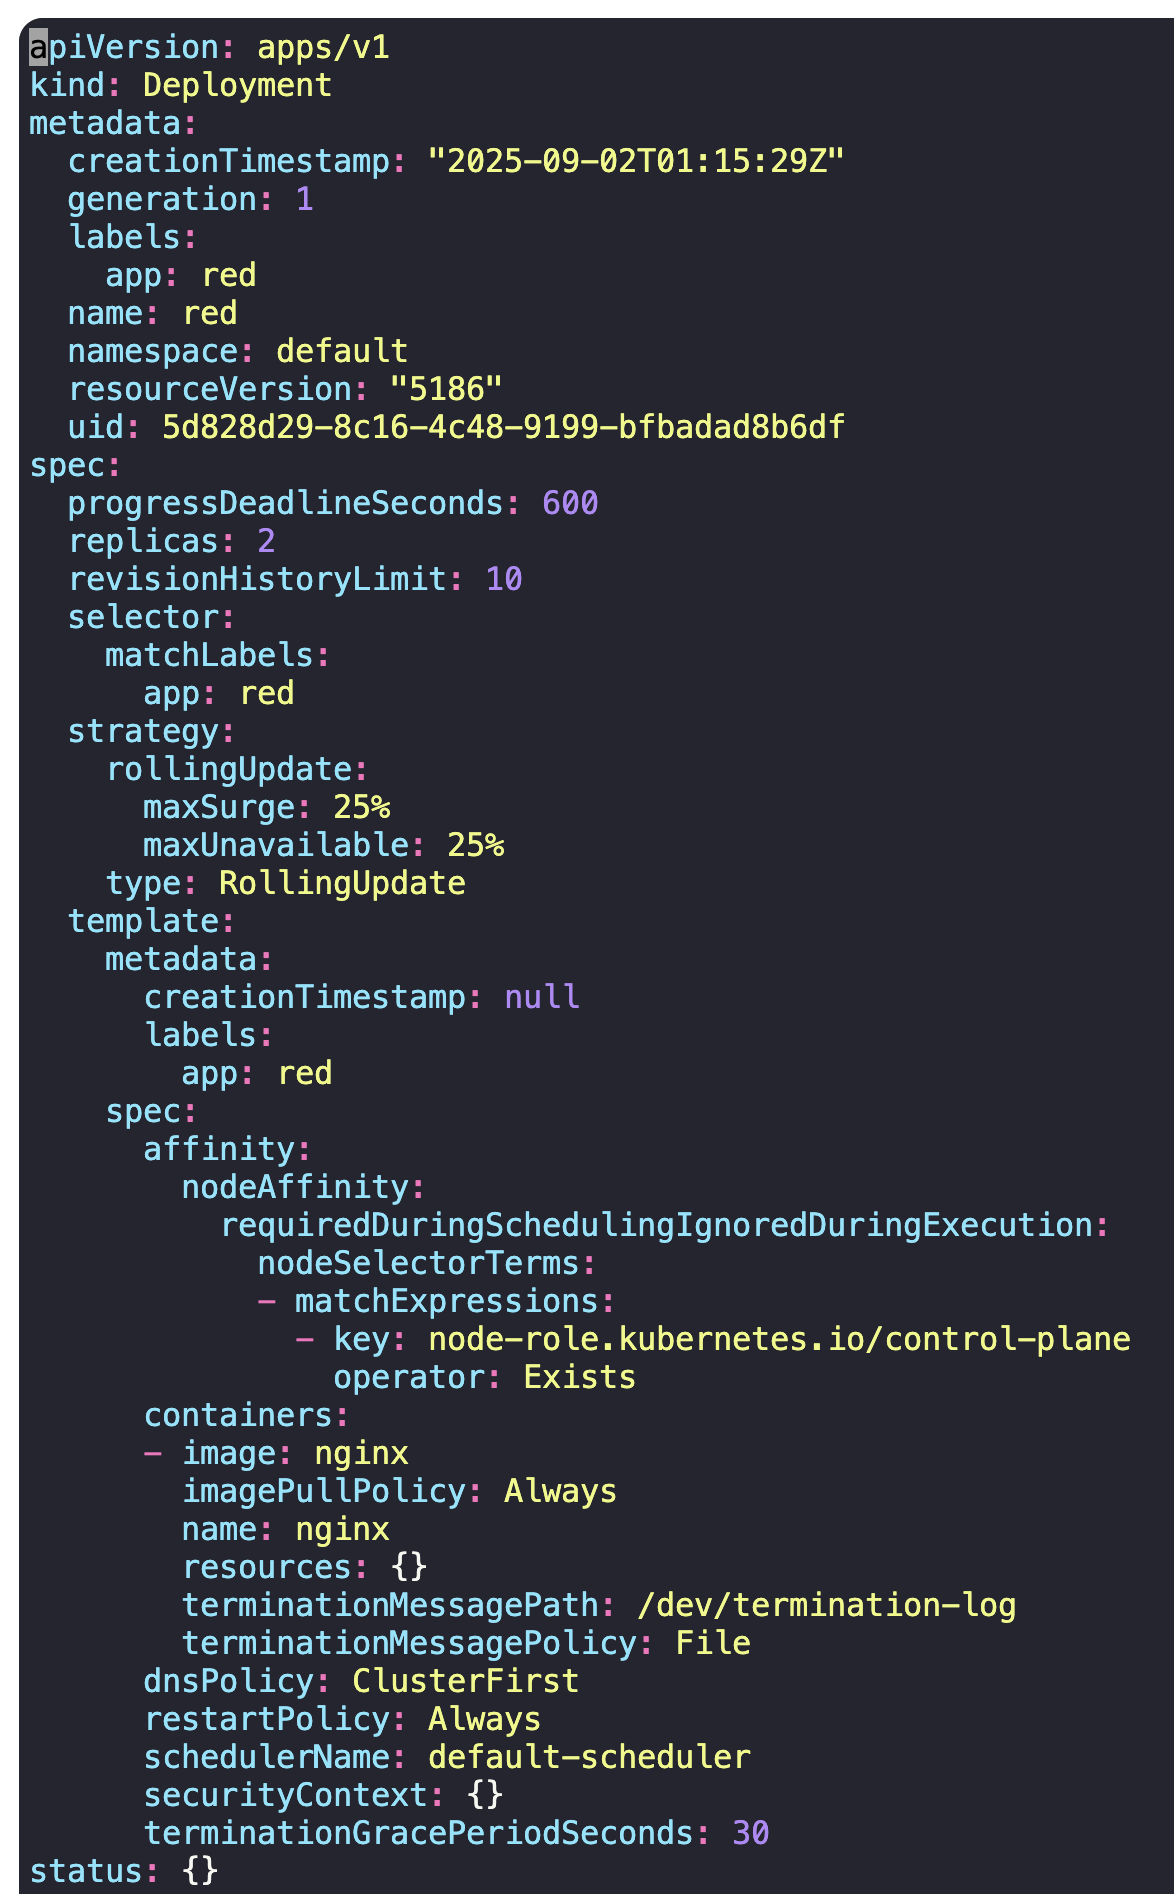
kubectl create -f red.yaml
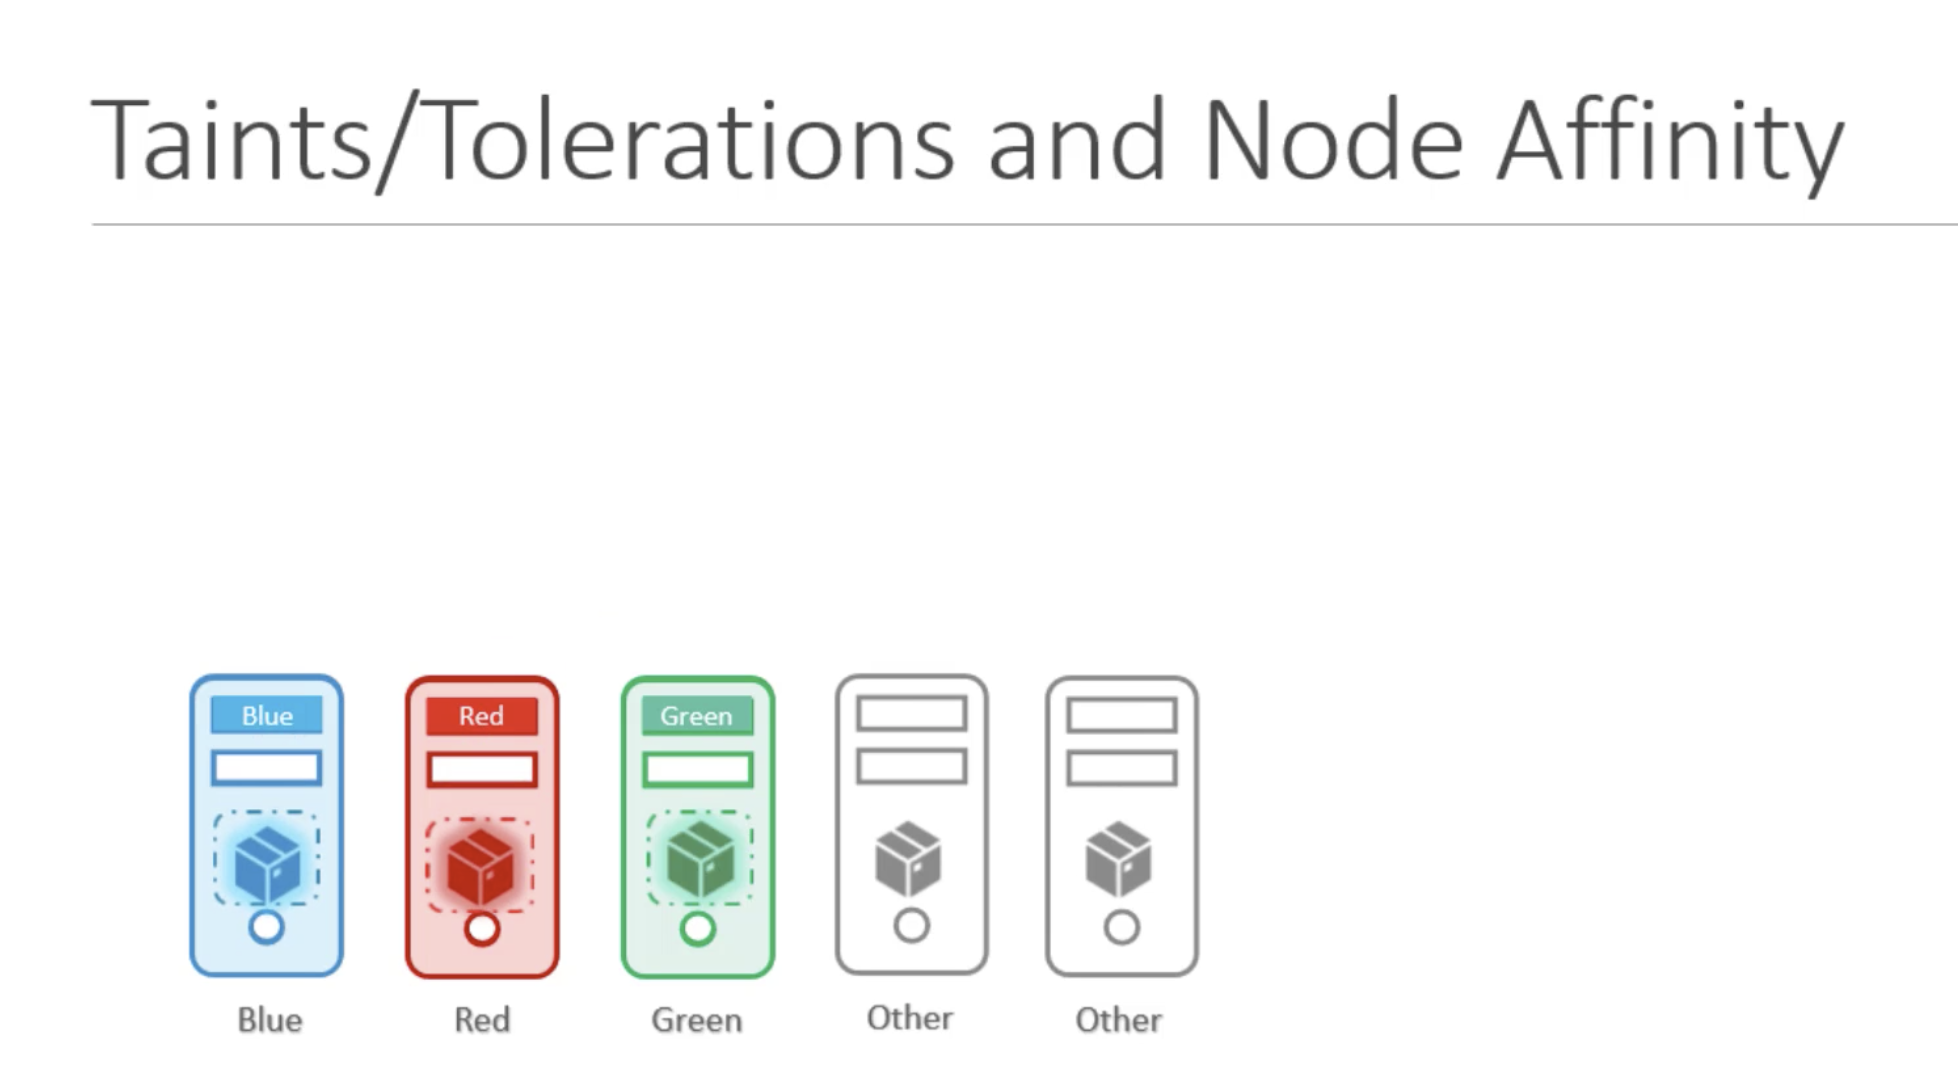
Taints and Tolerations vs Node Affinity
내가 원하는 pod - node간 관계를 limit하고 싶다.
이 때 두 가지 방법을 혼합하여 제어할 수 있다.
각 node에 Taints(스프레이)를 적용한 다음, pod에 tolerations(방어막)을 적용한다.
Pod가 생성되면 node는 올바른 tolerations을 가진 pod만 수용하여 배포시킨다.
올바른 tolerations가 적용되지 않은 pod는 taints로 제한된 node를 버틸 수 없다.
But, taint가 적용되지 않은 다른 node에도 pod가 배포될 수 있다.
Node Affinity를 통해 추가 작업을 진행한다.
각 node에 label을 붙인 다음, pod의 node selector 기능을 설정해 pod가 배포될 node를 선택하여 연결될 수 있다.
But, 일반 pod가 제한하고 싶은 node에 배포되지 않는다는 보장은 없다.
다른 pod가 제한하고자 하는 node에도 올 가능성이 있다.
따라서 두 가지 방법을 조합 활용하여 특정 pod와 특정 node 간의 배포 관계를 완전히 고정할 수 있다.
내가 원하는 pod를 원하는 node에만 서로 배포시킬 수 있는 것이다.
Resource Limits
Resource
pod가 배포될 때마다 요구되는 리소스 양을 확인하여 가장 베스트 옵션인 node를 정해 배포한다.
Resource Limits - CPU vs Memory
pod가 limit 초과하여 자원을 사용하려고 시도하면,
1) cpu의 경우 시스템이 cpu를 조절해 지정된 limit를 넘지 않도록 한다.
컨테이너는 limit를 초과하여 cpu 리소스를 사용할 수 없다.
2) But, memory의 경우에는 그렇지 않다. 컨테이너는 limit보다 많은 메모리 리소스를 사용할 수 있다.
pod가 끊임없이 pod의 메모리의 limit보다 더 많은 메모리를 소모하면, pod는 terminated 될 것이다.
그리고 OOM (out of memory) 에러 상태를 로그에서 볼 것이다.
The status OOMKilled indicates that it is failing because the pod ran out of memory.
Resource - Memory 단위
1 G (Gigabyte) = 1,000,000,000 bytes
1 M (Megabyte) = 1,000,000 bytes
1 K (Kilobyte) = 1,000 bytes
1 Gi (Gibibyte) = 1,073,741,824 bytes
1 Mi (Mebibyte) = 1,048,576 bytes
1 Ki (Kibibyte) = 1,024 bytes
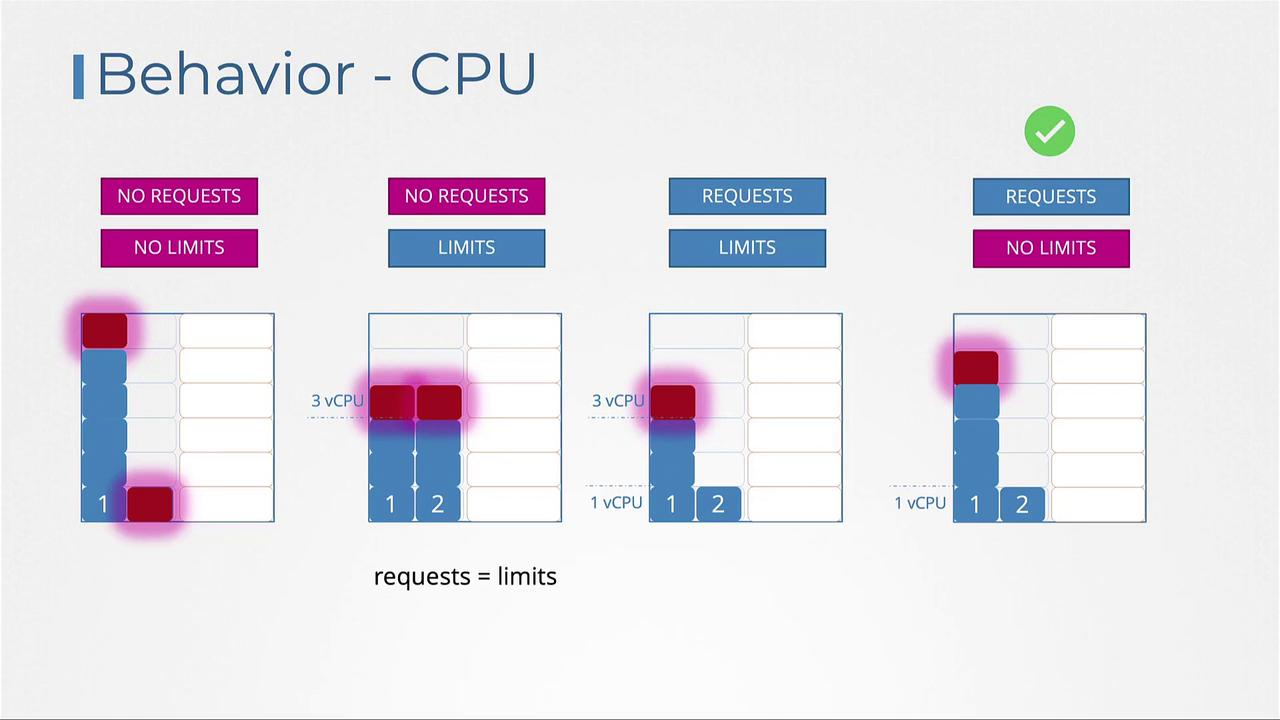
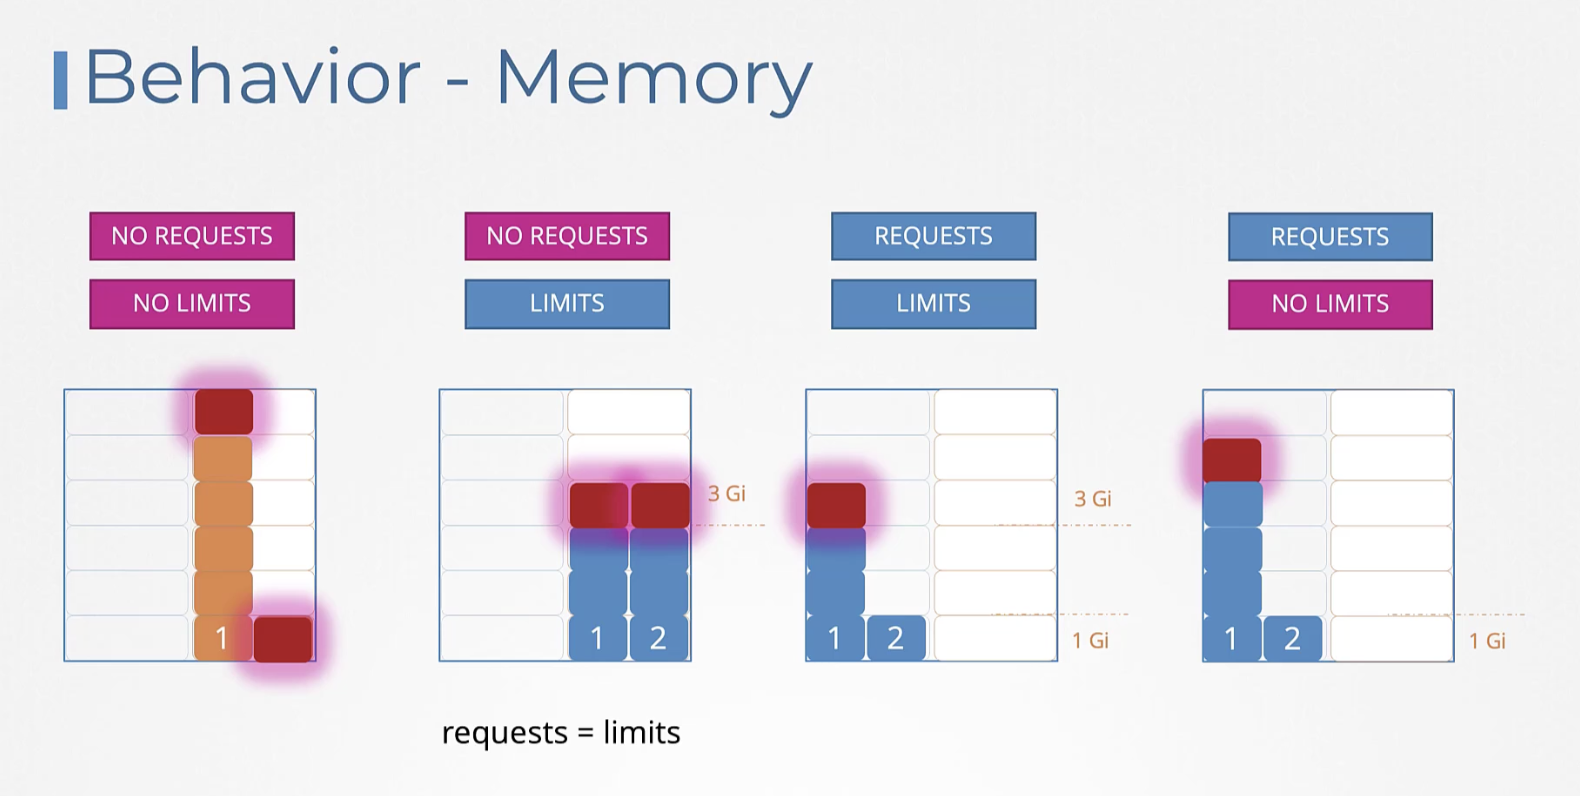
Behavior - CPU
Requests 존재 / No Limits 상태 => 가장 이상적인 상태
- 응용 프로그램이 CPU를 제한하고 싶지 않을 때
- 모든 pod에 request가 설정되어 있어야 함
Behavior - Memory
Memory는 CPU와 다르게 시스템이 컨트롤할 수 없으므로
4번의 케이스 Requests 존재 / No Limits 상태에서 1번 pod가 메모리를 많이 소비하면 2번 pod를 죽이는 수밖에 없다.
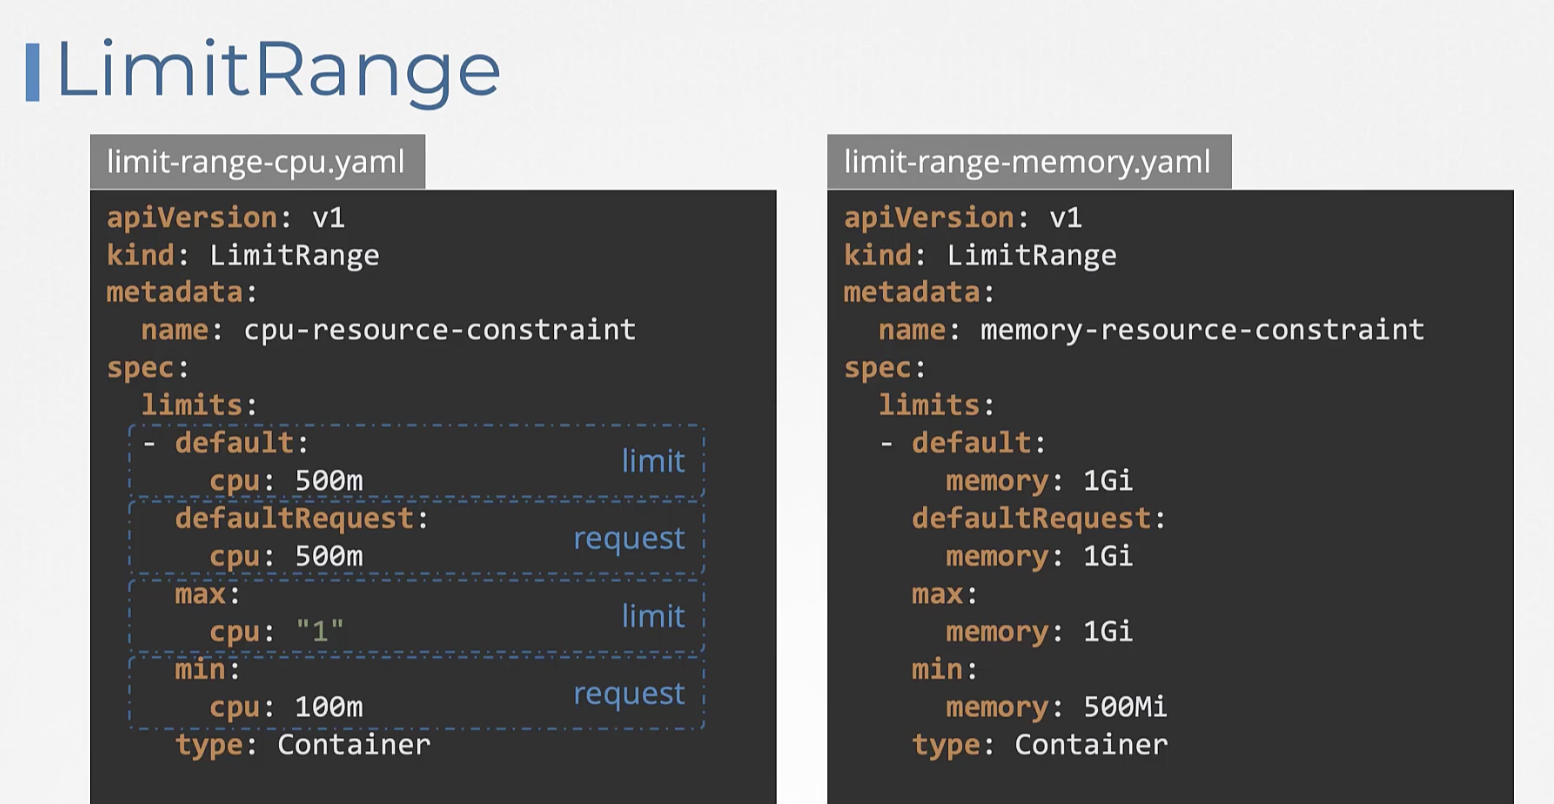
LimitRange
LimitRange를 생성하거나 변경해도 기존의 실행되던 pod에는 영향을 받지 않는다.
후에 새로 만드는 포드에만 영향을 미친다.
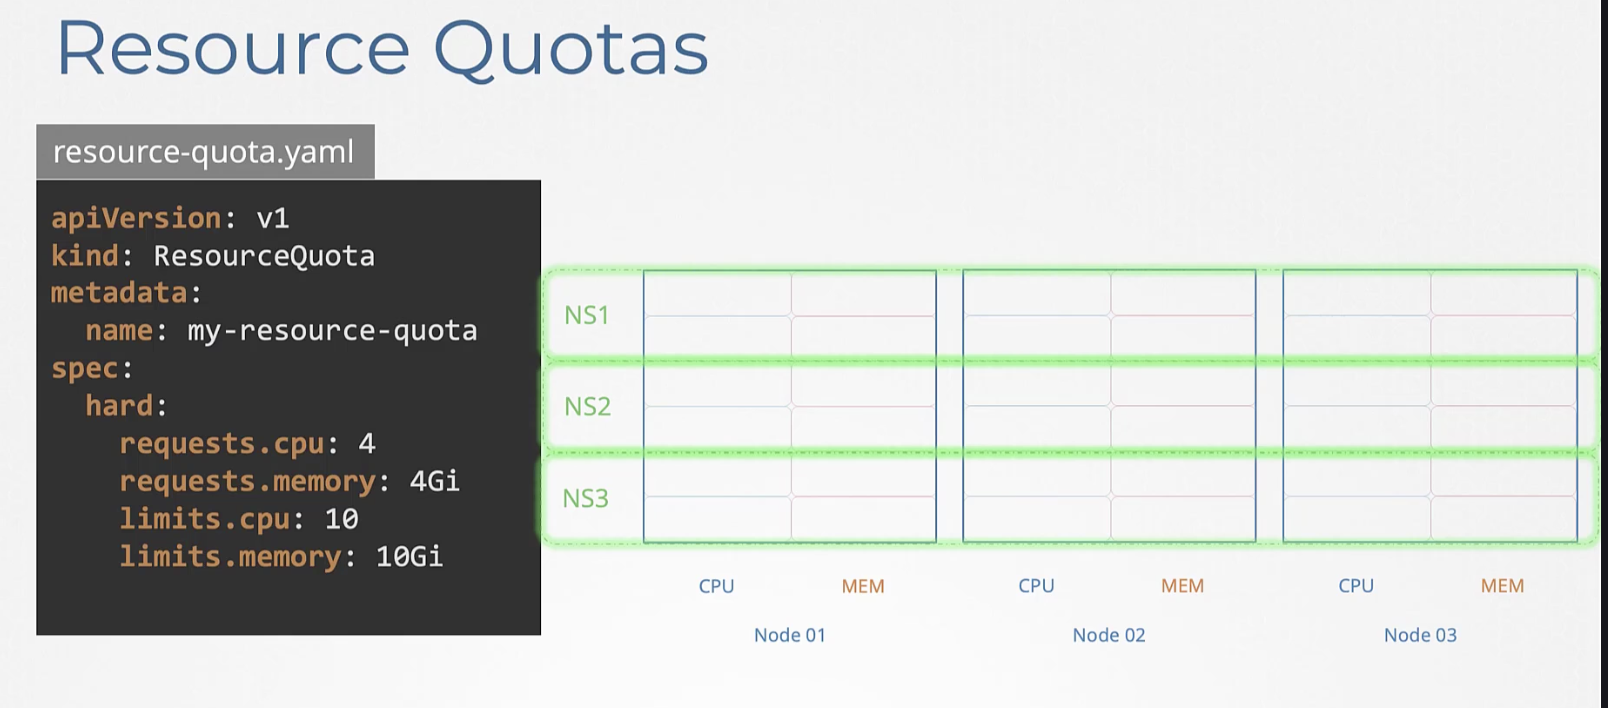
Resource Quotas
전체 pod의 메모리/CPU를 관리하는 방법이다.
네임스페이스 별로 Quota를 생성해 관리할 수 있다.
Resource 수정하기
Pod 수정하기
Pod는 일부 항목(이미지, activeDeadlineSeconds, tolerations)만 직접 수정할 수 있고, 그 외 항목(환경 변수, 서비스 계정, 리소스 제한 등)은 직접 수정이 불가능하다.
만약 환경 변수 같은 수정 불가 항목을 바꾸고 싶다면, 두 가지 방법이 있다:
1) kubectl edit pod <pod 이름>으로 pod를 편집한 후, 저장할 때 오류가 발생하면 편집 내용을 임시 파일로 저장한다. 기존 pod를 삭제(kubectl delete pod <pod 이름>)하고, 임시 파일을 사용해 새로 생성한다(kubectl create -f <임시 파일 경로>).
2) kubectl get pod <pod 이름> -o yaml > <파일 이름>.yaml로 pod 정보를 yaml 파일로 뽑아내고, 편집한 뒤, 기존 pod를 삭제하고 수정한 파일로 pod를 새로 생성한다.
Deployment 수정하기
Deployment의 경우, pod 템플릿을 마음대로 수정할 수 있다.
kubectl edit deployment <deployment 이름> 명령어로 쉽게 편집 가능하다.
Deployment를 수정하면 자동으로 관련 pod가 삭제되고 새로운 pod가 변경사항 반영되어 만들어진다.
즉, 개별 Pod는 대부분 수정할 수 없지만, Deployment로 만든 Pod는 템플릿을 수정하면 자동으로 새로 반영된다. Pod를 직접 수정하려면 삭제 후 재생성이 필요하다.
문제 예시
The elephant pod runs a process that consumes 15Mi of memory. Increase the limit of the elephant pod to 20Mi.
Delete and recreate the pod if required. Do not modify anything other than the required fields.
해답
Create the file elephant.yaml by running command
kubectl get po elephant -o yaml > elephant.yaml
and edit the file such as memory limit is set to 20Mi as follows:
---
apiVersion: v1
kind: Pod
metadata:
  name: elephant
  namespace: default
spec:
  containers:
  - args:
    - --vm
    - "1"
    - --vm-bytes
    - 15M
    - --vm-hang
    - "1"
    command:
    - stress
    image: polinux/stress
    name: mem-stress
    resources:
      limits:
        memory: 20Mi
      requests:
        memory: 5Mi
then run
kubectl replace -f elephant.yaml --force
This command will delete the existing one first and recreate a new one from the YAML file.
(2025) Admission Controllers
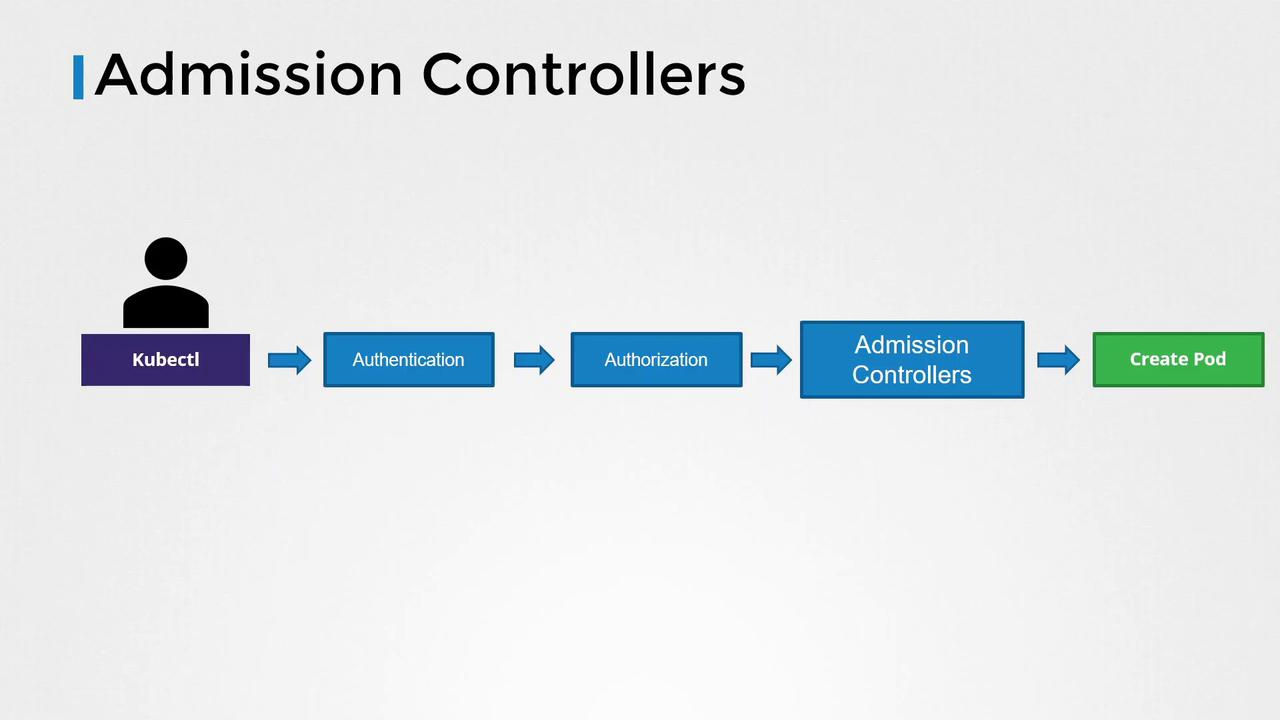
Admission Controller는 클러스터로 들어오는 요청을 가로채서 검증하거나 수정하는 플러그인이다.
쿠버네티스 API 서버로 들어오는 요청(예: 새로운 Pod 생성)을 가로채서, 해당 요청을 검증하거나 수정하는 플러그인이다.
요청이 영구 저장(etc)되기 직전에 마지막으로 "컨트롤"하는 역할을 한다.
요청이 어드미션 컨트롤러를 통과할 때 조건에 맞지 않으면 사용자에게 오류로 리턴한다.
ex. NamespaceLifecycle
요청의 처리 단계:
- 인증(Authentication)
- 인가(Authorization)
- Admission Controller
- etcd에 저장 및 리소스 생성
vi /etc/kubernetes/manifests/kube-apiserver.yaml
grep enable-admission-plugins /etc/kubernetes/manifests/kube-apiserver.yaml
ps -ef | grep kube-apiserver | grep admission-plugins
(2025) Validating and Mutating Admission Controllers
Mutating 컨트롤러 → 요청을 먼저 수정
Validating 컨트롤러 → 수정된 요청을 검증
둘 중 하나라도 요청을 거절하면 → 리소스 생성 실패, 사용자에게 에러 메시지 반환
DafaultStorageClass - 기본 Admission Controllers
어드미션 컨트롤러는 PVC 생성 시 해당 DafaultStorageClass 값을 pvc create 정보로 추가하여 사용자가 지정하지 않았음에도 생성된 PVC에 해당 값이 설정된 것을 볼 수 있다.
- 유저가 쿠버네티스에 요청
- 인증, 인가 → Admission Controller
- Mutating Admission Controller로 자동 수정(예: default storage class 추가)
- Validating Admission Controller로 정책 검증(예: 네임스페이스 검사)
- Webhook(외부 서버) 호출로 더 복잡한 검증/수정 가능
- 모두 통과해야 리소스 생성
Admission Controller 종류
1) Validating Admission Controller (검증)
요청을 검사해서 정책에 맞지 않으면 거절한다.
예시: 네임스페이스가 존재하지 않으면 거절
2) Mutating Admission Controller (수정)
요청 내용을 자동으로 변경(수정) 해서 처리한다.
예시: PVC(PersistentVolumeClaim)를 만들 때 storageClass를 지정하지 않으면, 기본(storageClassName: default)이 자동으로 추가된다.
외부 Admission Controller: Webhook
쿠버네티스는 내장 Admission Controller 뿐 아니라, 사용자가 만든 외부 Admission Controller(Webhook)를 쓸 수 있다.
Mutating Admission Webhook: 요청을 수정해서 되돌려주기.
Validating Admission Webhook: 요청을 검증해서 통과/거부 결정.
쿠버네티스 API 서버는 요청을 Webhook 서버로 JSON(AdmissionReview) 형태로 보낸다.
Webhook 서버가 승인(or 거절), 필요한 경우 요청을 수정해서 응답한다.
Webhook 예시
요청:
{
  "apiVersion": "admission.k8s.io/v1",
  "kind": "AdmissionReview",
  "request": { ... }
}
응답(승인):
{
  "apiVersion": "admission.k8s.io/v1",
  "kind": "AdmissionReview",
  "response": {
    "uid": "...",
    "allowed": true
  }
}
Webhook Server
Go, Python 등 다양한 언어로 작성 가능
예시: flask로 만든 Python 웹서버에서, 요청을 검증(validate)하거나 수정(mutate)하는 코드를 작성
Webhook 서버 배포 & 쿠버네티스 API 연동
Webhook을 사용하는 목적: 커스텀 정책 적용(내장 컨트롤러로 못하는 것을 가능)
- Webhook 서버를 쿠버네티스 안(혹은 외부)에 배포
- 클러스터 내부라면 service, deployment로 올림
- Kubernetes에 Webhook 연동 설정
- ValidatingWebhookConfiguration YAML 작성
- MutatingWebhookConfiguration YAML 작성
- API Server가 서버로 요청 보낼 수 있게 TLS 및 CA 인증서(인증 chain) 설정
- Pod 생성 요청이 들어오면 Admission Webhook Service로 전달되어, 검증/수정 후 승인/거부 결정
apiVersion: admissionregistration.k8s.io/v1
kind: ValidatingWebhookConfiguration
metadata:
  name: "pod-policy.example.com"
webhooks:
- name: "pod-policy.example.com"
  clientConfig:
    service:
      namespace: "webhook-namespace"
      name: "webhook-service"
    caBundle: "..."
  rules:
  - apiGroups: [""]
    apiVersions: ["v1"]
    operations: ["CREATE"]
    resources: ["pods"]
    scope: "Namespaced"
kubectl get pod -o yaml
(2025) securityContext
Pod 또는 컨테이너의 보안 설정을 지정하는 영역
1) 사용자/그룹 권한:
- 어떤 Linux 사용자(UID)로 실행할지 (runAsUser)
- 어떤 그룹(GID)로 실행될지 (runAsGroup)
2) root 사용 여부 제한:
- 컨테이너가 root로 실행되는 것을 제한 (runAsNonRoot)
파일 시스템 권한: - 컨테이너가 볼륨을 읽기전용으로 쓸지, 특정 퍼미션으로 마운트할지
3) 특수 권한 설정:
- Privileged 모드에서 실행 가능한지 (privileged)
- 캡처블(capabilities) 설정
- SELinux/AppArmor 설정