0. 학습 데이터 준비 - 1
Yolo fine-tuning을 위한 학습 데이터를 준비해야 한다.
여기서 학습데이터란 원본 이미지와 해당 이미지 내 target class가 labeling된 json 혹은 txt 파일을 의미한다.
src 데이터와 labeling 데이터는 동일한 이름으로 존재해야한다.
(동일한 이름이 아니더라도 무관하나 추가적인 전처리가 필요함.)
ex)
train_001.png
train_001.json
1. 학습 데이터 준비 - 2
from tqdm import tqdm
from pathlib import Path
import os
import sys
import json
import shutil
import numpy as np


LABEL = {
    "안전모": 0,
    "안전대": 1,
    "마스크": 2,
    "장갑": 3,
    "보안경": 4,
}

IMAGE_WIDTH = 1920
IMAGE_HEIGHT = 1080

def transform_yolo_coord(coords:list) -> list:
    """
    입력된 절대 좌표를 YOLO 형식의 상대 좌표로 변환하는 함수.

    Args:
    coords (list): [[x_min, y_min], [x_max, y_max]] 형태의 절대 좌표 리스트.

    Returns:
    list: YOLO 형식의 좌표 [x_center, y_center, width, height]
    """

    # 절대 좌표에서 x_min, y_min, x_max, y_max 추출
    x_min, y_min, x_max, y_max = coords

    # 중심 좌표 계산
    x_center = (x_min + x_max) / 2 / IMAGE_WIDTH
    y_center = (y_min + y_max) / 2 / IMAGE_HEIGHT

    # 너비와 높이 계산
    width = (x_max - x_min) / IMAGE_WIDTH
    height = (y_max - y_min) / IMAGE_HEIGHT

    # YOLO 형식으로 반환
    return ' '.join(map(str, np.round(np.array([x_center, y_center, width, height]), decimals=6).tolist()))


def json_to_txt(json_file:Path, save_path:Path) -> None:
    ...


if __name__ == "__main__":
    code_path, input_path = map(Path, sys.argv)
    output_path = Path(input_path.parent, "dataset")

    train_split_portion = 0.7
    valid_split_portion = 0.2
    test_split_portion = 0.1


    src_files = {f.stem:f for f in input_path.rglob("*.jpg")}
    json_files = {f.stem:f for f in input_path.rglob("*.json")}

    train_point = int(len(src_files)*train_split_portion)
    valid_point = int(len(src_files)*valid_split_portion)

    # lables

    save_train_json  = Path(output_path, "labels", "train")
    save_val_json  = Path(output_path, "labels", "val")
    save_test_json  = Path(output_path, "labels", "test")
    os.makedirs(save_train_json, exist_ok=True)
    os.makedirs(save_val_json, exist_ok=True)
    os.makedirs(save_test_json, exist_ok=True)

    # val
    save_train_src = Path(output_path, "images", "train")
    save_val_src = Path(output_path, "images", "val")
    save_test_src = Path(output_path, "images", "test")
    os.makedirs(save_train_src, exist_ok=True)
    os.makedirs(save_val_src, exist_ok=True)
    os.makedirs(save_test_src, exist_ok=True)


    # train
    for key in tqdm(list(src_files.keys())[:train_point], desc="(1/3) processing / train"):
        json_file = json_files[key]
        src_file = src_files[key]

        # trnsform json
        json_to_txt(json_file, save_train_json)

        # moving src
        if not os.path.isfile(str(save_train_src / src_file.name)):
            shutil.copyfile(str(src_file), str(save_train_src / src_file.name))

    # valid
    for key in tqdm(list(src_files.keys())[train_point:train_point+valid_point], desc="(2/3) processing / val"):
        json_file = json_files[key]
        src_file = src_files[key]

        # trnsform json
        json_to_txt(json_file, save_val_json)

        # moving src
        if not os.path.isfile(str(save_val_src / src_file.name)):
            shutil.copyfile(str(src_file), str(save_val_src / src_file.name))

    # test
    for key in tqdm(list(src_files.keys())[train_point+valid_point:], desc="(3/3) processing / test"):
        json_file = json_files[key]
        src_file = src_files[key]

        # trnsform json
        json_to_txt(json_file, save_test_json)

        # moving src
        if not os.path.isfile(str(save_test_src / src_file.name)):
            shutil.copyfile(str(src_file), str(save_test_src / src_file.name))

    print("작업 완료")
위 코드를 사용한다.
위 코드는 input 경로 내 데이터들을
train / valid / test dataset으로 분류해준다.
(각각의 비율은 코드 내 하드코딩으로 지정할 수 있으며
랜덤 샘플링으로 분류한다.)
추가로 json_to_txt 함수를 직접 작성해야한다.
json 내 labeling 정보를 읽고 이를 txt 파일로 바꿔주는 함수다.
(만약 labeling 데이터가 txt로 존재한다면 그에 맞게 수정하거나 혹은 바로 사용하면 된다.)
결과적으로는 아래와 같은 양식의 txt 파일이 존재하면 된다.
3 0.94925 0.475672 0.010415 0.019939
12 0.121961 0.363105 0.067546 0.174788
0 0.973638 0.398444 0.015228 0.021329
좌측부터 class number, x_center, y_center, width, height
그리고 1번에서 이미 설명했듯이
이미지와 labeling 데이터의 파일명은 동일하게 유지되어야 한다.
2. yaml 작성
train: .\dataset\images\train  # 학습 이미지 경로
val: .\dataset\images\val      # 검증 이미지 경로
test: .\dataset\images\test    # 검증 이미지 경로

nc: 5  # 클래스 수 (예: 14개의 클래스)
names: ['안전모', '안전대', '마스크', '장갑', '보안경']  # 클래스 이름 (예: 고양이와 개)
어려울거 없다 그냥 위에 복사 - 붙여넣기 해주고
class수가 몇개인지와 각각의 class name이 무엇인지 작성해주면 된다.
모르면 gpt에게 물어보자.
3. Yolo fine-tuning
from ultralytics import YOLO

model = YOLO('yolov10x.pt') # 24년 11월 기준 yolo 11까지 나왔다.

results = model.train(data='data.yaml', epochs=100, imgsz=1280, batch=4, cache='disk')
model.save('best_yolov10x.pt')
이제부터는 비교적 간단하다.
당연 python에 대한 지식이 있다면 코드만 보고도 어떻게 굴러가는지 알거다.
알아서 하이퍼 파라미터 조정하면서 fine-tuning을 진행해주면 된다.
참고로 yolo10x 에서 x는 모델의 종류이며
종류는 아래와 같다.
| 접미사 | 설명 |
|---|---|
| n (nano) | 경량화 모델. 연산 속도가 빠르나 정확도는 비교적 낮다. |
| s (small) | 경량화와 성능 간의 균형을 맞춘 모델. |
| m (medium) | 중간 크기 모델. s보다 더 높은 정확도를 보임. |
| l (large) | 대형 모델. 정확도가 높은 편이며 더 큰 데이터셋에 대한 학습이 가능. |
| x (extra large) | 가장 큰 yolo 모델 버전. 고해상도 객체 탐지와 정밀 작업에 적합. |
속도와 정확도는 반비례한다고 생각하고
본인 Task에 맞게 모델 버전을 결정하면 되겠다.
4. Prediction
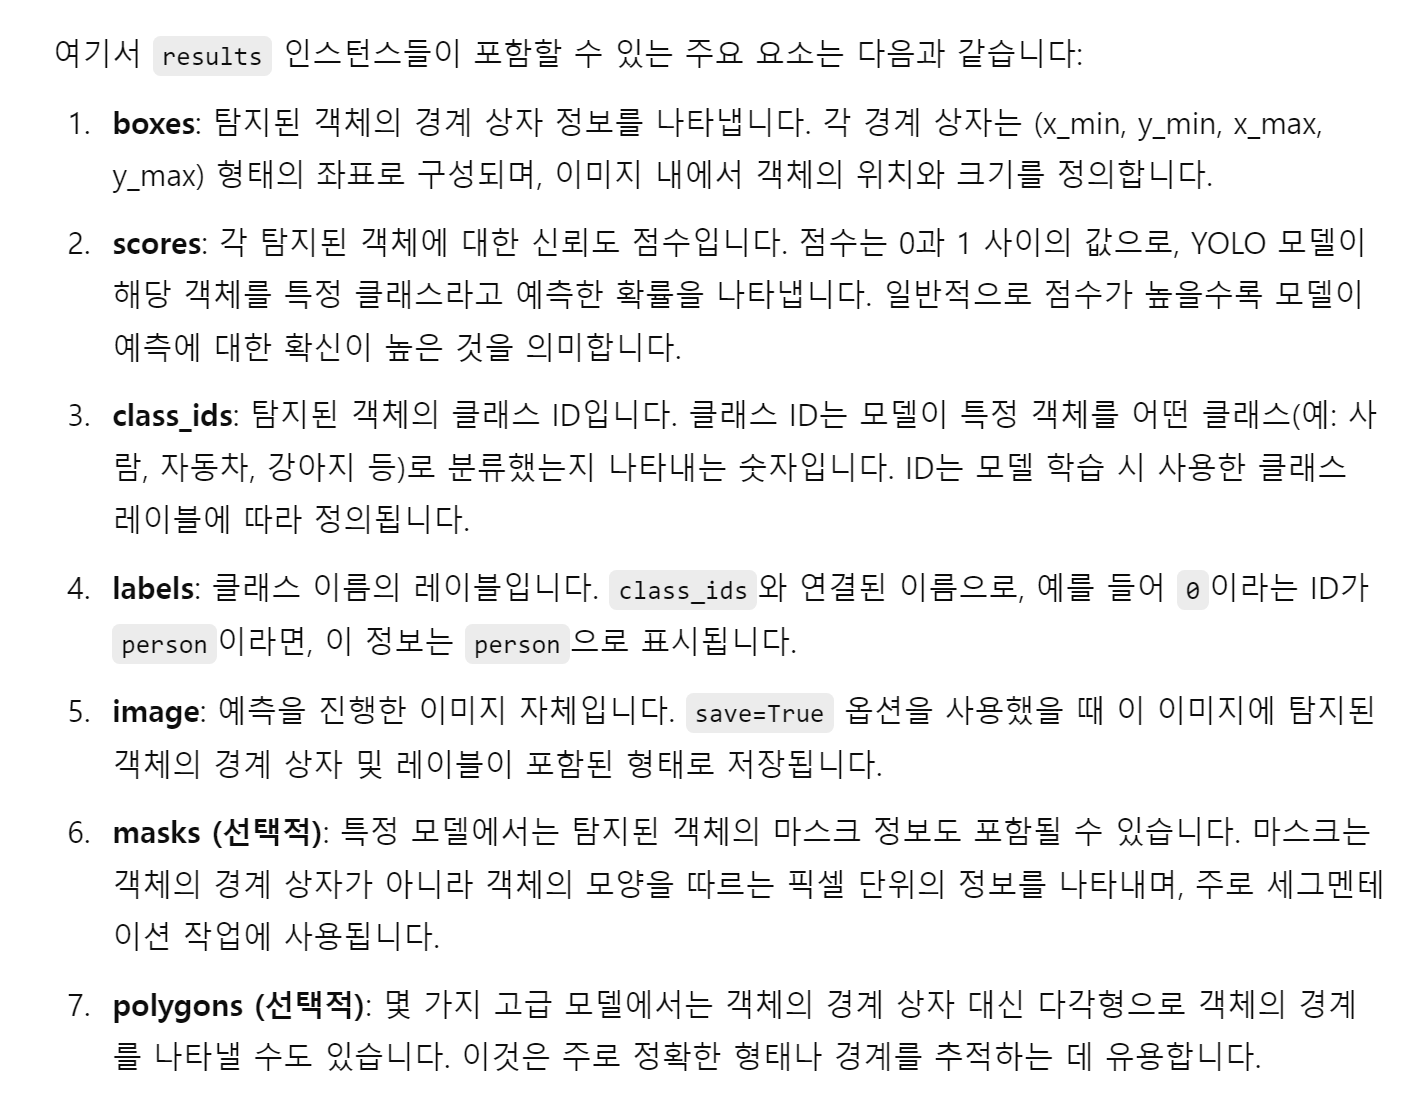
results = model.predict(source=r'test dataset 경로', save=True)학습이 전부 종료되었다면 predict 메서드로 test dataset에서 결과물을 검증해보면 된다.
results에 대한 주요 instance라는데 참고하길 바란다.
(gpt 답변이기에 할루시네이션이 있을 수 있으니 사용이 되지 않는 instance가 있을 수 있다.)
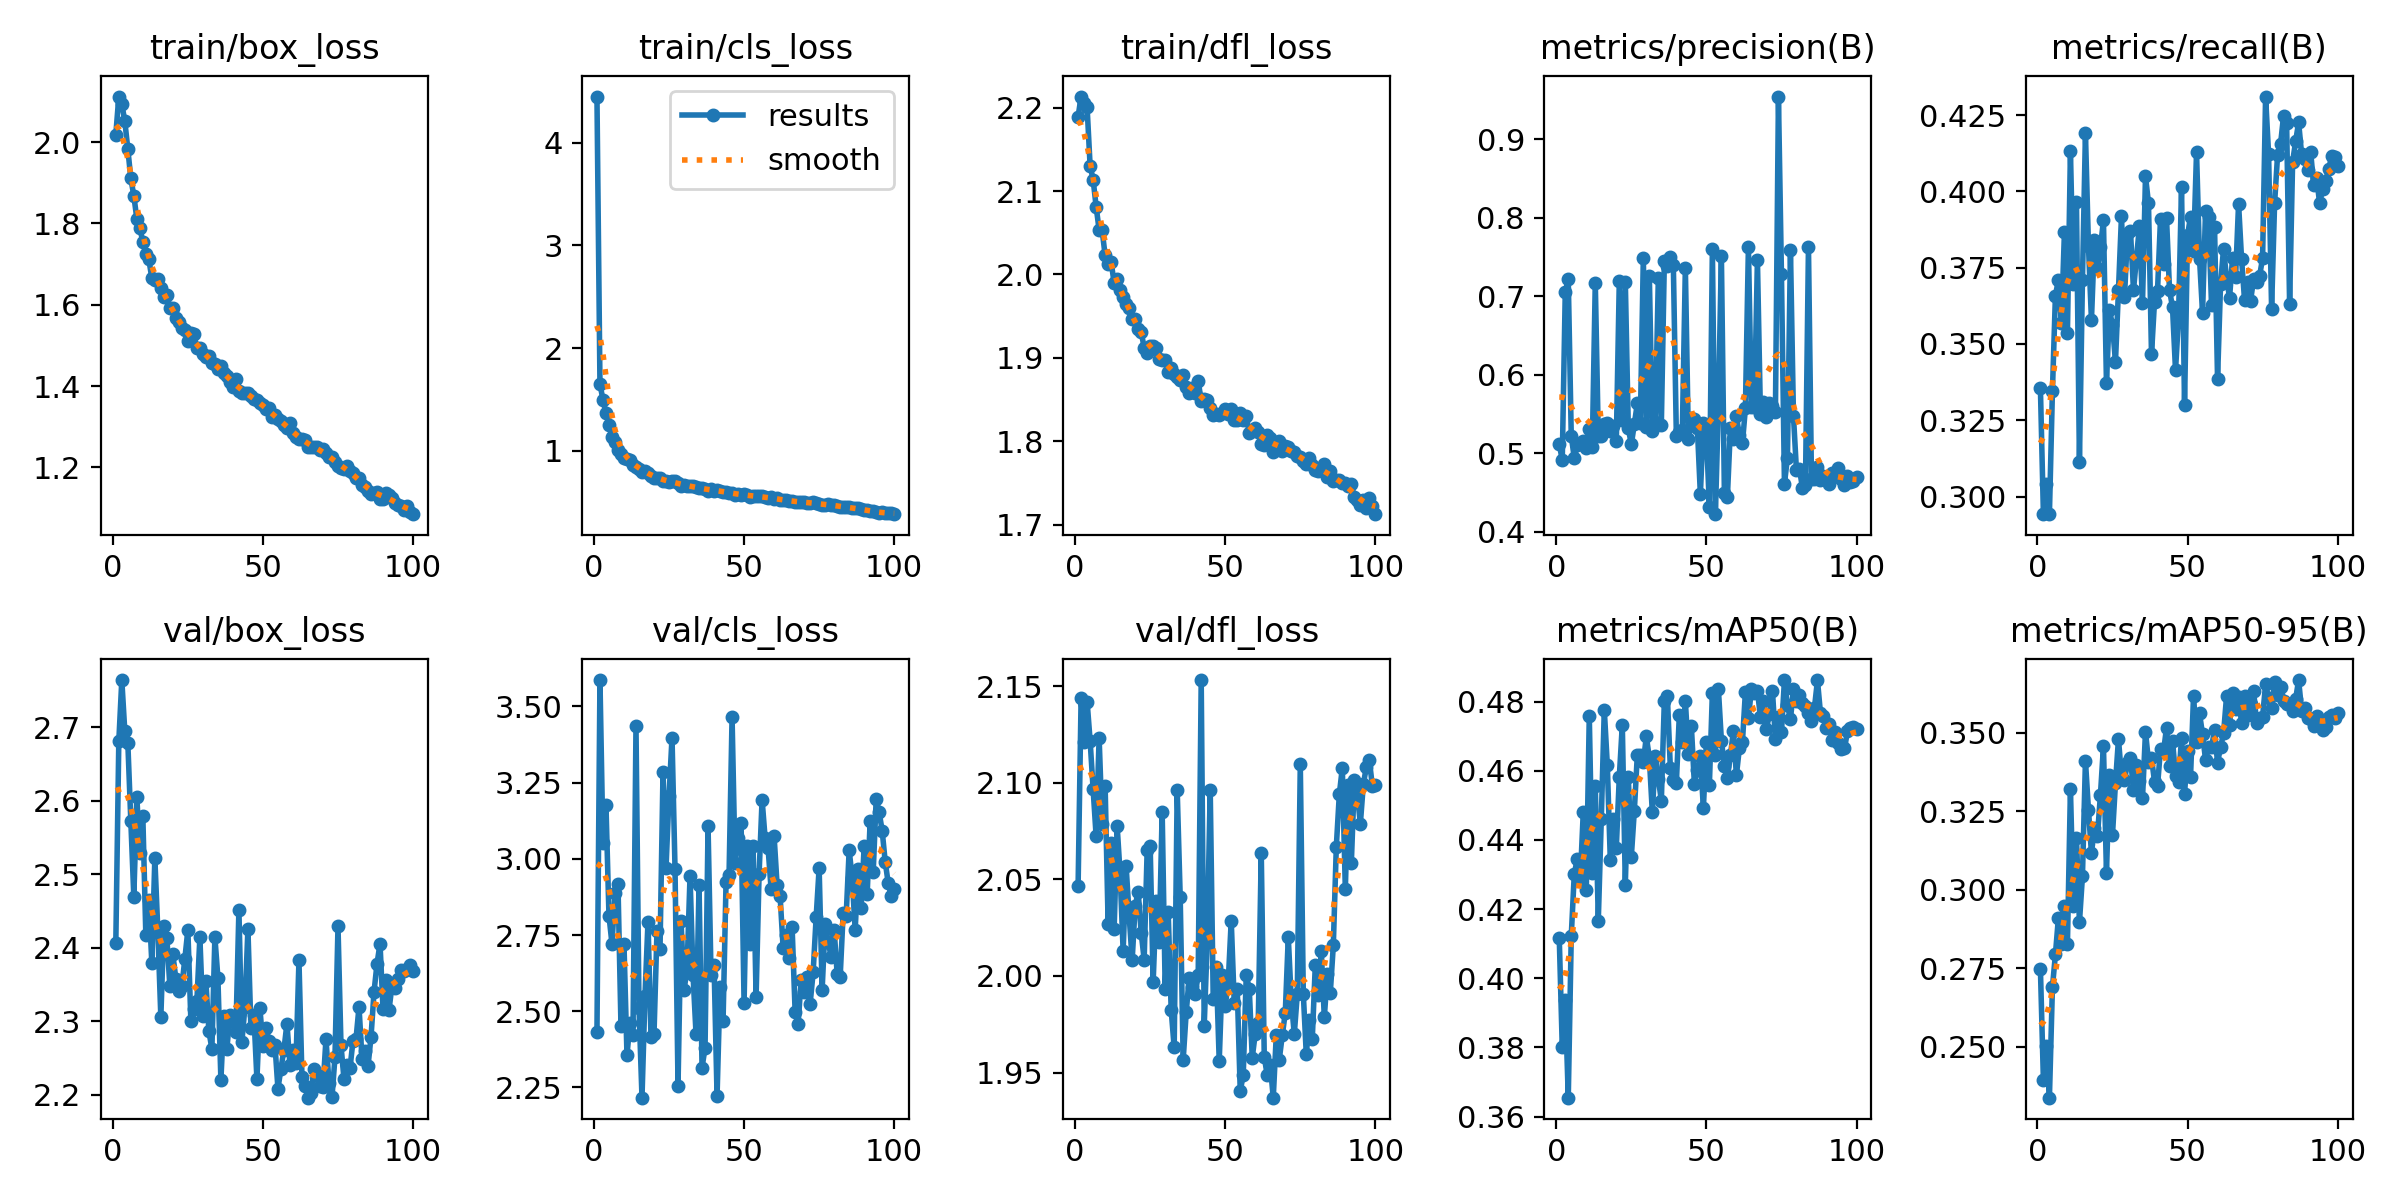
그리고 fine-tuning이 종료되었다면
결과물이 출력된 폴더가 생성되었을텐데
해당 폴더를 확인해보면 loss 시각화 및 실제 데이터에 대해서 어떻게 bbox가 진행되었는지 확인할 수 있다.