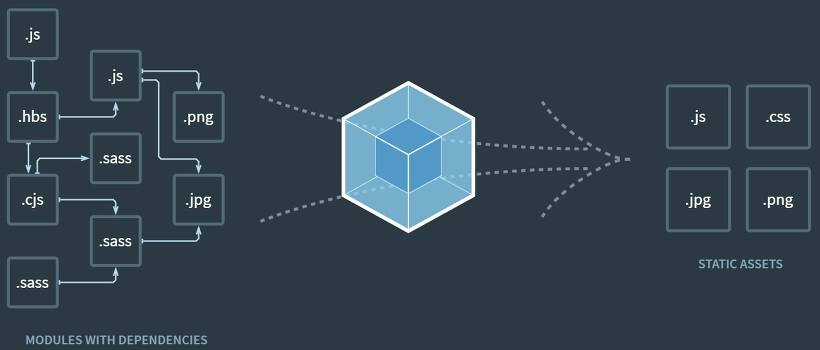
Webpack이란?
- 여러개의 파일을 브라우저에서 로딩하는 것은 네트워크 비용을 그만큼 사용하게 되어 결국 반응속도가 느려지게되는 문제점이 발생하게되고 이외에도 많은 문제점을 가져옵니다.
- 이러한 문제를 해결하기 위한 모듈 번들러로 Webpack을 사용합니다.
- 쉽게 말해
많은 파일들을 필요한 형태의 하나 또는 여러개의 번들파일로 만들어줍니다.
왜 Webpack을 사용할까?
모듈 번들러를 사용해야하는 이유를 먼저 알아봅시다.
1. 네트워크 병목현상을 해결 할 수 있습니다.
- 너무 많은 자바스크립트 파일을 로드하게되면, 네트워크 병목현상에 빠질 수 있습니다.
- 이때의 해결방법으로 하나의 자바스크립트 파일만을 사용할 수 있지만 이 방법에는 문제점이 있습니다.
- 문제점: 가독성과 유지보수 효율성이 떨어집니다.
- 해결방법으로 Webpack과 같은 모듈 번들러를 사용하게 되면 종속성이 있는 파일들을 묶어주기 때문에 가독성과 유지보수 효율성을 높이고 네트워크 병목현상을 최소화 할 수 있습니다.
2. 모듈 단위로 개발이 가능합니다.
① 스코프에 신경 쓰지 않고 개발이 가능합니다.
// test1.js               //test2.js
let value = 'a';          let value = 'b';
console.log(value); console.log(value);- test1, test2 파일을 HTML 변수가 같은 스코프에 선언되어 충돌이 발생합니다.
- 하지만 이때 모듈 번들러를 사용하게 되면 모듈 번들러는 모듈을 IIFE(즉시실행함수) 로 변경해주기 때문에, 스코프에 신경쓰지 않고 개발을 할 수 있습니다.
② 라이브러리 종속 순서를 신경 쓰지 않아도 됩니다.
<script src="util-jquery.js" />
<script src="jquery.js" />util-jquery.js는 jquery를 사용하기 때문에, 로드 순서상jquer.js가 나중에 호출되면 에러가 발생합니다.- 하지만 모듈 번들러를 사용한다면 위와 같은 로드 순서를 신경쓰지 않아도 됩니다.
3. 코드를 압축/최적화 할 수 있습니다.
- 앞서 말한 것과 같이 종속성이 있는 파일들을 묶어주기 때문에 Webpack의 Config 또는 플러그인에 따라 코드를 압축/최적화할 수 있습니다.
4. ES6 버전 이상의 스크립트를 사용할 수 있습니다.
- 오래된 버전의 브라우저에서는 ES6이상의 자바스크립트 문법을 사용할 수 없습니다.
- 하지만 Webpack의 Babel-loader를 사용한다면 ES6 이상의 자바스크립트 문법을 ES5 버전의 문법으로 변경시켜주기 때문에 사용가능해집니다.
Webpack을 이해해보자.
Webpack의 이해하기 위해서 Entry, Output, Loader, Plugins, mode를 학습해봅시다.
1. Entry
module.export={
  entry: './src/indx.js'
  //여러개의 entry 선언 방법
  /*
  entry: {
    index: './src/index.js',
    file: './src/file.js',
  }
  */
};- 종속성 그래프의 시작점을 Entry 라고 합니다.
- 쉽게 말하여 모듈번들의 기준이 되는 자바스크립트 파일을 말합니다.
- Config 파일에 Entry 설정이 되어 있지 않다면 기본값은
./src/index.js입니다.
2. Output
const path = require('path');

module.exports={
  entry: './src/index.js',
  output:{
    path: path.resolve(__dirname, 'dist'),
    filename: 'webpack-bundle.js',
  }
};- Output 설정은 번들된 파일의 이름과 저장할 위치를 지정할 수 있습니다.
- output 설정이 되어있지 않다면 기본값은
./dist/main.js입니다.
3. Loader
const path = require('path');

module.exports = {
  entry: './src/index.js',
  output: {
  	path: path.resolve(__dirname, 'dist'),
    filename: 'webpack-bundle.js',
  },
  module: {
    rules:[
      {
        test: /\.(ts|tsx)$/,
        use: 'babel-loader',
        exclude: /node_modules/,
      },
  	]
  }
};- Webpack은 자바스크립트 파일만 읽어 올 수 있기 때문에, Loader를 통해 스타일시트나 타입스크립트 등의 파일을 Webpack이 읽을 수 있는 모듈로 변경해주는 과정이 필요합니다.
test: 변환 할 파일을 지정합니다.(확장자)use: 변환 할 파일에 지정할 로더를 설정합니다.
4. Plugins
const HtmlWebpackPlugin = require('html-webpack-plugin');
const webpack = require('webpack');

module.exports = {
  entry: './src/index.js',
  output: {
  	path: path.resolve(__dirname, 'dist'),
    filename: 'webpack-bundle.js',
  },
  module: {
    rules:[
      {
        test: /\.(ts|tsx)$/,
        use: 'babel-loader',
        exclude: /node_modules/,
      },
  	]
  },
  plugins:[
    new HtmlWebpackPlugin({template: './src/index.html'}),
  ]
};- Loader는 모듈을 처리하지만, Plugin은 번들된 파일을 처리합니다.
- Plugin은 번들된 파일을 난독화 하거나, 압축하는데 사용됩니다.
4. Mode
module.exports ={
  mode: 'production' || 'development' || 'none'
}- mode는 production, development, none 3가지의 옵션이 존재합니다.
- mode의 기본값은 production입니다.
- 3가지의 각각의 내장된 옵션을 가지고 있습니다.
① development
module.exports = {
  devtool: 'eval',
  plugins: [
    new webpack.NamedModulesPlugin(),
    new webpack.NamedChunksPlugin(),
    new webpack.DefinePlugin({
      "process.env.NODE_ENV": JSON.stringify("development")
    }),
  ]
}
② production
module.exports = {
  plugins: [
    new UglifyJsPlugin(/* ... */),
    new webpack.optimize.ModuleConcatenationPlugin(),
    new webpack.NoEmitOnErrorsPlugin(),
    new webpack.DefinePlugin({
      "process.env.NODE_ENV": JSON.stringify("production")
    }),
  ]
}
③ none
module.exports = {
  plugins:[]
}
웹팩 바벨에 대해서 공부해도 막연했는데 잘 공부하고 갑니다 감사해요!!