React는 선언적인 방식으로 UI를 조작한다.
개별적인 UI를 직접 조작하는 것 대신에 컴포넌트 내부에 여러 state를 묘사하고 사용자의 입력에 따라 state를 변경한다.
React의 대표 철학을 나타내는 수식이다. UI = f(state)
즉, 상태가 바뀌면 → UI는 자동으로 다시 계산된다는 것을 의미한다.
선언형 UI와 명령형 UI 비교
순수 Javascript (명령형)
const button = document.getElementById("btn");
const text = document.getElementById("text");

button.addEventListener("click", () => {
  text.innerText = "바뀐 텍스트";
});
순수 JS 코드 : UI를 어떻게 바꿀지 한 단계씩 명령함
1. 버튼을 찾아라
2. 이벤트를 등록해라
3. 텍스트를 직접 수정해라
-> 즉, DOM을 어떻게 조작할지 단계별로 지시한다.
React (선언형)
function App() {
  const [text, setText] = React.useState("기존 텍스트");

  return (
    <>
      <p>{text}</p>
      <button onClick={() => setText("바뀐 텍스트")}>
        변경
      </button>
    </>
  );
}
React :
- text 값이 이거면, 화면은 이렇게 생겼다.
- text를 바꾸면, UI는 그에 맞게 다시 그려진다.
-> 우리는 UI가 어떤 상태(state)일 때 어떻게 생겨야 하는지만 선언하고, DOM을 직접 건드리지 않는다.
<p>{text}</p>

setText("바뀐텍스트")- 이렇게 하면 React가 알아서 DOM을 찾고 / 바뀐 부분을 계산하고 / 필요한 부분만 수정한다.
선언형 React
- React에서는 직접 UI를 조작할 필요가 없다. 컴포넌트를 직접 활성화하거나 비활성화하거나 보여주거나 숨길 필요 없이 무엇을 보여주고 싶은지 선언하기만 하면 된다. 그러면 React는 어떻게 UI를 업데이트 해야 할지 이해할 것이다.
UI를 선언적인 방식으로 생각하기
- 컴포넌트의 다양한 시각적 state를 확인하세요.
- 무엇이 state 변화를 트리거하는지 알아내세요.
useState를 사용해서 메모리의 state를 표현하세요.- 불필요한 state 변수를 제거하세요.
- state 설정을 위해 이벤트 핸들러를 연결하세요.
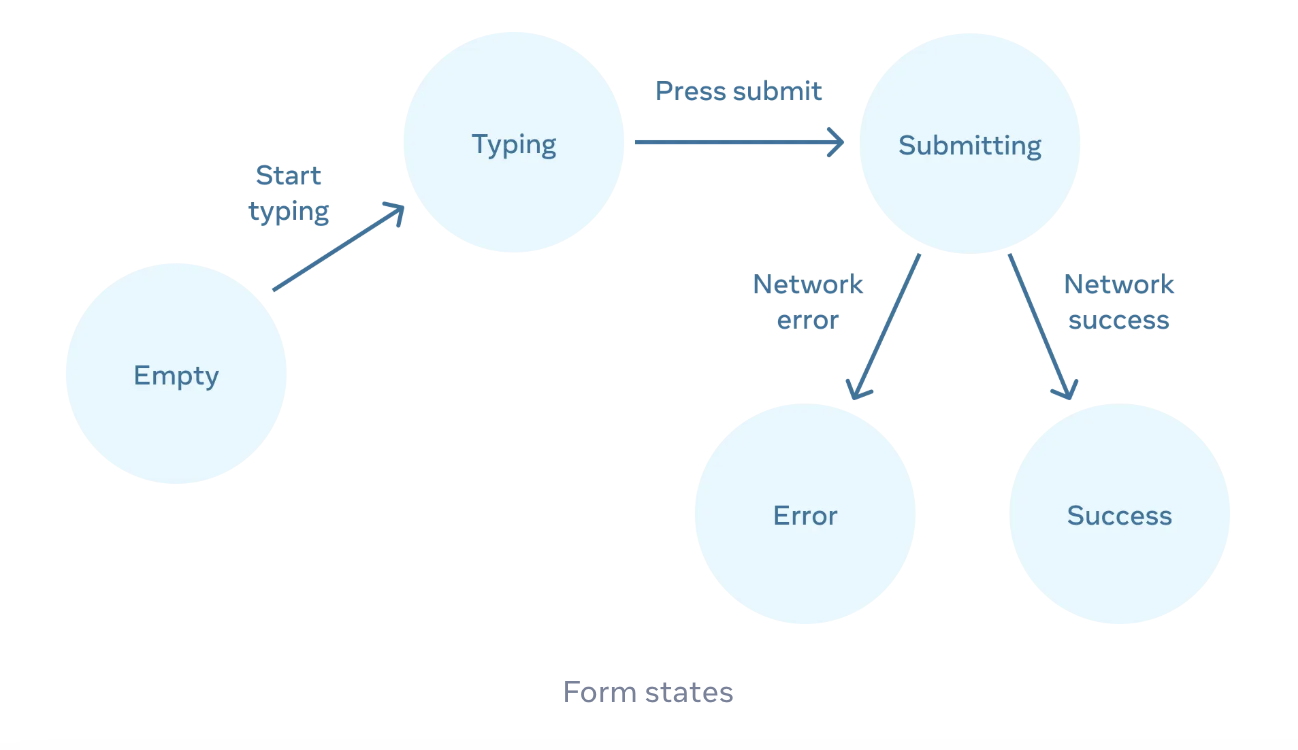
1. 컴포넌트의 다양한 시각적 state 확인하기
- 사용자가 볼 수 있는 UI의 모든 state를 시각화해야 한다.
- Empty : 폼은 비활성화된 “제출” 버튼을 가지고 있다.
- Typing : 폼은 활성화된 “제출” 버튼을 가지고 있다.
- Submitting : 폼은 완전히 비활성화되고 스피너가 보인다.
- Success : 폼 대신에 “감사합니다” 메시지가 보인다.
- Error : “Typing” state와 동일하지만 오류 메시지가 보인다.
export default function Form({
  status = 'Empty' // success, error, empty 등등 ..
}) {
  if (status === 'success') {
    return <h1>That's right!</h1>
  }
  return (
    <>
      <h2>City quiz</h2>
      <p>
        In which city is there a billboard that turns air into drinkable water?
      </p>
      <form>
        <textarea />
        <br />
        <button>
          Submit
        </button>
      </form>
    </>
  )
}
2. 무엇이 state 변화를 트리거하는지 알아내기
두 종류의 인풋 유형으로 state 변경을 트리거할 수 있다.
- 휴먼 인풋 : 버튼 누르기, 필드 입력, 링크 이동 등
- 컴퓨터 인풋 : 네트워크 응답, 타임아웃, 이미지 로딩 등
두 가지 경우 모두 UI를 업데이트하기 위해서는 state 변수를 설정해야 한다. 몇 가지 입력에 따라 state를 변경해야 한다.
-
텍스트 인풋 변경 (휴먼) : 텍스트 상자가 비어있는지 여부에 따라 state를 Empty에서 Typing 으로 또는 그 반대로 변경해야 함.
-
제출 버튼 클릭 (휴먼) : Submitting state를 변경해야 함.
-
네트워크 응답이 성공적으로 도착 (컴퓨터) : Success state를 변경해야 함.
-
네트워크 요청이 실패 (컴퓨터) : 해당하는 오류 메시지와 함께 Error state를 변경해야 함.
-
참고로 휴먼 인풋은 종종 이벤트 핸들러가 필요할 수도 있다.
3. 메모리의 state를 useState 로 표현하기
useState 를 사용하여 컴포넌트의 시각적 state를 표현해야 한다. 이 과정은 단순함이 핵심이다.
각각의 state는 움직이는 조각이고, 움직이는 조각은 적을수록 좋다.
const [answer, setAnswer] = useState('');
const [error, setError] = useState(null);

const [isEmpty, setIsEmpty] = useState(true);
const [isTyping, setIsTyping] = useState(false);
const [isSubmitting, setIsSubmitting] = useState(false);
const [isSuccess, setIsSuccess] = useState(false);
const [isError, setIsError] = useState(false);
초반에 어떤 state 변수를 사용할지에 대한 좋은 방법이 떠오르지 않는다면 가능한 모든 state를 커버할 수 있는 확실한 것을 먼저 추가하는 방식으로 시작하고, 추후에 state를 리팩토링하면 된다.
4. 불필요한 state 변수 제거하기
state의 중복은 피하고 필수적인 state만 남겨두는 것이 좋다.
state 구조를 리팩터링하는데 시간을 투자하면 컴포넌트는 더 이해하기 쉬워질 것이고 불필요한 중복은 줄어들며 의도하지 않은 의미를 피할 수 있다.
리팩토링의 목표는 state가 사용자에게 유효한 UI를 보여주지 않는 경우를 방지하는 것이다.
state 변수에 관한 몇 가지 질문
1. state가 역설을 일으키지 않는지
-isTyping과 isSubmitting이 동시에 true일 수는 없다. 이러한 역설은 보통 state가 충분히 제한되지 않았음을 의미한다. 여기에는 두 boolean에 대한 네 가지 조합이 있지만 오직 유효한 state는 세 개뿐이다.
- 이러한 “불가능한” state를 제거하기 위해 세 가지 값 'typing', 'submitting', 'success'을 하나의 status로 합칠 수 있다.
2. 다른 state 변수에 이미 같은 정보가 담겨있지 않는지
isEmpty와isTyping은 동시에true가 될 수 없다.- 이 경우에
isEmpty를 지우고answer.length === 0으로 체크할 수 있다.
3. 다른 변수를 뒤집었을 때 같은 정보를 얻을 수 있진 않은지
isError는error !== null로도 확인할 수 있기 때문에 필요하지 않다.
const [answer, setAnswer] = useState('');
const [error, setError] = useState(null);
const [status, setStatus] = useState('typing'); // 'typing', 'submitting', or 'success'
5. state 설정을 위해 이벤트 핸들러 연결하기
import { useState } from 'react';

export default function Form() {
  const [answer, setAnswer] = useState('');
  const [error, setError] = useState(null);
  const [status, setStatus] = useState('typing');

  if (status === 'success') {
    return <h1>That's right!</h1>
  }

  async function handleSubmit(e) {
    e.preventDefault();
    setStatus('submitting');
    try {
      await submitForm(answer);
      setStatus('success');
    } catch (err) {
      setStatus('typing');
      setError(err);
    }
  }

  function handleTextareaChange(e) {
    setAnswer(e.target.value);
  }

  return (
    <>
      <h2>City quiz</h2>
      <p>
        In which city is there a billboard that turns air into drinkable water?
      </p>
      <form onSubmit={handleSubmit}>
        <textarea
          value={answer}
          onChange={handleTextareaChange}
          disabled={status === 'submitting'}
        />
        <br />
        <button disabled={
          answer.length === 0 ||
          status === 'submitting'
        }>
          Submit
        </button>
        {error !== null &&
          <p className="Error">
            {error.message}
          </p>
        }
      </form>
    </>
  );
}

function submitForm(answer) {
  // 네트워크에 접속한다고 가정해봅시다.
  return new Promise((resolve, reject) => {
    setTimeout(() => {
      let shouldError = answer.toLowerCase() !== 'lima'
      if (shouldError) {
        reject(new Error('Good guess but a wrong answer. Try again!'));
      } else {
        resolve();
      }
    }, 1500);
  });
}