0526_Kubernetes_Pod Scheduling : NodeName, NodeSelector, Affinity, Anti-Affinity / Cordon & Drain / Taint & Toleration / Kubeconfig / Authentication : SA, RBAC, x509
Kubernetes
Pod Scheduling
Pod Sheduler
- 필터링 : NodeSet 찾음
- 스코어링(scoring) : 목록에 남아있는 노드의 순위를 지정하여 가장 적합한 파드 배치를 선택
노드에 파드 할당
NodeName
NodeName은 직접 지정하기 때문에 Scheduler 영향 받지 x (스케줄러와 관계 x)
➜ 특정 노드에 강제 배치 가능
➜ NodeName를 세팅하지 않으면 스케줄러에 의해 스케줄링
노드를 정해서 구축하면 고가용성 효율 감소
복제본 생성 시 장점 x
🎈 nodeName을 확인할 수 있는 필드
pod.spec.nodeName
rs.spec.template.spec.nodeName
deploy.spec.template.spec.nodeName
myweb-rs-nn.yaml
apiVersion: apps/v1
kind: ReplicaSet
metadata:
  name: myweb-rs-nn
spec:
  replicas: 3
  selector:
    matchLabels:
      app: web
  template:
    metadata:
      labels:
        app: web
    spec:
      nodeName: node2 ✔️
      containers:
        - name: myweb
          image: ghcr.io/c1t1d0s7/go-myweb
생성
$ kubectl create -f myweb-rs-nn.yamlRS 파드가 생성 된 노드 확인
$ kubectl get po -o wideNodeSelector
원하는 Node에 label을 붙여서 특정 label이 있는 Node에만 오브젝트 배치
Node에 부여되어있는 label과 일치하도록 설정
🎈 NodeSelector가 존재하는 오브젝트
pod.spec.template.spec.nodeSelector
rs.spec.template.spec.nodeSelector
deploy.spec.template.spec.nodeSelector
🎈 노드 레이블 확인
$ kubectl describe node [노드 이름]
node1
beta.kubernetes.io/arch=amd64
beta.kubernetes.io/os=linux
kubernetes.io/arch=amd64
kubernetes.io/hostname=node1
kubernetes.io/os=linux
# 이 아래로는 control plane에만 존재하는 node label
node-role.kubernetes.io/control-plane=
node-role.kubernetes.io/master=
node.kubernetes.io/exclude-from-external-load-balancers=
node2
beta.kubernetes.io/arch=amd64
beta.kubernetes.io/os=linux
kubernetes.io/arch=amd64
kubernetes.io/hostname=node2
kubernetes.io/os=linux
node3
beta.kubernetes.io/arch=amd64
beta.kubernetes.io/os=linux
kubernetes.io/arch=amd64
kubernetes.io/hostname=node3
kubernetes.io/os=linux
노드 레이블 생성
$ kubectl label node node1 gpu=highend
$ kubectl label node node2 gpu=midrange
$ kubectl label node node3 gpu=lowend
노드 레이블 확인
$ kubectl get nodes -L gpu NAME STATUS ROLES AGE VERSION GPU
node1 Ready control-plane,master 3d12h v1.22.8 highend ✔️
node2 Ready <none> 3d11h v1.22.8 midrange ✔️
node3 Ready <none> 3d11h v1.22.8 lowend ✔️-L : 레이블 -> 키 지정하면 키가 필드로 보임
-l : 검색/식별 시 사용
myweb-rs-ns.yaml
apiVersion: apps/v1
kind: ReplicaSet
metadata:
  name: myweb-rs-ns
spec:
  replicas: 3
  selector:
    matchLabels:
      app: web
  template:
    metadata:
      labels:
        app: web
    spec:
      nodeSelector: ✔️
        gpu: lowend
      containers:
        - name: myweb
          image: ghcr.io/c1t1d0s7/go-myweb
생성
$ kubectl create -f myweb-rs-ns.yaml모두 Node3에 배치된 것 확인
$ kubectl get po -o wide NAME READY STATUS RESTARTS AGE IP NODE NOMINATED NODE READINESS GATES
myweb-rs-ns-fsx5k 0/1 ContainerCreating 0 5s <none> node3 <none> <none>
myweb-rs-ns-ft46x 0/1 ContainerCreating 0 5s <none> node3 <none> <none>
myweb-rs-ns-l7vvv 0/1 ContainerCreating 0 5s <none> node3 <none> <none>
nfs-client-provisioner-758f8cd4d6-svrqw 1/1 Running 1 (3h2m ago) 26h 10.233.96.100 node2 <none> <none>Node 2의 label 변경
$ kubectl label node node2 gpu=lowend --overwrite$ kubectl get nodes -L gpu
NAME STATUS ROLES AGE VERSION GPU
node1 Ready control-plane,master 3d12h v1.22.8 highend
node2 Ready <none> 3d12h v1.22.8 lowend
node3 Ready <none> 3d12h v1.22.8 lowend기존 파드 지우고 재생성
gpu=lowend label을 가진 Node 2, 3에만 파드 생성된 것 확인
$ kubectl delete po -l app=web
$ kubectl get po -o wide
NAME READY STATUS RESTARTS AGE IP NODE NOMINATED NODE READINESS GATES
myweb-rs-ns-fc82r 1/1 Running 0 23s 10.233.92.89 node3 <none> <none>
myweb-rs-ns-pc8qg 1/1 Running 0 24s 10.233.96.101 node2 <none> <none>
myweb-rs-ns-w6zkm 1/1 Running 0 23s 10.233.96.102 node2 <none> <none>
nfs-client-provisioner-758f8cd4d6-svrqw 1/1 Running 1 (3h4m ago) 26h 10.233.96.100 node2 <none> <none>➕ AWS에서는 Node Label을 사용해 로 가용영역 지정해서 배치 가능
Affinity(선호) & Anti-Affinity(비선호)
NodePort, NodeSelector보다 Scheduling에 대해 유연한 개념
label을 이용하여 Affinity/AntiAffinity 설정
🎈 Affinity 필드
pod.spec.affinity
pod.spec.affinity.nodeAffinity
pod.spec.affinity.podAffinity
- Affinity
➜ PodAffinity, NodeAffinity 만족하는 것이 Best- Pod
pod.spec.affinity.podAffinity.requiredDuringSchedulingIgnoredDuringExecution
: 같은 Node에 파드 배치
- Node
스케줄링이 되는 순간에만 아래 정책 부여 가능(실행 중에는 세팅 불가)preferredDuringSchedulingIgnoredDuringExecution
- prefer ➜ soft
- 만족하지 않는다고 구성 안되진 x
- weight 필드로가중치설정 가능requiredDuringSchedulingIgnoredDuringExecution
- require ➜ hard
- 만족하지 않으면 구성 안될 수도 있음
- 강제이기 때문에 가중치 존재 x
- Pod
- Anti-Affinity
- Pod : 같은 Node에 파드 배치 x
🎈 topologyKey
spec.affinity.podAffinity.preferredDuringSchedulingIgnoredDuringExecution.podAffinityTerm.topologyKey
파드 간 Affinity / Anti-Affinity 기준 설정
➜ 파드 배치 도메인(특정 영역)
ex. "kubernetes.io/hostname" == host 이름을 기준으로 같은 노드 / 다른 노에 배치하라
🎈 예시 Web-DB 시나리오
같은 애플리케이션 : Anti-Affinity
같은 기능 파드 : Anti-Affinity
연관 기능 파드 : Affinity
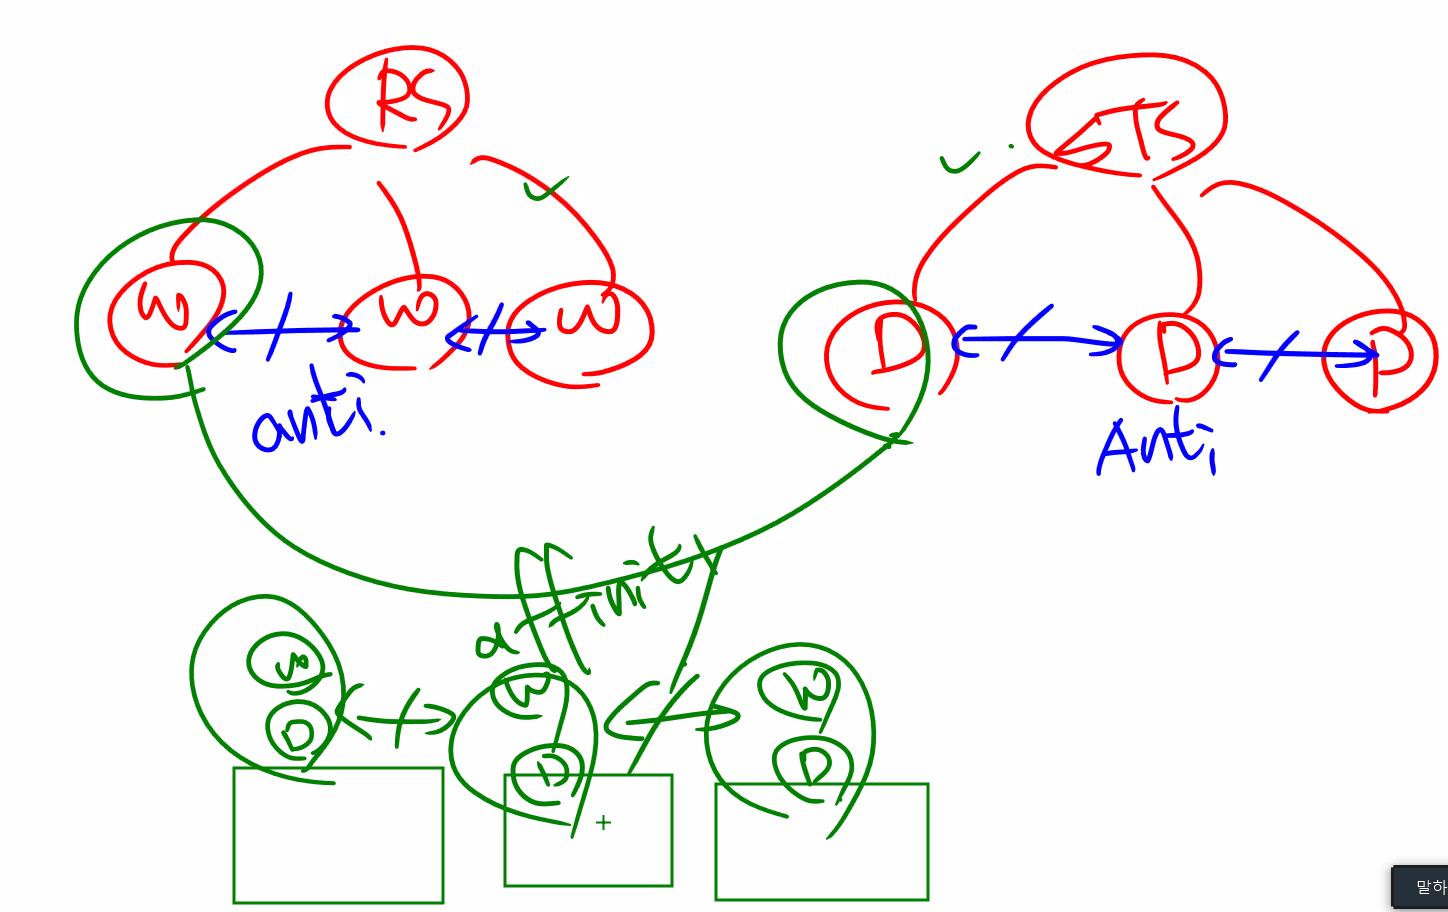
🎈 Affinity 실습
구조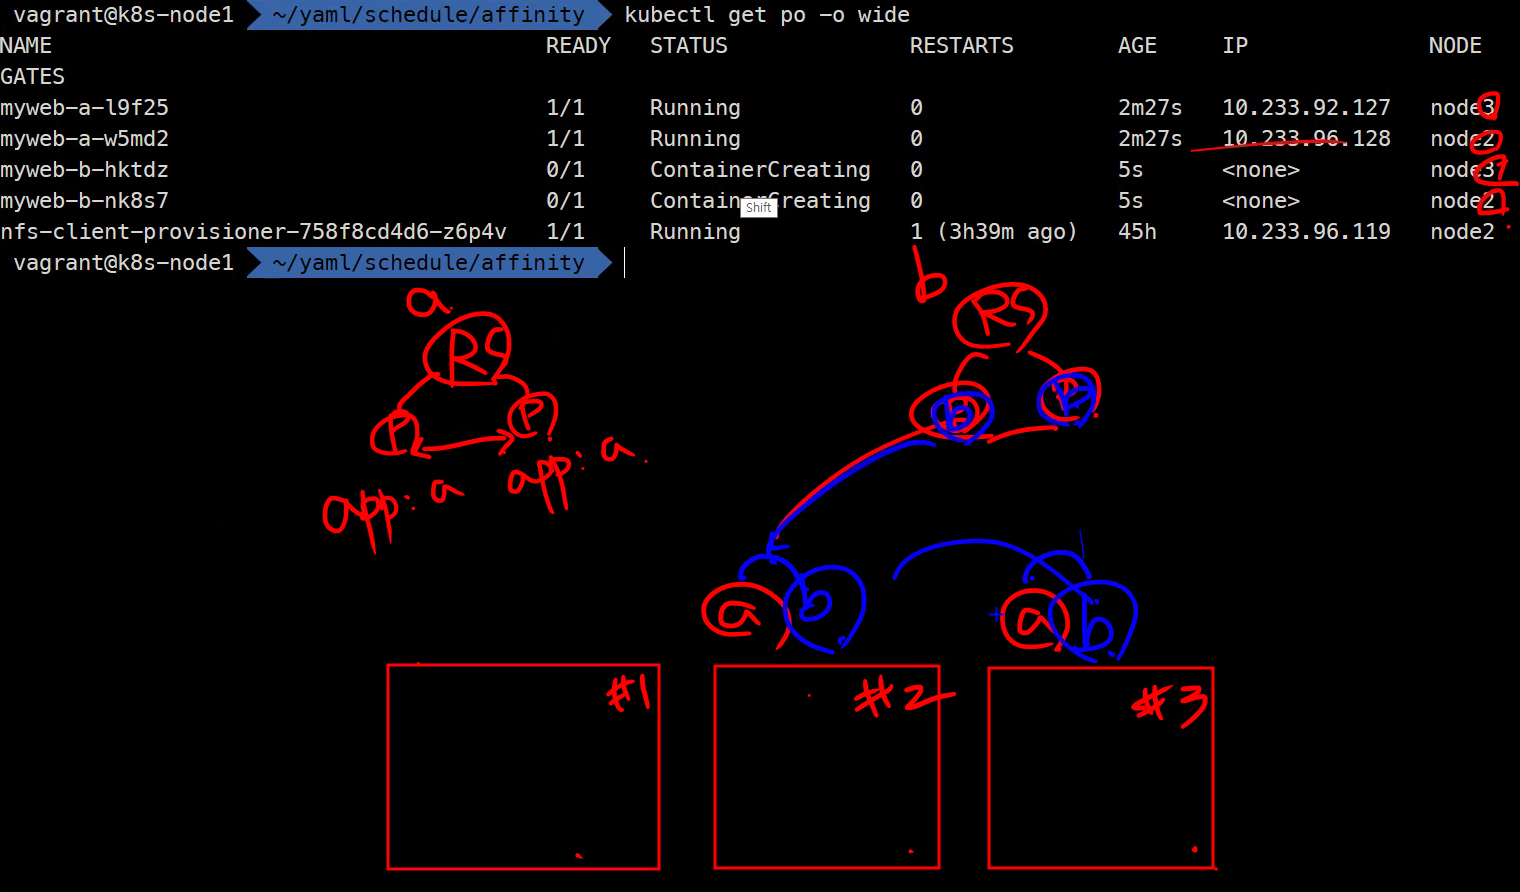
myweb-a.yaml
'gpu' label을 가진 노드에 배치
(이전 NodeSelector 실습에 의해 현 모든 노드에 gpu label 존재, 없으면 생성하기!)
'b' label을 가진 파드 요구
apiVersion: apps/v1
kind: ReplicaSet
metadata:
  name: myweb-a
spec:
  replicas: 2
  selector:
    matchLabels:
      app: a
  template:
    metadata:
      labels:
        app: a
    spec:
      affinity: ✔️
        nodeAffinity:  ✔️
          preferredDuringSchedulingIgnoredDuringExecution:
            - weight: 10
              preference:
                matchExpressions:
                  - key: gpu
                    operator: Exists
        podAntiAffinity: ✔️
          requiredDuringSchedulingIgnoredDuringExecution:
            - labelSelector:
                matchLabels:
                  app: a
              topologyKey: "kubernetes.io/hostname" ✔️
      containers:
        - name: myweb
          image: ghcr.io/c1t1d0s7/go-myweb
myweb-b.yaml
'gpu' label을 가진 노드에 배치
'a' lebel을 가진 파드 요구
자신과 동일한 label을 가진 파드 배척
apiVersion: apps/v1
kind: ReplicaSet
metadata:
  name: myweb-b
spec:
  replicas: 2
  selector:
    matchLabels:
      app: b
  template:
    metadata:
      labels:
        app: b
    spec:
      affinity: ✔️
        nodeAffinity:
          preferredDuringSchedulingIgnoredDuringExecution:
            - weight: 10
              preference:
                matchExpressions:
                  - key: gpu
                    operator: Exists
        podAntiAffinity:✔️
          requiredDuringSchedulingIgnoredDuringExecution:
            - labelSelector:
                 matchLabels:
                   app: b
              topologyKey: "kubernetes.io/hostname"
        podAffinity:
          requiredDuringSchedulingIgnoredDuringExecution:
            - labelSelector:
                 matchLabels:
                   app: a
              topologyKey: "kubernetes.io/hostname"
      containers:
        - name: myweb
          image: ghcr.io/c1t1d0s7/go-myweb
앱 a, 앱 b 파드가 어떤 노드에 배치되었는지 확인
- 앱 a와 앱 b는
affinity관계 ➜ 둘이같은 노드에 배치 - 앱 a-앱 a와 앱 b-앱 b끼리는
Antiaffinity관계 ➜서로다른 노드에 배치
$ kubectl get po -o wideNAME READY STATUS RESTARTS AGE IP NODE NOMINATED NODE READINESS GATES
myweb-a-fncrb 1/1 Running 0 14s 10.233.96.105 node2 <none> <none>
myweb-a-rtjx2 0/1 ContainerCreating 0 14s <none> node3 <none> <none>
myweb-b-fgswj 0/1 ContainerCreating 0 14s <none> node3 <none> <none>
myweb-b-sth7q 0/1 ContainerCreating 0 15s <none> node2 <none> <none>
nfs-client-provisioner-758f8cd4d6-svrqw 1/1 Running 1 (4h14m ago) 28h 10.233.96.100 node2 <none> <none>Cordon & Drain
Cordon
스케줄링 금지
해당 노드에 이미 존재하는 파드는 상관 x
새롭게 생성되는 파드는 cordon 설정된 노드에 배치되지 x
cordon : 스케줄링 금지
$ kubectl cordon [노드명]uncordon : 스케줄링 허용
$ kubectl uncordon [노드명]cordon 전 노드 상태 확인
$  kubectl get nodes
NAME    STATUS   ROLES                  AGE     VERSION
node1   Ready    control-plane,master   3d13h   v1.22.8
node2   Ready    <none>                 3d13h   v1.22.8
node3   Ready    <none>                 3d13h   v1.22.8
node2 스케줄링 금지(cordon)
$ kubectl cordon node2codon 작업을 해 준 Node 상태 확인
➜ SchedulingDisabled인 상태로 변경
$ kubectl get nodes
NAME    STATUS                     ROLES                  AGE     VERSION
node1   Ready                      control-plane,master   3d13h   v1.22.8
node2   Ready,SchedulingDisabled✔️ <none>                 3d13h   v1.22.8
node3   Ready                      <none>                 3d13h   v1.22.8
새로 파드 생성하고 확인
$ kubectl get po -o wide파드들이 Node1, 3에만 배치된 것 확인
NAME                                      READY   STATUS              RESTARTS        AGE   IP              NODE    NOMINATED NODE   READINESS GATES
myweb-a-28zw2                             0/1     ContainerCreating   0               6s    <none>          node1   <none>           <none>
myweb-a-cz85l                             0/1     ContainerCreating   0               6s    <none>          node3   <none>           <none>
myweb-b-2hchg                             0/1     ContainerCreating   0               6s    <none>          node1   <none>           <none>
myweb-b-76mgx                             0/1     ContainerCreating   0               6s    <none>          node3   <none>           <none>
스케줄링 금지 + antiaffinity 조합하면 파드가 배치되지 못하고 pending 상태
# 실습 후 채워넣기 📌Drain
Cordon 후 기존 파드 제거
현재 떠있는 파드를 해당 노드에서 쫒아내는 것
복제본을 제공하는 파드들은 상관 없지만 데몬셋, 단일 파드 들은 삭제하면 재배치 불가
안전한 패치, 재부팅 구현 ➜ drain하여 다른 노드들로 오브젝트들 옮겨주고 작업
$ kubectl drain [노드명]삭제할 수 없는 파드들이 있기 때문에 드레인 연기 중
...
There are ✔️pending nodes to be drained:
 node2
cannot delete ✔️DaemonSet-managed Pods (use --ignore-daemonsets to ignore): ingress-nginx/ingress-nginx-controller-f6km9, kube-system/calico-node-89slg, kube-system/kube-proxy-kmnmb, kube-system/nodelocaldns-64phn, metallb-system/speaker-7skh5
cannot delete Pods with local storage (use --delete-emptydir-data to override): kube-system/metrics-server-c57c76cf4-lslwb
드레인 허용
$ kubectl drain node2 --ignore-daemonsets--ignore-daemonsets : 데몬셋 삭제 허용
drain하면 자동으로 cordon
➜ 삭제 후 해당 노드에 다시 배치되면 안되기 때문에
node2가 schedulingDisabled (cordon) 상태로 자동으로 변경된 것 확인 가능
kubectl get nodeskubectl get nodes
NAME STATUS ROLES AGE VERSION
node1 Ready control-plane,master 3d13h v1.22.8
node2 Ready,SchedulingDisabled✔️ <none> 3d13h v1.22.8
node3 Ready <none> 3d13h v1.22.8재부팅하더라도 여전히 cordon 상태
🌟uncordon필수
Taint & Toleration
💡 핵심
Taint로 특정 노드에역할을 부여하여 역할을허용하는Toleration을 가진 Node에만 스케줄링 허용
ex1. Control Plane에 일반 파드 생성 x
ex2. 플레이북 실행 시 Not Ready 상태라 Taint가 존재해도 Calico 파드 스케줄링
Taint
특정 노드에 역할 을 부여
ex. master라는 역할을 부여
➜ 이 역할을 가지고 싶다면 tolerlation을 세팅하여 스케줄링 허용해야함
🎈 Taint 예시
Control Plane : "node-role.kubernetes.io/master:NoSchedule"
== 마스터 노드이기 때문에 여기에는 스케줄링 하지 마라
✔️ Taint 설정이 되어있기 때문에 Control Plane에 일반 파드 배치가 안되는 것
만약 노드 1을 control plane으로만 지정한다면,
전용 컨트롤 플레인으로만 배치하면 "node-role.kubernetes.io/master:NoSchedule" taint가 설정되어있을 것임
현재 노드 1 : control plane && worker node / 노드 2,3 : worker node
➜ worker node에는 파드 배치 가능
$ kubectl describe node node1
...
Taints:             <none>
...
node1이 worker node로도 동작하기 때문에 taint 설정 없음
🎈 taint 실습
taint 설정
➜ key=value:effect 구조
kubectl taint nodes node1 key1=value1:NoScheduletaint 해제
➜ 끝에 '-' 붙이기
kubectl taint nodes node1 key1=value1:NoSchedule- ✔️Toleration
Taint 노드에 스케줄링 허용
pod.spec.tolerations
taint가 설정되어있으면 파드 생성 시 tolerations 지정 가능
Pod Scheduler에 의해 지정 노드(taint 걸린 노드)에만 파드 배치 가능
- 전용 노드(ex. control plane), 특별한 하드웨어가 있는 노드 등
- Taint 기반 축출 ➜ toleration 없는 애들은 쫒아냄
taint 설정
➜ node1을 master node로 설정
$ kubectl taint node node1 node-role.kubernetes.io/master:NoScheduletaint 설정 확인
$ kubectl describe node node1 | grep -i taint

Taints:             node-role.kubernetes.io/master:NoSchedule
RS 생성 후 상세정보 확인
➜ node1에 배치 된 앱 a 파드 설치 x (taint + antiaffinity 조합에 의해 )
$ kubectl create -f myweb-a.yaml
$ kubectl get po -o wide
Warning FailedScheduling 5s default-scheduler 0/3 nodes are available: 1 node(s) had taint {node-role.kubernetes.io/master: }, that the pod didn't tolerate, 2 node(s) didn't match pod anti-affinity rules.🎈 toleration 설정
기존 web-a.yaml 에 template.spec.tolerations 추가
➜ 키 확인 후 스케줄링 허용 여부 설정
  template:
    spec:
      tolerlations:
        - key: kubernetes.io/master ✔️
          operator: Exists
          effect: Noschedule ✔️
template.spec.tolerations.effect
(효과 ↓) prefernoschedule -> noschedule -> noexcute (효과 ↑)
➜ noexcute 설정 시, taint가 걸려있어도 해당 노드에 오브젝트 배치 가능 (무적)
ex. k8s api server는 control plane의 taint 설정을 무력화 시키고 node1(Master Node)에 배치
cordon 적용 시, conrdon 설정한 노드에 tolerlation 자동 생성
$ kubectl cordon node2 $ kubectl describe nodes | grep -i taint
Taints: <none>
Taints: node.kubernetes.io/unschedulable:NoSchedule✔️
Taints: <none>💡 toleration 항목 뒤에 시간 정보 : 해당 시간 동안에만 toleration 적용 가능
✔️ 실습 후 taint 해제하기!
Kubeconfig
~/.kube/config : k8s configuration file
kubectl(client)이 api server(server)에게 접근할 때 사용하는 인증정보를 가진 파일
apiVersion: v1
kind: Config
preferences: {}

clusters: ✔️
- cluster:  # kubectl이 어떤 서버에게 요청 할 것인가
    certificate-authority-data: LS0tLS1C... # CA 인증서를 base64 인코딩한 정보
    server: https://127.0.0.1:6443 # api server 기본 포트 : 6443
  name: cluster.local # 서버 이름(자동으로 cluster.local로 세팅 됨)

users: ✔️ # 인증 받을 사용자의 계정 이름 (사용자를 만드는 개념은 없고 여기에 설정해놓음)
- name: kubernetes-admin
  user:
    client-certificate-data: LS0tLS... # client 인증서 (공개키 포함)
    client-key-data: LS0tLS1... # client private key
# 인증이 되면 k8s 클러스터 사용 가능

contexts: ✔️ # context == 사용자와 클러스터를 연결해놓은 것 (사용자와 클러스터 결정)
- context:
    cluster: cluster.local # 클러스터 이름
    user: kubernetes-admin
  name: kubernetes-admin@cluster.local

current-context: kubernetes-admin@cluster.local # 현재 사용할 context ➜ context.nameclusters: kubectl이 어떤 서버에게 요청 할 것인가users: 인증받을 사용자의 계정 이름 (k8s는 사용자 생성 개념 x)contexts: 사용자와 클러스터 지정하여 연결
CA 인증서 확인 디렉토리 : /etc/kubernetes/pki
$ ls

...
ca.crt✔️ ca.key
...
🎈 $ kubectl config
클러스터 인증 관련 정보 확인
$ kubectl config get-clusters
$ kubectl config get-users
$ kubectl config get-contexts
config 파일 확인 (민감한 정보 출력 x)
$ kubectl config viewcontext 이름 확인
$ kubectl config get-contexts
CURRENT   NAME                             CLUSTER         AUTHINFO           NAMESPACE
*         kubernetes-admin@cluster.local   cluster.local   kubernetes-admin
사용자명@클러스터이름 ➜ 관습
NS 설정 ➜ default
* : 현재 사용하고 있다는 뜻
🎈 사용 클러스터 전환
🌟 사용할 context 지정
kubectl config use-contexts myadmin@cluster변경 확인
kubectl config get-contexts📌config 파일 수정 부분 필기하기
🎈 윈도우에서 kubectl 사용하기
➜ 잘 사용하지 x
-
파워쉘 관리자 권한으로 실행
-
k8s-cli 설치
현재 노드가 1.22.x 사용 중이므로 가까운 버전 사용
$ choco install kubernetes-cli --version=1.22.4인증이 안되어있기 때문에 kubectl 사용 불가
$ kubectl get nodes

Unable to connect to the server: dial tcp [::1]:8080: connectex: No connection could be made because the target machine actively refused it.- .kube 디렉토리 생성
PS C:\Users\Playdata> mkdir .kube- .kube/config 파일 수정 ➜ clusters.cluster.server 를 control plane IP주소(https://192.168.100.100:6443)로 변경
Authenticating(인증)
Service Account(SA)
원하는 권한을 부여한 SA 계정을 만들고 / 파드를 만들 때 할당하면 / 해당 계정의 권한으로 애플리케이션에서 작업 가능
Service Account(SA): 쿠버네티스가 관리하는 SA 사용자
- 사용자가 사용 x
- pod가 사용
(≒ IAM 사용자를 생성해서 연결하면
VM(EC2)에 해당 사용자의 권한을 할당해서
VM의 어플리케이션이 부여받은 권한을 가지고 다른 어플리케이션 및 AWS의 다른 서비스에 접근 가능)Normal User: 일반 사용자 (k8s가 관리 x)
- 사용자가 사용
- pod 사용 x
🎈 Service Account 리소스 확인
$ kubectl api-resources | grep serviceacc
serviceaccounts                   sa           v1                                     true         ServiceAccount
우리가 사용하기 위한 인증서는 쿠버네티스가 관리해주지만 사용자 자체를 관리해주진 x
🎈 인증 방법
x509 인증서토큰OpenID Connect( 🌟OIDC🌟)
- 외부 인증 표준화 인터페이스
ex. EKS에서 AWS IAM을 사용- okta (가장 유명한 서비스) ➜ 표준을 지키는 인증 서버 SaaS
- OAuth 2.0
- AWS IAM
💡 요약
pod는SA라는 계정을 통해 부여받은 권한을 가지고 파드를 생성할 수 있고,
사용자는x509라는 인증을 통해서 📌녹화본 보고 적기
토큰은 패스워드와는 다르게 인증을 받아야함
➜ /etc/kubernetes/pki 디렉토리의 ca.crt, ca.key
✔️ SA의 토큰 정보는 secret 에 저장 (token / CA / ns)
Secret 확인
$ kubectl get secret NAME TYPE DATA AGE
default-token-ssc5t ✔️ kubernetes.io/service-account-token 3 3d16h
nfs-client-provisioner-token-ntl9v kubernetes.io/service-account-token 3 2dSA 확인
$ kubectl get sa NAME SECRETS AGE
default 1 3d16h ✔️
nfs-client-provisioner 1 2dSA 상세 정보 확인
➜ "default-token-ssc5t" 라는 이름을 가진 토큰이 시크릿에 마운트 되어있음
$ kubectl describe sa default Name: default
Namespace: default
Labels: <none>
Annotations: <none>
Image pull secrets: <none>
Mountable secrets: default-token-ssc5t ✔️
Tokens: default-token-ssc5t ✔️
Events: <none>➕ 애플리케이션은 파드에 마운트 된 볼륨에 존재하는 토큰 정보를 가지고 다른 애플리케이션에 접근
➜kubectl describe po [파드명]에서 마운트 정보 확인 가능
RBAC : Role Based Access Control
💡 반드시 구별하기!
식별(Identification) ex. 주민등록번호인증(Authentication) : A 라는 사용자가 맞다고 증명하는 것자격증명(Credential) : 자격증명을 통해 인증 가능인가(Authorization) : 인증된 사용자에게 권한을 부여하는 것
RBAC : 역할 기반 접근 제어 ➜
인가방법
요청 동사
Role: 권한 (NS) ➜ 특정 NS에 권한 부여ClusterRole: 권한 (Global) ➜ NS에 상관 없이 동일한 권한 행사 가능- RoleBinding
- Role <->RoleBinding<-> SA/User - ClusterRoleBinding
- ClusterRole <->ClusterRoleBinding<-> SA/User
🎈 RBAC 리소스 확인
cluster를 사용하는 role에는 NS 부여되지 x
$ kubectl api-resources | grep rbac clusterrolebindings rbac.authorization.k8s.io/v1 false ClusterRoleBinding
clusterroles rbac.authorization.k8s.io/v1 false ClusterRole
rolebindings rbac.authorization.k8s.io/v1 true RoleBinding
roles rbac.authorization.k8s.io/v1 true Role🎈 요청 동사
| 요청동사 | 종류 |
|---|---|
| create | kubectl create, kubectl apply |
| get | kubectl get po myweb |
| list | kubectl get pods |
| watch | kubectl get po -w |
| update | kubectl edit, replace |
| patch | kubectl patch |
| delete | kubectl delete po myweb |
| deletecollection | kubectl delete po --all |
🎈 RBAC 예시 yaml 파일
- Role 예시
중요한 것 rules
➜ 사용자가 어떤 권한을 가질 수 있는 지 설정
어떤 그룹의(apiGroups) / 어떤 리소스(resources)에 대하여 / 요청 동사가 어떤 권한(verbs)을 가지는가
apiVersion: rbac.authorization.k8s.io/v1
kind: Role
metadata:
  namespace: default
  name: pod-reader
rules: ✔️
- apiGroups: [""]     # "" : core API group을 나타냄 -> (rest) API server
  resources: ["pods"]
verbs: ["get", "watch", "list"] # 요청 동사- RoleBinding 예시
Subjects: 어떤 그룹의 어떤 사용자를 연결할 것인가
roleRef: 어떤 역할을 연결할 것인가
➜ Jane이라는 사용자에 pod-reader라는 역할 연결
apiVersion: rbac.authorization.k8s.io/v1
# This role binding allows "jane" to read pods in the "default" namespace.
# You need to already have a Role named "pod-reader" in that namespace.
kind: RoleBinding ✔️
metadata:
  name: read-pods
  namespace: default
subjects: ✔️
# You can specify more than one "subject"
- kind: User ✔️ # 일반 사용자
  name: jane # "name" is case sensitive ✔️.kube/config의 users.username이 jane이어야함
  apiGroup: rbac.authorization.k8s.io
roleRef: ✔️
  # "roleRef" specifies the binding to a Role / ClusterRole
  kind: Role #this must be Role or ClusterRole
  name: pod-reader # this must match the name of the Role or ClusterRole you wish to bind to
apiGroup: rbac.authorization.k8s.io- ClusterRoleBinding 예제 yaml 파일
apiVersion: rbac.authorization.k8s.io/v1
# This cluster role binding allows anyone in the "manager" group to read secrets in any namespace.
kind: ClusterRoleBinding ✔️
metadata:
  name: read-secrets-global
subjects:
- kind: Group ✔️ # 그룹도 지정 가능
  name: manager # Name is case sensitive
  apiGroup: rbac.authorization.k8s.io
roleRef: ✔️
  kind: ClusterRole
  name: secret-reader
  apiGroup: rbac.authorization.k8s.io
🎈 NFS 서버 RBAC yaml 파일
~/nfs-subdir-external-provisioner/deploy/rbac.yaml
apiVersion: v1
kind: ServiceAccount # SA 생성
metadata:
  name: nfs-client-provisioner
  # replace with namespace where provisioner is deployed
  namespace: default

---
kind: ClusterRole # 클러스터 역할 생성
apiVersion: rbac.authorization.k8s.io/v1
metadata:
  name: nfs-client-provisioner-runner
rules:
  - apiGroups: [""]
    resources: ["nodes"] # 코어 그룹의 노드에 대한 정보
    verbs: ["get", "list", "watch"]
  - apiGroups: [""]
    resources: ["persistentvolumes"] # pv
    verbs: ["get", "list", "watch", "create", "delete"] # pv 생성/삭제 등
  - apiGroups: [""]
    resources: ["persistentvolumeclaims"] # pvc
    verbs: ["get", "list", "watch", "update"] # pv에 대한 정보 업데이
  - apiGroups: ["storage.k8s.io"]
    resources: ["storageclasses"] # 스토리지 클래스 확인
    verbs: ["get", "list", "watch"]
  - apiGroups: [""]
    resources: ["events"] # 리소스 별 이벤트 만들고 업데이트하고 변경
    verbs: ["create", "update", "patch"]

---
kind: ClusterRoleBinding # 클러스터 역할 - SA 연결
apiVersion: rbac.authorization.k8s.io/v1
metadata:
  name: run-nfs-client-provisioner
subjects:
  - kind: ServiceAccount
    name: nfs-client-provisioner
    # replace with namespace where provisioner is deployed
    namespace: default
roleRef:
  kind: ClusterRole
  name: nfs-client-provisioner-runner
  apiGroup: rbac.authorization.k8s.io
---
kind: Role
apiVersion: rbac.authorization.k8s.io/v1
metadata:
  name: leader-locking-nfs-client-provisioner
  # replace with namespace where provisioner is deployed
  namespace: default
rules:
  - apiGroups: [""]
    resources: ["endpoints"]
    verbs: ["get", "list", "watch", "create", "update", "patch"]

---
kind: RoleBinding
apiVersion: rbac.authorization.k8s.io/v1
metadata:
  name: leader-locking-nfs-client-provisioner
  # replace with namespace where provisioner is deployed
  namespace: default
subjects:
  - kind: ServiceAccount
    name: nfs-client-provisioner
    # replace with namespace where provisioner is deployed
    namespace: default
roleRef:
  kind: Role
  name: leader-locking-nfs-client-provisioner
  apiGroup: rbac.authorization.k8s.io
➜ SA 계정 하나에 clusterrole과 clusterrolebinding / role과 rolebinding 연결
➜ 디플로이 할 때 spec에 serviceAccountName로 권한 지정
🎈 ClusterRole
- view : 읽을 수 있는 권한
- edit : 생성/삭제/변경 할 수 있는 권한
- admin: 모든 것 관리 (RBAC : Clusterrole 제외)
- Cluster-admin : 모든 것 관리
모든 role의 요청 동사 확인 가능
$ kubectl describe clusterrole view
$ kubectl describe clusterrole edit
$ kubectl describe clusterrole admin
$ kubectl describe clusterrole cluster-admin
사용자 생성을 위한 x509 인증서
x509 : 공개키 인증서에 대한 규약
사용자를 config 파일에 등록
(사용자 생성이라는 개념 x)
🎈 인증서 리소스 확인
$ kubectl api-resources | grep cer
certificatesigningrequests        csr          certificates.k8s.io/v1                 false        CertificateSigningRequest
private key
$ openssl genrsa -out myuser.key 2048x509 인증서 요청 생성
$ openssl req -new -key myuser.key -out myuser.csr -subj "/CN=myuser"🎈 인증서 요청 생성 실습
myuser-csr
apiVersion: certificates.k8s.io/v1 ✔️
kind: CertificateSigningRequest ✔️
metadata:
  name: myuser-csr
spec:
  usages: ✔️
    - client auth
  signerName: kubernetes.io/kube-apiserver-client
request: LS0tLS1... usage: 사용자가 인증하기 위한 용도 (여러 개 선택 가능)singnerName: 인증하려는 사용자 이름request: 인증서 서명 요청 (인코딩한 값)
인증서 base64로 인코딩
$ cat myuser.crt | base64 | tr -d "\n"인증서 요청 생성
$ kubectl create -f csr.yaml확인
➜ 상태 : Pending (아직 인증받지 x)
$ kubectl get csr🌟 승인
$ kubectl certificate approve myuser-csr확인
➜ 상태: Approved, Issued
$ kubectl get csrcsr 상세 정보 확인
➜ status.certificates 필드 (발급한 인증서)
kubectl get csr myuser-csr -o yamlcertificates 복사하여 base64 디코딩
➜ 서명 된 인증서가 됨
kubectl get csr myuser-csr -o jsonpath='{.status.certificate}' | base64 -d > myuser.crt인증서 해석으로 보기
➜ 인증서를 넣으면(in) 텍스트로 출력
openssl x509 -in myuser.crt --textissuer : 발급자 -> 현재 쿠버네티스의 CA가 발급해줌
subject : 발급 대상
(issuer == subject : 자체서명인증서(ssc))
🎈 kubeconfig 사용자 생성
config 파일 만들기
$ kubectl config set-credentials myuser --client-certificate=myuser.crt
\--client-key=myuser.key --embed-certs=true
--embed-certs=true 옵션 : name과 user에 인코딩된 값이 들어감
해당 옵션 x ➜ name과 user : 파일경로명 (파일 옮길 떄 불편)
➕ 기존 cofig 파일 수정하여 변경하기도 가능
🎈 kubeconfig 컨텍스트 생성
kubectl config set-context myuser@cluster.local --cluster=cluster.local --user=myuser --namespace=default사용할 컨텍스트 변경
$ kubectl config use-context myuser@cluster.local현재 사용 중인 컨텍스트 확인
$ kubectl config get-contexts명령어 실행 여부 확인
➜ 막힘 : 역할 및 권한을 부여한 적이 없기 때문에 해당 사용자로 명령을 실행할 권한이 없음
$ kubectl get nodes 🌟 반드시 원래 사용자 로 use-context 해서 원상복구
$ kubectl config use-context myuser@cluster.localCluster Role Binding
현재 cluster-admin 권한으로 k8s 사용 중
권한 부여 후 세팅한 다음 위에서 생성한 사용자로 k8s 사용
ClusterRoleBinding
myuser-view-crb.yaml
apiVersion: rbac.authorization.k8s.io/v1
kind: ClusterRoleBinding
metadata:
  name: myuser-view-crb
roleRef:
  apiGroup: rbac.authorization.k8s.io
  kind: ClusterRole
  name: view
subjects:
  - apiGroup: rbac.authorization.k8s.io
    kind: User
    name: myuser