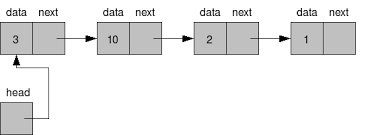
Linked List 자료구조는 각 데이터가 데이터 그 자체 외에도 이전 혹은 다음 데이터를 가르키는 정보를 갖고 있는 구조이다.
- Linked List : 각 데이터가 (데이터 + 다음 데이터의 포인터)로 이뤄져있고, 한 방향으로만 탐색 가능하다.
- Doubly Linked LIst : (이전 데이터의 포인터) + (데이터) + (다음 데이터의 포인터), 양방향 탐색가능하다.
- Circular Linked List : Doubly Linked LIst의 양끝이 연결되어 있는 구조이다. (영어를 보면 circle이 있다.)
아래 그림에서 각 원소를 '노드(Node)'라고 부른다.
연결 리스트에서 삽입과 삭제를 할 때 전체 데이터는 변동 없고 앞, 뒤 데이터의 포인터만 변경해주면 된다. 따라서 연결 리스트의 삽입, 삭제 과정은 매우 빠르게 수행할 수 있다. 그러나 특정 데이터를 찾는 것은 오래걸린다. 포인터를 따라서 이동해기 때문이다.
데이터의 변동이 많은 상황에서는 연결 리스트를 활용하는 것이 좋다.
Linked List 구현
Node를 클래스로 연결리스트를 생성자 함수로 구현하자.
class Node {
  constructor(data) {
    this.data = data;
    this.next = null;
  }
}
function LinkedList() {
  this.length = 0;
  this.head = null;
}
연결리스트 생성자 함수의 prototype 프로퍼티에 각 기능을 수행하는 메서드를 만들자.
- append : 요소를 추가한다.
LinkedList.prototype.append = function (data) {
  let node = new Node(data);
  let currentHead;

  if (this.head === null) {
    this.head = node;
  } else {
    currentHead = this.head;
    while (currentHead.next) {
      currentHead = currentHead.next;
    }
    currentHead.next = node;
  }

  this.length++;
};- removeAt : 위치를 인자로 받아서 요소를 제거한다.
LinkedList.prototype.removeAt = function (position) {
  if (position > -1 && position < this.length) {
    let currentHead = this.head;
    let prev,
      index = 0;
    if (position === 0) {
      this.head = currentHead.next;
      this.length--;
      return currentHead.next;
    }

    while (index++ < position) {
      prev = currentHead;
      currentHead = prev.next;
    }

    prev.next = currentHead.next;

    currentHead.next = null;
    this.length--;

    return currentHead.data;
  }
};- indexOf : 요소의 인덱스를 반환한다.
LinkedList.prototype.indexOf = function(data) {
  let currentHead = this.head;
  let index = -1;
  while(currentHead) {
    if (currentHead.data === data) {
      index++;
      return index;
    }

    index++;
    currentHead = currentHead.next;
  }
  return -1;
}- remove : 데이터를 기준으로 요소를 제거한다.
LinkedList.prototype.remove = function(data) {
	const index = this.indexOf(data);
return this.removeAt(index);- insert : 원하는 위치에 데이터를 추가한다.
// 임의의 위치에 원소를 삽입
LinkedList.prototype.insert = function (position, data) {
  if (position > -1 && position < this.length) {
    let node = new Node(data);
    let prev,
      index = 0;
    currentHead = this.head;

    if (position === 0) {
      node.next = currentHead;
      this.head = node;
    } else {
      while (index++ < position) {
        prev = currentHead;
        currentHead = prev.next;
      }

      prev.next = node;
      node.next = currentHead;
    }

    this.length++;

    return true;
  }
  return false;
};
연결리스트를 구현하는데 약 3 ~ 4시간 정도 걸렸다. 참고하면서 했는데도 불구하고 꽤 오랜시간이 걸린 걸 보면 아직 난 멀었다. 이제 연결리스트에 대해서 와닿을 정도로 이해했으니 현업에서 어떤 식으로 사용되고 있는지 그리고 다른 자료구조를 구현할 때 어떤 식으로 활용되는지 고찰해보자!
References
Java로 연결 리스트(Linked List) 구현하기
출처: https://freestrokes.tistory.com/84 [FREESTROKES DEVLOG]
자바스크립트 자료구조 연결 리스트(Linked List)
출처: https://boycoding.tistory.com/33 [소년코딩]

세계 최고 수준을 향해 달려가는 개발자입니다.