Spring Security의 기본 동작
세세한 걸 알아보기에 앞서, 전체적인 동작을 확인해 보자.
우선, Spring Security는 Servlet의 Filter 기반으로 작동한다.
문제는 여기에 있다. Filter는 Spring Context 밖에 있는 녀석이다.
그 말은, Bean을 인식하지 못한다는 거다.
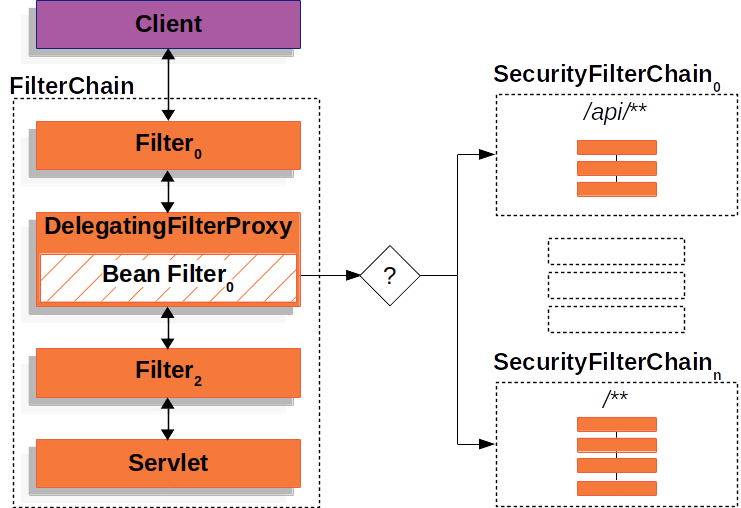
그렇기에 Servlet의 FilterChain에 DelegatingFilterProxy라는 이름만 들어도 껍데기 냄새가 폴폴나는 필터를 하나 집어넣는 트릭을 쓴다.
// Servlet의 FilterChain
public void doFilter(ServletRequest request, ServletResponse response, FilterChain chain) {
    // do something before the rest of the application
    chain.doFilter(request, response); // invoke the rest of the application
    // do something after the rest of the application
}

// DelegatingFilterProxy의 SecurityFilterChain
public void doFilter(ServletRequest request, ServletResponse response, FilterChain chain) {
    // Lazily get Filter that was registered as a Spring Bean
    // For the example in DelegatingFilterProxy delegate is an instance of Bean Filter0
    Filter delegate = getFilterBean(someBeanName);
    // delegate work to the Spring Bean
    delegate.doFilter(request, response);
}DelegatingFilterProxy는 Bean으로 등록된 Filter들을 찾아내 받는 것이 일이다.
이 녀석은 Spring Context에 속해있기 때문에 당연히 그게 가능하다.
이런 구조를 취함으로써 얻는 이득이 하나 더 있다.
Bean으로 등록된 Filter들을 찾는 시점을 늦출 수 있다는 것이다.
이게 왜 중요하냐면, 컨테이너는 기본적으로 컨테이너로써 동작하기 전에 Filter 구성을 끝마친다. 그런데 Spring은 ContextLoaderListener를 사용해 빈을 등록한다. 문제는 이게 한참 뒤에 실행되기 때문에 Bean으로 등록된 Filter들은 정작 Servlet의 Filter들이 구성될 때에 로드가 되지 않은 상태이기 때문이다.
간단히 비유하자면,
'여기 치킨 배달 되죠?' -> '네, 됩니다. 바로 나갑니다.' 해놓고는 뒤에서 생닭 사러 갔다는 거다.
DelegatingFilterProxy에 의해 찾아내진 Bean들은 이 FilterChainProxy에 등록된다.
그림으로 표현하자면 이렇다.
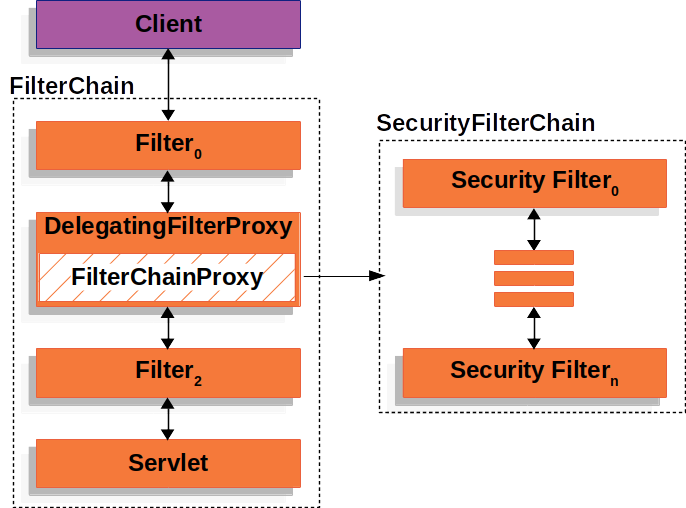
이 녀석도 이름따라 껍데기인데, 실질적인 필터링은 등록된 SecurityFilterChain 내부의 필터들에게 위임하는 역할을 한다.
왜 프록시에 프록시를 넣는 이따위 구조를 쓰냐?
장점이 몇 개 있다.
- Spring Security의 모든 Servlet 지원을 위한 시작점을 제공한다.
- Spring Security에 대한 문제를 해결 할 때, 디버그 포인트를
FilterChainProxy에 등록해버릴 수 있다.
- Spring Security에 대한 문제를 해결 할 때, 디버그 포인트를
- 선택 사항으로 간주되지 않는 작업을 수행할 수 있다.
- 메모리 누수 방지를 위해
SecurityContext를 지운다던가,HttpFirewall을 적용하여 특정 유형의 공격으로부터 애플리케이션을 보호한다던가.
- 메모리 누수 방지를 위해
SecurityFilterChain을 호출 시기를 결정하는 데에 있어 더 많은 유연성을 제공한다.RequestMatcher인터페이스를 이용해HttpServletRequest의 값을 기반으로 호출을 결정할 수 있다.
- 그리고 여러 개의
SecurityFilterChain이 있을 때, 어떤 것을 사용해야 할 지도 정할 수 있다.
아무튼, Bean으로 등록된 Filter들은 SecurityFilterChain이라는 내부의 필터 체인에서 돌아가게 된다.
만약 Filter를 제대로 통과하지 못한다면 인증이 요구된다.
Spring Security를 적용하고나서 어플리케이션을 실행했을 때, 로그인 화면으로 가는 것이 이 때문.
성공적으로 로그인을 해 인증을 하면, 해당 정보는
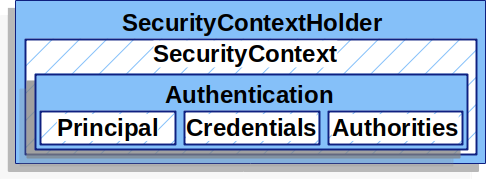
이렇게 SecurityContextHolder 내부의 SecurityContext 안의 Authentication에 저장된다.
Principal은 유저 ID, Credentials은 비밀번호, Authorities는 권한으로 보면 된다.
Security Filters
필터의 종류가 정말 많다.
일단 공식 사이트에 있는 것만 32개인데, 이런 사이트 특성 상 업데이트가 잘 안된다는 걸 생각해보면 더 많을 수도 있지 않을까?
그런고로, 모든 필터가 다 알고 싶다면 밑에 References에서 첫 번째 사이트로 간 다음 9.5 항목을 살펴보자.
여기서는 주로 사용되는 필터 위주로 알아보도록 하겠다.
-
DefaultLoginPageGeneratingFilter : 기본 로그인 페이지를 제공한다.
-
DefaultLogoutPageGeneratingFilter : 기본 로그아웃 페이지를 제공한다.
-
CorsFilter : CORS (Cross-origin resource sharing)에 대한 검사를 한다.
-
CsrfFilter : CSRF (Cross-site request forgery)에 대한 검사를 한다.
-
LogoutFilter : logout request인지에 대한 검사를 한다.
-
SecurityContextPersistenceFilter :
- 한번 인증을 했으면, 인증을 계속해서 요구하지 않도록, 그 정보가 담겨있는
SecurityContext를 여러 요청에 걸쳐 공유하게 해 준다. - 이를 위해
SecurityContextRepository인터페이스를 이용하는데 디폴트 구현체는HttpSessionSecurityContextRepository이다. - 로그인 시에
httpSession에SecurityContext를 넣어두고 있다가, 다음 요청이 오면SecurityContextHolder에서SecurityContext를 꺼낸다. - 그리고
SecurityContextHolder를 비운다. - 꺼낸
SecurityContext를SecurityContextRepository에 저장한다. - 왜 굳이 이렇게 하느냐? 그건
SecurityContextHolder는 쓰레드별로SecurityContext를 관리하기 때문. Servlet은 요청마다 쓰레드를 새로 생성하기 때문에, 새로운 요청에선 기존 인증 정보에 접근을 못한다.
- 한번 인증을 했으면, 인증을 계속해서 요구하지 않도록, 그 정보가 담겨있는
-
RememberMeAuthenticationFilter :
- 인증 정보를 세션으로 관리하는 경우, 세션 timeout이 발생했을 때 remember-me 쿠키를 이용해 로그인을 기억했다 자동으로 재로그인 시켜준다.
- 이를 위해
RemberMeServices인터페이스를 활용한다. - 구현체는
AbstractRemeberMeServices가 있으며, 이를 상속한TokenBaseRememberMeServicese,PersisenceTokenBasedRememberMeServicese가 있다. TokenBaseRememberMeServicese는 토큰을 브라우저 쿠키에 저장하고 서버에는 저장하지 않는다. ID와 만료시간 변환된 암호값이 그대로 토큰에 들어가기 때문에, 만약 토큰이 탈취되면 만료시간이 끝나거나 비밀번호가 변경되지 않는 한 ID가 공공재가 되어버린다.- 그런 허약한 보안을 보완하기 위한 것이
PersisenceTokenBasedRememberMeServicese이다. ID와 만료시간 대신 토큰의 시리즈 값을 넘겨준다. 대신 서버에서는PersistentTokenRepository인터페이스의 구현체인JdbcTokenRepositoryImpl를 통해 DB로 토큰을 관리한다. - 해당 DB에는 {유저ID, 토큰의 시리즈 값, 토큰, 최근 사용일}이 저장된다.
- 세션이 만료되면 서버에서는 브라우저 쿠키의 토큰을 DB의 것과 비교한 다음, 시리즈 값이 같다면 새 토큰을 발행해 세션을 갱신한다. 그리고 DB를 업데이트 시키고 사용자의 브라우저에도 새 토큰을 넘겨준다.
- 이 토큰도 탈취되면 1번의 로그인까지는 허용한다. 하지만 (설정에 따라 다르긴 하지만) 대개 중복 로그인이 나면 기존 유저가 튕겨나가게 되고, 이 때 원주인이 재로그인을 하면 토큰이 갱신되고 공격자는 튕겨나간다. 이후에 탈취했던 토큰을 사용해봐야 서버의 DB에 있는 값과 다르기 때문에 인증을 통과하지 못한다.
- 이렇게 토큰 불일치가 일어났을 때는
CookieTheftException이 발생되며, 해당 유저에게 발급되었던 토큰은 DB에서 모두 제거되어 버린다. 그렇기에 탈취 된 토큰은 더이상 유효하지 않게 된다.
-
AnonymousAuthenticationFilter : Security Filter 처리를 위해서는 어쨌거나 Authentication이 null이어선 안된다. 그렇기 때문에 인증 정보가 아직 존재하지 않는다면, 익명 사용자용으로 아무것도 인증하지 못하는 빈 껍데기 같은 걸 하나 내준다.
-
UsernamePasswordAuthenticationFilter : username과 password를 이용한 Form 로그인 방식을 지원한다.
-
OAuth2AuthorizationRequestRedirectFilter :
OAuth2AuthorizationRequestResolver인터페이스의 구현체인DefaultOAuth2AuthorizationRequestResolver를 이용해 어느 사이트의 인증이 필요한지를 알아낸다.OAuth2AuthorizationRequest객체를 만들어 해당 사이트로 redirect 요청을 보낸다.
-
OAuth2LoginAuthenticationFilter :
ClientRegistration을 통해 인증의 결과를 받는다. 이후,OAuth2AuthorizationResponse객체로 authorization code를 생성해서OAuth2LoginAuthenticationToken을 얻는다.- 이 토큰을 얻을 때에는
OAuth2LoginAuthenticationProvider라고 하는ProviderManager의 일종이 일을 한다. - 이 Provider는
DefaultAuthorizationCodeTokenResponseClient구현체를 이용해 OAuth2 server에서 토큰을 요청한다. - 토큰을 받으면 그것을 가지고 다시 한번 OAuth2 server에서 유저 정보를 요청한다.
-
BasicAuthenticationFilter : SPA이나 모바일 환경에서 요청 헤더에 토큰을 담아서 로그인하는 Ajax 로그인을 지원한다.
-
ConcurrentSessionFilter : 매 요청마다 현재 사용자의 세션 만료 여부를 체크한다. 만료 여부는 SessionManagementFilter에서 설정한 값을 따른다. 세션이 만료되었을 경우, 로그아웃을 시키고 세션 만료에 관한 처리를 한다.
-
SessionManagementFilter :
- 세션 변조 방지 전략을 설정 하거나, 유효하지 않은 세션을 Redirect 시킬 URL을 설정하고, 최대 세션 개수를 설정하며, Spring Security의 세션 생성 전략을 결정할 수 있다.
http.sessionManagement.maximumSessions(1)과 같은 식으로 최대 세션 개수를 정한다. 즉, 중복 로그인을 막는다는 것. 2나 3 등으로 해도 된다.- 세션 생성 전략에는
IF_REQUIRED,ALWAYS,NEVER,STATELESS가 있다. ALWAYS는 언제나 Spring Security가 세션을 생성,NEVER는 하지 않지만 이미 존재한다면 사용한다.IF_REQUIRED는기본값이며 필요하다면 생성한다.STATELESS는 생성하지 않고 존재해도 사용하지 않는다.STATELESS는 주로JWT인증 방식일 때 사용된다.
-
FilterSecurityInterceptor : 사용자의 request에 대해 인증과 권한을 확인한다. 통과 못 할 경우에 Exception이 던져지고,
ExceptionTranslationFilter에 의해 처리된다. -
ExceptionTranslationFilter :
FilterSecurityInterceptor가AccessDecisionManager를 통해AuthenticationException혹은AccessDeniedException을 발생시킨 경우, Exception을 받아 각각AuthenticationEntryPoint,AccessDeniedHandler로 보낸다.
Filter의 순서
EnableWebSecurity(debug = true)로 하고 security filter chain을 통과하게 만들면 볼 수 있다.
아래의 순서를 따른다.
- DisableEncodeUrlFilter
- WebAsyncManagerIntegrationFilter
- SecurityContextPersistenceFilter
- HeaderWriterFilter
- CorsFilter
- LogoutFilter
- OAuth2AuthorizationRequestRedirectFilter // OAuth2 방식 url 리디렉트
- OAuth2LoginAuthenticationFilter // OAuth2 방식 인증 처리
- UsernamePasswordAuthenticationFilter // Username, Password 기반으로 form login 처리
- RequestCacheAwareFilter // 인증 성공 시 이전 요청 url 캐시에서 받아와 리디렉트
- SecurityContextHolderAwareRequestFilter
- AnonymousAuthenticationFilter
- SessionManagementFilter
- ExceptionTranslationFilter // Exception 처리
- FilterSecurityInterceptor // Exception throw
HttpSecurity.httpBasic().disable() 따위의 설정으로 인해 적용 해제 된 필터도 있다.
Security의 예외 처리
각 과정에 대해 살펴보자.
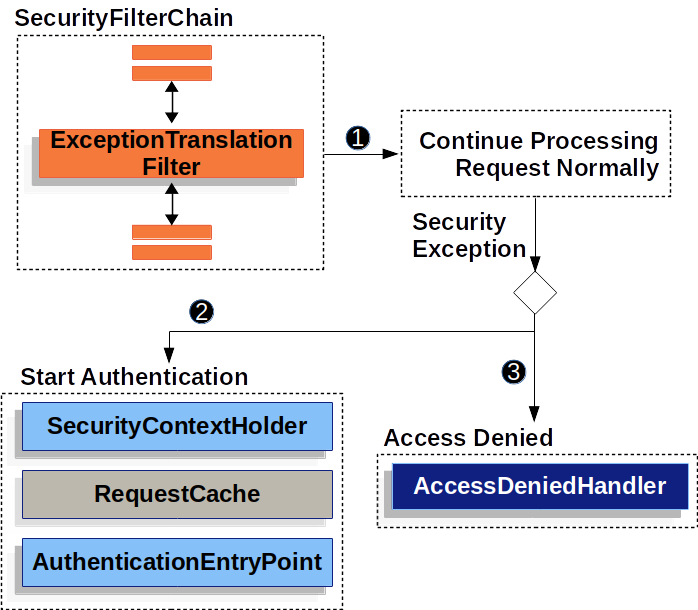
ExceptionTranslationFilter가 필터 체인을 호출한다.- 만약 유저가 인증되지 않았건,
AuthenticationException예외가 던져졌다면, 인증 절차를 시작한다.- 해당 절차는 아래와 같다.
- 우선
SecurityContextHolder를 비운다. HttpServletRequest가RequestCache에 저장된다. 유저가 성공적으로 인증을 했다면,RequestCache는 원본 요청을 다시 불러오는데 쓰일 수 있다.AuthenticationEntryPoint는 사용자를 로그인 페이지로 다시 보내거나 하여credential을 요구한다.
AccessDeniedException이 발생한 경우,AccessDeniedHandler에게 제어가 넘어가며 접근이 거부된다.
아래는 ExceptionTranslationFilter의 수도 코드이다.
주석이 있는 부분이 위 그림의 1, 2, 3번과 일치한다.
try {
    filterChain.doFilter(request, response); // 1
} catch (AccessDeniedException | AuthenticationException ex) {
    if (!authenticated || ex instanceof AuthenticationException) {
        startAuthentication(); // 2
    } else {
        accessDenied(); // 3
    }
}
References
- Spring Security Reference: https://docs.spring.io/spring-security/site/docs/5.4.0/reference/html5/#introduction