
쿠버네티스 클러스터 생성 과정
-
VPC 생성
-
eksctl을 이용해서 VPC의 subnets를 이용해서 클러스터를 생성
0) EKS 구축에 사용하는 도구 설치
- AWS CLI
- 다운로드: https://aws.amazon.com/ko/cli/
- 확인:
aws --version - 사용을 위해서는 aws configure 명령을 수행해서 access-key 와 secret access-key를 설정해야 함
- eksctl
- Windows: https://github.com/eksctl-io/eksctl/releases
- Mac:
brew install weaveworks/tap/eksctl - 설치 확인:
eksctl version
- kubectl
- 다운로드
curl -O https://s3.us-west-2.amazonaws.com/amazon-eks/1.31.0/2024-09-12/bin/darwin/amd64/kubectl - 설치 확인:
kubectl version --client
- 다운로드
1)EKS 클러스터 생성을 위한 VPC 생성
-
AWS CloudFormation 에서 템플릿 파일을 활용하여 VPC 생성
-
base_resources_cfn.yaml: VPC를 생성하기 위한 CloudFormation 파일 -
base_resources_cfn.yamlAWSTemplateFormatVersion: "2010-09-09" # Parameters 부분은 변수 설정 Parameters: ClusterBaseName: Type: String Default: eks-work TargetRegion: Type: String Default: ap-northeast-2 AvailabilityZone1: Type: String Default: ap-northeast-2a AvailabilityZone2: Type: String Default: ap-northeast-2b AvailabilityZone3: Type: String Default: ap-northeast-2c VpcBlock: Type: String Default: 192.168.0.0/16 WorkerSubnet1Block: Type: String Default: 192.168.0.0/24 WorkerSubnet2Block: Type: String Default: 192.168.1.0/24 WorkerSubnet3Block: Type: String Default: 192.168.2.0/24 # 리소스 부분 Resources: # VPC 생성 부분 EksWorkVPC: Type: AWS::EC2::VPC Properties: CidrBlock: !Ref VpcBlock EnableDnsSupport: true EnableDnsHostnames: true Tags: - Key: Name Value: !Sub ${ClusterBaseName}-VPC # VPC 안에서 사용할 서브넷으로 현재는 3개인데 위에 subnet을 추가하면 더 배치가 가능(AZ는 한국의 경우 4개 밖에 없으므로 5개 이상을 생성하고자 하는 경우에는 AZ를 중복시켜야 함) WorkerSubnet1: Type: AWS::EC2::Subnet Properties: AvailabilityZone: !Ref AvailabilityZone1 CidrBlock: !Ref WorkerSubnet1Block VpcId: !Ref EksWorkVPC MapPublicIpOnLaunch: true Tags: - Key: Name Value: !Sub ${ClusterBaseName}-WorkerSubnet1 WorkerSubnet2: Type: AWS::EC2::Subnet Properties: AvailabilityZone: !Ref AvailabilityZone2 CidrBlock: !Ref WorkerSubnet2Block VpcId: !Ref EksWorkVPC MapPublicIpOnLaunch: true Tags: - Key: Name Value: !Sub ${ClusterBaseName}-WorkerSubnet2 WorkerSubnet3: Type: AWS::EC2::Subnet Properties: AvailabilityZone: !Ref AvailabilityZone3 CidrBlock: !Ref WorkerSubnet3Block VpcId: !Ref EksWorkVPC MapPublicIpOnLaunch: true Tags: - Key: Name Value: !Sub ${ClusterBaseName}-WorkerSubnet3 # 인터넷 게이트웨이 설정: 이 설정이 있어야 안에 만들어지는 노드들이 인터넷이 가능 - 게이트웨이를 생성하고 부착하는 부분 InternetGateway: Type: AWS::EC2::InternetGateway VPCGatewayAttachment: Type: AWS::EC2::VPCGatewayAttachment Properties: InternetGatewayId: !Ref InternetGateway VpcId: !Ref EksWorkVPC # 라우팅 테이블을 만드는 부분 # Route 테이블을 출력한 이유는 다른 서브넷을 추가할 경우 라우팅 테이블에 서브넷을 추가해야만 그 서브넷에 다른 서브넷에서 접근이 가능하기 때문에 WorkerSubnetRouteTable: Type: AWS::EC2::RouteTable Properties: VpcId: !Ref EksWorkVPC Tags: - Key: Name Value: !Sub ${ClusterBaseName}-WorkerSubnetRouteTable WorkerSubnetRoute: Type: AWS::EC2::Route Properties: RouteTableId: !Ref WorkerSubnetRouteTable DestinationCidrBlock: 0.0.0.0/0 GatewayId: !Ref InternetGateway WorkerSubnet1RouteTableAssociation: Type: AWS::EC2::SubnetRouteTableAssociation Properties: SubnetId: !Ref WorkerSubnet1 RouteTableId: !Ref WorkerSubnetRouteTable WorkerSubnet2RouteTableAssociation: Type: AWS::EC2::SubnetRouteTableAssociation Properties: SubnetId: !Ref WorkerSubnet2 RouteTableId: !Ref WorkerSubnetRouteTable WorkerSubnet3RouteTableAssociation: Type: AWS::EC2::SubnetRouteTableAssociation Properties: SubnetId: !Ref WorkerSubnet3 RouteTableId: !Ref WorkerSubnetRouteTable # 다른 곳에서 사용할 정보를 외부에 출력하기 위한 부분 # 서브넷을 출력한 이유는 이 서브넷을 알아야 eks 가 node 컴퓨터에 주소를 할당해서 배치를 하기 때문 Outputs: VPC: Value: !Ref EksWorkVPC WorkerSubnets: Value: !Join - "," - [!Ref WorkerSubnet1, !Ref WorkerSubnet2, !Ref WorkerSubnet3] RouteTable: Value: !Ref WorkerSubnetRouteTable
-
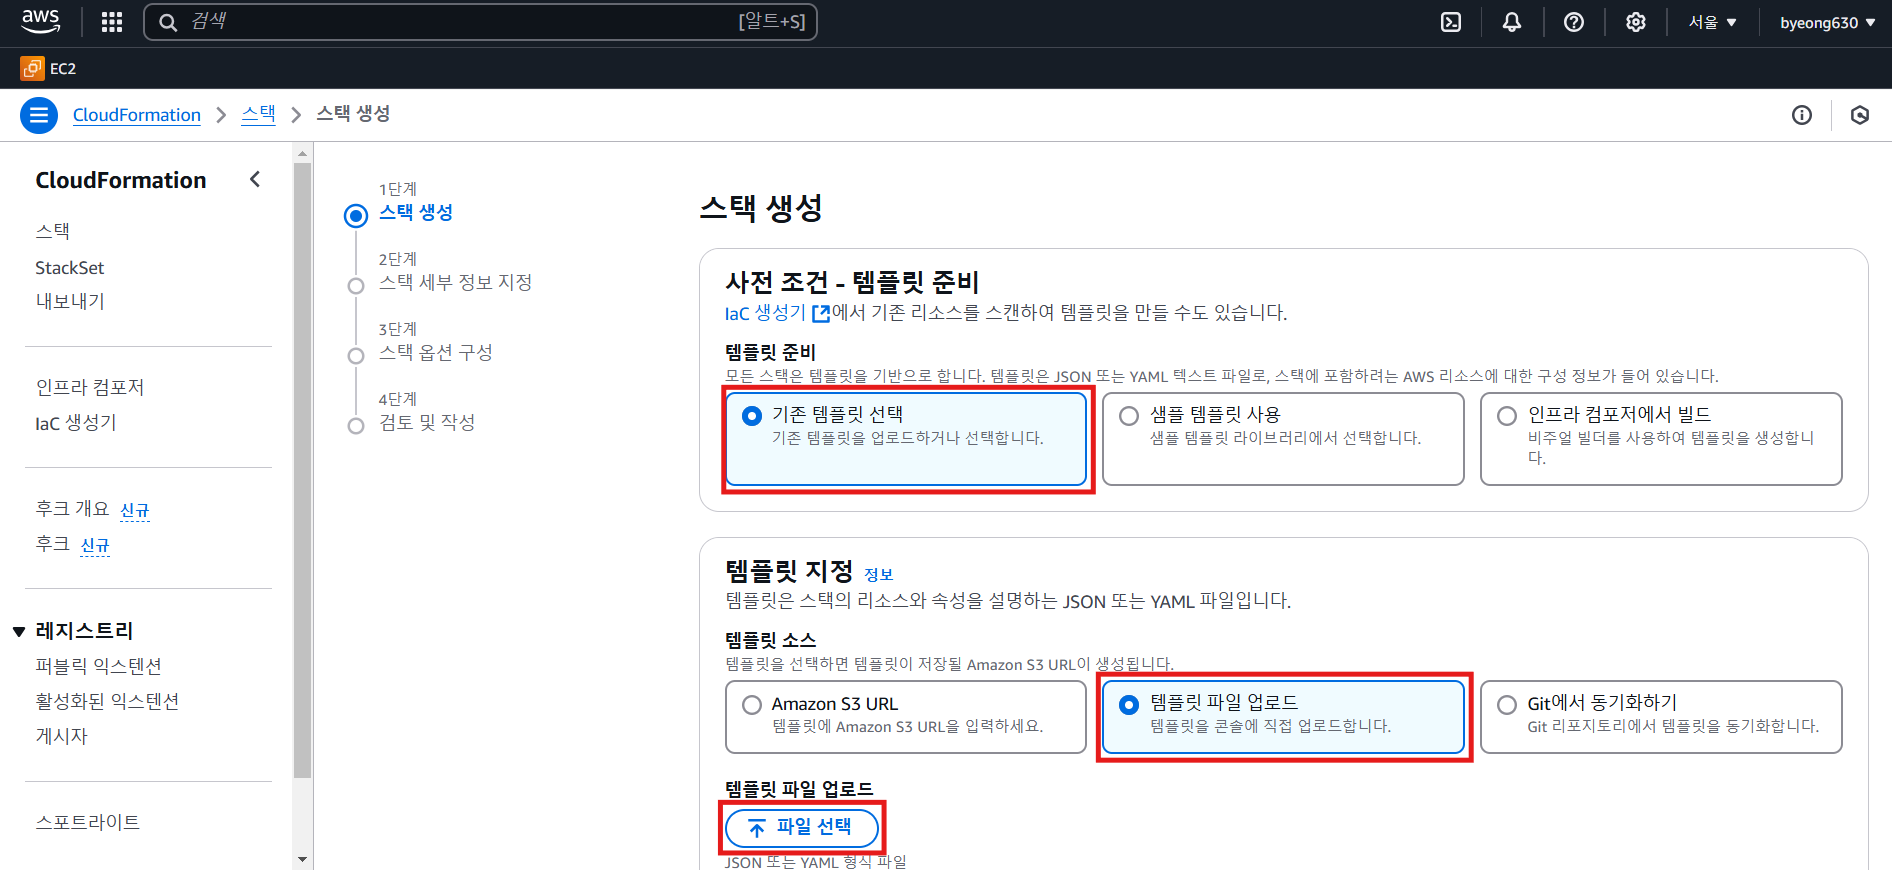
AWS [CloudFormation] - [스택] - [스택 생성]
[파일 선택]을 클릭하여,
base_resources_cfn.yaml파일 업로드
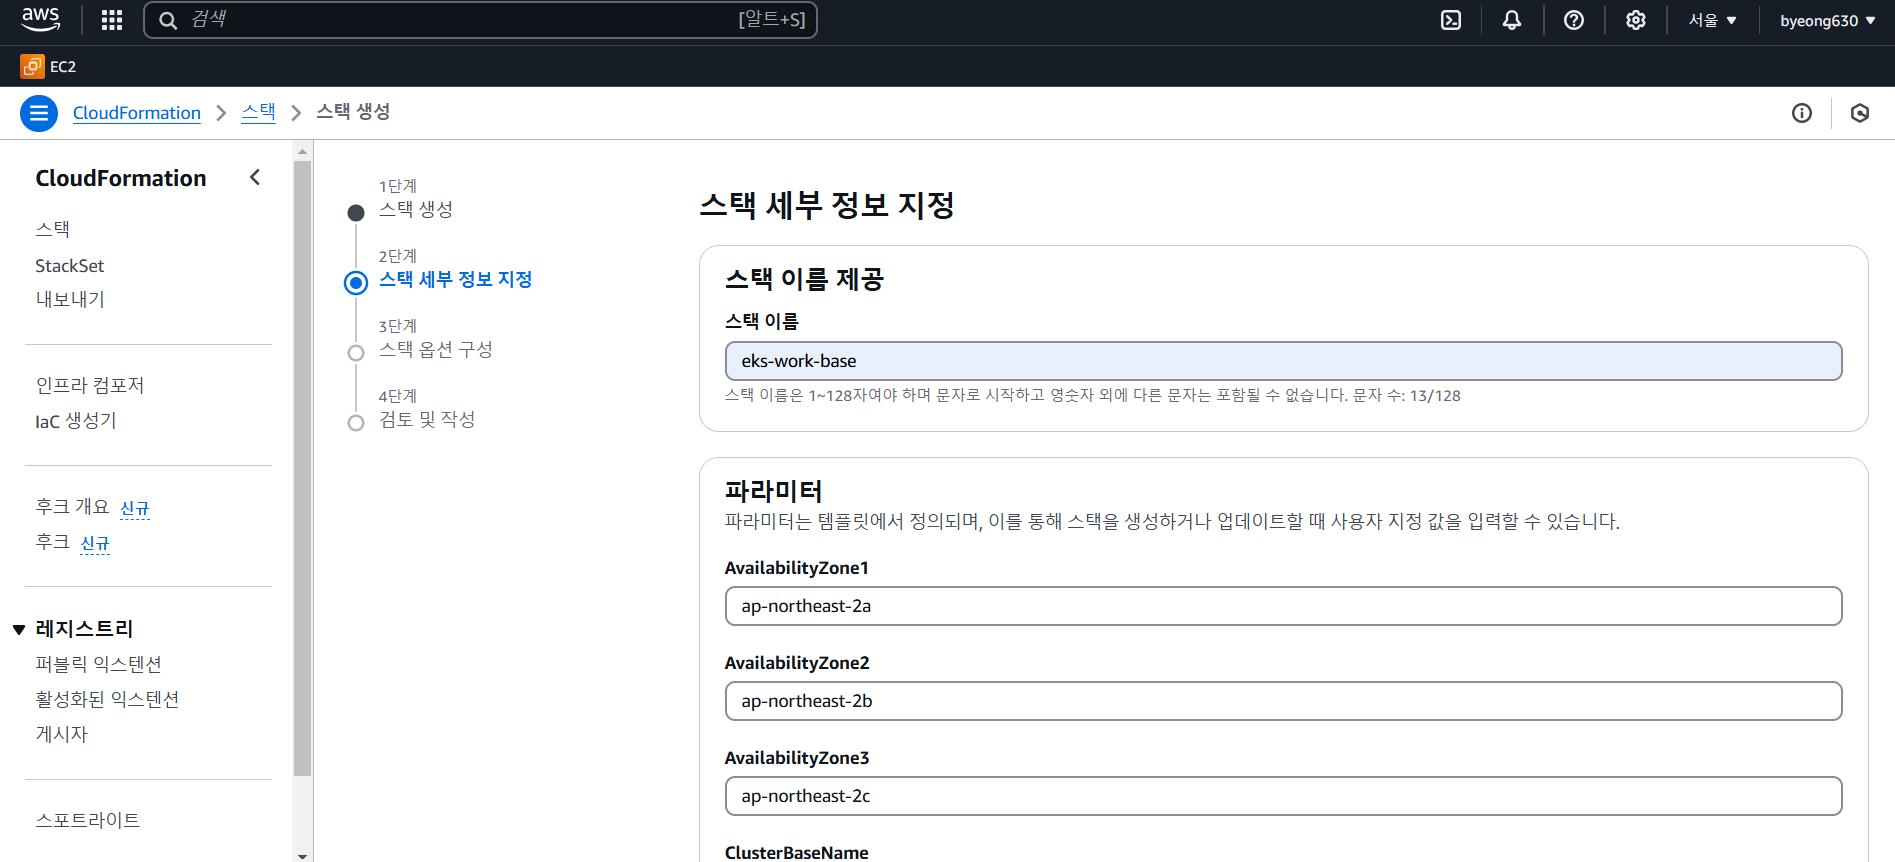
- 스택 세부 정보 지정 페이지에서 스택 이름을 설정:
eks-work-base후 생성
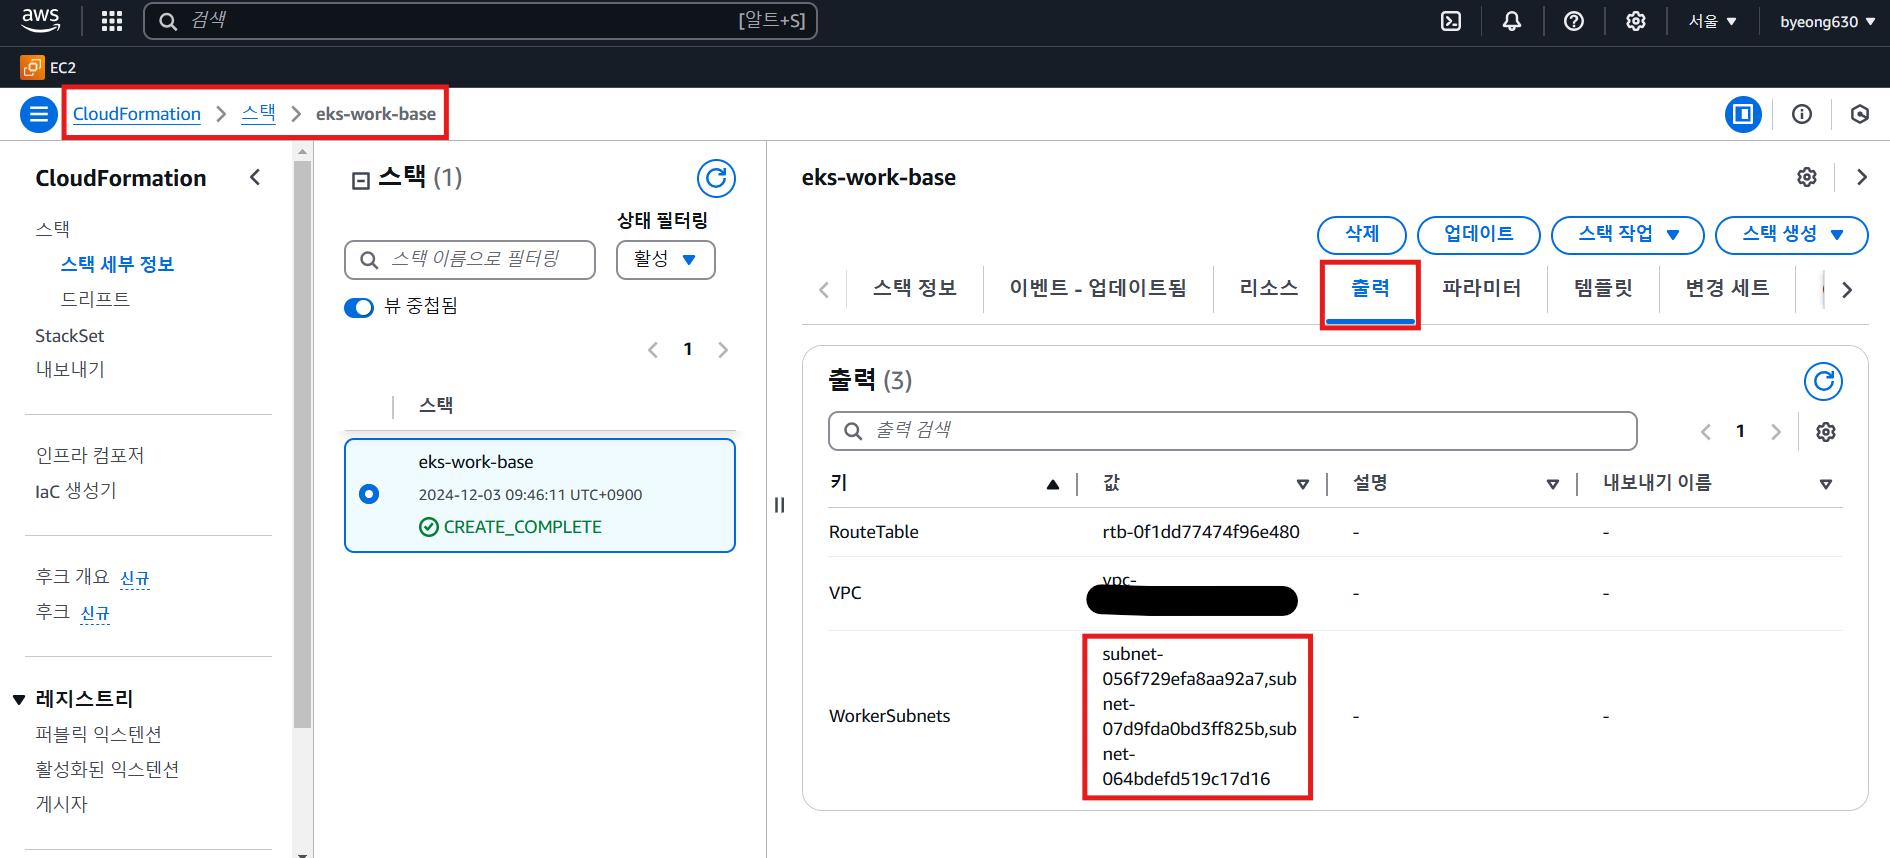
- 생성된 리소스 확인: VPC 항목에서
eks-work-VPC생성 확인

- [CloudFormation] - [스택] - [생성한 스택] - [출력]
WorkerSubnets 값 복사
2)클러스터 생성 명령
eksctl create cluster
--vpc-public-subnets VPC의Subnets값
--name 클러스터이름(하나의 컴퓨터 내에서는 중복이 안되지만 다른 컴퓨터의 경우는 중복 가능)
--region 리전이름
--version 버전(1.xx: 현재는 24 부터 31까지 지원 - 쿠버네티스 관련 명령은 kubectl 을 이용하는데 AWS에서는 하나 이전 버전까지는 문제가 없을 거라고 합니다.)
--nodegroup-name 노드그룹이름(중복 가능)
--node-type 인스턴스하드웨어종류(사용할 수 있는 값이 제한적)
--nodes 노드의개수
--nodes-min  최소 노드의 개수
--nodes-max 최대 노드의 개수 - 이전에 복사한 WorkerSubnets 값을 사용하여 생성된 VPC 안에서 EKS 클러스터 구축
Permission Denied 에러가 발생하는 경우: IAM에서 사용자에게 권한을 추가eksctl create cluster --vpc-public-subnets subnet-056f729efa8aa92a7,subnet-07d9fda0bd3ff825b,subnet-064bdefd519c17d16 --name eks-work-cluster --region ap-northeast-2 --version 1.31 --nodegroup-name eks-work-nodegroup --node-type t2.micro --nodes 3 --nodes-min 3 --nodes-max 5
- 로컬 컴퓨터에서 Cluster 구축 확인
설정한 만큼의 노드가 보이는지 확인kubectl get nodes

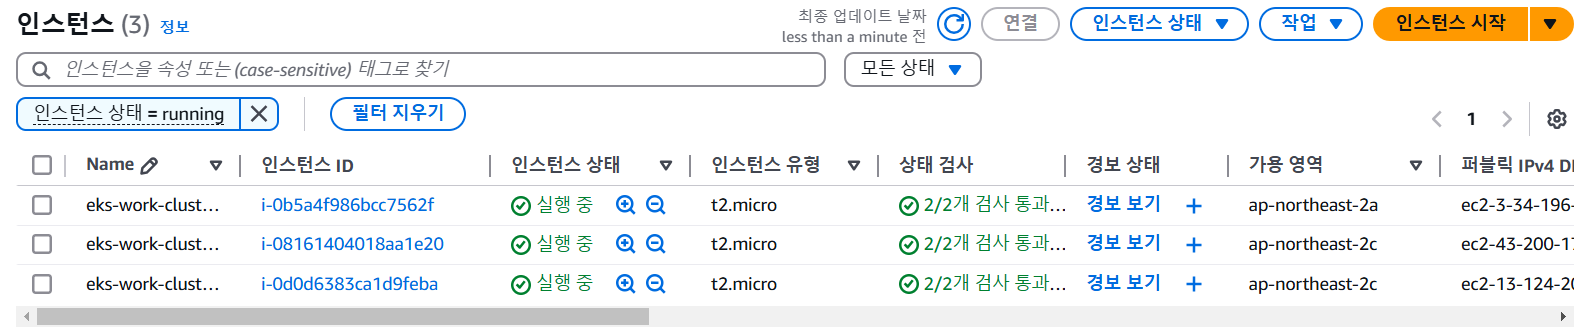
- AWS 관리 콘솔에서 EC2 페이지에서 노드의 개수만큼 인스턴스가 추가되었는지 확인
- CloudFormation에서 2개의 스택이 추가되었는지 확인
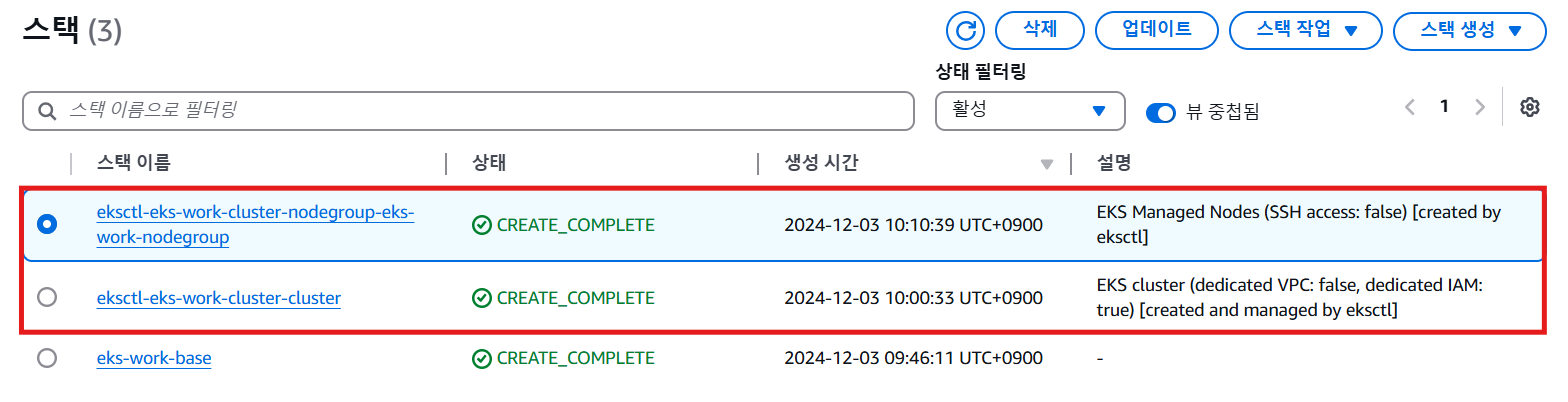
- 첫번째 스택은 Control Plain 에 대한 리소스를 생성하는데 이 때 IAM 설정이 같이 이루어집니다.
- 두번째 스택은 Worker Node 에 대한 리소스를 생성하는 스택으로 보안 그룹도 함께 생성됩니다. 이 때 ECR을 읽을 수 있는 권한도 추가가 됩니다. 포트도 기본적으로 1025~65535번까지를 열어줍니다. 443 번 포트도 기본적으로 같이 열어줍니다.
- kubeconfig 설정
- eksctl은 EKS 클러스터 구축 중에 kubeconfig(~/.kube/config) 파일을 자동으로 업데이트
- kubeconfig 파일은 쿠버네티스 클라이언트인 kubectl이 이용할 설정 파일로 접속 대상 쿠버네티스 클러스터의 접속 정보를 저장하고 있다.
- kubeconfig 파일의 구성
- clusters: 쿠버네티스 클러스터의 정보
- users: 클러스터에 접근할 유저의 정보
- context: cluster 와 user를 조합해서 생성된 값
- current-context
- context 조회:
kubectl config get-contexts
앞에 *이 추가된 클러스터가 현재 사용 중인 클러스터 - context 변경:
kubectl config use-context 컨텍스트이름
3)EKS 클러스터에 Pod와 Service를 배포하여 외부에서 접속 테스트
-
Pod 배포를 위한 야믈 파일 작성:
pod.yamlapiVersion: v1 kind: Pod metadata: name: nginx-pod labels: app: nginx-app spec: containers: - name: nginx-container image: nginx ports: - containerPort: 80
-
야믈 파일 실행
kubectl apply -f pod.yaml -
pod 생성 확인
kubectl get pods
- Load Balancer를 부착해서 외부에서 접속 가능하도록 작업(직접 생성한 쿠버네티스 클러스터라면 Load Balancer를 만들고 Service 를 만들어서 부착을 해야 하지만 EKS에서는 Service 만 만들면 ELB를 생성해 줍니다.)
- service를 위한 야믈 파일 생성:
service.yamlapiVersion: v1 kind: Service metadata: name: nginx-service spec: type: LoadBalancer selector: app: nginx-app ports: - protocol: TCP port: 80 targetPort: 80
- 생성한 yaml 파일 실행
kubectl apply -f service.yaml
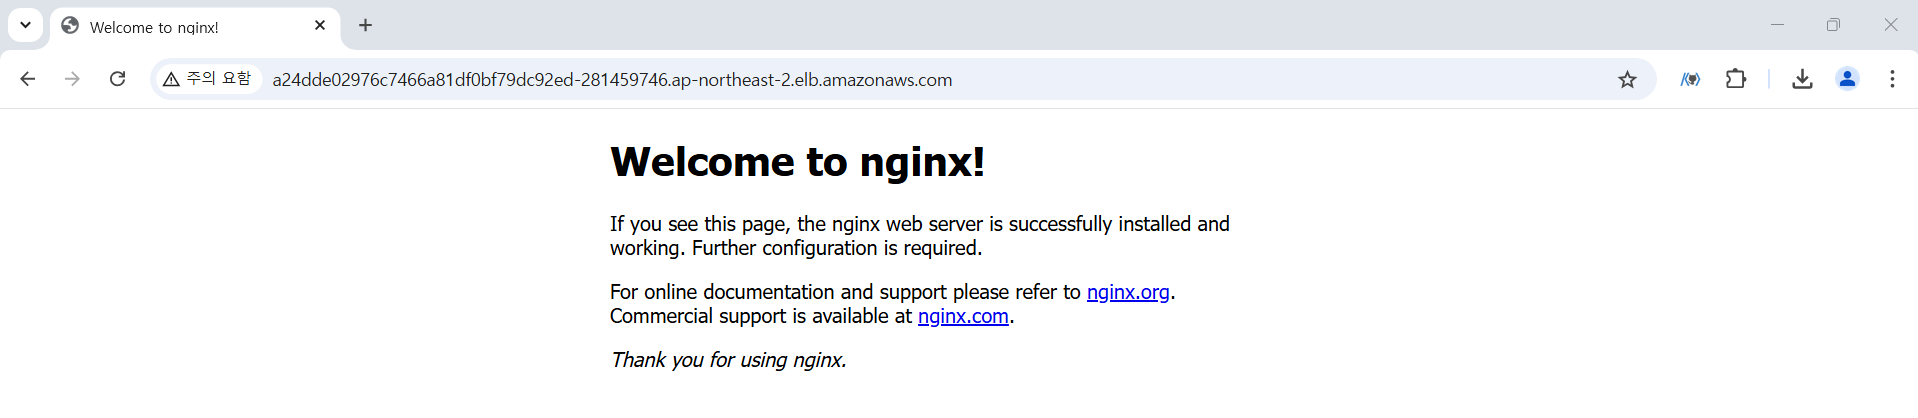
- service 의 External IP를 확인
kubectl get svc
- 로드밸런서가 생성되고, External IP 가 부여된다.

- External IP로 외부에서 접속이 가능한지 확인
4)클러스터 삭제
-
배포된 서비스가 있다면 삭제
kubectl delete svc nginx-service -
클러스터 목록을 확인하여 클러스터 이름 확인
eksctl get cluster
- 확인한 클러스터 이름으로 EKS 클러스터 삭제
eksctl delete cluster --name eks-work-cluster
