
1)IaC & Dockerfile
- IaC 가 필요한 이유
- 명령어 기반의 인프라 구성 시 사용자 실수 와 같은 인적 오류 가능성이 높음
- 이런 인적 오류 가능성을 낮추기 위해서 인프라 구성을 코드로 수행
2)최적의 Dockerfile
- 경량의 컨테이너 서비스를 제공
- 레이어를 최소화
- 하나의 애플리케이션은 하나의 컨테이너로 실행
- 캐시 기능을 활용
- 디렉토리 단위로 작업
- 서버리스 환경으로 개발: 별도의 서버를 이용하지 않도록 작성
3)Dockerfile 명령어
- FROM
- 필수 항목
- 이미지의 베이스 이미지를 지정하는데 hub.docker.com에서 제공하는 이미지를 권장
- 이미지를 선택할 때 slim(작은 크기의 이미지) 이나 Alpine(리눅스 배포판) 이미지를 권장
- MAINTAINER
- 이미지를 빌드한 작성자 이름 과 이메일을 작성
- MAINTAINER bh bh@google.com
- LABEL
- 이미지를 작성하는 목적으로 버전이나 타이틀 등을 작성
- RUN
- 설정된 기본 이미지에 패키지 업데이트, 각종 패키지 설치, 명령 실행 등을 작성
- 여러 개 작성 가능
- RUN 명령어의 개수를 최소화하는 것을 권장
- RUN 명령 하나의 하나의 레이어가 됨
- 2가지 방법으로 작성하는데 하나는 shell 방식이고 다른 하나는 exec 방식
- Shell 방식
RUN apt update && apt install -y nginx - exec 방식
RUN [“/bin/bash”, “-c”, “apt update”]
RUN [“/bin/bash”, “-c”, “apt install -y nginx”]
- CMD
- 생성한 이미지를 컨테이너로 실행할 때 실행되는 명령이고 ENTRYPOINT 명령으로 지정된 커맨드에 디폴트로 넘길 파라미터를 지정할 때 사용
- 여러 개의 CMD를 작성해도 마지막 하나만 처리됩니다.
- 일반적으로 이미지의 컨테이너 실행 시 애플리케이션 데몬이 실행되도록 하는 경우 유용
CMD [“python”, “app.py”]
- ENTRYPOINT
- CMD 와 마찬가지로 생성된 이미지가 컨테이너로 실행될 때 사용되지만 컨테이너가 실행될 때 명령어 및 인자 값을 전달받아 실행된다는 것이 다름
- CMD 컨테이너 실행 시 다양한 명령어를 지정하는 경우에 유용하고 ENTRYPOINT는 컨테이너를 실행할 때 반드시 수행해야 하는 명령어를 지정
- COPY
- 호스트 환경의 파일 이나 디렉토리를 복사할 때 사용
- ADD
- 파일 과 디렉토리를 이미지 안에 복사할 뿐 아니라 URL 주소에서 직접 다운로드 받아서 이미지 안에 넣을 수 있고 tar 나 tar.gz의 경우는 지정한 경로에 압축을 풀어서 추가
- 빌드 작업 디렉토리 외부의 파일을 ADD 할 수 없고 디렉토리는 /로 끝나야 합니다.
- ENV
- 환경변수 설정에 이용
- EXPOSE
- 포트 나 프로토콜을 외부로 개방하기 위해서 사용
- VOLUME
- 볼륨 지정을 위해서 사용
- USER
- 기본 사용자인 root 이외의 사용자를 지정할 때 사용
- WORKDIR
- 컨테이너 상에서 작업할 경로를 전환하기 위해서 사용하는데 이 디렉토리를 설정하면 RUN, CMD, ENTRYPOINT, COPY, ADD 명령문이 전부 이 디렉토리를 기준으로 수행됩니다.
- ARG
- build 시점에서 변수값을 전달하기 위해서 사용
- build 할 때 --build-arg 변수명=값 의 형태로 전달
- HEALTHCHECK
- 프로세스의 상태를 체크하고자 하는 경우 사용
- 하나의 명령만이 유효하고 여러 개가 지정된 경우 마지막에 선언된 HEALTHCHECK 만 적용
- 옵션으로 interval 이 있는데 헬스 체크 간격으로 기본값은 30초이며 timeout은 기다리는 시간으로 기본값은 30초이며 retries는 타임 아웃 횟수로 기본값은 3
- 상태코드는 0, 1, 2 세가지가 있는데 0은 성공이고 1은 올바르게 작동하지 않는 상태이며 2는 예약된 코드
HEALTHCHECK --interval=1m --timeout=3s --retries=5 CMD curl -f http://localhost || exit 1
- 시작은 FROM 부터 이지만 나머지는 순서가 없는데 명령 순서는 빌드 캐시의 무효화 와 연관되므로 변경 빈도 수가 적은 명령을 먼저 배치하는 것을 권장
4)이미지 빌드
docker build [옵션] 이미지이름[:태그] 경로 | URL | 압축파일- 옵션
-t: 태그를 지정하는 경우
-f: Dockerfile 이 아닌 다른 파일명을 사용하는 경우
- 경로: 디렉토리 단위 개발을 권장하고 현재 경로에 Dockerfile 이 있으면 .을 사용하고 Dockerfile이 있는 경로를 설정해도 됩니다.
- URL: 경로 대신에 Dockerfile이 포함된 URL을 제공하고자 하는 경우 사용
- 압축 파일을 사용하는 경우는 압축된 파일 안에 Dockerfile이 있는 경우 사용
5) Dockerfile이 필요한 이유
-
도커 파일이 없는 경우
우분투 위에 아파치 웹 서버 위에 PHP를 이용해서 웹 애플리케이션을 구현하는 경우, 우분투 이미지를 이용해서 컨테이너를 생성하고 컨테이너 안에 접속을 해서 아파치 웹 서버를 설치하고 아파치 웹 서버를 구동한 후 php를 설치하고 그 위에 코드를 작성해야 함 -
동일한 작업을 Dockerfile을 이용
Dockerfile에 모든 명령어를 작성해두고 한 번의 명령어로 수행
6)Dockerfile 작성 및 실행
- 디렉토리를 생성해서 프롬프트를 이동
mkdir phpappcd phpapp
-
도커 파일을 생성하고 작성(vi Dockerfile)
FROM ubuntu:14.04

MAINTAINER "bh <yachae1101@naver.com>"

LABEL title "IaC PHP application"

RUN apt-get update && apt-get install -y apache2 php5 git curl ssh wget

#Apache2 Environment Variable
ENV APACHE2_RUN_USER www-data
ENV APACHE2_RUN_GROUP www-data
ENV APACHE2_LOG_DIR /var/log/apache2
ENV APACHE2_WEB_DIR /var/www/html
ENV APACHE2_PID_FILE /var/run/apache2/apache2.pid

#basic web page
RUN echo 'Hello Docker Application' > /var/www/html/index.html

#PHP 파일
RUN echo '<?php phpinfo(); ?>' > /var/www/html/index.php

EXPOSE 80

WORKDIR /var/www/html

CMD ["/usr/sbin/apache2ctl", "-D", "FOREGROUND"]
- Dockerfile 빌드 - 현재 디렉토리에 Dockerfile 로 존재
docker build -t myphpapp:1.0 .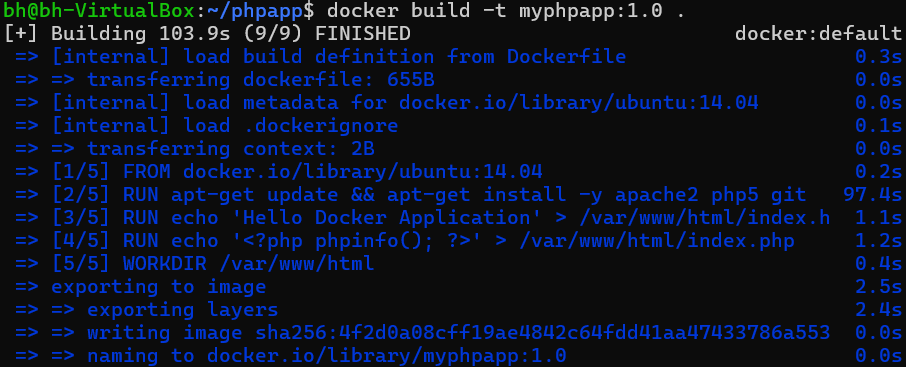
- 이미지 빌드 확인
docker images
- 컨테이너로 생성 후, 컨테이너 실행 확인
docker run -dit -p 8101:80 --name phpapp1 myphpapp:1.0docker ps
- curl 명령을 통해 요청을 보내 확인
curl localhost:8101
7)이미지 빌드 과정
- 이미지 빌드는 사용자와의 대화식 처리가 아닌 자동화된 빌드입니다.
- ubuntu 기반의 이미지를 생성하는 경우 패키지를 설치하고자 하면 반드시 apt-get update를 포함시켜야 하며 -y 옵션을 추가해서 자동으로 설치하도록 해주어야 합니다.
- 이미지 빌드를 할 때는 현재 디렉토리에 있는 모든 파일 과 디렉토리의 콘텐츠는 도커 데몬에 빌드 컨텍스트로 전달되는데 이 때 제외하고 싶은 파일이나 디렉토리가 있으면 .dockerignore 파일에 기재하면 됩니다.
python 개발 환경을 만들기 위해서 ubuntu 에 python 패키지를 설치
-
디렉토리를 생성하고 프롬프트 이동
mkdir python_labcd python_lab -
nano Dockerfile 명령으로 파일을 생성하고 작성
FROM ubuntu:latest RUN apt-get install python -
이미지 빌드: 실패(apt-get update를 하지 않아서 실패)
docker build -t mypyapp:1.0 .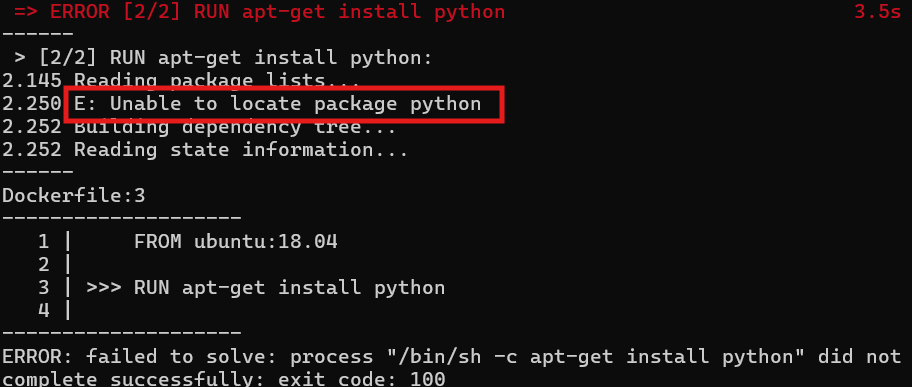
-
nano Dockerfile 명령으로 파일을 생성하고 수정
FROM ubuntu:latest RUN apt-get update RUN apt-get install python -
이미지 빌드: 실패(대화식으로 작업하도록 해서 실패: 패키지를 설치할 때는 -y 옵션을 추가해서 자동으로 설치되도록 해주어야 합니다.)
docker build -t mypyapp:1.0 .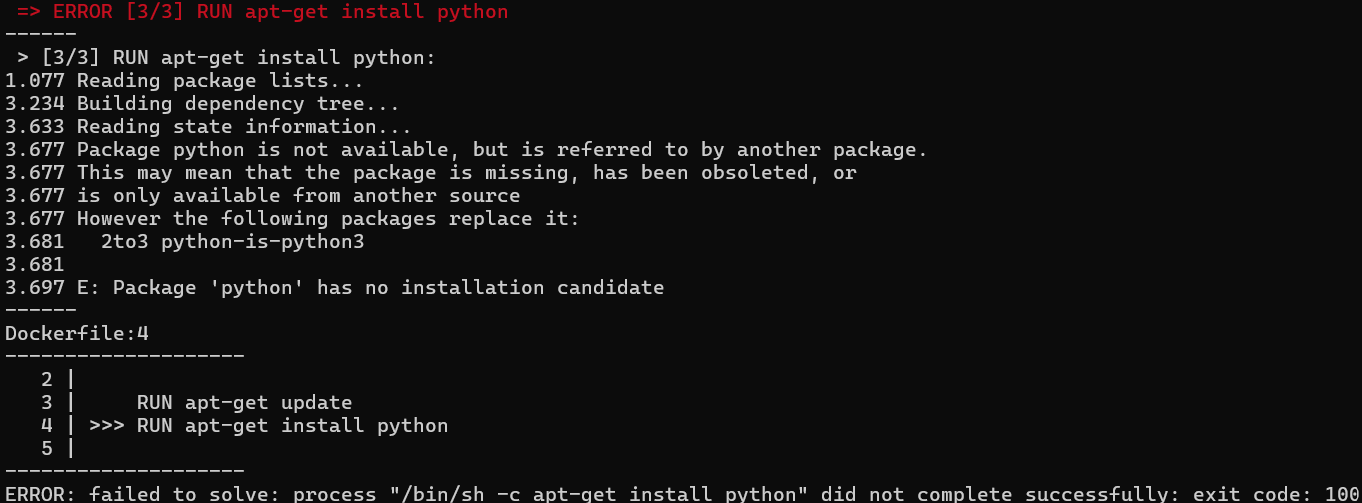
-
nano Dockerfile 명령으로 파일을 생성하고 수정
FROM ubuntu:latest RUN apt-get update RUN apt-get install python -y -
이미지 빌드: 성공
docker build -t mypyapp:1.0 .
빌드 캐시 사용을 위한 실습
-
Dockerfile을 생성
FROM ubuntu:latest RUN apt-get update && apt-get install -y nginx curl vim RUN echo 'Docker Container Application.' > /var/www/html/index.html EXPOSE 80 CMD ["nginx", "-g", "daemon off;"] -
이미지 빌드 : 126.2초
docker build -f Dockerfile -t webapp:1.0 .
- 이미지 빌드 : 2.4초
docker build -f Dockerfile -t webapp:2.0 .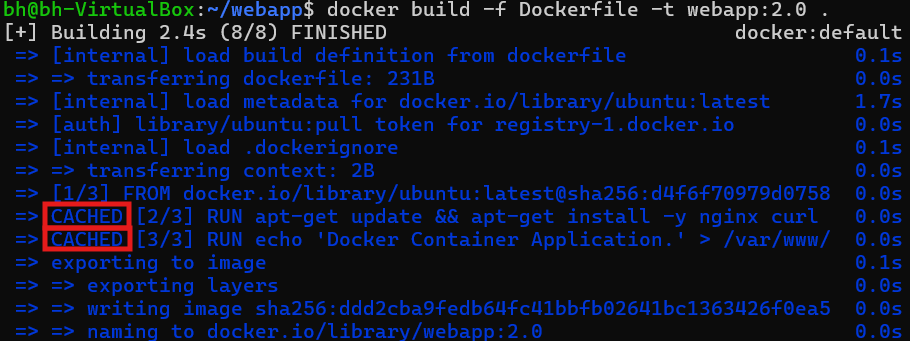
- 동일한 내용을 가지고 두번째 빌드를 하게 되면 cached 라고 하는 문장이 보이게 되는데 빌드 속도 향상을 위해서 실행 중간에 있는 이미지 캐시를 사용하게 되는데 이를 빌드 캐시라고 합니다.
- 빌드 캐시를 할 때는 동일한 명령어의 연속된 부분까지 빌드 캐시를 이용합니다.
Dockerfile 최적화
- Ubuntu에 python을 설치하고 app.py 파일을 복사해서 실행하는 Dockerfile을 작성
FROM ubuntu:20.04 COPY app.py /app RUN apt-get update && apt-get -y install python python-pip RUN pip install -r requirements.txt CMD python /app/app.py - Dockerfile을 빌드할 때 RUN, ADD, COPY 이 명령어들은 각각의 레이어를 생성하고 CMD, LABEL, ENV, EXPOSE는 레이어를 생성하지 않음
- RUN 명령어들은 하나로 합칠 수 있다면 하나로 합치는게 좋습니다.
- 기반 이미지를 사용할 때 alpine 버전을 사용하면 용량이 작기 때문에 성능 향상에 도움이 됩니다.
- 기반 이미지에 개발 환경이 설치된 이미지를 활용하면 빌드 성능 향상에 도움이 됩니다.
FROM python:3.9.2-alpine COPY app.py /app RUN apt-get update && apt-get -y install python-pip RUN pip install -r requirements.txt CMD python /app/app.py - 빌드 캐시는 수정된 코드 이전까지만 적용되므로 변경될 가능성이 낮은 옵션을 상단에 배치해야 합니다.
FROM python:3.9.2-alpine
RUN apt-get update && apt-get -y install python-pip
RUN pip install -r requirements.txt
COPY app.py /app
CMD python /app/app.py
8) 다양한 방법의 Dockerfile 작성
ADD 명령어의 자동 압축 해제 기능 활용
-
압축 파일 가져오기
sudo apt install git
git clone https://github.com/brayanlee/webapp.git
-
압축 파일이 있는 곳으로 프롬프트를 이동
cd webapp -
ls 명령으로 압축 파일이 있는지 확인

-
Dockerfile이 저장될 디렉토리를 생성
mkdir dockerfiles -
Dockerfile 생성하고 작성
nano dockerfiles/DockerfileFROM ubuntu:latest RUN apt-get update && apt-get -y install apache2 vim curl ADD webapp.tar.gz /var/www/html WORKDIR /var/www/html EXPOSE 80 CMD /usr/sbin/apachectl -D FOREGROUND -
이미지 빌드
docker build -t webapp:8.0 -f ./dockerfiles/Dockerfile . -
컨테이너 생성
docker run -dit -p 8201:80 --name webapp8 webapp:8.0 -
압축된 파일이 해제되었는지 확인
docker exec -it webapp8 /bin/bash
ls
- 소스 파일을 이미지에 복사하고자 하는 경우 파일 단위로 복사하는 것은 자원의 낭비이므로 디렉토리 전체를 복사하던가 압축된 파일의 형태로 복사하는 것이 효율적
- Dockerfile의 경로가 현재 디렉토리가 아니거나 현재 디렉토리에 있더라도 Dockerfile 이라는 이름이 아닌 경우는 -f 옵션을 이용해서 파일 경로를 설정해 주어야 합니다.
- Ubuntu Linux를 기본 이미지로 해서 패키지를 설치한 경우 용량을 축소하고자 하는 경우에는 RUN 명령에서 apt-get clean(설치에 사용한 패키지 라이브러리, 임시 파일, 오래된 파일을 삭제), apt-get autoremove(다른 패키지들의 종속성을 충족시키기 위해 자동으로 설치된 패키지를 삭제), rm -rfv(apt 와 관련된 캐시를 삭제) 명령을 수행해서 불필요한 패키지를 제거해주면 됩니다.
-
이전에 사용한 도커 파일을 수정(nano dockerfiles/Dockerfile)
FROM ubuntu:latest RUN apt-get update && apt-get -y install apache2 vim curl && apt-get clean -y && apt-get autoremove -y && rm -rfv /var/lib/apt/lists/* /tmp/* /var/tmp/* ADD webapp.tar.gz /var/www/html WORKDIR /var/www/html EXPOSE 80 CMD /usr/sbin/apachectl -D FOREGROUND -
이미지 빌드
docker build -t webapp:9.0 -f ./dockerfiles/Dockerfile . -
이미지 크기 확인
docker images
