아래 글에 'idlegame.15pluto.co.kr'이라고 나오는건 전부 자신의 url을 넣으면 됩니다.
'/home/ubuntu/webHome' 이건 php의 webhome를 넣어야 합니다.
https외부 접근을 위해서 443포트 열기
sudo ufw allow 443/tcp
sudo ufw reload
sudo ufw status
만약 Status : inactive가 되어있을때는
sudo ufw enable
sudo ufw allow 22/tcp
sudo ufw allow 80/tcp
sudo ufw allow 443/tcp
sudo ufw reload
sudo ufw status
OpenSSL 및 Apache 설치
먼저, 서버에 OpenSSL과 Apache를 설치합니다:
sudo apt update
sudo apt install -y openssl apache2
SSL 인증서 및 키 생성
비밀 키와 인증서 서명 요청(CSR)을 생성합니다:
sudo openssl genrsa -des3 -out server.key 2048
sudo openssl req -new -key server.key -out server.csr
비밀 키에서 패스프레이즈 제거
생성된 비밀 키는 패스프레이즈로 암호화되어 있습니다. 이를 제거하려면:
sudo cp server.key server.key.org
sudo openssl rsa -in server.key.org -out server.key
자체 서명된 인증서 생성
비밀 키와 CSR을 사용하여 자체 서명된 인증서를 생성합니다:
sudo openssl x509 -req -days 365 -in server.csr -signkey server.key -out server.crtApache에 SSL 설정 적용
생성된 인증서와 키를 Apache 설정에 추가합니다:
sudo cp server.crt /etc/ssl/certs/
sudo cp server.key /etc/ssl/private/
Apache SSL 모듈을 활성화하고 기본 SSL 설정 파일을 수정합니다:
sudo a2enmod ssl
sudo vi /etc/apache2/sites-available/default-ssl.conf
default-ssl.conf 파일에서 다음 부분을 수정합니다:
d를 연타 해서 다 삭제 하고 그냥 바꾸세요.
<VirtualHost _default_:443>
   ServerAdmin webmaster@localhost
   ServerName idlegame.15pluto.co.kr

   DocumentRoot /home/ubuntu/webHome

   SSLEngine on
   SSLCertificateFile /etc/ssl/certs/server.crt
   SSLCertificateKeyFile /etc/ssl/private/server.key

   <FilesMatch "\.(cgi|shtml|phtml|php)$">
           SSLOptions +StdEnvVars
   </FilesMatch>
   <Directory /usr/lib/cgi-bin>
           SSLOptions +StdEnvVars
   </Directory>

   BrowserMatch "MSIE [2-6]" \
           nokeepalive ssl-unclean-shutdown \
           downgrade-1.0 force-response-1.0
   # MSIE 7 and newer should be able to use keepalive
   BrowserMatch "MSIE [17-9]" ssl-unclean-shutdown
</VirtualHost>
다른 url을 추가하고 싶을때
d를 연타 해서 다 삭제 하고 그냥 바꾸세요.
<VirtualHost _default_:443>
   ServerAdmin webmaster@localhost
   ServerName idlegame.15pluto.co.kr
   ServerAlias www.idlegame.15pluto.co.kr
   DocumentRoot /home/ubuntu/webHome

   SSLEngine on
   SSLCertificateFile /etc/ssl/certs/server.crt
   SSLCertificateKeyFile /etc/ssl/private/server.key

   <FilesMatch "\.(cgi|shtml|phtml|php)$">
           SSLOptions +StdEnvVars
   </FilesMatch>
   <Directory /usr/lib/cgi-bin>
           SSLOptions +StdEnvVars
   </Directory>

   BrowserMatch "MSIE [2-6]" \
           nokeepalive ssl-unclean-shutdown \
           downgrade-1.0 force-response-1.0
   # MSIE 7 and newer should be able to use keepalive
   BrowserMatch "MSIE [17-9]" ssl-unclean-shutdown
</VirtualHost>
ServerAlias www.idlegame.15pluto.co.kr와 같은 형식으로 추가 해주면 된다.
Apache 설정 활성화 및 재시작
SSL 사이트 설정을 활성화하고 Apache를 재시작합니다:
sudo a2ensite default-ssl
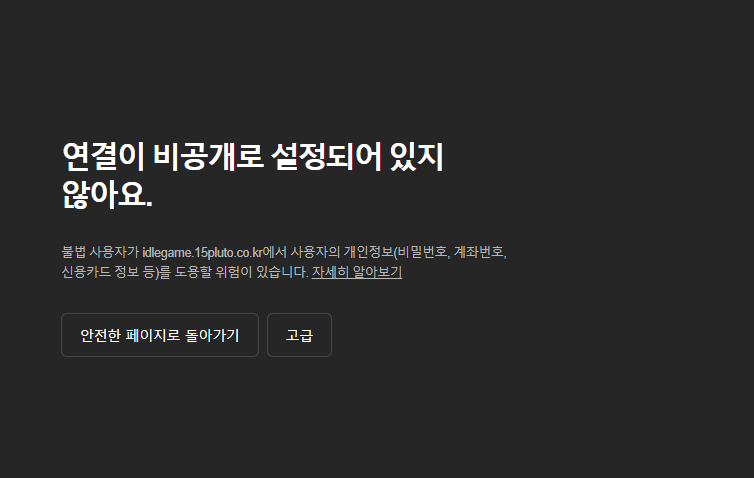
sudo systemctl restart apache2이렇게 하고 'https://idlegame.15pluto.co.kr'에 접속을 하면 다음과 같은 화면이 뜬다.
Certbot 설치
먼저 Certbot을 설치합니다:
sudo apt install -y certbot python3-certbot-apacheLet's Encrypt SSL 인증서 발급
Certbot을 사용하여 SSL 인증서를 발급받습니다:
sudo certbot --apache -d idlegame.15pluto.co.kr혹시 이부분에서 입력을 요청하면 2를 넣자.
url이 여러개 연결 되어있으면 각각 인증서를 만들어주자.
Certbot 자동 갱신 설정
Certbot이 자동으로 인증서를 갱신하도록 cron 작업을 설정합니다:
echo "0 0,12 * * * root certbot renew --quiet" | sudo tee -a /etc/crontab > /dev/nullApache 재시작
Apache를 재시작하여 변경 사항을 적용합니다:
sudo systemctl restart apache2테스트 해본 결과 아래는 필요가 없는거 같다.
Apache 설정 확인
Certbot이 Apache 설정을 올바르게 구성했는지 확인합니다. /etc/apache2/sites-available/idlegame-le-ssl.conf 파일을 확인합니다:
sudo vi /etc/apache2/sites-available/idlegame-le-ssl.conf안에 있는거 d를 연타 해서 다 삭제 하고 다음을 추가 한다.
<IfModule mod_ssl.c>
<VirtualHost *:443>
    ServerAdmin webmaster@localhost
    ServerName idlegame.15pluto.co.kr
    DocumentRoot /home/ubuntu/webHome

    SSLEngine on
    SSLCertificateFile /etc/letsencrypt/live/idlegame.15pluto.co.kr/fullchain.pem
    SSLCertificateKeyFile /etc/letsencrypt/live/idlegame.15pluto.co.kr/privkey.pem

    <FilesMatch "\.(cgi|shtml|phtml|php)$">
        SSLOptions +StdEnvVars
    </FilesMatch>
    <Directory /usr/lib/cgi-bin>
        SSLOptions +StdEnvVars
    </Directory>

    BrowserMatch "MSIE [2-6]" \
        nokeepalive ssl-unclean-shutdown \
        downgrade-1.0 force-response-1.0
    BrowserMatch "MSIE [17-9]" ssl-unclean-shutdown

    ErrorLog ${APACHE_LOG_DIR}/error.log
    CustomLog ${APACHE_LOG_DIR}/access.log combined
</VirtualHost>
</IfModule>
Apache 재시작
Apache를 재시작하여 변경 사항을 적용합니다:
sudo systemctl restart apache2만약 이렇게 했는데 접속이 안되면 오라클 인바운드 규칙에서 443포트가 열렸는지 확인 해야합니다.

백수