
내가 보려고 정리한 상태관리를 위한 공부 했다.
Redux
createStore subscribe getState dispatch
상태관리란 ?
👉🏻 프로그램이 동작하는데 필요한 데이터를 체계적으로 분리해주는 것.
Redux자체는React와 무관하다.Javascript로 된 프로젝트라면 어디서든 사용할 수 있다.Redux를React에서 사용하려면 어려운 점이 많다.- 그 어려운점을 해결해 주는 것이
React-Redux이다.
React-Rdux
connect useDispatch useSelector
이 도구를 사용하면
React와Redux를 통합할 수 있다.
그럼에도 불구하고 Redux를 이용하는데에 많은 문제점들이 있다.
- 설정할 것이 많다.
- 미들웨어를 사용할려면 설치, 설정을 해야한다.
- 반복되는 코드들이 많다.
- 불변성 유지하기에 어렵다.
이 문제점을 해결하는데에 사용하는 도구가 바로 Redux-toolkit이다.
먼저, 예제를 통해 어떻게 간편해 지는지를 알아보자.
"+" 버튼을 클릭하면 숫자가 증가하는
counter App을 만든다는 가정이다.
Redux React-Redux를 사용했을 경우.
/* App.js */

import React from “react”;
import { createStore } from “redux”;
import { Provider, useSelector, useDispatch } from “react-redux”;

function reducer(state, action) {
    if(action.type === ‘up’) {
        return { …state, value: state.value + action.step }
    }
    return state;
}

const initialState = { value: 0 }
const store = createStore(reducer, initialState);

function Counter () {
    const dispatch = useDispatch();
    const count = useSelector( state => state.value );
    return (
	<div>
	    <button onClick={()=> {
		dispatch({ type: ‘up’, step: 2 })
	    }}> + </button> 0
	</div>
    )
}

export default function App(){
    return (
	<Provider store={store}>
            <div>
	        <Counter />
	    </div>
	</Provider>
    )
}
Redux toolkit
configureStore createSlice createAsyncThunk
설치
- 새로 프로젝트를 시작할 때,
Redux toolkit이 셋팅된 개발환경이 만들어진다.
npx create-react-app 프로젝트명 --template redux

# Vite with our Redux+TS template
# (using the `degit` tool to clone and extract the template)
npx degit reduxjs/redux-templates/packages/vite-template-redux my-app

# Next.js using the `with-redux` template
npx create-next-app --example with-redux my-app- 기존 만들고 있는 프로젝트에
redux-toolkit추가할 경우
npm install @reduxjs/toolkit
yarn add @reduxjs/toolkit
다른 점 : store
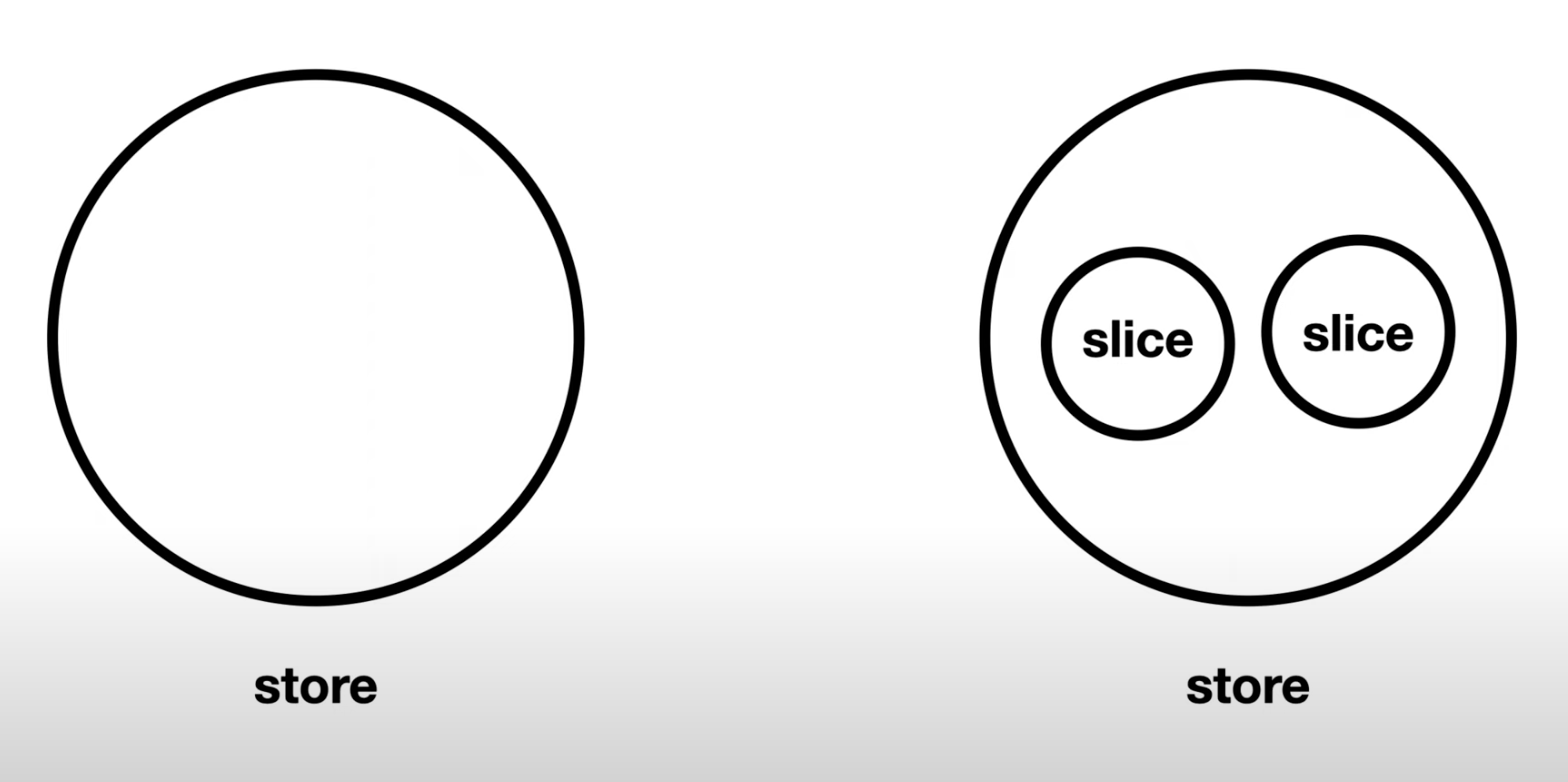
Redux를 사용한 경우
👉🏻 하나의store안에 모든store를 넣어 거대한store를 만든다.
Redux-toolkit을 사용한 경우
👉🏻 프로젝트가 커지면 기능별로 작은store를 만든다.
👉🏻 그것을slice라고 한다.
👉🏻 그 작은store들을 합쳐서Redux가 요구하는 큰store로Redux-toolkit을 만들어준다.
Redux-toolkit을 사용했을 경우
"+" 버튼을 클릭하면 숫자가 증가하는
counter App을 만든다는 가정이다.
/* App.js */

import React from “react”;
import { createStore } from “redux”;
import { Provider, useSelector, useDispatch } from “react-redux”;
import { createSlice, configureStore } from “@reduxjs/toolkit”;

const counterSlice = createSlice({
    name: ‘counter’,
    initialState: { value: 0 },
    reducers: {
	up: (state, action)=> {
	    // state.value = state.value + action.step;
	    state.value = state.value + action.payload;
	}
});

const store = configureStore({
    reducer: {
		counter: counterSlice.reducer	// counter에 대한 reducer
    }
});

function Counter () {
    const dispatch = useDispatch();
    const count = useSelector( state => state.counter.value );
    return (
      <div>
          <button onClick={()=> {
              // dispatch({ type: ‘counter/up’, step: 2 })
              dispatch(counterSlice.actions.up(2))
          }}> + </button> 0
      </div>
    )
}

export default function App() {
    return (
      <Provider store={store}>
        <div>
        	<Counter />
        </div>
      </Provider>
    )
}-
slice: [createSlice]slice를import한다.slice를 만든다. (createSlice({}))- 이
slice는counterSlice라고 변수명을 지어줬다.
const counterSlice = createSlice({}) - slice는 필요한 객체들이 있다.
- slice의 이름 : “counter”,
- slice의 초기값 : initialState,
- slice의 reducers ( 복수형 ⭐️ )
type별로 함수를 정해준다.Redux reducer는action.type에 따라switch또는if문으로 해줬지만,Redux-toolkit의reducer는type만 적어준다.
up: (state, action) => { // .. 함수 실행 }
Redux reducer의 내부함수에선 불변성을 지키기 위해 복제를 해서…기존값을 가져왔지만,Redux-toolkit의 내부함수는 바꿔주고 싶은 값을 간결하게 바꿔줄 수 있다.- 그럼
upType일 때 처리해야되는reducer를 만들었다. - 이렇게 만든
slice는 하나의 작은store가 된다. - 이런
slice들을 여러개 만들어 파일을 만들어 관리하면된다.
-
store: [configureStore({})]- 작은
slice들을 모아store를 만들 때configureStore를 사용한다. - 필수 적으로 들어가는 것은
reducer이다. ( 복수형 ❌ ) - 각 각의
slice들의reducer가 들어간다.
ex)counterSlice의reducers의type(up, down, set 등..)들을 하나로 합쳐 하나의reducer를 자동으로 만들어주는 것이다. - 그렇게 만들어진것이 하나의 거대한
store이다.
const store = configureStore({})
- 작은
-
<Provider></Provider>:store를 전달 해주기 위한 태그
-
useSelector: 전달받은store에서 정보들을 사용하기 위한hookstate를console.log()로 출력했을 시,
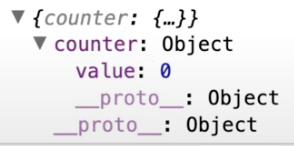
- 이
counter는store의reducer의 이름이다. state=>state.value 👉🏻 state=>state.counter.value- 화면에 초기값인
“0”이 표시되는 것을 확인할 수 있다.
-
dispatch()- 이벤트(클릭)을 발생했을 때, 숫자가 증가한다.
type은slice에 해당하는name을 적고,“/“한 후? 원하는reducers의 를 적어준다.
{ type: slice의 name/원하는 reducers, step: 2 ( 2씩 증가 ) }- But, 이 방법 보다 좀 더 간단하고
“step”이라는 명칭을 사용하지 않는 방법이 있다. reducers함수들을 참고해서 자동으로action을 만들어내는actionCreate를 만들어준다.
dispatch(counterSlice.actions.up(2))( actions 복수형⭐️ )- 그럼
Slice에“up”의action이 어떻게 찍힐 까 ?
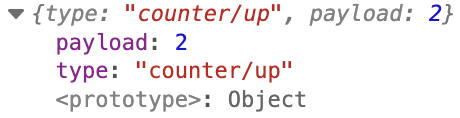
actions를 하고.up(2)을 하게 되면payload라는 이름의 약속된 값이 생긴다.Slice의up함수를 그럼 수정해줘야된다.
state.value = state.value + action.payload;
파일 분리
- 한 파일안에 모두 다 때려박지 않고, 분리를 한다.
App
import react from “react”;
import { Provider, useSelector, useDispatch } from ‘react-redux’;
import store from ‘./store’;
import { up } from ‘./slice/counterSlice’;

function Counte() {
    const dispatch = useDispatch();
    const count = useSelector(state => {
	return state.counter.value
    });

    return (
	<div>
	    <button onClick={() => {
	        dispatch(up(2))
	    }}>+</button> { count }
	</div>
    );
}

export default function App() {
    return (
	<Provider store={store}>
	    <div>
		<Counter />
	    </div>
	</Provider>
    );
};
Store
/* store.js */

import { configureStore } from ‘@reduxjs/toolkit’;
import counterSlice from ‘./counterSlice’;

const store = configureStore({
    reducer: {
	counter: couterSlice.reducer
    }
});

export default store;
Slice
/* slice/counterSlice.js */

import { createSlice } from ‘@reduxjs/toolkit’;

const counterSlice = createSlice({
    name: ‘counter’,
    initialState: { value: 0 },
    reducers : {
	up: (state, action) => {
	    state.value = state.value + action.payload;

	}
    }
});

export default counterSlice;
// 간결하게 사용하기 위해서 구조분해할당으로 내보낸다.
export const { up } = counterSlice.actions;
어깨빵으로 부딪혀보는 개발끄적이는 양씨 인간