로컬, 개발, 운영 환경에 맞게 프로파일 분리
- 개발환경
- local(로컬 개발환경) : 각 개발자 PC에서 개발 및 테스트 환경 설정
- dev(서버 개발환경) : 개발자들이 만든 코드를 통합하여 테스트 할 수 있는 서버 환경
- production(운영 환경) : 실제 서비스를 운영하는 환경
-
개발환경에 맞게 프로퍼티 파일 준비
application.properties
application-dev.properties
application-prod.properties -
적용할 프로퍼티 지정
- application.properties 파일에 활성 프로파일을 dev로 지정
spring.profiles.active=dev- 실행할 때 active 프로퍼티 지정
java -jar  XXX.jar                              // application.properties 적용됨
java -jar -Dspring.profiles.active=dev XXX.jar // application-dev.properties 적용됨- .gitignore에 *.properties 추가
외부 경로의 리소스(업로드폴더) 접근
import java.util.concurrent.TimeUnit;
import org.springframework.http.CacheControl;
import org.springframework.web.servlet.config.annotation.ResourceHandlerRegistry;
import org.springframework.web.servlet.config.annotation.WebMvcConfigurer;

@Configuration
public class ResourceConfiguration implements WebMvcConfigurer {

	@Value("${file.uploadpath}")
	String uploadpath;

    @Override
    public void addResourceHandlers(final ResourceHandlerRegistry registry) {

        registry.addResourceHandler("/img/**")
        .addResourceLocations("file://" + uploadpath + "/")

        // 접근 파일 캐싱 시간
	.setCacheControl(CacheControl.maxAge(1, TimeUnit.MINUTES));
    }
}
log4jdbc 설정
- log4jdbc 의존성 추가
	<!-- log4jdbc -->
   <dependency>
		<groupId>org.bgee.log4jdbc-log4j2</groupId>
		<artifactId>log4jdbc-log4j2-jdbc4.1</artifactId>
		<version>1.16</version>
</dependency>- 데이터소스 driver-class-name과 url 수정
application.properties 파일 수정
- 변경전
spring.datasource.driver-class-name=oracle.jdbc.OracleDriver
spring.datasource.url=jdbc:oracle:thin:@localhost:1521:xe- 변경후
spring.datasource.driver-class-name=net.sf.log4jdbc.sql.jdbcapi.DriverSpy
spring.datasource.url=jdbc:log4jdbc:oracle:thin:@localhost:1521:xe- log4jdbc.log4j2.properties 파일 생성
- src/main/resources 폴더에 파일 생성하고 아래의 내용 작성
log4jdbc.spylogdelegator.name=net.sf.log4jdbc.log.slf4j.Slf4jSpyLogDelegator- log레벨 설정
application.properties 파일 수정
logging.level.jdbc.sqlonly=OFF
logging.level.jdbc.sqltiming=DEBUG
logging.level.jdbc.audit=OFF
logging.level.jdbc.resultset=OFF
logging.level.jdbc.resultsettable=DEBUG
logging.level.jdbc.connection=OFF
- 테스트 매퍼
import java.util.Map;
import org.apache.ibatis.annotations.Select;

public interface TestMapper {
	@Select("select ${col1}, #{col2} as col2 from dual")
	public Map<String,Object> test(String col1, String col2);
}- junit 테스트
import static org.junit.jupiter.api.Assertions.assertEquals;
import java.util.Map;
import org.junit.jupiter.api.Test;
import org.springframework.beans.factory.annotation.Autowired;
import org.springframework.boot.test.context.SpringBootTest;

import com.yedam.app.emp.mapper.TestMapper;

@SpringBootTest
public class TestMapperClient {

	@Autowired TestMapper testMapper;
	@Test
	public void tes() {
		String col = "scott";
		Map<String, Object> map = testMapper.test("sysdate", col);
		assertEquals(col, (String)map.get("col"));
	}
}
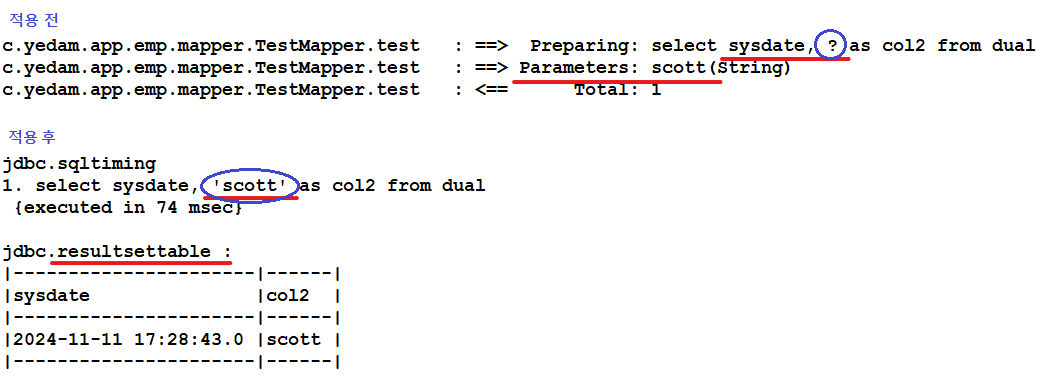
- 적용전과 후를 비교
security 설정
import org.springframework.context.annotation.Bean;
import org.springframework.context.annotation.Configuration;
import org.springframework.security.config.annotation.web.builders.HttpSecurity;
import org.springframework.security.config.annotation.web.configuration.EnableWebSecurity;
import org.springframework.security.config.annotation.web.configuration.WebSecurityCustomizer;
import org.springframework.security.crypto.bcrypt.BCryptPasswordEncoder;
import org.springframework.security.crypto.password.PasswordEncoder;
import org.springframework.security.web.SecurityFilterChain;

@Configuration
@EnableWebSecurity
public class SecurityConfig {

	@Bean
	public PasswordEncoder bcryptPassword() {
		return new BCryptPasswordEncoder();
	}

	@Bean
	public SecurityFilterChain filterChain(HttpSecurity http) throws Exception {
		http.authorizeHttpRequests((requests) -> requests.antMatchers("/home", "/").permitAll().antMatchers("/admin/**")
				.hasAuthority("ROLE_ADMIN")
				//.anyRequest().authenticated()
				.anyRequest().permitAll()
				)
				.formLogin(login -> login.defaultSuccessUrl("/home").loginPage("/login").usernameParameter("userid")
						.permitAll())
				.logout().logoutUrl("/logout").logoutSuccessUrl("/home").permitAll()
		// .and()
		// .csrf().disable();
		;
		return http.build();
	}


	@Bean
	public WebSecurityCustomizer webSecurityCustomizer() {
		return (web) -> web.ignoring().antMatchers("/images/**", "/js/**", "/css/**");
	}
}
프로퍼티 파일 암호화
1. 라이브러리 추가
<dependency>
        <groupId>com.github.ulisesbocchio</groupId>
        <artifactId>jasypt-spring-boot-starter</artifactId>
        <version>3.0.5</version>
</dependency>
2. 빈등록
@Configuration
public class JasyptConfig {

    @Bean(name = "jasyptStringEncryptor")   //	복호화할 때 사용할 빈
    public StringEncryptor stringEncryptor() {
	String jasyptkey = System.getenv("jasyptkey");
        final String key = jasyptkey;
        PooledPBEStringEncryptor encryptor = new PooledPBEStringEncryptor();
        SimpleStringPBEConfig config = new SimpleStringPBEConfig();
        config.setPassword(key);
        config.setAlgorithm("PBEWithMD5AndDES");
        config.setPoolSize("1");
        encryptor.setConfig(config);
        return encryptor;
    }
}
3. 암호화
public class JasyptTest {

  @Test
  public void testpass(){
    String encodedPass = encPass("db");
    System.out.println(encodedPass);
  }

  public String encPass(String rawPass){
    String jasyptkey = System.getenv("jasyptkey");     //암호화할 때 사용할 키는 실행할 때 외부에서 주입
    StandardPBEStringEncryptor standardPBEStringEncryptor = new StandardPBEStringEncryptor();
    standardPBEStringEncryptor.setAlgorithm("PBEWithMD5AndDES");
    standardPBEStringEncryptor.setPassword(jasyptkey);
    String encodedPass = standardPBEStringEncryptor.encrypt(rawPass);
    return encodedPass;
  }
}
4. properties 파일에 패스워드 암호화된 값으로 변경
jasypt.encryptor.bean=jasyptStringEncryptor
  db.username=ENC(X3XXXX==)
  db.password=ENC(eGXXXX==)
5. run configuration에서 enviroment 추가
name: jasyptkey value: 사용할 키
대구 SW개발 & DB전문교육기관