이미지 업로드 프로세스 이해
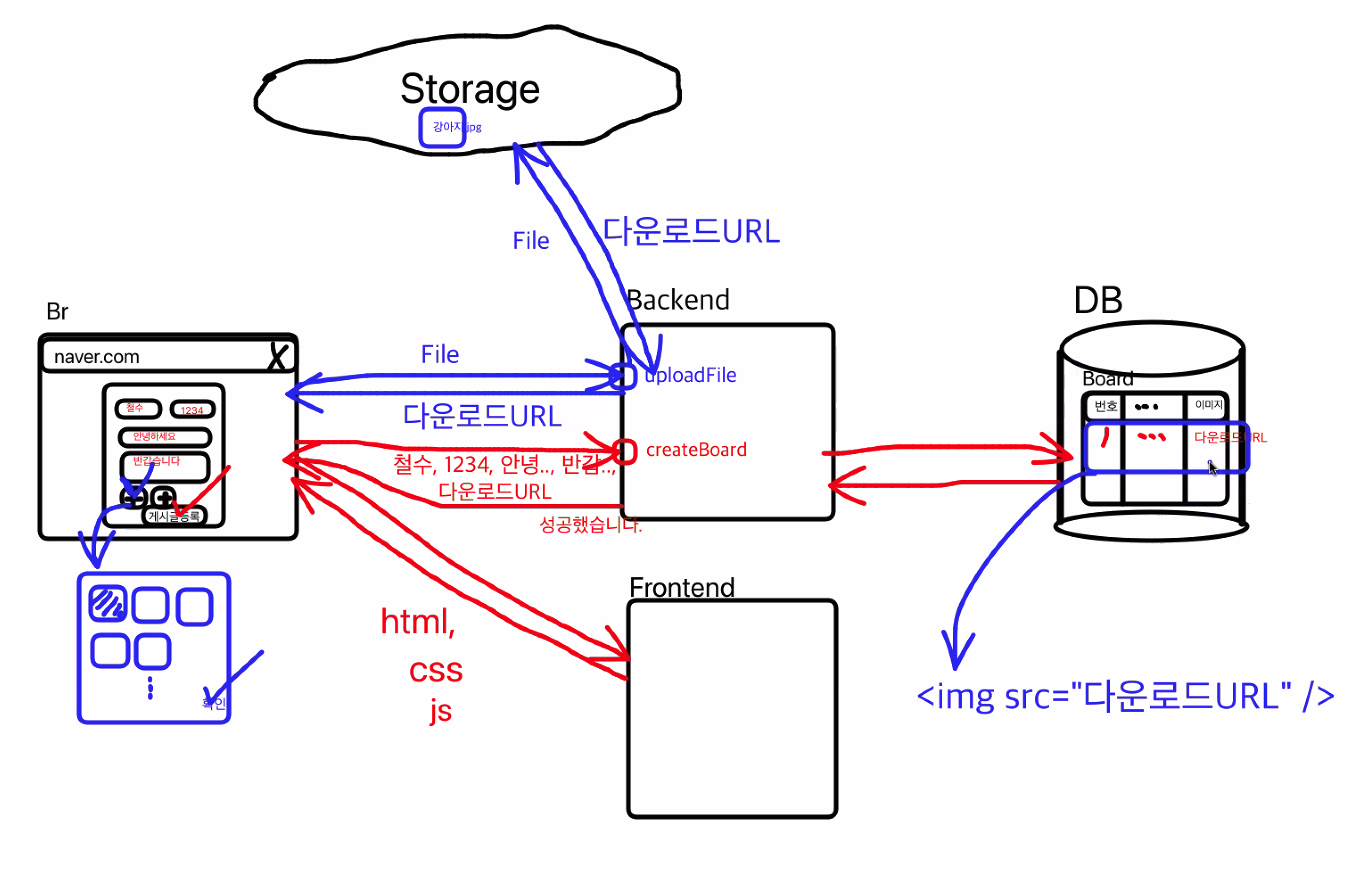
uploadFile이라는 api가 존재할 때, 파일을 선택하고 uploadFile을 요청하게 될 경우, backend에서 storage로 파일을 전송하게 된다.
이미지를 저장할 때 실제 이미지는 DB에 저장되지 않고 storage에 저장 된다. storage에 저장될 때 backend로 이미지를 다운받을 수 있는 주소를 넘겨주게 되고, 이 주소를 다시 front에 전달하게 된다.
그 주소를 가지고 게시글 등록과 같은 API 요청 시, image에 대한 주소를 보낼 수 있게 되는 것이고 이 정보를 DB에 저장하게 된다.
storage?
storage 또한 컴퓨터이며, 여러 컴퓨터들을 연결시켜 놓은 큰 용량을 담을 수 있는 DB이다.
storage는 AWS, GCP, AZURE와 같은 클라우드 안에 존재한다.
이미지 업로드 해보기
-
아폴로 업로드 라이브러리 설치와 셋팅
yarn add apollo-upload-client
yarn add --dev @types/apollo-upload-client -
app.tsx에서 사용을 위한 셋팅
// class 폴더의 app.tsx파일
//import 부분
import {ApolloLink} from "@apollo/client"
import {createUploadLink} from "apollo-upload-client"

//세팅 함수 부분
const uplodLink = createUploadLink({
		uri : "백엔드 주소"
	})
const client = new ApolloClient({
		link : ApolloLink.from([uplodLink as inknown as ApolloLink]),
		cache : new inMemoryCache(),
})- 파일 업로드 하기
//index.tsx 파일

// 이미지 업로드 api 사용을 위한 쿼리 작성
const UPLOAD_FILE = gql`
	mutation uploadFile($file:Upload!){
				uploadFile(file:$file){
					url
		}
	}
`

const ImageUPloadPage = ()=>{
	const [uploadFile] = useMutation(UPLOAD_FILE)

	// 이미지 업로드 함수
	const onchangeFile = async(e:ChangeEvent<HTMLInputElement>)=>{
		//files는 있을수도 있고,없을수도 있기 때문에 옵셔널 체이닝을 사용해주셔야 합니다.
		const Imagefile = e.target.files?.[0]
		try{
				// 우리가 선택한 사진을 Imagefile라는 변수에 담았으니 해당 변수를 variables에 넣어서 보내주면 됩니다.
				await uploadFile({ variables : {file : Imagefile} })
				console.log(result.data?.uploadFile.url)
			} catch(error){
					alert(error.message)
			}
		}

	return <input type="file" onChange={onChangeFile}/>
}❗️해당 url의 이미지를 보고싶다면, 저장해둔 스토리지 주소의 뒤에 이미지 url을 적어주시면 된다
구글컴퓨터 주소 : http://storage.goolgeapis

차곡차곡 쌓는 몌으니 개발노트