진도
- react native lifecycle
- typescript -> #2
- thread
- bridge
- Component -> #2, #3
- routing, navigation -> #7
- network -> #4
- redux -> #8 mobx, coil(aws), context -> 구조파악
- apply webrtc
02. ReactNative 기본 다지기
ReactNative Framework의 작동 원리
Bridge
브라우저에서 JS engine을 떼어내어 JS code로 구현된 View class를 Native framework의View class로 호출하여 연결
React 동작 원리
DOM과 랜더링
DHTML(동적 HTML) 방식은 객체 지향 언어의 상속 관계로 설계한 "DOM(문서 객체 모델)타입 자바스크립트 객체"를 생성하여 동작
- DOM 클래스의 인스턴스? DOM 객체
- HTMLDivElement 클래스의 인스턴스인
<div>,
HTMLHeadingElement 클래스의 인스턴스인<h1>
- HTMLDivElement 클래스의 인스턴스인
- 랜더링? 웹 브라우저가 HTML을 파싱하여 자바스크립트 DOM 구조로 만드는 것
Physical DOM vs Virtual DOM
React에는 독특하게 Physical(물리) DOM 구조와 Virtual(가상) DOM 구조를 사용
- Physical DOM :
웹 브라우저에서 js code가 생성한 실제 DOM 구조 - Virtual DOM :
react code가 생성한 js 객체 구조- renderer : react는 특정 시점에서 virtual DOM 구조를 physical DOM 구조로 만든다
react framework vs react-native framework
- react :
virtual DOM 구조를react-dom(*DOM Renderer)이라는 renderer 패키지를 사용하여 physical DOM 구조로 랜더링- App Component 랜더링
- react-native :
react-native(*Native Renderer)라는 renderer 패키지를 사용하여 랜더링- react 요소를
Android framework나iOS UIKit framework의 화면 UI 객체로 바꿔주는 역할 수행
- react 요소를
Bridge 방식 랜더링
- react-native의 랜더링은 네이티브 모듈 쪽에서 랜더링 진행
- android와 ios 디렉터리에 있는 java나 objective-c로 구현한 네이티브 모듈
- JavaScriptCore 엔진은 Android에서는 JNI(Java Native Interface), iOS에서는 FFI(Foreign Function Interface) 방식으로 연결되어 동작
- <-> react에서는 React.render 랜더러의 동작을 코드로 확인할 수 있지만, react-native에서는 네이티브 랜더러의 모습을 확인할 수 없다.
RN에서의 Thread
RN app을 설치 후 실행하면 Thread 동작 어떻게 될까?
- RN의 Native module이 실행되면서 Native를 담당하는
UI Thread와 App.tsx와 같은 JS code를 실행하는JS engine Thread2개가 동시에 동작- 이 두 Thread는 message queue 방식으로 서로 랜더링과 관련된 데이터를 주고 받음
- 터치 이벤트가 발생하면 UI Thread는 이 내용을 JS Thread에 event 형태로 넘김
react-native 전용 패키지에는 항상 JS Thread에서 동작하는 쪽과 UI Thread에서 동작하는 쪽이 따로 있다. 때문에 두 패키지를 모두 설치해야 정상 동작
React.createElement API
- React.createElement -> 가상 DOM 객체 생성
- document.createElement -> 물리 DOM 객체 생성
react-native framwork에서 가상 DOM 객체 생성
const textElement = React.createElement(Text, null, 'Hello World')react-native framework에서 가상 DOM 객체를 물리 DOM 객체로 변환 하는 방법
import ReactDOM from 'react-dom'

const pElement = React.createElement('p', null, 'Hello World')
ReactDOM.render(pElement, document.body)
react-native renderer가 가상 DOM 객체를 native로 넘기는 방법
export default function App() {
  const textElement = React.createElement(Text, null, 'Hello World')
  return textElement
}
react-native-cli는 네이티브 모듈에서 동작하는 js engine이 가상 DOM 객체를 넘겨주는 App의 존재를 알 수 있도록 (1) index.js 파일 생성, (2) 자바 파일 생성 필요
// (1) index.js
import {AppRegistry} from 'react-native'
import App from './App'
import {name as appName} from './app.json'

AppRegistry.registerComponent(appName, () => App)
// (2) android/app/src/main/java/com/win/MainApplication.java
...
@Override
protected String getJSMainModuleName() {
return "index"
};
...Commands
npm i: package.json 파일에 명시된 패키지를 node_modules 디렉터리에 설치. 설치한 패키지는 android 나 ios 디렉터리의 네이티브 모듈에서 동작하는 파일을 가짐
[Android commands]
npm run android: android app build command- ts code와는 상관없이 android directory만을 대상으로 java로 작성한 native app 부분을 빌드하여 에뮬레이터에 설치
npm start: 메트로 서버 실행 명령 (메트로 서버? 설치된 앱이 처음 구동될 때 앱이 수신해야 할 ES5 js code로 컴파일된 ts code 번들을 제공)./gradlew installDebug: android build.gradle(app 수준) 내용을 참조하여 빌드 (실행 파일 생성)
[iOS commands]
npm run ios: Xcode의 빌드 명령 실행, 빌드한 앱을 시뮬레이터에 설치하고 실행npm start: 메트로 서버에서 ts code를 컴파일한 js code 번들을 내려받아 실행npx pod-install: ios directory의 Podfile 실행 명령. 필요한 패키지를 내려받아 로컬 컴퓨터에 설치
(<-> android는 gradle이 동일한 역할 수행하기에 이 과정 필요 X)npx react-native init: 프로젝트를 생성하면서npx pod-install명령도 자동으로 실행
[프로젝트 초기화 commands]
./gradlew clean:./gradlew installDebug명령으로 생성된 임시 파일을 삭제. 원격지 저장소에서 내려받은 패키지도 함께 삭제rm -r force .gradle (window)
rm -rf .gradle (mac): 빌드한 앱 삭제xcodebuild clean: Xcode가 생성한 임시 파일 삭제pod deintegrate: npx pod-install 명령으로 내려받은 패키지 삭제
JSX syntax
JSX : JavaScript + XML
XML에 JS를 결합할 용도로 만든 구문
- 확장자 :
.tsx - JSX 구문을 사용하기 위해
import React from 'react'필요
Babel 구조를 통해 JS를 확장하여 React.createElement 코드를 더욱 간결하게 사용 가능
- 'JS를 확장한다' = 표준 ESNext js나 ts 문법에는 JSX구문이 없다는 뜻
- ESNext js 컴파일러인
Babel이 플러그인 구조로 동작
-> JSX 구문이 표준 js 문법에 포함된 것처럼 동작 가능해짐- Babel 사용 용도 : 주석 제거, 코드 압축
JavaScript의 3가지 종류
- ~ES5
- ESNext (=ES6~)
- 하위 호환 가능 -> Babel transpiler를 거쳐 ES5 코드로 변환
- TypeScript
- ESNext 문법 대부분 지원
- (1) destructuring assignment, (2) arrow function, (3) class, (4) module, (5) generator, (6) promise and async/await syntax
- 하위 호환 가능 -> TSC(TypeScript compiler) transpiler를 거쳐 ES5 코드로 변환
[참고]
- transpiler : source code -> source code
- compiler : source code -> binary code
- ESNext 문법 대부분 지원
[출처 : https://greendreamtrre.tistory.com/718]
React.createElement와 JSX syntax와의 관계
Component는 여러개의 property와 하나 이상의 자식 Component를 가질 수 있다.
- Component ex. Text, View...
JSX syntax에서 중괄호'{}'의 의미
XML에 js code를 삽입 가능
const hello = 'Hello World'
<Text>{hello}</Text>
JSX syntax의 js code는 반드시 return 키워드 없이 값을 반환 -> ESNext js에서의 '표현식'
JSX 조건 분기문 사용 방법
JSX 밖에서 if문
const isLoading = true
if (isLoading) {
  return (
    <SafeAreaView>
    ...
    </SafeAreaView>
  )
}
return (
  <SafeAreaView>
  ...
  </SafeAreaView>
)
단축 평가 조건문 (short circuit evaluation)
JSX parser는 undefined 혹은 null인 결과를 무시한다.
const isLoading = true
return (
  <SafeAreaView>
    // isLoading ? <Text>...</Text> : undefined
    {isLoading && <Text>...</Text>}

    // !isLoading ? <Text>...</Text> : undefined
    {!isLoading && <Text>...</Text>}
  </SafeAreaView>
)
변수에 JSX문을 담기
const isLoading = true
const children = isLoading ? (
  <Text>...</Text>
) : (
  <Text>Hello JSX world</Text>
)

return <SafeAreaView>{children}</SafeAreaView>
배열과 JSX Syntax
배열에 여러개의 JSX문을 담기
*부모없이 여러 개의 XML요소를 만들 수 없다.
const children = [
  <Text>...</Text>,
  <Text>...</Text>,
  <Text>...</Text>
]

// 부모 없이 홀로 작성 불가
// return children
// return {children}

// 반드시 부모 컴포넌트의 자식 컴포넌트 형태로 작성
return <SafeAreaView>{children}</SafeAreaView>
데이터 배열을 컴포넌트 배열로 만들기
const children = [1, 2, 3].map((i) => <Text>Hello {i}</Text>)조금씩 다른 100개의 컴포넌트 배열 만들기
const children = new Array(100) // undefined로 채워진 배열 생성
  .fill(null) // undefined로는 map 사용 불가하여 null로 배열 채우기
  .map((notUsed, index) => <Text>Hello {index}</Text>)
컴포넌트와 속성 이해하기
Components
Lifecycle
- Mounting
: being created and inserted into the DOM- constructor()
- DO
- Assign the initial state to this.state directly
- If not using class properties syntax — prepare all class fields and bind functions that will be passed as callbacks
- DON'T
- Cause any side effects (AJAX calls, subscriptions, etc.)
- Call setState()
- Copy props into state (only use this pattern if you intentionally want to ignore prop updates)
- DO
- static getDerivedStateFromProps()
- render()
- DO
- Return a valid Javascript value
- The render() function should be pure
- DON'T
- DO
- componentDidMount()
- constructor()
- Updating
: changes to props or state, when a component is re-rendered- static getDerivedStateFromProps()
- shouldComponentUpdate()
- render()
- getSnapshotBeforeUpdate() // ReactNative에서는 쓸모없음
- componentDidUpdate()
- Unmounting
: when a component is removed from the DOM- componentWillUnmount()
- Error handling
: when there is an error during rendering, in a lifecycle method, or in the constructor of any child component- static getDerivedStateFromError()
- componentDidCatch()

[출처 : https://www.netguru.com/blog/react-native-lifecycle]
Flexbox
- flexDirection
- default : column (top to bottom)
- alignItems
- default : stretch
- justifyContent
- default : flex-start
- flexShrink
- default : 0
- flex
- parameter : only single number
04. 함수 컴포넌트와 React Hooks
React Hooks이란?
React framework는 컴포넌트라는 기법으로 가상 DOM 객체를 만들고 가상 DOM 객체에 어떤 변화가 감지되면 해당 변화만 화면에 재렌더링하여 전체 렌더링 속도를 빠르게 하는 목적을 가진 framework이다.
React Hooks의 탄생 배경이 된 클래스 컴포넌트의 문제점
용도별 Hooks functions
| 용도 | hooks | 요약 |
|---|---|---|
| 컴포넌트 데이터 관리 | useMemo | |
| useCallback | ||
| useState | ||
| useReducer | ||
| 컴포넌트 생명주기 대응 | useEffect | 비동기로 실행(콜백 함수의 종료를 기다리지 않음) |
| useLayoutEffect | 동기로 실행(콜백 함수의 종료를 기다림) | |
| 컴포넌트 간의 정보 공유 | useContext | |
| 컴포넌트 메서드 호출 | useRef | |
| 컴포넌트 메서드 호출 | useImperativeHandle |
기본 Hooks
- useCallback
- useState
- useEffect
Custom Hooks
08. State 관리 라이브러리
app 상태 관리 라이브러리
Flux
Redux
- Flux 패턴 기반의 상태 관리 라이브러리
- 모든 상태는 하나의 store 안에, 하나의 객체 트리 구조로 저장
- 하나의 상태 트리만을 가지기에 디버깅 용이, undo/redo 기능 구현 용이
- 서버에서 가져온 상태는 serialized되거나 hydrated되어 전달되어 클라이언트에서 추가적인 코딩 없이 사용 가능
MobX
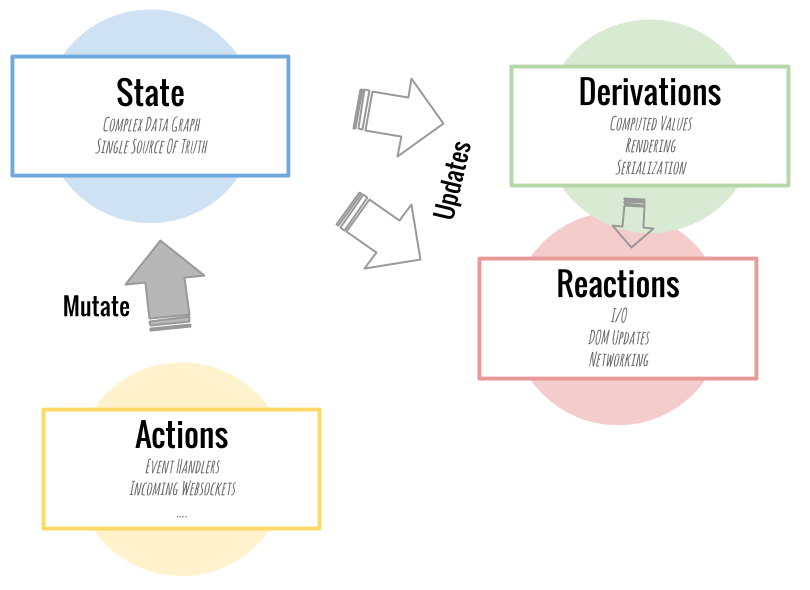
1. State :
objects, arrays, primitives, references의 그래프 형태로 어플리케이션을 구성. 이것들은 spreadsheet의 data cells이 될 것
2. Derivations :
어플리케이션으로부터 자동으로 계산되는 모든 값을 뜻함. 이 값들은 간단한 값에서부터 복잡한 시각적 html 표현까지 다양한 값이 될 수 있다. spreadsheet의 chart 개념과 비슷
3. Reactions :
Derivations와 유사한 개념. 가장 큰 차이점은 값을 생성하지 않는 함수라는 것이다. 대신 자동으로 특정 작업들을 수행시켜주고, 이는 대체로 I/O와 연관된 작업들이다. reaction은 적당한 때에 자동으로 DOM을 업데이트하게 해주고 네트워크 요청을 하도록 해준다.
4. Actions :
state를 변경하는 모든 것. 이 action들은 모두 동기적으로 처리된다.
[출처 : https://mobx.js.org/getting-started]
Coiled(AWS)
Context API
Context의 주된 용도는 다양한 레벨에 nesting된 많은 컴포넌트에게 데이터를 전달하는 것
Context를 사용하면 컴포넌트를 재사용하기 어려워지므로 꼭 필요할 때만 사용
Navigation
- react-navigation-stack
- CreateStackNavigator
: 각 화면이 전환될 수 있는 기본 틀 제공 - RouteConfigs
: CreateStackNavigator가 쭉 뻗은 도로를 제공해주었다면, RouteConfigs는 그 도로를 이리저리로 꺾고 각 화면으로 안내해주는 표지판을 세우는 작업 - StackNavigationConfig
: RouteConfig가 길안내 표지판이였다면, StackNavigationConfig는 전체 길에 대한 안내를 담당. 길을 modal로 띄울지 screen으로 띄울지 아무것도 모르고 온 사람에게 어디를 제일 처음 안내할지 같은 설정을 담당 - navigationOptions
: 이 길은 콘크리트로할지 흙길로할지 각 길들의 세부 설정. Header에 표시될 정보, Tab으로 표현 여부, 각 버튼의 색상과 같은 가장 세부적인 설정들
- CreateStackNavigator
- react-navigation-tab
- react-navigation-drawer
[출처 : https://jeffgukang.github.io/react-native-tutorial/docs/router-tutorial/react-navigation-stack/react-navigation-stack-kr.html]
https://reactnavigation.org/docs/getting-started/
references:
[책] Do it! 리액트 네이티브 앱 프로그래밍, 전예홍 저, 이지스퍼블리싱
[문서] https://reactnative.dev/docs/intro-react
