React can change how you think about the designs you look at and the apps you build.
- 리액트는 당신이 바라보는 디자인과 만들고 있는 앱에 대한 사고 방식을 바꾼다.
When you build a user interface with React, you will first break it apart into pieces called components.
- 리액트로 UI(유저 인터페이스)를 구축한다면, 먼저 '컴포넌트'라고 불리는 조각으로 UI를 나누게 될 것이다.
인터페이스(Interface)
- 프로그래밍의 전반적 개념 (TS에도 등장)
- 예) 가위바위보: 반드시 2명 이상이 필요, 누가 가위 또는 바위 또는 보를 냈는지에 따라 승부가 갈림
- 예) 신호등: 도로에서 차와 보행자를 위해 필요, 초록 불이면 건널 수 있고 노란 불이면 기다려야 하고 빨간 불이면 건널 수 없음
- 환경과 내부 구성 요소들이 상호작용하기 위한, 동작에 필요한 '규칙', '약속'
Then, you will describe the different visual states for each of your components.
- 이후, 각각의 컴포넌트를 위해 서로 다른 시각적 상태(= 리액트 state)를 묘사할 것이다.
Finally, you will connect your components together so that the data flows through them.
- 마지막으로, 이 컴포넌트들을 연결하여 데이터가 컴포넌트를 따라 (단방향으로) 흐르도록 할 것이다.
In this tutorial, we’ll guide you through the thought process of building a searchable product data table with React.
- 리액트를 사용하여 검색 가능한 상품 데이터 표를 만드는 과정을 알아보자.
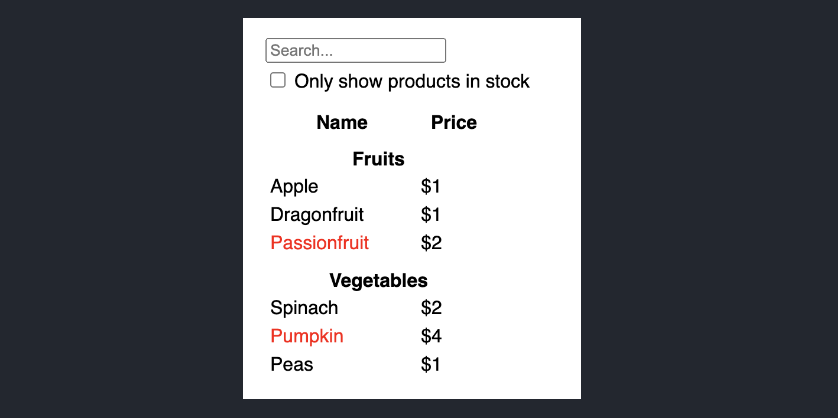
JSON 데이터:
과일/채소 배열 (카테고리, 가격, 재고 여부, 이름 포함)
[
  { category: "Fruits", price: "$1", stocked: true, name: "Apple" },
  { category: "Fruits", price: "$1", stocked: true, name: "Dragonfruit" },
  { category: "Fruits", price: "$2", stocked: false, name: "Passionfruit" },
  { category: "Vegetables", price: "$2", stocked: true, name: "Spinach" },
  { category: "Vegetables", price: "$4", stocked: false, name: "Pumpkin" },
  { category: "Vegetables", price: "$1", stocked: true, name: "Peas" }
]
디자이너가 준 UI 목업:
To implement a UI in React, you will usually follow the same five steps.
- 리액트에서 UI를 구현하려면 보통 5가지 단계를 거친다.
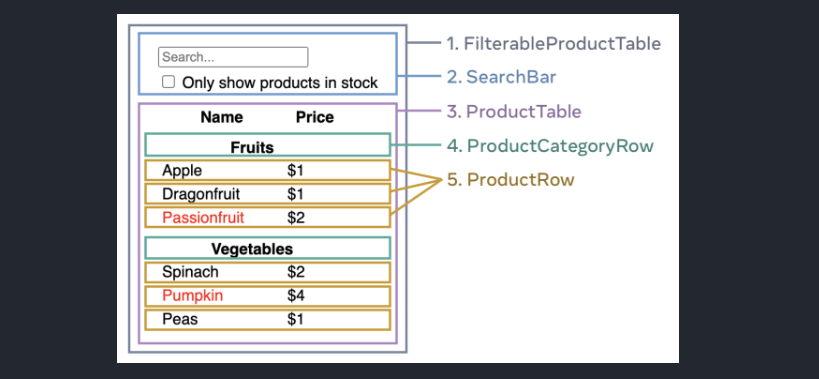
1단계: UI를 컴포넌트 위계 구조로 나누기
Start by drawing boxes around every component and subcomponent in the mockup and naming them.
- 목업에 있는 모든 컴포넌트와 서브 컴포넌트를 색깔 박스로 감싸고 (컴포넌트) 이름을 붙여보자.
If you work with a designer, they may have already named these components in their design tool. Ask them!
- 만약 디자이너가 있다면 이미 피그마 같은 곳에서 이름을 붙여놨을 수도 있다.
Depending on your background, you can think about splitting up a design into components in different ways:
- 사람에 따라 디자인을 컴포넌트로 나누는 방법이 다양할 수 있다.
Programming — use the same techniques for deciding if you should create a new function or object.
- Programming — 새 함수나 객체 단위를 만들 때 일관된 기술 쓰기
One such technique is the single responsibility principle, that is, a component should ideally only do one thing.
- 이 기술 중 하나인 SRP(단일 책임 원칙): 컴포넌트는 이상적으로 오직 하나의 일만 해야 한다
If it ends up growing, it should be decomposed into smaller subcomponents.
(이 원칙에 따르면) 나중에 컴포넌트가 커지게 된다면, 결국 작은 서브 컴포넌트로 나눠져야 할 것이다.
CSS — consider what you would make class selectors for. (However, components are a bit less granular.)
- CSS — 어디에 클래스 선택자를 붙일 수 있을지 생각해보기 (컴포넌트들은 다소 '알갱이적'(granular)이지 못한 면이 있다 -- 작은 단위로 나누기 쉽지 않다는 뜻)
Design — consider how you would organize the design’s layers.
- Design — 디자이너의 레이어(UI)를 어떻게 조합할 수 있을지 생각해보자.
If your JSON is well-structured, you’ll often find that it naturally maps to the component structure of your UI.
- 만약 JSON 데이터가 잘 구조화되어 있다면, UI 컴포넌트 구조와 자연스럽게 맵핑(매칭)될 것이다.
That’s because UI and data models often have the same information architecture—that is, the same shape.
- UI와 데이터 모델이 주로 '같은 정보 구조'(information architecture)를 갖고 있기 때문에 가능한 부분이다.
Separate your UI into components, where each component matches one piece of your data model.
- UI를 컴포넌트로 나눠서 각 컴포넌트 하나하나가 데이터 모델 하나와 매칭되도록 하자.
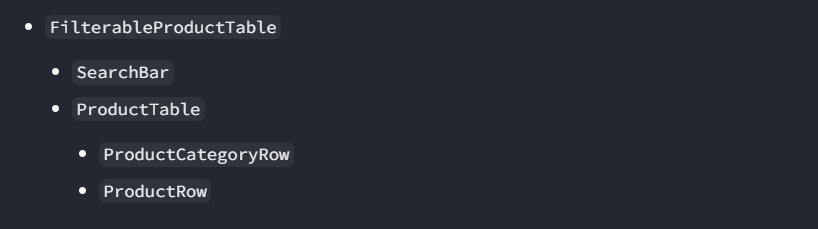
(위 내용을 바탕으로) 목업 화면을 5가지 컴포넌트로 나누면 다음과 같다.
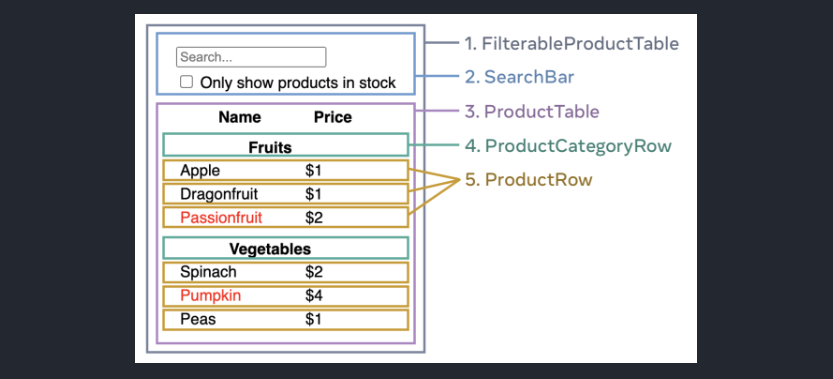
FilterableProductTable(가장 바깥쪽 회색 박스)
- 전체 앱을 감싸는 컨테이너 (contains the entire app)
SearchBar(상단 파란색 박스)
- 유저 인풋을 받는 곳 (receives the user input)
ProductTable(하단 보라색 박스)
- 유저 인풋에 따른 '필터링'(By 검색 및 체크박스 체크)된 리스트 (displays and filters the list according to the user input)
ProductCategoryRow(헤더를 가리키는 초록색 박스)
- 각 카테고리별 제목 (displays a heading for each category)
ProductRow(각 행을 가리키는 노란색 박스)
- 각각의 상품을 나타내는 행 (displays a row for each product)
If you look at ProductTable (lavender), you’ll see that the table header (containing the “Name” and “Price” labels) isn’t its own component.
ProductTable(보라색 박스)를 보면, 제목인 헤더 부분('Name', 'Price')이 따로 박스로 나뉘어져 있지 않다.
This is a matter of preference, and you could go either way.
- 이건 선호도 문제이므로 나눠도 되고 안 나눠도 되는 부분이다.
For this example, it is a part of ProductTable because it appears inside the ProductTable’s list.
- 이 예시에서는, 헤더 부분이
ProductTable리스트 내부에 나타나므로ProductTable의 일부라고 볼 수 있다.
However, if this header grows to be complex (e.g., if you add sorting), you can move it into its own ProductTableHeader component.
- 만약 헤더에 정렬 같은 게 추가되어 더 복잡해질 경우,
ProductTableHeader와 같은 컴포넌트로 분리할 수 있을 것이다.
Now that you’ve identified the components in the mockup, arrange them into a hierarchy.
- 이제 컴포넌트를 모두 나눈 목업 화면을 컴포넌트 위계 구조에 맞추어보자.
Components that appear within another component in the mockup should appear as a child in the hierarchy:
- 한 컴포넌트 안에 나타나는 또 다른 컴포넌트는 목업의 위계 구조 상에서 자식 컴포넌트(child)가 되어야 한다.
들여쓰기가 더 바깥에 있을수록 부모 컴포넌트
내부(아래)로 내려가면서, 각각 두 개씩 서로 형제 관계인 자식 컴포넌트들이 등장
2단계: 리액트에서 정적 버전(static version) 구축하기
Now that you have your component hierarchy, it’s time to implement your app.
- 이제 실제 앱을 구현해볼 차례다.
The most straightforward approach is to build a version that renders the UI from your data model without adding any interactivity… yet!
- 제일 간단한 방법은 아무 (유저) 상호 작용 없이 데이터 모델(JSON 데이터)만 가지고 UI를 렌더링하는 것이다.
It’s often easier to build the static version first and add interactivity later.
- 보통은 정적 버전을 먼저 만들고 상호 작용은 나중에 추가한다.
Building a static version requires a lot of typing and no thinking, but adding interactivity requires a lot of thinking and not a lot of typing.
- 정적 버전을 만드는 건 타이핑만 많이 하면 되지만, 상호작용 추가는 타이핑보다는 생각을 더 많이 해야 한다.
To build a static version of your app that renders your data model, you’ll want to build components that reuse other components and pass data using props.
- 데이터를 보여주는 정적 모델 앱을 만들기 위해, 재사용되는 컴포넌트를 만들고 props로 데이터를 전달하게 된다.
Props are a way of passing data from parent to child.
- Props가 바로 부모에서 자식으로 데이터를 보내기 위한 방법 중 하나이다.
State is reserved only for interactivity, that is, data that changes over time. Since this is a static version of the app, you don’t need it.
- 상태는 시간이 지나면서 변화하는 상호 작용성(interactivity)을 위해서 필요하다. 지금 만들려는 앱은 아직은 정적 버전이므로 상태가 필요 없다.
You can either build “top down” by starting with building the components higher up in the hierarchy (like FilterableProductTable) or “bottom up” by working from components lower down (like ProductRow).
- 더 위에서부터(예:
FilterableProductTable) 시작하는 "top down" 방식을 쓸 수도 있고, 밑에서부터(예:ProductRow) 시작하는 "bottom up" 방식을 쓸 수도 있다.
In simpler examples, it’s usually easier to go top-down, and on larger projects, it’s easier to go bottom-up.
- 간단한 예제에서는 top-down으로 만드는 것이 더 쉽고 큰 프로젝트에서는 bottom-up 방식이 더 간단하다.
(우리는 큰 프로젝트라 가정하고 bottom-up으로 만들어보기로 한다)
- 먼저 컴포넌트 박스 중 가장 작은 단위이자 서로 형제 컴포넌트인
ProductCategoryRow(초록색 박스)와ProductRow(노란색 박스) 컴포넌트를 만든다.
function ProductCategoryRow({ category }) {
  return (
    <tr>
      <th colSpan="2">
        {category}
      </th>
    </tr>
  );
}
function ProductRow({ product }) {
const name = product.stocked ? product.name :
<span style={{ color: 'red' }}>
{product.name}
</span>;
return (
<tr>
<td>{name}</td>
<td>{product.price}</td>
</tr>
);
}- 이 둘을 합치고 (따로 컴포넌트로 분리되지 않은) 헤더를 포함한
ProductTable(보라색 박스)을 만든다.
function ProductTable({ products }) {
  const rows = [];
  let lastCategory = null;

  products.forEach((product) => {
    if (product.category !== lastCategory) {
      rows.push(
        <ProductCategoryRow
          category={product.category}
          key={product.category} />
      );
    }
    rows.push(
      <ProductRow
        product={product}
        key={product.name} />
    );
    lastCategory = product.category;
  });

  return (
    <table>
      <thead>
        <tr>
          <th>Name</th>
          <th>Price</th>
        </tr>
      </thead>
      <tbody>{rows}</tbody>
    </table>
  );
}
- 상단의 유저 인풋
SearchBar(파란색 박스)를 구현한다.
function SearchBar() {
  return (
    <form>
      <input type="text" placeholder="Search..." />
      <label>
        <input type="checkbox" />
        {' '}
        Only show products in stock
      </label>
    </form>
  );
}
- 마지막으로,
ProductTable와SearchBar를 합쳐FilterableProductTable(가장 바깥쪽 회색 박스)을 만든다.
function FilterableProductTable({ products }) {
  return (
    <div>
      <SearchBar />
      <ProductTable products={products} />
    </div>
  );
}
- App.js에서 데이터 모델(JSON 데이터,
PRODUCTS)를 props로 내려보낸다.
export default function App() {
  return <FilterableProductTable products={PRODUCTS} />;
}
After building your components, you’ll have a library of reusable components that render your data model.
- 컴포넌트들을 만들고 나면, 데이터 모델을 렌더링하는 재사용 가능한 컴포넌트 라이브러리가 완성된다.
Because this is a static app, the components will only return JSX.
- 아직은 정적인 앱이기 때문에 컴포넌트는 (상태가 포함되지 않은) JSX만 반환할 것이다.
The component at the top of the hierarchy (FilterableProductTable) will take your data model as a prop.
- 위계 구조 제일 위에 있는 컴포넌트(
FilterableProductTable)가 props로 데이터 모델을 보유한다.
This is called one-way data flow because the data flows down from the top-level component to the ones at the bottom of the tree.
- 이 방식을 컴포넌트 트리의 제일 꼭대기에서 데이터를 아래쪽으로 흘려보내는 방식인, 단방향 데이터 흐름(one-way data flow)이라고 한다.

지금까지는 상태(state)를 전혀 쓰지 않은 정적인 앱이었다. 다음 단계부터 상태를 사용할 것이다.
3단계: '가장 작으면서 완성된' UI 상태의 표본 찾기
To make the UI interactive, you need to let users change your underlying data model. You will use state for this.
- UI를 상호 작용적으로 만들려면, 데이터 모델(JSON 데이터)을 유저들이 변경할 수 있도록 해야 한다.
Think of state as the minimal set of changing data that your app needs to remember.
- 상태(state)를 앱이 기억해야 하는 변경되는 최소한의 데이터 집합으로 생각해보자.
The most important principle for structuring state is to keep it DRY (Don’t Repeat Yourself).
- 상태를 만드는 가장 중요한 원칙은 DRY(Don’t Repeat Yourself), 즉 중복을 최대한 없애는 원칙이다.
Figure out the absolute minimal representation of the state your application needs and compute everything else on-demand.
- 앱이 필요로 하는 절대적으로 작은 상태 표본을 찾아내고, (그 외) 필요한 부분은 연산하자.
For example, if you’re building a shopping list, you can store the items as an array in state.
- 예를 들어, 쇼핑 목록을 만들고 있다면 아이템 목록을 배열 형태로 상태(state)에 저장할 것이다.
If you want to also display the number of items in the list, don’t store the number of items as another state value—instead, read the length of your array.
- 목록에 있는 아이템의 갯수를 보여주고 싶을 때 아이템 갯수를 또 다른 상태 값으로 저장하는 게 아니라, 그저 배열의 길이를 읽으면 된다.
Now think of all of the pieces of data in this example application:
- 이제 예시의 모든 '데이터 조각'을 정리해보자.
- The original list of products (상품 목록 원본)
- The search text the user has entered (유저가 입력한 검색어)
- The value of the checkbox (체크박스 값)
- The filtered list of products (필터된 상품 목록)
Which of these are state? Identify the ones that are not:
- 이 중에 어떤 것들을 '상태(state)'라고 할 수 있을까?
상태가 아닌 것을 정의해보자.
- Does it remain unchanged over time? (시간이 지나도 변하지 않는가?)
- Is it passed in from a parent via props? (부모 컴포넌트에서 props로 전달되었는가?)
- Can you compute it based on existing state or props in your component? (기존의 state나 props를 가지고 연산 가능한가?)
위 세 가지에 해당한다면 상태가 아니다.
Let’s go through them one by one again:
- 이제 예시의 각 데이터 조각이 상태인지 여부를 살펴보자:
- The original list of products is passed in as props, so it’s not state.
- 상품 목록 원본(= JSON 데이터)
- 부모에서 props로 전달됨 - 상태 아님
- The search text seems to be state since it changes over time and can’t be computed from anything.
- 입력된 검색어
- 시간이 지남에 따라 변화 가능
- 다른 요소로부터 연산 불가 - 상태
- The value of the checkbox seems to be state since it changes over time and can’t be computed from anything.
- 체크박스의 체크 값
- 시간이 지남에 따라 변화 가능
- 다른 요소로부터 연산 불가 - 상태
- The filtered list of products isn’t state because it can be computed by taking the original list of products and filtering it according to the search text and value of the checkbox.
- 필터링된 상품 목록
- 기존 값(상품 목록 원본)을 통해 연산 가능 (=> 검색과 체크박스 체크로 필터링됨) - 상태 아님
This means only the search text and the value of the checkbox are state!
- 즉, '검색어'와 '체크박스 값'만 상태(state)이다.
4단계: 상태를 어떤 컴포넌트에 살게 할 지 정하기
After identifying your app’s minimal state data, you need to identify which component is responsible for changing this state, or owns the state.
- 앱의 최소한의 상태들을 파악하고 나면, 어떤 컴포넌트가 이 상태를 변경하거나 소유할 수 있는지 알아야 한다.
Remember: React uses one-way data flow, passing data down the component hierarchy from parent to child component.
- 리액트는 위계 구조를 따라 부모 컴포넌트에서 자식 컴포넌트로 데이터를 흘려보내는 단방향 데이터 흐름(one-way data flow)을 가진다.
You can figure it out by following these steps!
- 다음 단계를 따라 상태(state)가 컴포넌트에서 갖는 위치를 파악해보자.
- Identify every component that renders something based on that state.
- 상태를 기반으로 뭔가를 렌더링하는 모든 컴포넌트를 확인하자.
- Find their closest common parent component—a component above them all in the hierarchy.
- 가장 가까운 공통된 부모 컴포넌트(위계 구조에서 해당 컴포넌트의 위에 있는 컴포넌트)를 찾자.
- Decide where the state should live:
-
상태가 어디에 있어야 할지 결정하기:
1) Often, you can put the state directly into their common parent.
- 공통된 부모 컴포넌트에
2) You can also put the state into some component above their common parent.
- 공통된 부모 바로 위 컴포넌트에
3) If you can’t find a component where it makes sense to own the state, create a new component solely for holding the state and add it somewhere in the hierarchy above the common parent component.
- (상태가 있을 컴포넌트를 못 찾겠다면) 상태를 갖고 있는 것만 하는 새로운 컴포넌트를 추가하고 공통 부모 컴포넌트의 위쪽 어딘가에 추가하자.
In the previous step, you found two pieces of state in this application: the search input text, and the value of the checkbox.
- 이전 단계에서, 두 가지 상태 데이터인 입력된 검색어와 체크박스 값을 찾았을 것이다.
In this example, they always appear together, so it makes sense to put them into the same place.
- 이 예시 앱에서 둘은 항상 같이 나타나므로 같은 컴포넌트에 두자.
- Identify components that use state:
- 상태가 사용되는 컴포넌트를 찾자.
ProductTable은 상태(검색어와 체크박스 값)에 따라 상품 목록을 필터링한다.SearchBar는 상태(검색어와 체크박스 값)를 보여준다.
- Find their common parent: The first parent component both components share is
FilterableProductTable.
- 공통된 부모 컴포넌트를 찾자: 두 컴포넌트가 공유하는 첫 번째 부모 컴포넌트는
FilterableProductTable이다.
- Decide where the state lives: We’ll keep the filter text and checked state values in
FilterableProductTable.
- 상태를 어디에 둘지 결정한다: (위의 내용을 기반으로) 검색어와 체크박스 상태 값을
FilterableProductTable에 두면 될 것이다.
Add state to the component with the useState() Hook.
- useState 훅을 사용해서 컴포넌트에 상태를 추가하자.
Hooks are special functions that let you “hook into” React.
- 훅은 React에 "훅(갈고리)"을 걸 수 있는 특별한 함수
Add two state variables at the top of FilterableProductTable and specify their initial state:
- 두 상태 변수(
filterText,inStockOnly)를FilterableProductTable컴포넌트의 위쪽에 추가하고 초기값을 정의하자.
function FilterableProductTable({ products }) {
  const [filterText, setFilterText] = useState('');
  const [inStockOnly, setInStockOnly] = useState(false);
  ...
Then, pass filterText and inStockOnly to ProductTable and SearchBar as props:
- 이후
filterText와inStockOnly두 가지 상태를ProductTable과SearchBar에 props로 전달하자.
<div>
  <SearchBar
    filterText={filterText}
    inStockOnly={inStockOnly} />
  <ProductTable
    products={products}
    filterText={filterText}
    inStockOnly={inStockOnly} />
</div>
Notice that editing the form doesn’t work yet.
- 아직까지 Form이 동작하지는 않을 것이다.
Console Error: You provided a
valueprop to a form field without anonChangehandler. This will render a read-only field.
- '
onChange핸들러 없이 form 필드에valueprop을 전달했다'
You haven’t added any code to respond to the user actions like typing yet. This will be your final step.
- 유저 액션에 반응하는 (상호 작용적) 코드를 아직 추가하지 않았기 때문이다. (이제 마지막 단계!)
5단계: 역방향 데이터 흐름 추가하기 (= 이벤트 추가하기)
Currently your app renders correctly with props and state flowing down the hierarchy.
- 이제 위계 구조에 따라 앱이 props와 state를 잘 내려보낼 것이다.
But to change the state according to user input, you will need to support data flowing the other way: the form components deep in the hierarchy need to update the state in FilterableProductTable.
- 하지만 유저의 인풋(동작)에 따라 상태를 변경하려면, 역방향의 데이터 흐름, 즉 위계 구조 아래에 있는
form컴포넌트가 상위의FilterableProductTable에 있는 상태를 변경할 수 있어야 한다.
If you try to type or check the box in the example above, you’ll see that React ignores your input.
- 위 예시의 체크박스에 체크하거나 인풋 창에 입력하면 아직은 동작하지 않는다.
By writing <input value={filterText} />, you’ve set the value prop of the input to always be equal to the filterText state passed in from FilterableProductTable.
<input value={filterText} />이라는 코드를 작성함으로써, 인풋의valueprop이FilterableProductTable에서 전달된filterText와 동일하도록 설정되었다.
Since filterText state is never set, the input never changes.
filterText상태는 전혀 'set'(set 메서드로 변경)되지 않았기 때문에 (입력해도) 인풋은 변하지 않는다.
You want to make it so whenever the user changes the form inputs, the state updates to reflect those changes.
- 유저가 form의 인풋 값을 바꿀 때마다 상태가 이 변경 사항을 반영해서 갱신되면 인풋이 변할 수 있을 것이다.
The state is owned by FilterableProductTable, so only it can call setFilterText and setInStockOnly.
- 상태는 최상위인
FilterableProductTable컴포넌트에 있기 때문에 여기서setFilterText와setInStockOnly라는 set 메서드가 호출된다.
To let SearchBar update the FilterableProductTable’s state, you need to pass these functions down to SearchBar:
SearchBar가FilterableProductTable의 상태를 갱신하도록 하기 위해 set 메서드들을SearchBar로 내려보내자.
function FilterableProductTable({ products }) {
  const [filterText, setFilterText] = useState('');
  const [inStockOnly, setInStockOnly] = useState(false);

  return (
    <div>
      <SearchBar
        filterText={filterText}
        inStockOnly={inStockOnly}
        onFilterTextChange={setFilterText}
        onInStockOnlyChange={setInStockOnly} />
        ...
      />
Inside the SearchBar, you will add the onChange event handlers and set the parent state from them:
SearchBar에서onChange이벤트 핸들러를 추가하고 이걸 가지고 부모 컴포넌트의 상태(filterText)를 변경할 것이다.
<input
  type="text"
  value={filterText}
  placeholder="Search..."
  onChange={(e) => onFilterTextChange(e.target.value)} />
Now the application fully works!
- 이제 앱이 정상적으로 작동한다!
배운 점 🎢
- 리액트의 단방향 데이터 흐름
- 리액트에서 상태인 것 vs. 상태가 아닌 것
- 적절한 컴포넌트에 상태를 위치시키기
- 이벤트 핸들러를 통해 유저 인풋에 따라 상태 변경하기