- 사전세팅(도전과제)
- EKS 관리형 노드그룹
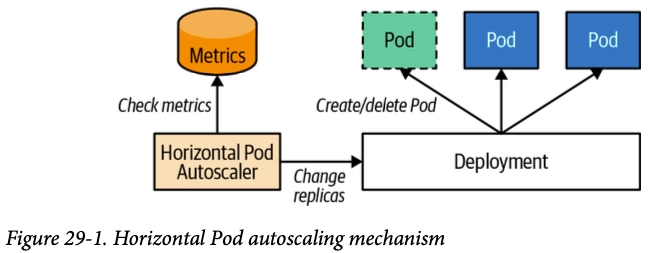
- Scaling up 소개
- HPA
- VPA
- KEDA
- CPA
- CA/CAS
- Karpenter
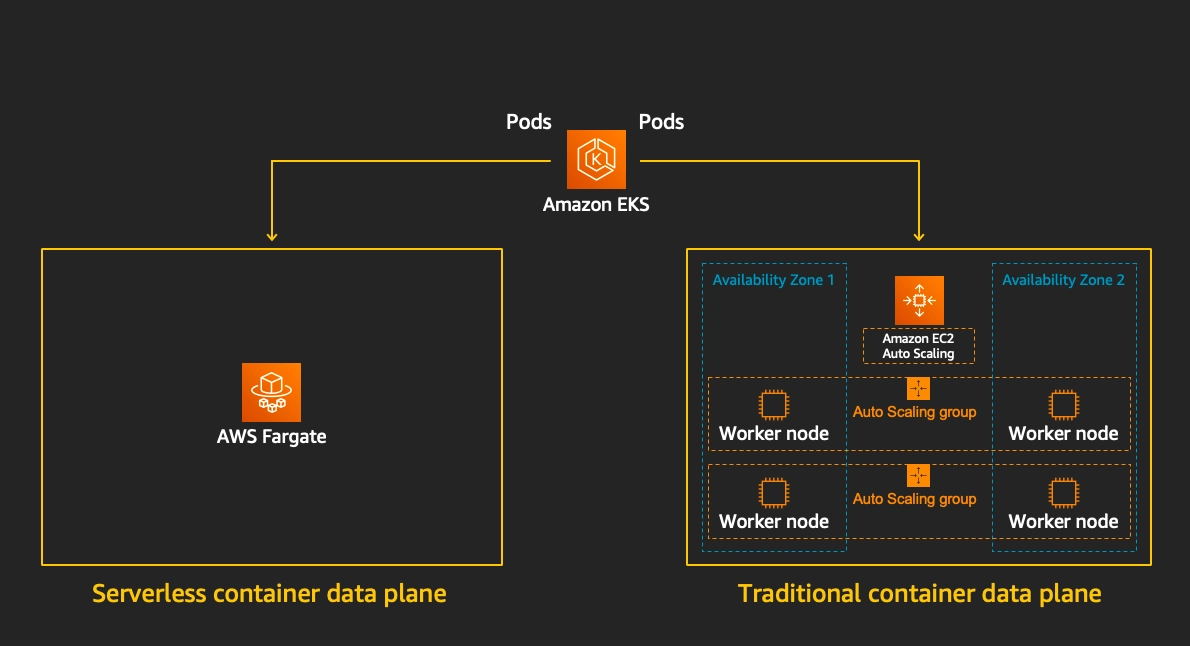
- Fargate
0. 테라폼으로 eks addon 에 external-dns 배포 시, extraArgs 에 policy=sync 적용해보기
external-dns 는 쿠버네티스 Service/Ingress에 설정한 도메인을 자동으로 Route53에 DNS 레코드로 등록해주는 도구
eks.tf 수정은 아래와 같이 해줬습니다.
- Helm provider 버전을 명시적으로 지정
- Helm 차트를 배포할 때 어느 쿠버네티스 클러스터에 배포할지 알려주는 설정 module.eks.cluster_endpoint로 EKS 클러스터를 가리키고, aws eks get-token으로 인증
- external-dns 파드가 AWS API를 호출할 수 있도록 IRSA(IAM Role for Service Account) 설정
- IAM Role에 Route53 권한을 부여
- 실제 external-dns를 Helm으로 배포하는 블록
##1
terraform {
  required_providers {
    helm = {
      source  = "hashicorp/helm"
      version = "~> 3.0"
    }
  }
}


########################
# Provider Definitions #
########################

...

##2
provider "helm" {
  kubernetes = {
    host                   = module.eks.cluster_endpoint
    cluster_ca_certificate = base64decode(module.eks.cluster_certificate_authority_data)
    exec = {
      api_version = "client.authentication.k8s.io/v1beta1"
      command     = "aws"
      args        = ["eks", "get-token", "--cluster-name", module.eks.cluster_name, "--region", var.TargetRegion]
    }
  }
}

########################
# IAM ROLE Setup       #
########################
## 3
resource "aws_iam_role" "external_dns" {
  name = "${var.ClusterBaseName}-external-dns"
  assume_role_policy = jsonencode({
    Version = "2012-10-17"
    Statement = [{
      Effect    = "Allow"
      Principal = { Federated = module.eks.oidc_provider_arn }
      Action    = "sts:AssumeRoleWithWebIdentity"
      Condition = {
        StringEquals = {
          "${module.eks.oidc_provider}:sub" = "system:serviceaccount:external-dns:external-dns"
          "${module.eks.oidc_provider}:aud" = "sts.amazonaws.com"
        }
      }
    }]
  })
}
##4
resource "aws_iam_role_policy" "external_dns" {
  name = "${var.ClusterBaseName}-external-dns"
  role = aws_iam_role.external_dns.id
  policy = jsonencode({
    Version = "2012-10-17"
    Statement = [
      {
        Effect   = "Allow"
        Action   = ["route53:ChangeResourceRecordSets"]
        Resource = ["arn:aws:route53:::hostedzone/*"]
      },
      {
        Effect   = "Allow"
        Action   = ["route53:ListHostedZones", "route53:ListResourceRecordSets"]
        Resource = ["*"]
      }
    ]
  })
}

...

########################
# External DNS (Helm)  #
########################

##5

resource "helm_release" "external_dns" {
  name       = "external-dns"
  repository = "https://kubernetes-sigs.github.io/external-dns/"
  chart      = "external-dns"
  namespace  = "external-dns"
  version    = "1.14.4"
  depends_on = [module.eks]


  values = [
    yamlencode({
      policy   = "sync"
      provider = "aws"
      serviceAccount = {
        name = "external-dns"
        annotations = {
          "eks.amazonaws.com/role-arn" = aws_iam_role.external_dns.arn
        }
      }
    })
  ]
}
- 헬름 배포 확인

- Pod 확인

- policy=sync 확인
kubectl logs -n external-dns -l app.kubernetes.io/name=external-dns | grep -i policy...
TLSCA: TLSClientCert: TLSClientCertKey: Policy:sync
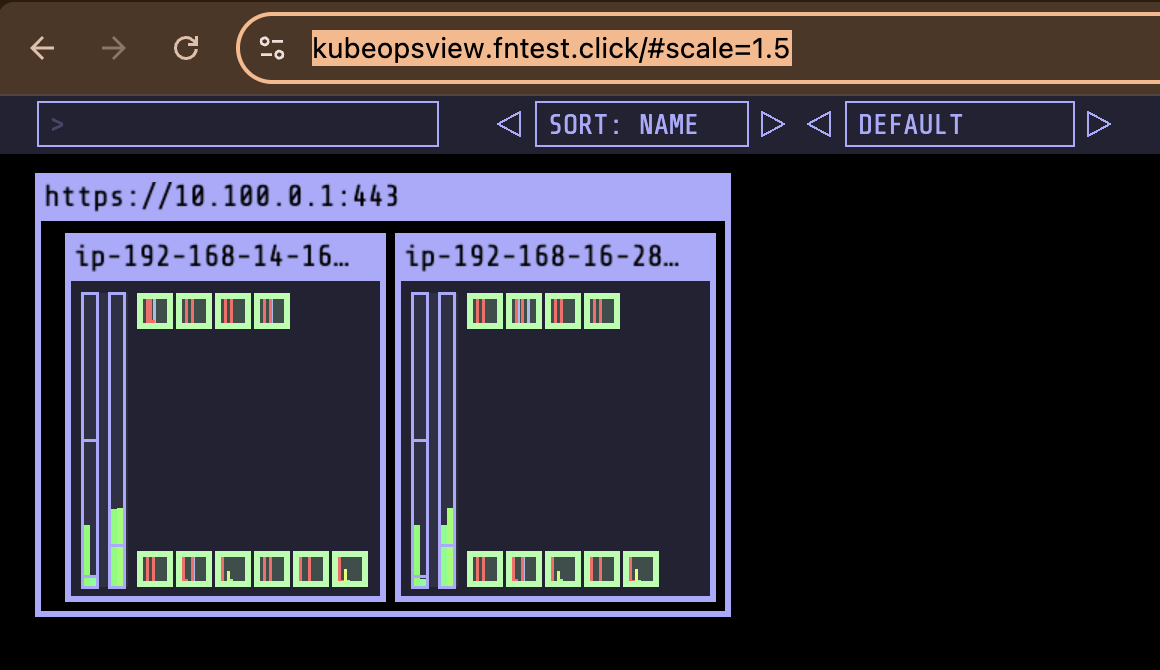
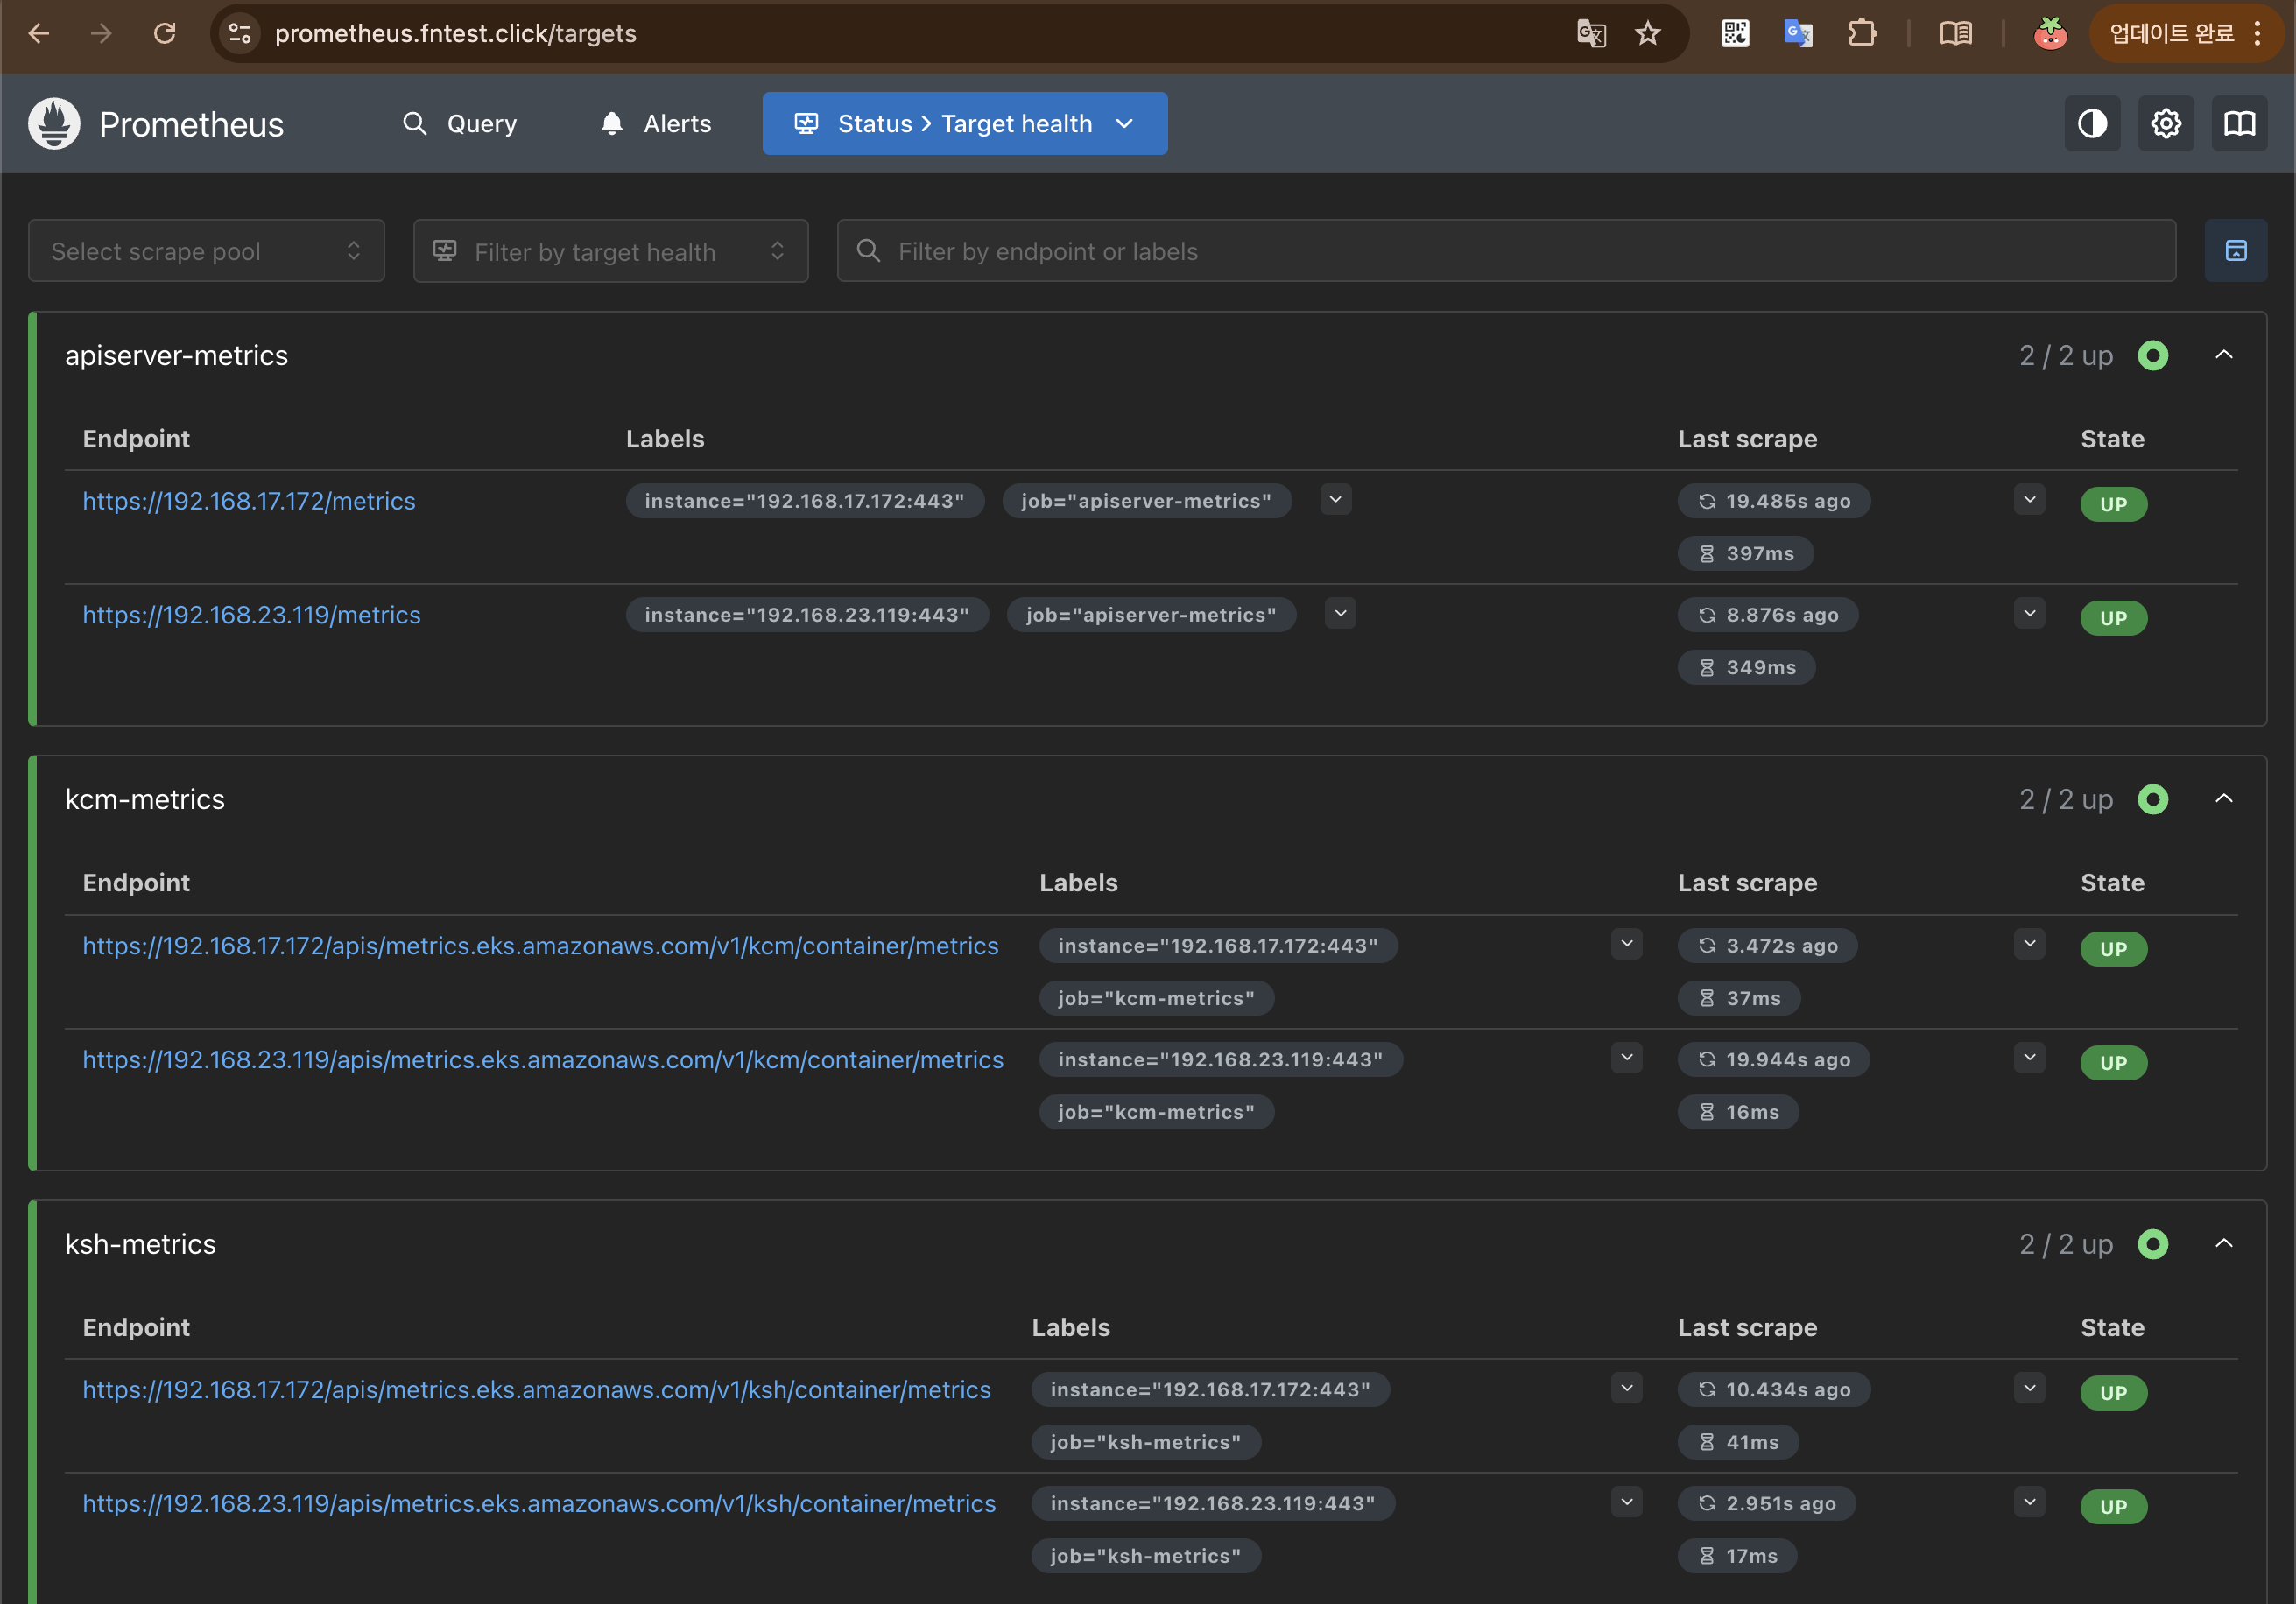
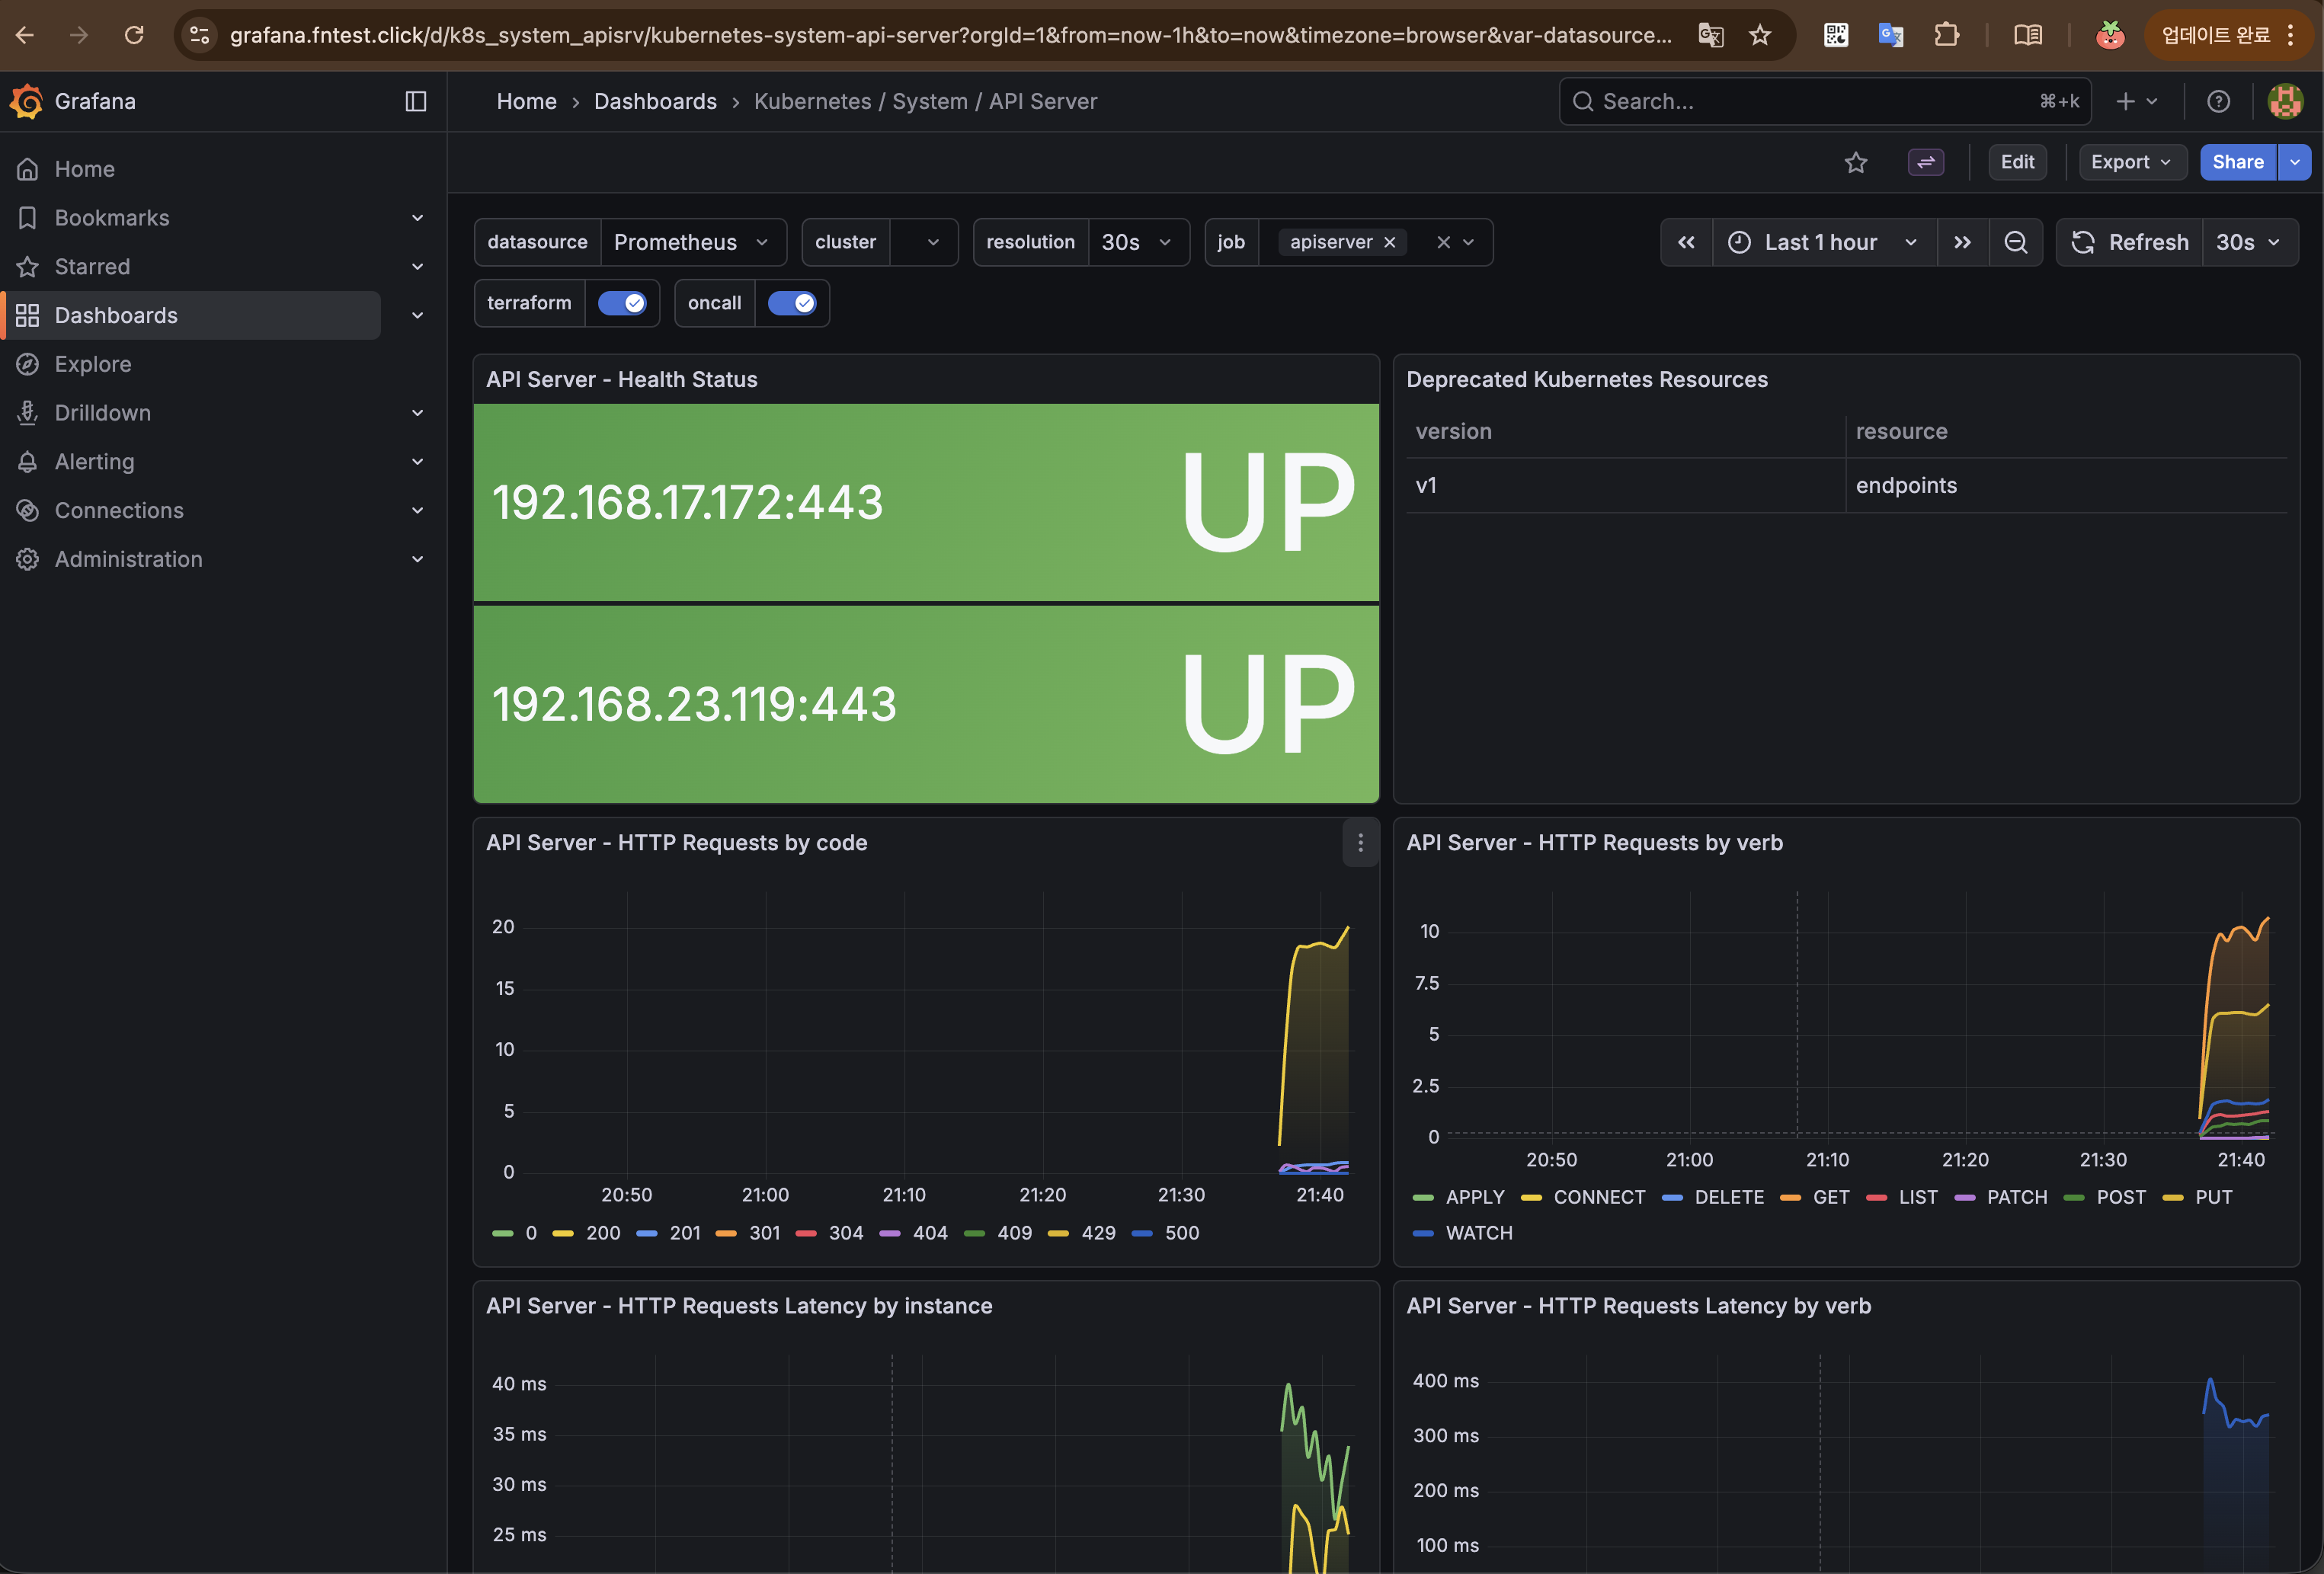
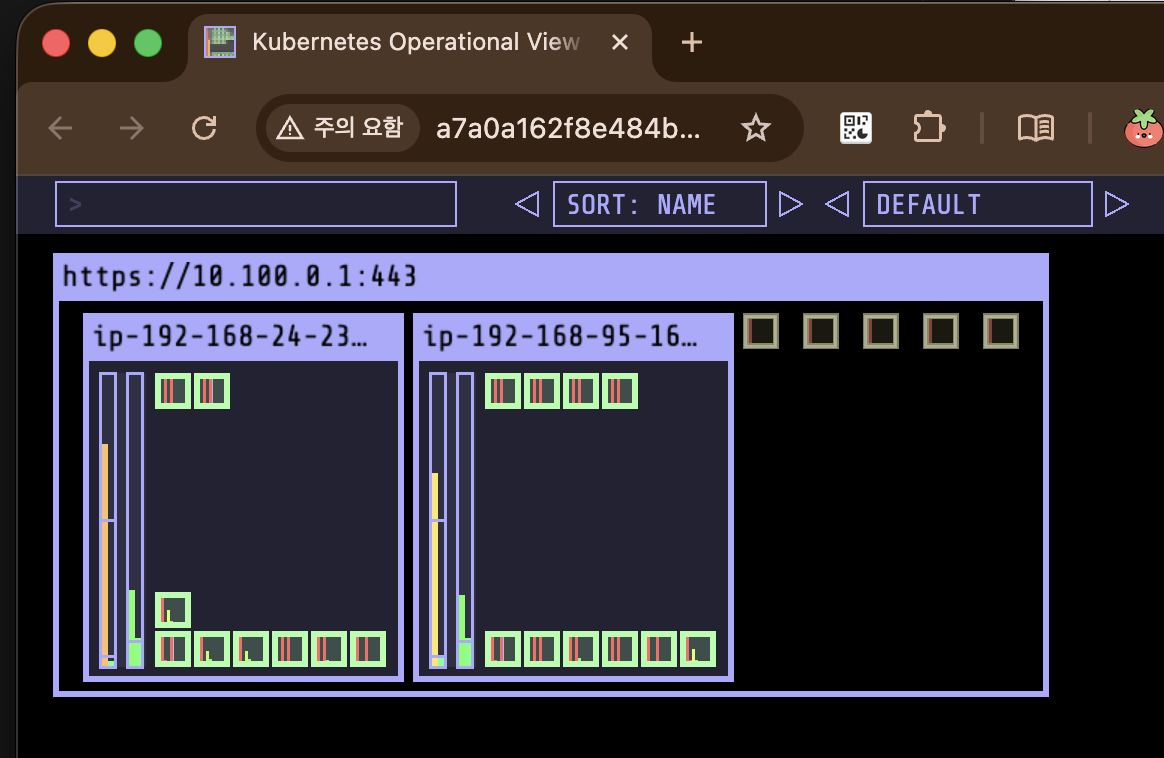
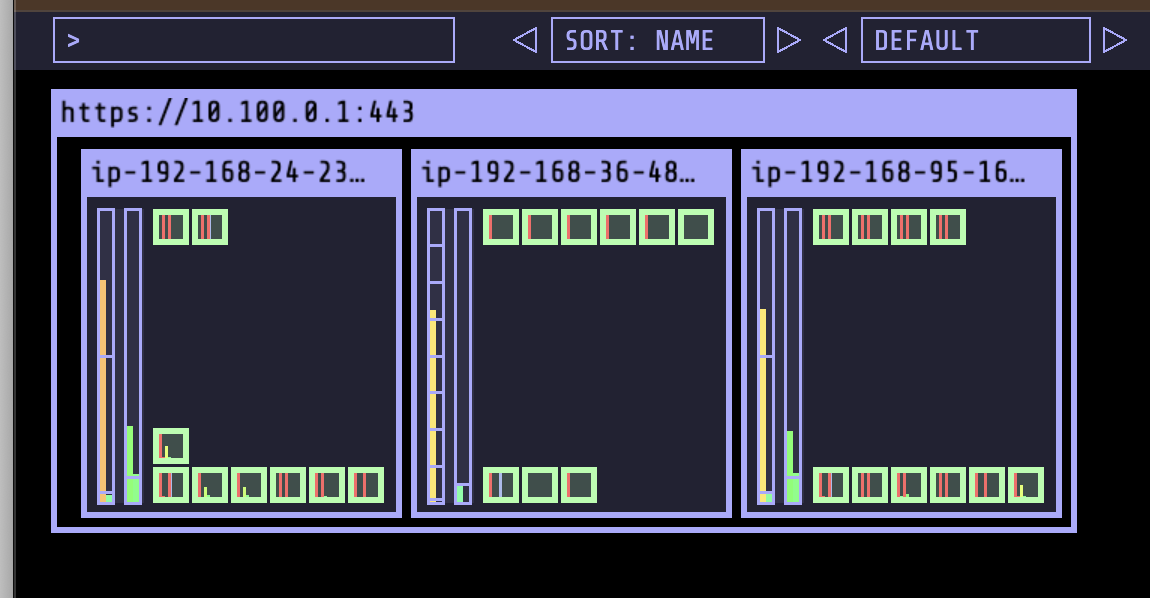
...그외 kube-ops view, prometheous, grafana
https://kubeopsview.fntest.click/#scale=1.5
https://prometheus.fntest.click
https://grafana.fntest.click
1. EKS 관리형 노드그룹
- EC2 노드의 프로비저닝/업데이트/종료를 AWS가 관리
- ASG(Auto Scaling Group) 기반으로 동작
eksctl또는 콘솔로 생성, 노드 업그레이드 시 drain → 교체 자동화
1.1 관리형 노드 그룹 확인
어떤 노드그룹에 있는지, 어떤 k8s control plane에 붙어있고, 어떤 인스턴스타입이고, ami type, label, asg 정보, 시작템플릿 정보등 자세한 정보를 아래와 같은 명령어로 알 수 있다.
yenajo@Yenas-MacBook ~/aews main ±✚ kubectl get nodes --label-columns eks.amazonaws.com/nodegroup,kubernetes.io/arch,eks.amazonaws.com/capacityType
NAME STATUS ROLES AGE VERSION NODEGROUP ARCH CAPACITYTYPE
ip-192-168-14-168.ap-northeast-2.compute.internal Ready <none> 146m v1.35.2-eks-f69f56f myeks-ng-1 amd64 ON_DEMAND
ip-192-168-16-28.ap-northeast-2.compute.internal Ready <none> 146m v1.35.2-eks-f69f56f myeks-ng-1 amd64 ON_DEMAND
yenajo@Yenas-MacBook ~/aews main ±✚ eksctl get nodegroup --cluster myeks
CLUSTER NODEGROUP STATUS CREATED MIN SIZE MAX SIZE DESIRED CAPACITY INSTANCE TYPE IMAGE ID ASG NAME TYPE
myeks myeks-ng-1 ACTIVE 2026-03-30T10:20:06Z 1 4 2 t3.medium AL2023_x86_64_STANDARD eks-myeks-ng-1-bcce9f20-fa21-a16f-566c-82d7ae25729b managed
yenajo@Yenas-MacBook ~/aews main ±✚ aws eks describe-nodegroup --cluster-name myeks --nodegroup-name myeks-ng-1 | jq
{
"nodegroup": {
"nodegroupName": "myeks-ng-1",
"nodegroupArn": "arn:aws:eks:ap-northeast-2:102011327768:nodegroup/myeks/myeks-ng-1/bcce9f20-fa21-a16f-566c-82d7ae25729b",
"clusterName": "myeks",
"version": "1.35",
"releaseVersion": "1.35.2-20260318",
"createdAt": "2026-03-30T19:20:06.115000+09:00",
"modifiedAt": "2026-03-30T21:41:25.784000+09:00",
"status": "ACTIVE",
"capacityType": "ON_DEMAND",
"scalingConfig": {
"minSize": 1,
"maxSize": 4,
"desiredSize": 2
},
"instanceTypes": [
"t3.medium"
],
"subnets": [
"subnet-070a5d721519c6508",
"subnet-06a98d9437e08ae1e",
"subnet-07af82ed48c4e8b0f"
],
"amiType": "AL2023_x86_64_STANDARD",
"nodeRole": "arn:aws:iam::102011327768:role/myeks-ng-1",
"labels": {
"tier": "primary"
},
"resources": {
"autoScalingGroups": [
{
"name": "eks-myeks-ng-1-bcce9f20-fa21-a16f-566c-82d7ae25729b"
}
]
},
"health": {
"issues": []
},
"updateConfig": {
"maxUnavailablePercentage": 33
},
"launchTemplate": {
"name": "primary-20260330101957093900000009",
"version": "1",
"id": "lt-02fd2a8cadeb2478b"
},
"tags": {
"Terraform": "true",
"Environment": "cloudneta-lab",
"Name": "myeks-ng-1"
}
}
}1.2 관리형 노드그룹(graviton, spot)
terraform 에 주석 제거
...
    # 2nd 노드 그룹 (추가)
     secondary = {
       name            = "${var.ClusterBaseName}-ng-2"
       use_name_prefix = false
       ami_type        = "AL2023_ARM_64_STANDARD" # https://docs.aws.amazon.com/ko_kr/tnb/latest/ug/node-eks-managed-node.html#node-eks-managed-node-capabilities
       instance_types  = ["t4g.medium"]
       desired_size    = 1
       max_size        = 1
       min_size        = 1
       disk_size        = var.WorkerNodeVolumesize
       subnets          = module.vpc.private_subnets
       vpc_security_group_ids = [aws_security_group.node_group_sg.id]

       iam_role_name    = "${var.ClusterBaseName}-ng-2"
       iam_role_use_name_prefix = false
       # 학습을 위해 EC2 Instance Profile 에 필요한 IAM Role 추가
       iam_role_additional_policies = {
         "${var.ClusterBaseName}AWSLoadBalancerControllerPolicy" = aws_iam_policy.aws_lb_controller_policy.arn
         "${var.ClusterBaseName}ExternalDNSPolicy" = aws_iam_policy.external_dns_policy.arn
         AmazonSSMManagedInstanceCore = "arn:aws:iam::aws:policy/AmazonSSMManagedInstanceCore"
       }

       # 노드에 배포된 파드에서 C2 Instance Profile 사용을 위해 EC2 메타데이터 호출을 위한 hop limit 2 증가
       metadata_options = {
         http_endpoint               = "enabled"
         http_tokens                 = "required"   # IMDSv2 강제
         http_put_response_hop_limit = 2            # hop limit = 2
       }

       # node label
       labels = {
         tier = "secondary"
       }

       # node taint
       taints = {
         frontend = {
           key    = "cpuarch"
           value  = "arm64"
           effect = "NO_EXECUTE"
         }
       }

       # AL2023 전용 userdata 주입
       cloudinit_pre_nodeadm = [
         {
           content_type = "text/x-shellscript"
           content      = <<-EOT
             #!/bin/bash
             echo "Starting custom initialization..."
             dnf update -y
             dnf install -y tree bind-utils tcpdump nvme-cli links sysstat ipset htop
             echo "Custom initialization completed."
           EOT
         }
       ]
     }


    # 3nd 노드 그룹 (추가)
     third = {
       name            = "${var.ClusterBaseName}-ng-3"
       use_name_prefix = false
       ami_type        = "AL2023_x86_64_STANDARD"
       # 스팟 인스턴스 설정의 핵심
       capacity_type   = "SPOT"
       instance_types  = ["c5a.large", "c6a.large", "t3a.large", "t3a.medium"]
       desired_size    = 1
       max_size        = 1
       min_size        = 1
       disk_size        = var.WorkerNodeVolumesize
       subnets          = module.vpc.private_subnets
       vpc_security_group_ids = [aws_security_group.node_group_sg.id]

       iam_role_name    = "${var.ClusterBaseName}-ng-3"
       iam_role_use_name_prefix = false
       # 학습을 위해 EC2 Instance Profile 에 필요한 IAM Role 추가
       iam_role_additional_policies = {
         "${var.ClusterBaseName}AWSLoadBalancerControllerPolicy" = aws_iam_policy.aws_lb_controller_policy.arn
         "${var.ClusterBaseName}ExternalDNSPolicy" = aws_iam_policy.external_dns_policy.arn
         AmazonSSMManagedInstanceCore = "arn:aws:iam::aws:policy/AmazonSSMManagedInstanceCore"
       }

       # 노드에 배포된 파드에서 C2 Instance Profile 사용을 위해 EC2 메타데이터 호출을 위한 hop limit 2 증가
       metadata_options = {
         http_endpoint               = "enabled"
         http_tokens                 = "required"   # IMDSv2 강제
         http_put_response_hop_limit = 2            # hop limit = 2
       }

       # node label
       labels = {
         tier = "third"
       }

       # AL2023 전용 userdata 주입
       cloudinit_pre_nodeadm = [
         {
           content_type = "text/x-shellscript"
           content      = <<-EOT
             #!/bin/bash
             echo "Starting custom initialization..."
             dnf update -y
             dnf install -y tree bind-utils tcpdump nvme-cli links sysstat ipset htop
             echo "Custom initialization completed."
           EOT
         }
       ]
     }
     ...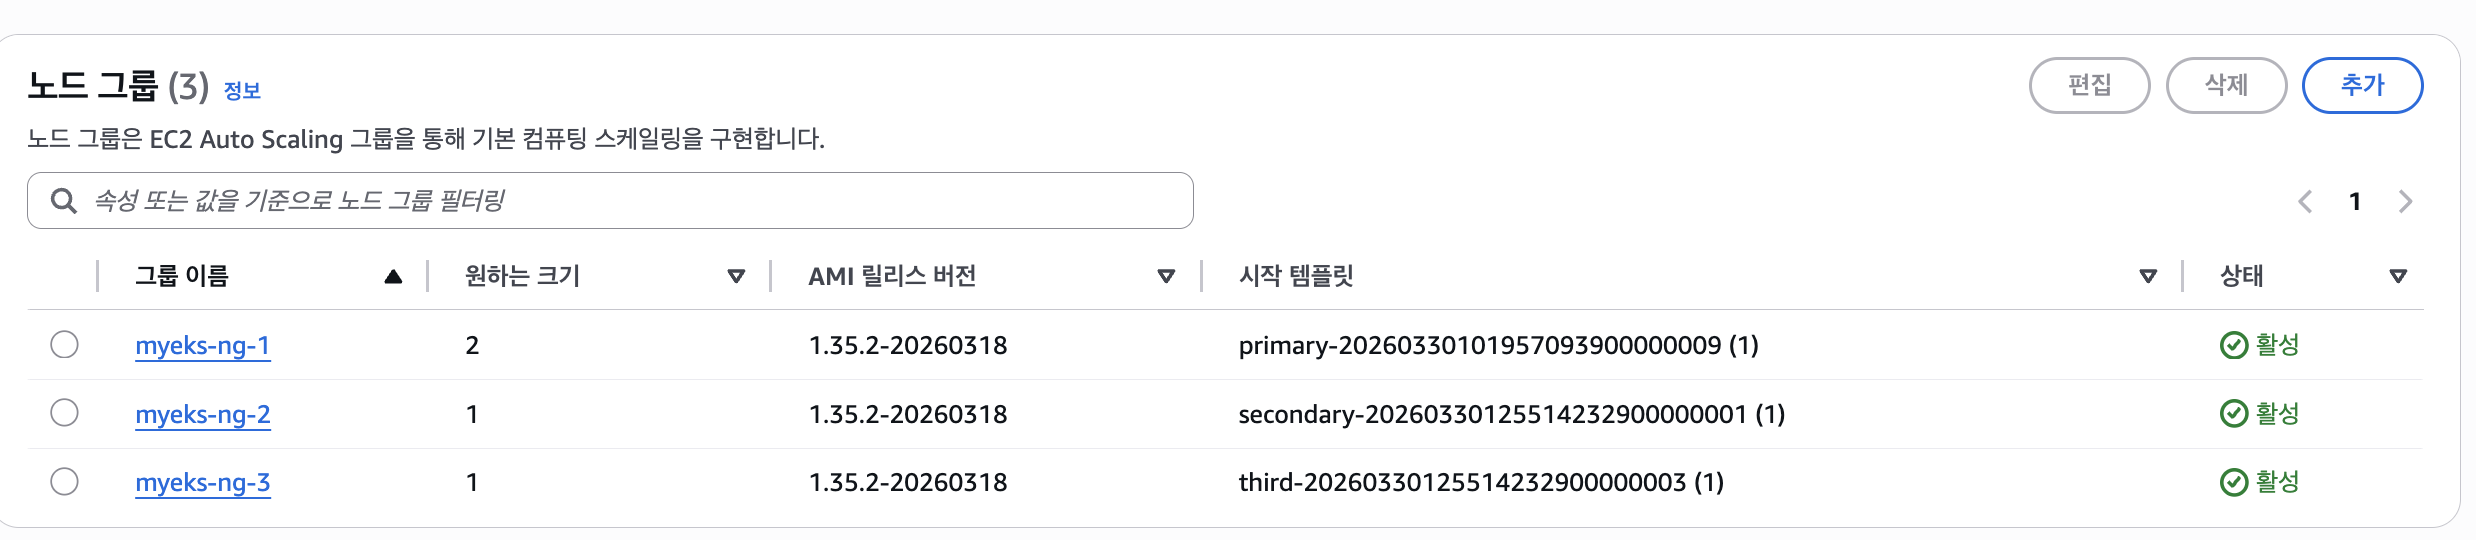
노드그룹이 여러개 생겼다
1.2.1 AWS Graviton (ARM) Instance 소개
: AWS Graviton 프로세서 : 64-bit Arm 프로세서 코어 기반의 AWS 커스텀 반도체 ⇒ 20~40% 향상된 가격대비 성능


arm64 확인가능
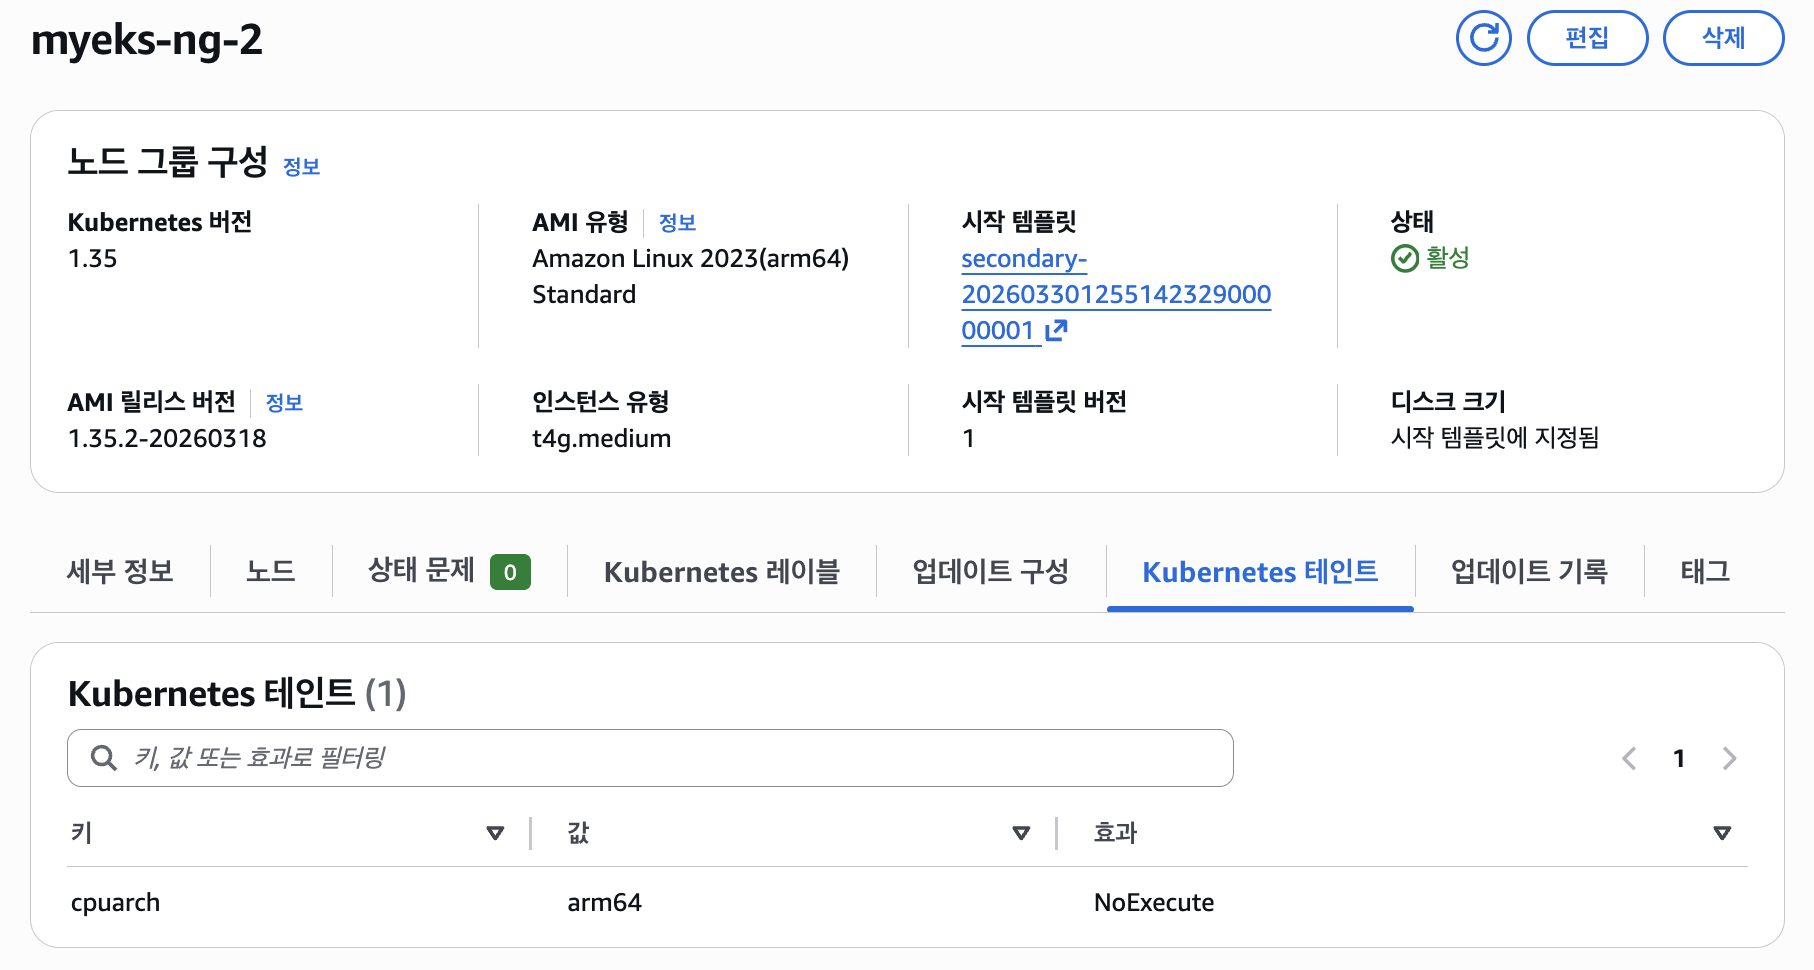
taint 정보도 넣어놨기 때문에 확인할 수 있다
해당 노드에 신규 pod 배포할 땐 node selector (kubernetes.io/arch: arm64)를 사용한다
cat <<EOF | kubectl apply -f -
apiVersion: apps/v1
kind: Deployment
metadata:
  name: sample-app
  labels:
    app: sample-app
spec:
  replicas: 1
  selector:
    matchLabels:
      app: sample-app
  template:
    metadata:
      labels:
        app: sample-app
    spec:
      nodeSelector:
        kubernetes.io/arch: arm64
      containers:
      - name: sample-app
        image: nginx:alpine
        ports:
        - containerPort: 80
        resources:
          requests:
            cpu: 100m
            memory: 128Mi
EOF

cat <<EOF | kubectl apply -f -
apiVersion: apps/v1
kind: Deployment
metadata:
  name: sample-app
  labels:
    app: sample-app
spec:
  replicas: 1
  selector:
    matchLabels:
      app: sample-app
  template:
    metadata:
      labels:
        app: sample-app
    spec:
      nodeSelector:
        kubernetes.io/arch: arm64
      tolerations:
      - key: "cpuarch"
        operator: "Equal"
        value: "arm64"
        effect: "NoExecute"
      containers:
      - name: sample-app
        image: nginx:alpine
        ports:
        - containerPort: 80
        resources:
          requests:
            cpu: 100m
            memory: 128Mi
EOF
첫번째 예시를 배포하면

이렇게 toleration이 없어서 pod 배치가 안된다.
두번째 예시로 toleration 까지 추가해줘야 node에 잘 배치됨
1.2.2 Spot instances 노드 그룹 활용 소개
- AWS 고객이 EC2 여유 용량 풀을 활용하여 엄청난 할인으로 EC2 인스턴스를 실행할 수 있습니다.
- EC2에 용량이 다시 필요할 때 2분 알림으로 Spot Instances를 중단할 수 있습니다.
- Kubernetes 워커 노드로 Spot Instances를 사용하는 것은 상태 비저장 API 엔드포인트, 일괄 처리, ML 학습 워크로드, Apache Spark를 사용한 빅데이터 ETL, 대기열 처리 애플리케이션, CI/CD 파이프라인과 같은 워크로드에 매우 인기 있는 사용 패턴입니다.
- 예를 들어 Kubernetes에서 상태 비저장 API 서비스를 실행하는 것은 Spot Instances를 워커 노드로 사용하기에 매우 적합합니다. Pod를 우아하게 종료할 수 있고 Spot Instances가 중단되면 다른 워커 노드에서 대체 Pod를 예약할 수 있기 때문입니다.
스팟 인스턴스는 이 부분이 중요하다(테라폼에서)

확인

type도 지정되어있다

웹콘솔에서도 확인해볼 수 있다

pod 배포를 해보자
-> node selector 에 spot을 넣고 배포
# 파드 배포
cat <<EOF | kubectl apply -f -
apiVersion: v1
kind: Pod
metadata:
  name: busybox
spec:
  terminationGracePeriodSeconds: 3
  containers:
  - name: busybox
    image: busybox
    command:
    - "/bin/sh"
    - "-c"
    - "while true; do date >> /home/pod-out.txt; cd /home; sync; sync; sleep 10; done"
  nodeSelector:
    eks.amazonaws.com/capacityType: SPOT
EOF
spot 노드에 잘 배치 되었다
2. Scaling Up 소개
- 스케일링 대상은 크게 Pod(워크로드) 와 Node(인프라) 두 레이어로 구분
- Pod 스케일링: HPA / VPA / KEDA / CPA
- Node 스케일링: Cluster Autoscaler / Karpenter / Fargate

- Application tuning : Tune process
- VPA Vertical Pod Autoscaler + In-Place Pod Resource Resize
- HPA Horizontal Pod Autoscaler 메트릭 기준 : 요청 분산 처리를 위해 LB 필요 → KEDA 이벤트 기준
- CA/CAS Cluster Autoscaler : 서버(노드)를 동적으로 추가/삭제하기 위한 하이버파이저 혹은 플랫폼(퍼블릭 프로바이더) 필요
3. HPA (Horizontal Pod Autoscaler)
- CPU/Memory 메트릭 기반으로 Pod 수평 확장
metrics-server필요scaleTargetRef→ Deployment 등 지정,targetAverageUtilization임계값 설정
-> 저같은경우는 이벤트시 빨리 늘어나야하는 프론트 pod에 pod가 늘어나는 cpu 임계값을 낮게설정해서 빠르게 이벤트에 대처할 수 있게 hpa 설정을 해줬습니다
스터디에서 공유해주신 블로그 대로 cool down 기간은 주는것이 좋을거같아 개발계에서 테스트해보면 좋을거같습니다.
3.1 테스트
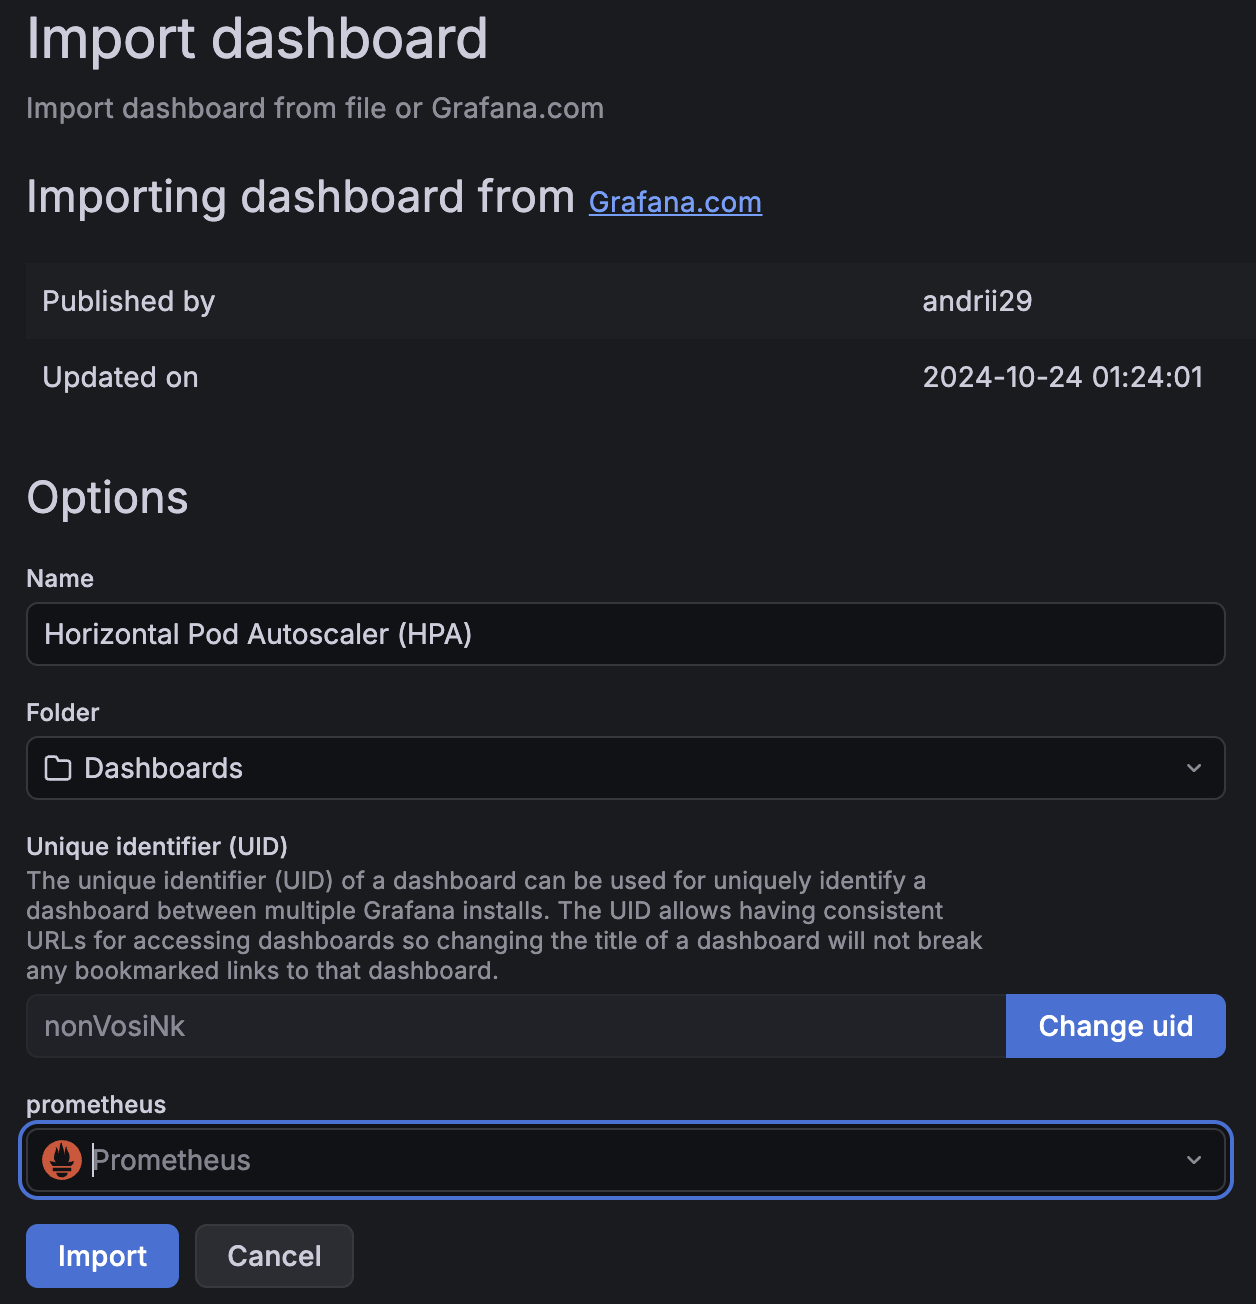
3.1.1 그라파나 22128, 22251 대시보드 import 설정

3.1.2 hpa 배포
공식 리소스
kubectl apply -f https://k8s.io/examples/application/php-apache.yaml
아래는 내용
# Run and expose php-apache server
# https://k8s.io/examples/application/php-apache.yaml
apiVersion: apps/v1
kind: Deployment
metadata:
  name: php-apache
spec:
  selector:
    matchLabels:
      run: php-apache
  template:
    metadata:
      labels:
        run: php-apache
    spec:
      containers:
      - name: php-apache
        image: registry.k8s.io/hpa-example
        ports:
        - containerPort: 80
        resources:
          limits:
            cpu: 500m
          requests:
            cpu: 200m
---
apiVersion: v1
kind: Service
metadata:
  name: php-apache
  labels:
    run: php-apache
spec:
  ports:
  - port: 80
  selector:
    run: php-apache
부하발생
# curl 파드 배포
cat <<EOF | kubectl apply -f -
apiVersion: v1
kind: Pod
metadata:
  name: curl
spec:
  containers:
  - name: curl
    image: curlimages/curl:latest
    command: ["sleep", "3600"]
  restartPolicy: Never
EOF
아래는 hpa 정책 생성
# Create the HorizontalPodAutoscaler : requests.cpu=200m - [알고리즘](https://kubernetes.io/docs/tasks/run-application/horizontal-pod-autoscale/#algorithm-details)
# Since each pod requests 200 milli-cores by kubectl run, this means an average CPU usage of 100 milli-cores.
cat <<EOF | kubectl apply -f -
apiVersion: autoscaling/v2
kind: HorizontalPodAutoscaler
metadata:
  name: php-apache
spec:
  scaleTargetRef:
    apiVersion: apps/v1
    kind: Deployment
    name: php-apache
  minReplicas: 1
  maxReplicas: 10
  metrics:
  - type: Resource
    resource:
      name: cpu
      target:
        averageUtilization: 50
        type: Utilization
EOF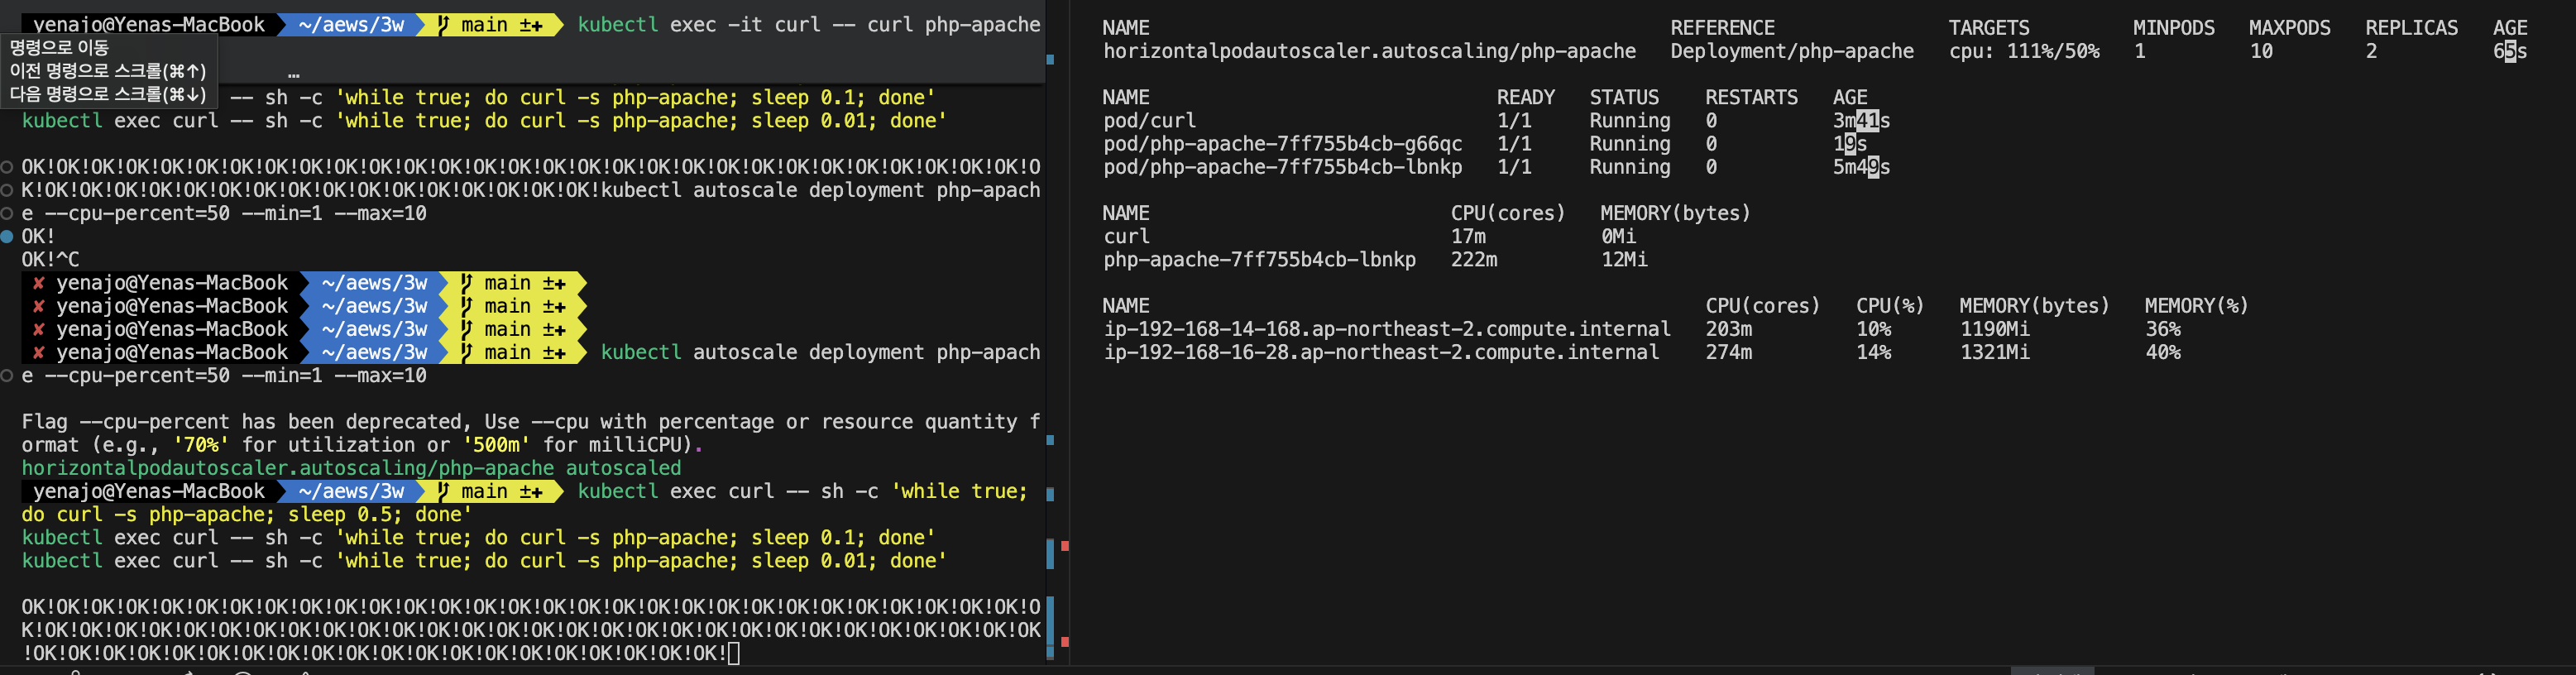
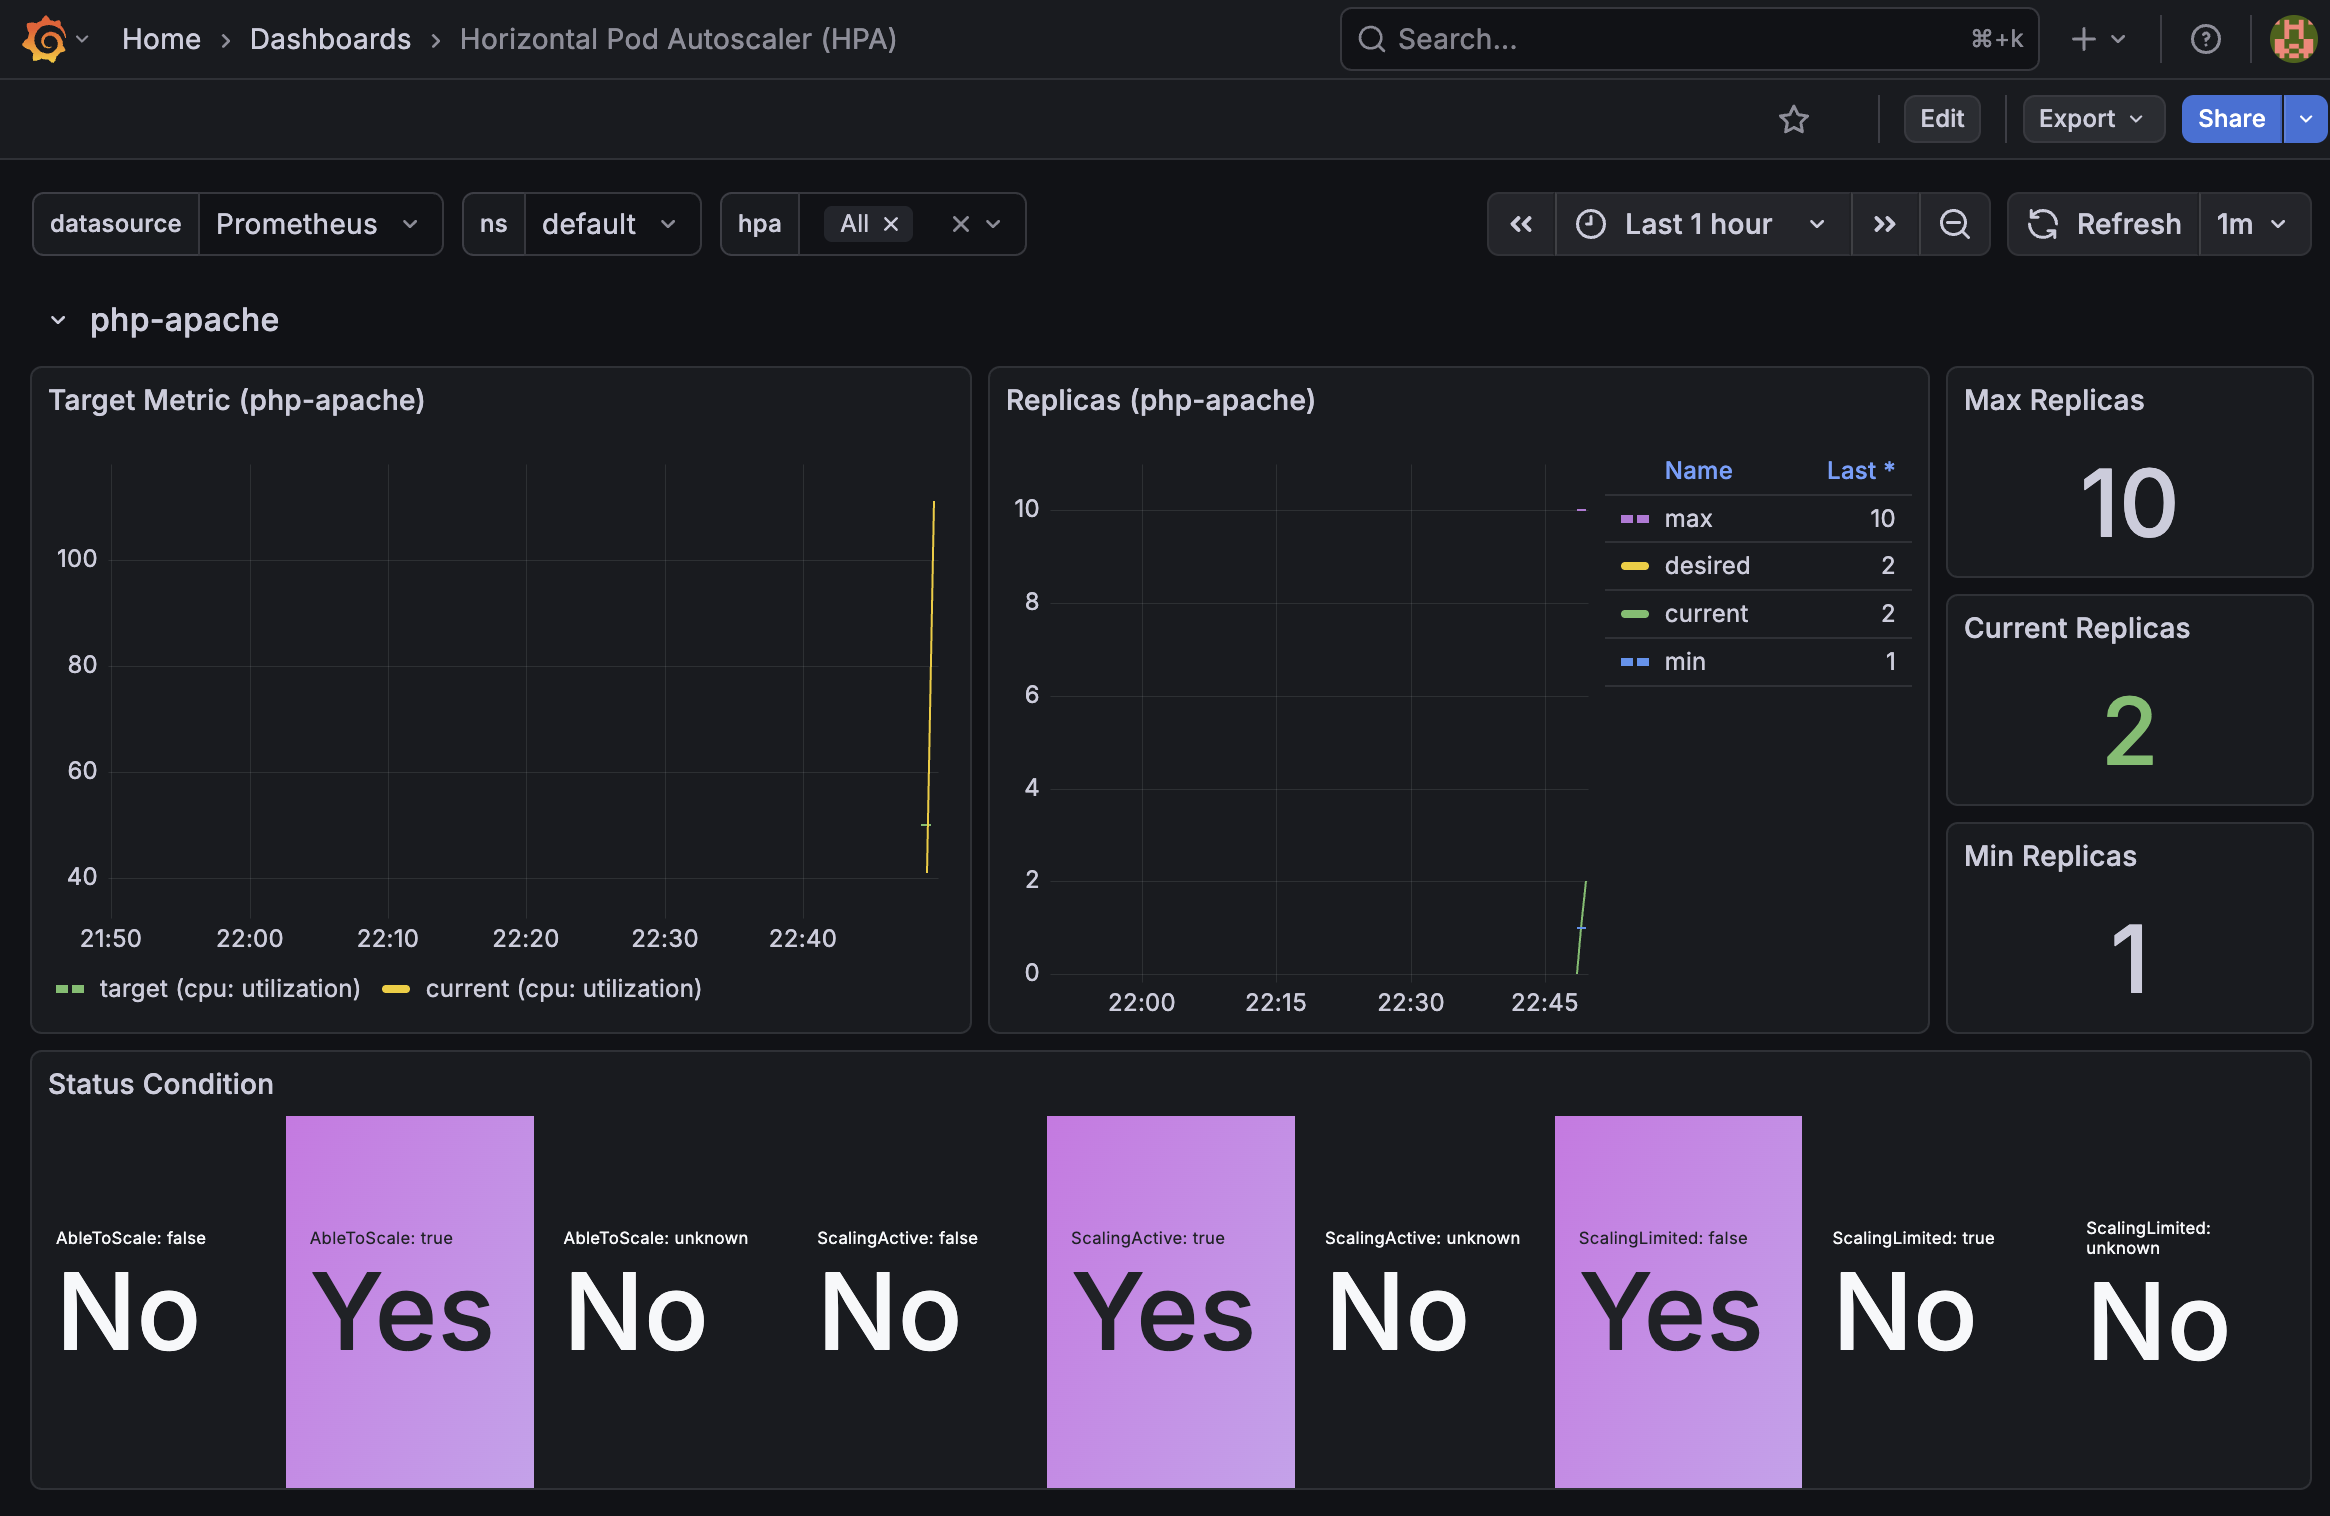
pod에 부하를 주니 pod가 1개에서 (max는 10이다)
2개까지늘어난것을 확인할 수 있다
그라파나에서도 확인 가능하다
4. VPA (Vertical Pod Autoscaler)
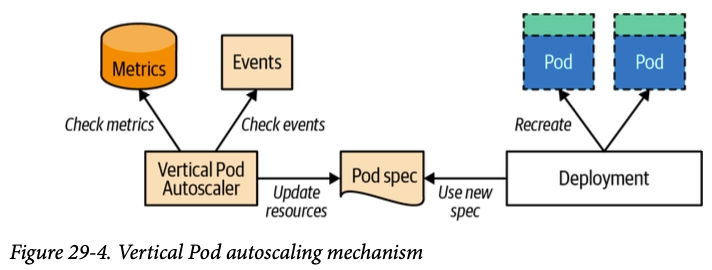
- Pod의 CPU/Memory request·limit을 자동 조정
- 모드:
Off/Initial/Auto(재시작 수반) - VPA는 HPA와 같이 사용할 수 없습니다
5. KEDA (Kubernetes Event-Driven Autoscaling)
- 외부 이벤트 소스 기반 스케일링 (SQS, Kafka, Redis 등 50+ 스케일러) (hpa, vpa 는 메트릭 기반)
ScaledObjectCRD로 정의, 내부적으로 HPA를 생성/관리- 0 → N 스케일링 지원 (HPA는 최소 1)
5.1 KEDA 설치
cat <<EOT > keda-values.yaml
metricsServer:
  useHostNetwork: true

prometheus:
  metricServer:
    enabled: true
    port: 9022
    portName: metrics
    path: /metrics
    serviceMonitor:
      # Enables ServiceMonitor creation for the Prometheus Operator
      enabled: true
  operator:
    enabled: true
    port: 8080
    serviceMonitor:
      # Enables ServiceMonitor creation for the Prometheus Operator
      enabled: true
  webhooks:
    enabled: true
    port: 8020
    serviceMonitor:
      # Enables ServiceMonitor creation for the Prometheus webhooks
      enabled: true
EOT

helm repo add kedacore https://kedacore.github.io/charts
helm repo update
helm install keda kedacore/keda --version 2.16.0 --namespace keda --create-namespace -f keda-values.yaml
- CPU/Mem은 기존 metrics-server 의존하여, KEDA metrics-server는 외부 이벤트 소스(Scaler) 메트릭을 노출

keda 에 php-apache 배포
kubectl apply -f https://k8s.io/examples/application/php-apache.yaml -n keda
kubectl get pod -n keda
ScaledObject 정책 생성 : cron
일정시간에 늘리고 줄이고가 가능하다(오..)
cat <<EOT > keda-cron.yaml
apiVersion: keda.sh/v1alpha1
kind: ScaledObject
metadata:
  name: php-apache-cron-scaled
spec:
  minReplicaCount: 0
  maxReplicaCount: 2  # Specifies the maximum number of replicas to scale up to (defaults to 100).
  pollingInterval: 30  # Specifies how often KEDA should check for scaling events
  cooldownPeriod: 300  # Specifies the cool-down period in seconds after a scaling event
  scaleTargetRef:  # Identifies the Kubernetes deployment or other resource that should be scaled.
    apiVersion: apps/v1
    kind: Deployment
    name: php-apache
  triggers:  # Defines the specific configuration for your chosen scaler, including any required parameters or settings
  - type: cron
    metadata:
      timezone: Asia/Seoul
      start: 00,15,30,45 * * * *
      end: 05,20,35,50 * * * *
      desiredReplicas: "1"
EOT
kubectl apply -f keda-cron.yaml -n keda
이벤트기반 증설이 필요할 경우
미리 cron 을 걸고 hpa 기반의 스케일아웃을 할 수 있어 좋은거같아 실 운영에 적용해봐도 좋을거같다고 생각했습니다.
6. CPA (Cluster Proportional Autoscaler)
- 클러스터 노드 수 또는 코어 수에 비례해 Pod 수 조정
- CoreDNS, kube-dns 같은 클러스터 애드온 스케일링에 주로 사용
- 메트릭 서버 불필요, 단순 비례 계산
#
helm repo add cluster-proportional-autoscaler https://kubernetes-sigs.github.io/cluster-proportional-autoscaler

# CPA규칙을 설정하고 helm차트를 릴리즈 필요
helm upgrade --install cluster-proportional-autoscaler cluster-proportional-autoscaler/cluster-proportional-autoscaler

# nginx 디플로이먼트 배포
cat <<EOT > cpa-nginx.yaml
apiVersion: apps/v1
kind: Deployment
metadata:
  name: nginx-deployment
spec:
  replicas: 1
  selector:
    matchLabels:
      app: nginx
  template:
    metadata:
      labels:
        app: nginx
    spec:
      containers:
      - name: nginx
        image: nginx:latest
        resources:
          limits:
            cpu: "100m"
            memory: "64Mi"
          requests:
            cpu: "100m"
            memory: "64Mi"
        ports:
        - containerPort: 80
EOT
kubectl apply -f cpa-nginx.yaml

# CPA 규칙 설정
cat <<EOF > cpa-values.yaml
config:
  ladder:
    nodesToReplicas:
      - [1, 1]
      - [2, 2]
      - [3, 3]
      - [4, 3]
      - [5, 5]
options:
  namespace: default
  target: "deployment/nginx-deployment"
EOF
kubectl describe cm cluster-proportional-autoscaler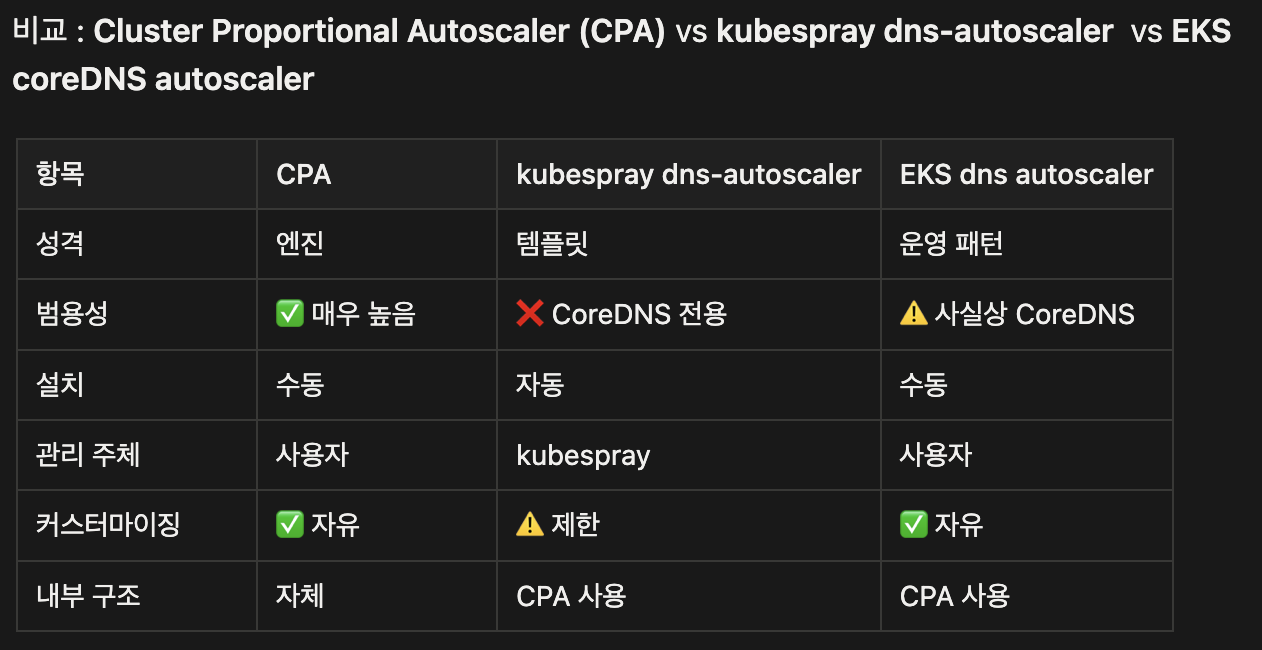
helm 업그레이드
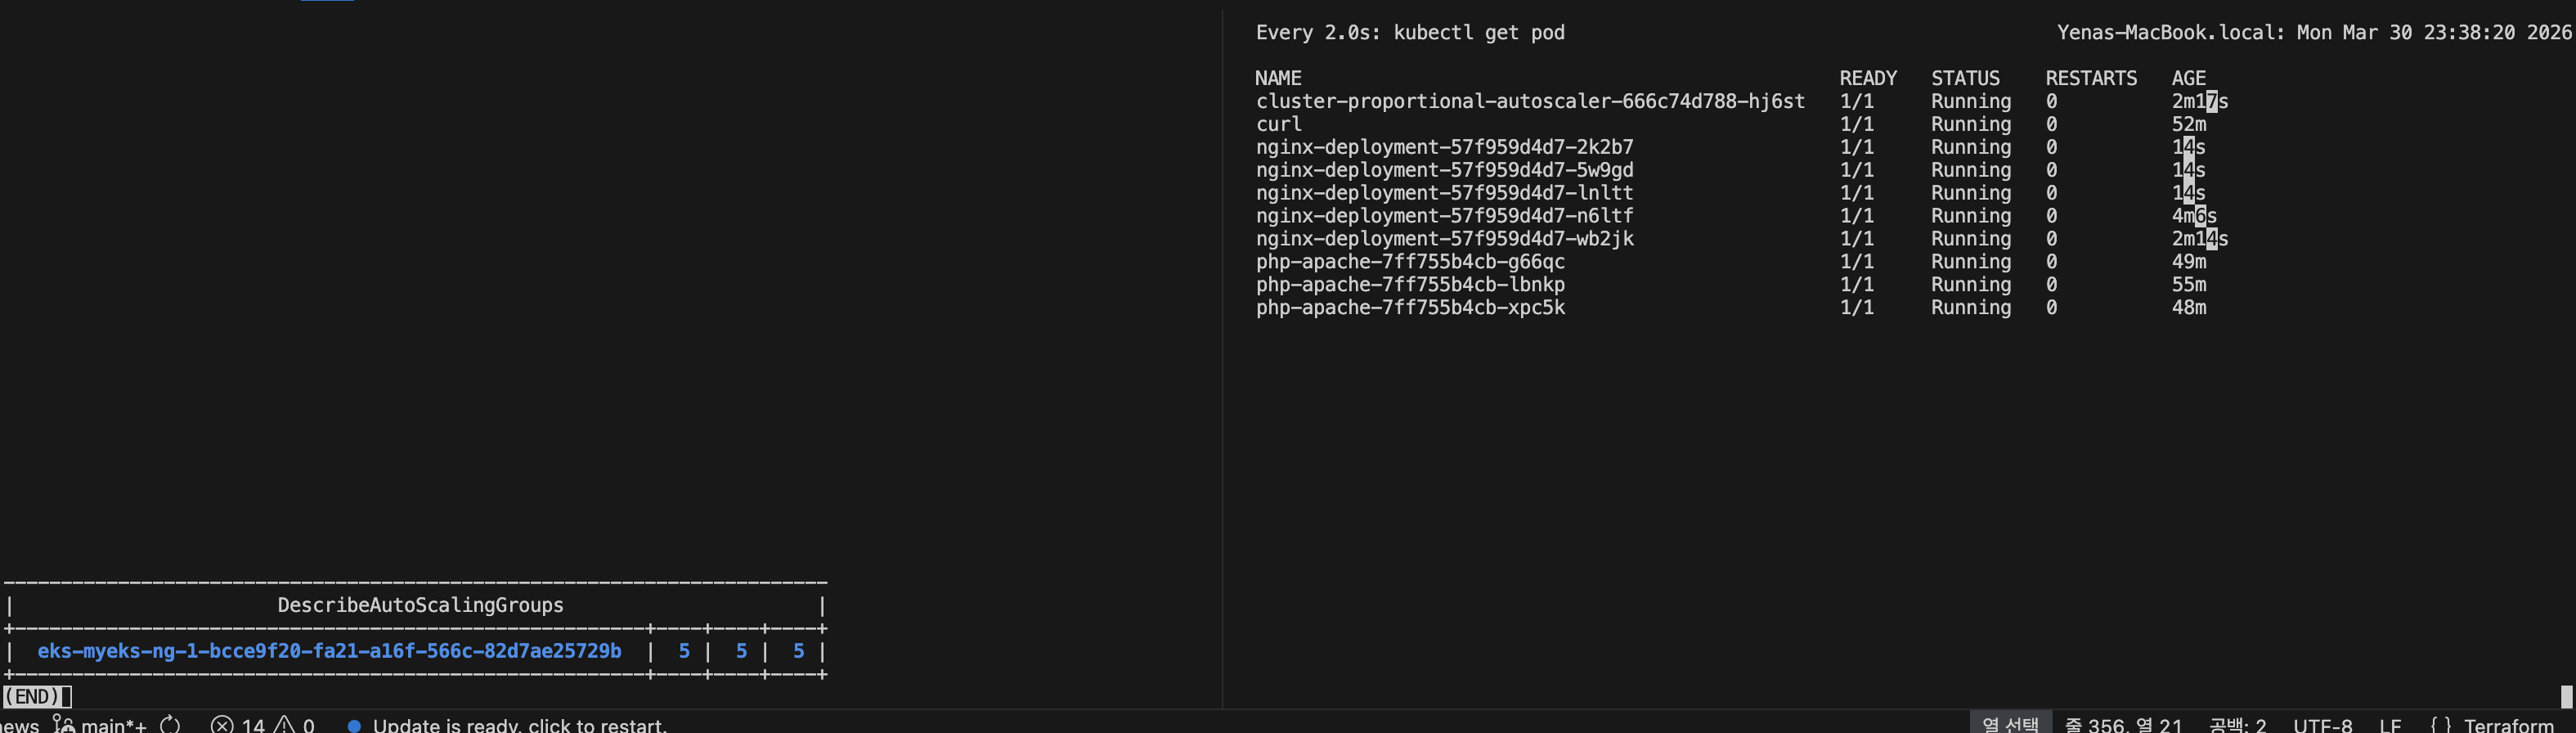
helm upgrade --install cluster-proportional-autoscaler -f cpa-values.yaml cluster-proportional-autoscaler/cluster-proportional-autoscaler노드 5개로 증가
export ASG_NAME=$(aws autoscaling describe-auto-scaling-groups --query "AutoScalingGroups[? Tags[? (Key=='eks:cluster-name') && Value=='myeks']].AutoScalingGroupName" --output text)
aws autoscaling update-auto-scaling-group --auto-scaling-group-name ${ASG_NAME} --min-size 5 --desired-capacity 5 --max-size 5
aws autoscaling describe-auto-scaling-groups --query "AutoScalingGroups[? Tags[? (Key=='eks:cluster-name') && Value=='myeks']].[AutoScalingGroupName, MinSize, MaxSize,DesiredCapacity]" --output table
node를 증설시키니 nginx pod도 증설되었습니다
7. CA / CAS (Cluster Autoscaler)
- Pending Pod 발생 시 노드 추가, 유휴 노드 제거
- ASG 기반 동작, 노드그룹별 min/max 설정 필요
- 스케일 다운 조건: 노드 사용률 50% 미만 + 10분 유지 (기본값)
-> 저같은경우는 운영중인 사이트에 daemonset 은 스케일업, 다운 조건에 포함되지 않도록 ignore-daemonsets-utilization 옵션을 줬고, scale-down-delay-after-add 시간을 주어 스케일아웃 된 노드는 30분동안 감설대상에서 제외하도록 설정해줬습니다.
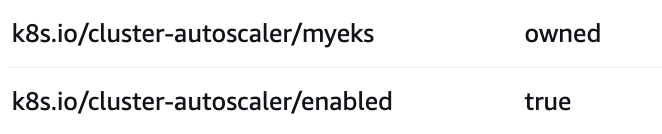
ca 를 사용하려면 node에 위 두개 태그가 붙어있어야한다.
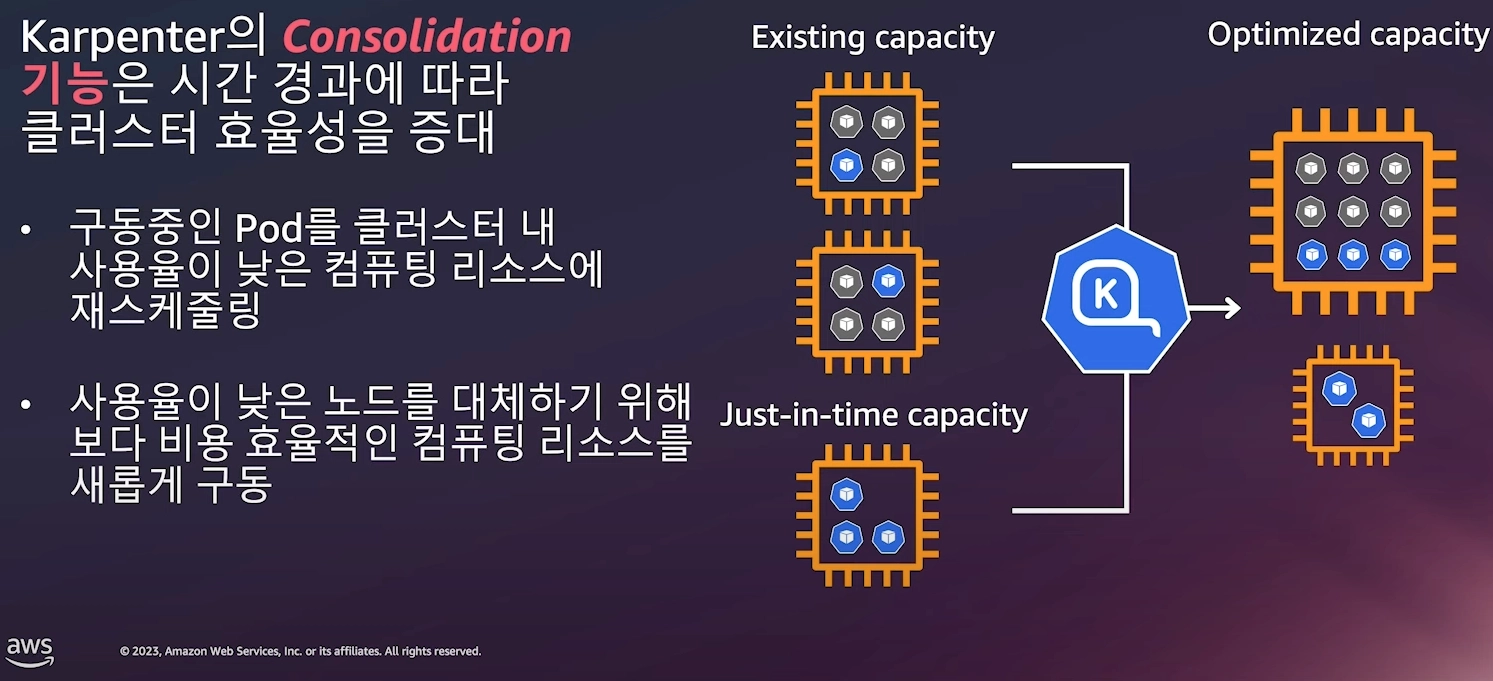
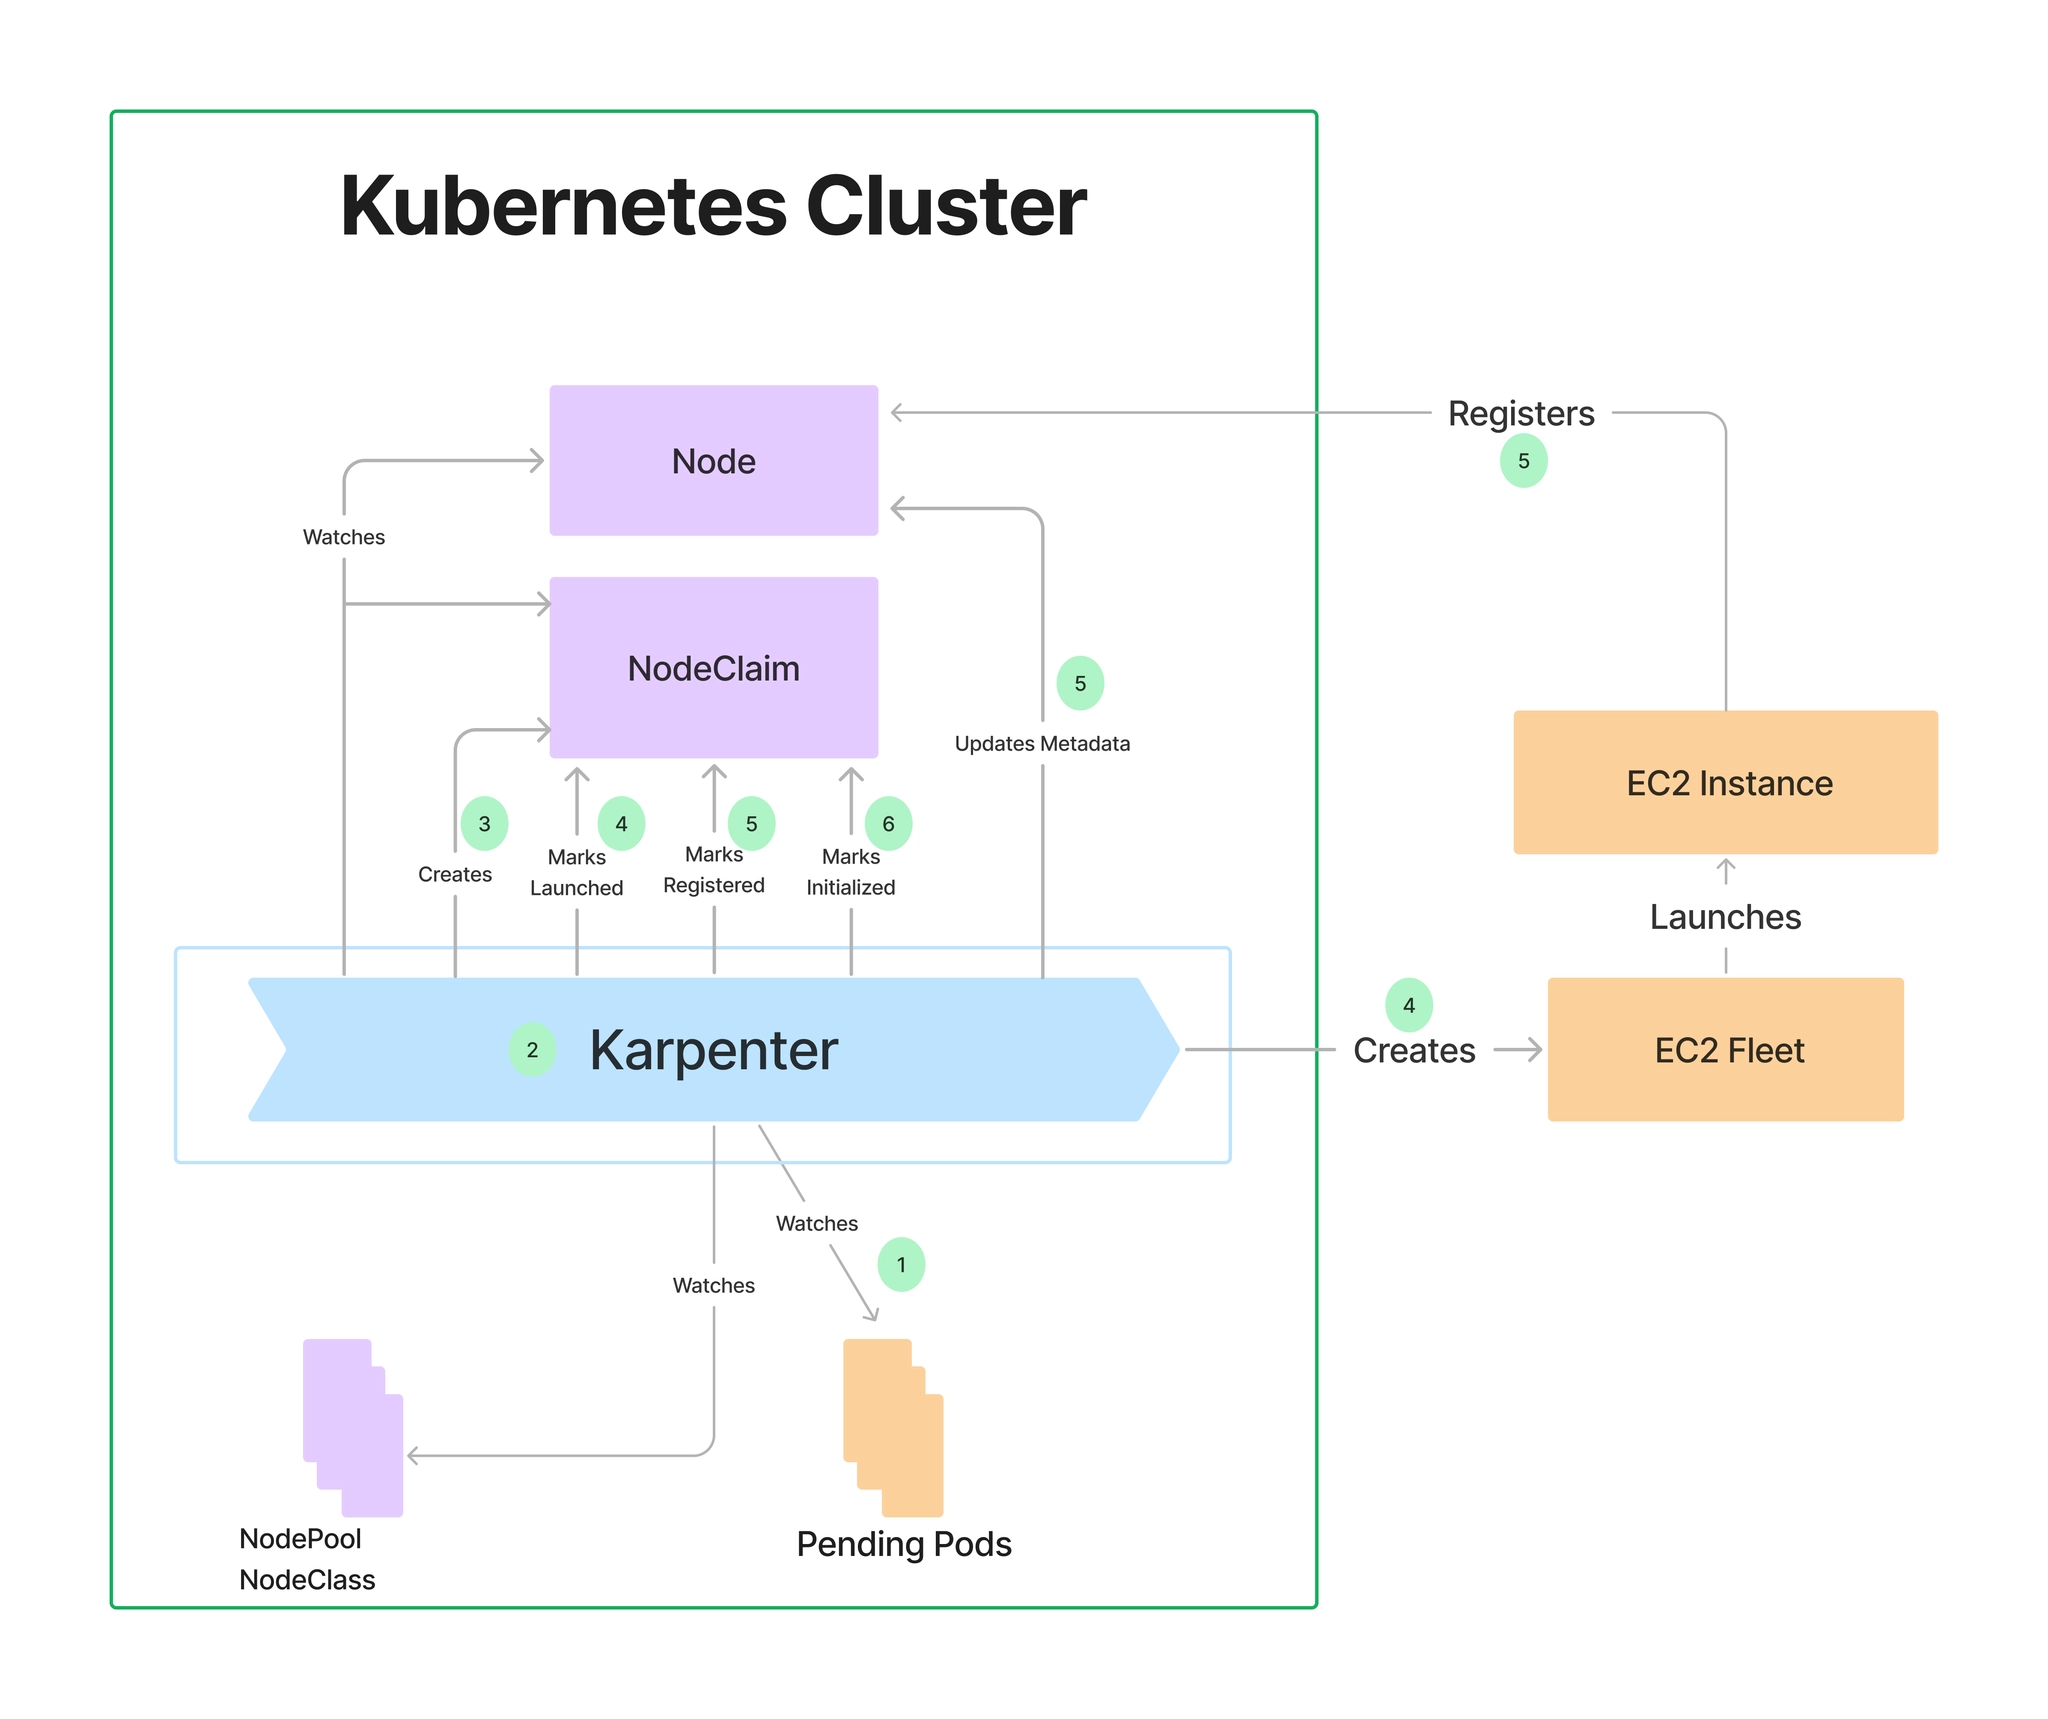
8. Karpenter
- CA 대비 더 빠른 노드 프로비저닝 (수십 초 수준)
NodePool/EC2NodeClassCRD로 인스턴스 유형·AZ·Spot 등 유연하게 정의- Bin-packing 최적화, 불필요 노드 자동 통합(Consolidation)
8.1 실습
1. Install utilities
    1. [AWS CLI](https://docs.aws.amazon.com/cli/latest/userguide/install-cliv2-linux.html) : 자격증명 설정
    2. `kubectl` - [the Kubernetes CLI](https://kubernetes.io/docs/tasks/tools/install-kubectl-linux/)
    3. `eksctl` (>= v0.202.0) - [the CLI for AWS EKS](https://eksctl.io/installation)
    4. `helm` - [the package manager for Kubernetes](https://helm.sh/docs/intro/install/)
    5. `eks-node-view`
8.1.1 카펜터 설치
# Logout of helm registry to perform an unauthenticated pull against the public ECR
helm registry logout public.ecr.aws


# Karpenter 설치를 위한 변수 설정 및 확인
export CLUSTER_ENDPOINT="$(aws eks describe-cluster --name "${CLUSTER_NAME}" --query "cluster.endpoint" --output text)"
export KARPENTER_IAM_ROLE_ARN="arn:${AWS_PARTITION}:iam::${AWS_ACCOUNT_ID}:role/${CLUSTER_NAME}-karpenter"
echo "${CLUSTER_ENDPOINT} ${KARPENTER_IAM_ROLE_ARN}"

# karpenter 설치
helm upgrade --install karpenter oci://public.ecr.aws/karpenter/karpenter --version "${KARPENTER_VERSION}" --namespace "${KARPENTER_NAMESPACE}" --create-namespace \
  --set "settings.clusterName=${CLUSTER_NAME}" \
  --set "settings.interruptionQueue=${CLUSTER_NAME}" \
  --set controller.resources.requests.cpu=1 \
  --set controller.resources.requests.memory=1Gi \
  --set controller.resources.limits.cpu=1 \
  --set controller.resources.limits.memory=1Gi \
  --wait

8.1.2 프로메테우스 / 그라파나 설치
# 프로메테우스 / 그라파나 설치
helm repo add grafana-charts https://grafana.github.io/helm-charts
helm repo add prometheus-community https://prometheus-community.github.io/helm-charts
helm repo update
kubectl create namespace monitoring

# 프로메테우스 설치
curl -fsSL https://raw.githubusercontent.com/aws/karpenter-provider-aws/v"${KARPENTER_VERSION}"/website/content/en/preview/getting-started/getting-started-with-karpenter/prometheus-values.yaml | envsubst | tee prometheus-values.yaml
helm install --namespace monitoring prometheus prometheus-community/prometheus --values prometheus-values.yaml
extraScrapeConfigs: |
    - job_name: karpenter
      kubernetes_sd_configs:
      - role: endpoints
        namespaces:
          names:
          - kube-system
      relabel_configs:
      - source_labels:
        - __meta_kubernetes_endpoints_name
        - __meta_kubernetes_endpoint_port_name
        action: keep
        regex: karpenter;http-metrics

# 프로메테우스 얼럿매니저 미사용으로 삭제
kubectl delete sts -n monitoring prometheus-alertmanager

# 프로메테우스 접속
kubectl port-forward --namespace monitoring svc/prometheus-server 9090:80 &
open http://127.0.0.1:9090


# 그라파나 설치
curl -fsSL https://raw.githubusercontent.com/aws/karpenter-provider-aws/v"${KARPENTER_VERSION}"/website/content/en/preview/getting-started/getting-started-with-karpenter/grafana-values.yaml | tee grafana-values.yaml
helm install --namespace monitoring grafana grafana-charts/grafana --values grafana-values.yaml
datasources:
  datasources.yaml:
    apiVersion: 1
    datasources:
    - name: Prometheus
      type: prometheus
      version: 1
      url: http://prometheus-server:80
      access: proxy
dashboardProviders:
  dashboardproviders.yaml:
    apiVersion: 1
    providers:
    - name: 'default'
      orgId: 1
      folder: ''
      type: file
      disableDeletion: false
      editable: true
      options:
        path: /var/lib/grafana/dashboards/default
dashboards:
  default:
    capacity-dashboard:
      url: https://karpenter.sh/preview/getting-started/getting-started-with-karpenter/karpenter-capacity-dashboard.json
    performance-dashboard:
      url: https://karpenter.sh/preview/getting-started/getting-started-with-karpenter/karpenter-performance-dashboard.json

# admin 암호
kubectl get secret --namespace monitoring grafana -o jsonpath="{.data.admin-password}" | base64 --decode ; echo

# 그라파나 접속
kubectl port-forward --namespace monitoring svc/grafana 3000:80 &
open http://127.0.0.1:3000
8.1.3 노드풀 만들기 (구 프로비저너)
- 관리 리소스는 securityGroupSelector and subnetSelector로 찾음
- consolidationPolicy : 미사용 노드 정리 정책, 데몬셋 제외
# 변수 확인
echo $ALIAS_VERSION
v20260318

# NodePool, EC2NodeClass 생성
cat <<EOF | envsubst | kubectl apply -f -
apiVersion: karpenter.sh/v1
kind: NodePool
metadata:
  name: default
spec:
  template:
    spec:
      requirements:
        - key: kubernetes.io/arch
          operator: In
          values: ["amd64"]
        - key: kubernetes.io/os
          operator: In
          values: ["linux"]
        - key: karpenter.sh/capacity-type
          operator: In
          values: ["on-demand"]
        - key: karpenter.k8s.aws/instance-category
          operator: In
          values: ["c", "m", "r"]
        - key: karpenter.k8s.aws/instance-generation
          operator: Gt
          values: ["2"]
      nodeClassRef:
        group: karpenter.k8s.aws
        kind: EC2NodeClass
        name: default
      expireAfter: 720h # 30 * 24h = 720h
  limits:
    cpu: 1000
  disruption:
    consolidationPolicy: WhenEmptyOrUnderutilized
    consolidateAfter: 1m
---
apiVersion: karpenter.k8s.aws/v1
kind: EC2NodeClass
metadata:
  name: default
spec:
  role: "KarpenterNodeRole-${CLUSTER_NAME}"       # replace with your cluster name
  amiSelectorTerms:
    - alias: "al2023@${ALIAS_VERSION}"            # ex) al2023@latest
  subnetSelectorTerms:
    - tags:
        karpenter.sh/discovery: "${CLUSTER_NAME}" # replace with your cluster name
  securityGroupSelectorTerms:
    - tags:
        karpenter.sh/discovery: "${CLUSTER_NAME}" # replace with your cluster name
EOF

# 확인
kubectl get nodepool,ec2nodeclass,nodeclaims
위 yaml 엔 내가 eks에서 사용할 node의 스펙을 제한해둔다고 생각하면 된다

8.1.4 Scale up deployment
# pause 파드 1개에 CPU 1개 최소 보장 할당할 수 있게 디플로이먼트 배포
cat <<EOF | kubectl apply -f -
apiVersion: apps/v1
kind: Deployment
metadata:
  name: inflate
spec:
  replicas: 0
  selector:
    matchLabels:
      app: inflate
  template:
    metadata:
      labels:
        app: inflate
    spec:
      terminationGracePeriodSeconds: 0
      securityContext:
        runAsUser: 1000
        runAsGroup: 3000
        fsGroup: 2000
      containers:
      - name: inflate
        image: public.ecr.aws/eks-distro/kubernetes/pause:3.7
        resources:
          requests:
            cpu: 1
        securityContext:
          allowPrivilegeEscalation: false
EOF

kubectl get pod
kubectl scale deployment inflate --replicas 5
우선 5개의 pending pod가 발생
1분도 지나지 않아 node가 뜸

9. Fargate
- 노드 없이 Pod 단위로 서버리스 실행
FargateProfile로 네임스페이스/레이블 기반 매핑- DaemonSet 미지원, 스토리지 제한 있음 → 스테이트리스 워크로드에 적합