
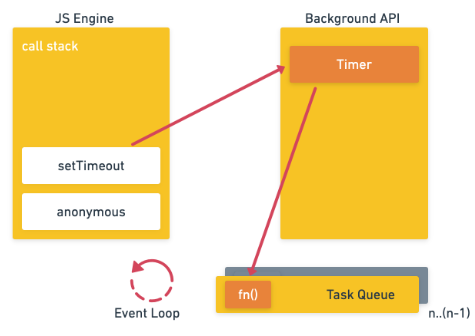
2.1 호출 스택, 이벤트 루프
function run(){
	console.log('3초 후 실행');
}
console.log('시작');
setTimeout(run, 3000);
console.log('끝');- 위 코드는 호출 스택만으로는 설명이 안됨.
- 호출 스택 + 이벤트 루프로 설명 가능
function oneMore(){
	console.log('one more');
}
function run(){
	console.log('run run');
	setTimeout(() => {
    	console.log('wow');
    }, 0)
	new Promise((resolve) => {
    	resolve('hi');
    })
 		.then(console.log);
	oneMore();
}
setTimeout(run, 5000);
/*
실행결과 :
run run
one more
hi
wow
*/- 위 코드 이벤트 루프를 통해 호출 스택 / 백그라운드 / 태스크 큐에서 어떻게 실행이 되는지 파악하기.
- Promise.then/catch 또는 process.nextTick는 태스크 큐에서 타이머 등을 새치기 한다.
2.2 ES2015+ 문법
1) var, const, let 스코프
var는 함수 스코프(function(){}이 스코프의 기준점)
- 다른 언어와는 달리 if나 for, while은 영향을 주지 못함
- const와 let은 함수 및 블록({})에도 별도의 스코프를 가짐
- var : 함수 스코프
- const let : 블록 스코프
if(true){
	var x = 3;
}
console.log(x); // 3

function a(){
	var y = 3;
}
console.log(y); // 에러

if(true){
	const z = 3;
}
console.log(z) // 에러
2) const 예제
const a = 3;
a = '5'; // 에러

const b = { name : 'yeobi01' };
b.name = 'tkdduq'; // 가능
3) 백틱 문자열, 템플릿 문자열
var won = 1000;
var result = '이 과자는 '+ won +'원입니다.';

const result2 = `이 과자는 ${won}원입니다`;

function a(){}
a();
a``; // 태그 템플릿 리터럴
4) ES5 시절의 객체 표현 방법
var sayNode = function(){
	console.log('Node');
};
var es = 'ES';

var oldObject = {
	sayJS: function(){
    	console.log('JS');
    },
	sayNode: sayNode,
};
oldObject[es + 6] = 'Fantastic';
console.log(oldObject.ES6); // Fantastic

var sayNode = function(){
	console.log('Node');
};
var newObject = {
	sayJS(){
    	console.log('JS');
    },
	sayNode,
	[es + 6]: 'Fantastic';
};
console.log(newObject.ES6); // Fantastic
5) arrow function
화살표와 중괄호 다음으로 return이 바로온다면 생략가능
function add1(x, y){
	return x + y;
}
const add2 = (x, y) => {
	return x + y;
};
const add3 = (x, y) => x + y;
const add4 = (x, y) => (x + y);

function not1(x){
	return !x;
}
const not2 = x => !x;

const obj = (x, y) => ({x, y});
// 객체를 리턴하는 경우에는 ()가 필수!!
that이라는 중간 변수를 이용해서 logFriends의 this를 전달
- 자기만의 this를 가져야할 때 기존의 function을 사용
var relationship1{
	name: 'zero',
    friends: ['nero', 'hero', 'xero'],
    logFriends: function(){
    	var that = this;
      	this.friends.forEach(function (friend){
        	console.log(that.name, friend);
        });
    },
};
var relationship2{
	name: 'zero',
    friends: ['nero', 'hero', 'xero'],
    logFriends() {
      	this.friends.forEach((friend) => {
        	console.log(this.name, friend);
        });
    },
}button.addEventListener('click', function(){
console.log(this.textContent);
});
button.addEventListener('click', (event) => {
console.log(event.target.textContent);
});6) 구조분해 할당
const example = {a: 123, b: {c: 135, d: 146}}
const a = example.a;
const d = example.b.d;

const{a, b: { d }} = example;
console.log(a); // 123
console.log(b); // 146
// 객체는 key가 일치해야함

arr = [1, 2, 3, 4, 5];
const x = arr[0];
const y = arr[1];
const z = arr[4];

const[x, y, , , z] = arr;
// 배열은 자리를 똑같이 하기
const candyMachine = {
status: {
name: 'node',
count: 5,
},
getCandy(){
this.status.count--;
return this.status.count;
},
};
const { getCandy, status: { count }} = candyMachine;
// this가 있으면 구조분해 할당 안하는게 좋음7) 클래스
class Human{
	constructor( type = 'human' ){
    	this.type = type;
    }
 	static isHuman(human){
    	return human instanceof Human;
    }
  	breathe(){
    	alert('h-a-a-a-m');
    }
}
class Zero extends Human{
	constructor(type, firstName, LastName){
    	super(type);
      	this.firstName = firstName;
      	this.lastName = lastName;
    }
  	sayName(){
    	super.breathe();
      	alert(`${this.firstName} ${this.lastName}`);
    }
}
const newZero = new Zero('human','Kim','SanyYeob');
8) 프로미스
- 프로미스 : 내용이 실행은 되었지만 결과를 아직 반환하지 않은 객체
- then을 붙이면 결과를 반환함
- 실행이 완료되지 않았으면 완료된 후에 then 내부 함수가 실행됨
- Resolve(성공리턴값) -> then으로 연결
- Reject(실패리턴값) -> catch로 연결
- Finally 부분은 무조건 실행됨
const condition = true; // true면 resolve, false면 reject
const promise = new Promise((resolve, reject) => {
	if(condition){
    	resolve('성공');
    } else {
    	reject('실패');
    }
})
// 다른 코드가 들어갈 수 있음
promise
	.then((message) => {
		console.log(message); // 성공(resolve)한 경우 실행
	})
	.catch((error) => {
		console.error(error); // 실패(reject)한 경우 실행
	})
async/await 강의영상 이해될 때까지 돌려보기
2.3 프론트엔드 JavaScript
1) AJAX
- 라이브러리 없이는 브라우저가 지원하는 XMLHttpRequest 객체 이용
- AJAX 요청 시 Axios 라이브러리를 사용하는 것이 편함.
- HTML에 아래 스크립트를 추가하면 사용할 수 있음.
<script src="https://unpkg.com/axios/dist/axios.min.js"</script>
<script>
  // 코드작성
</script>
GET 요청 보내기
- axios.get 함수의 인수로 요청을 보낼 주소를 넣으면 됨
- 프로미스 기반 코드라 async/await 사용 가능
.axios.get('https://www.zerocho.com/api/get')
	.then((result) => {
		console.log(result);
  		console.log(result.data);
	})
	.catch((error) => {
		console.error(error);
	});

(async () => {
	try{
    	const result = await axios.get('https://www.zerocho.com/api/get');
      	console.log(result);
      	console.log(result.data);
    } catch(error) {

    }
})();
POST 요청을 하는 코드(데이터를 담아 서버로 보내는 경우)
- 전체적인 구조는 비슷하나 두 번째 인수로 데이터를 넣어 보냄
(async () => {
	try{
    	const result = await axios.post('https://www.zerocho.com/api/post/json', {
        	name: 'zerocho',
            birth: 1994,
        });
    	console.log(result);
        console.log(result.data);
    } catch(error){
    	console.error(error);
    }
})();
2) FormData
HTML form 태그에 담긴 데이터를 AJAX 요청으로 보내고 싶은 경우
- FormData 객체 이용
FormData 메서드
- Append로 데이터를 하나씩 추가
- Has로 데이터 존재 여부 확인
- Get으로 데이터 조회
- getAll로 데이터 모두 조회
- delete로 데이터 삭제
- set으로 데이터 수정
const formData = new FormData();
formData.append('name','zerocho');
formData.append('item','orange');
formData.append('item','melon');
formData.has('item'); // true
formData.has('money'); // false
formData.get('item'); // orange
formData.getAll('item'); // ['orange', 'melon']
formData.append('test',['hi', 'zero']);
formData.get('test'); // hi, zero
formData.delete('test');
formData.get('test'); // null
formData.set('item', 'apple');
formData.getAll('item'); // ['apple']..?
FormData POST 요청으로 보내기
- Axios의 data자리에 formData를 넣어서 보내면 됨
(async () => {
	try{
    	const formData = new FormData();
      	formData.append('name', 'zerocho');
      	formData.append('birth', 1994);
      	const result = await axios.post('https://www.zerocho.com/api/post/formdata', formData);
      	console.log(result);
      	console.log(result.data);
    } catch (error){
    	console.error(error);
    }
})();
가끔 주소창에 한글 입력하면 서버가 처리하지 못하는 경우 발생
- encodeURIComponent로 한글 감싸줘서 처리
(async () => {
	try{
    	const result = await axios.get(`https://www.zerocho.com/api/search/${encodeURIComponent('노드')}`);
      	console.log(result);
      	console.log(result.data);
    } catch (error){
    	console.error(error);
    }
})();
**노드를 encodeURIComponent하면 %EB%85%B8%EB%93%9C가 됨
- decodeURIComponent로 서버에서 한글 해석
decodeURIComponent('%EB%85%B8%EB%93%9C'); // 노드4) data attribute와 dataset
HTML 태그에 테이터를 저장하는 방법
- 서버의 데이터를 프론트엔드로 내려줄 때 사용
- 태그 속성으로 data-속성명
- 자바스크립트에서 태그.dataset.속성명으로 접근 가능
- data-user-job -> dataset.userJob
- data-id -> dataset.id
- 반대로 자바스크립트 dataset에 값을 넣으면 data-속성이 생김
- dataset.monthSalary = 10000 -> data-month-salary="10000"
<ul>
	<li data-id="1" data-user-job="programmer">Zero</li>
  	<li data-id="2" data-user-job="designer">Nero</li>
  	<li data-id="3" data-user-job="programmer">Hero</li>
  	<li data-id="4" data-user-job="ceo">Kero</li>
</ul>
Studying NodeJS...