
진행하는 프로젝트에서 설계 도면의 제목뿐 아니라 도면 파일 내의 텍스트 데이터를 검색 인덱스로 사용해야 했다. 그래서 파일 내의 데이터를 추출 자동화가 필요했는데 autoCAD의 DATAEXTRACTION 명령어는 audoCAD 내에서 지원하기 때문에 사용할 수 없었고 데모 시연이 코앞이라 aspose사의 api를 사용하기에는 시간이 부족했다.
따라서 매크로를 사용해 도면 파일을 직접 업로드하고 변환 사이트에서 변환한 후 변환된 파일을 다운로드하는 방식을 사용했다.
wsl(ubuntu-20.04), nodejs의 selenium-webdriver패키지를 사용했다.
npm install selenium-webdriver chromedriver이렇게 설치 후
const { Builder, Browser, By, Key, until } = require("selenium-webdriver");
const chromeDriver = require("selenium-webdriver/chrome");
const chromeOptions = new chromeDriver.Options();
const downloadPath = path.join("./public/downloads");

chromeOptions.addArguments("--headless");
chromeOptions.addArguments("--disable-gpu");
chromeOptions.addArguments("--no-sandbox");
chromeOptions.setUserPreferences({
  "download.prompt_for_download": false,
  "download.directory_upgrade": true,
  "download.default_directory": downloadPath,
});

const chromeExample = async () => {
  const driver = await new Builder()
    .forBrowser(Browser.CHROME)
    .setChromeOptions(chromeOptions)
    .build();

  await driver.manage().window().maximize();

  try {
    /* Upload Start */
    await driver.get("https://products.aspose.app/cad/text-extractor/dwg");

    await driver.wait(
      // wait: file 업로드 element 렌더링
      until.elementLocated(By.className("filedrop")),
      10 * 1000
    );
    await driver.wait(
      // wait: file 업로드 element 활성화
      until.elementIsEnabled(
        driver.findElement(
          By.xpath(
            "//div[@class='filedrop filedrop-mvc fileplacement width-for-mobile']/input"
          )
        )
      ),
      10 * 1000
    );
    await driver
      .findElement(
        By.xpath(
          "//div[@class='filedrop filedrop-mvc fileplacement width-for-mobile']/input"
        )
      )
      .sendKeys(
        "/home/yeongori/workspace/Engineering-data-search-service/macro/public/images/testfile1.dwg"
      );

    await driver.wait(
      // wait: 변환 버튼 활성화
      until.elementIsEnabled(driver.findElement(By.id("uploadButton"))),
      10 * 1000
    );
    await driver.findElement(By.id("uploadButton")).click();
    /* Upload End */

    /* Download Start */
    await driver.wait(
      //wait: Download 페이지로의 redirection
      until.elementIsVisible(driver.findElement(By.id("DownloadButton"))),
      100 * 1000
    );
    await driver.wait(
      // wait: Download 버튼 활성화
      until.elementIsEnabled(driver.findElement(By.id("DownloadButton"))),
      10 * 1000
    );

    await driver.findElement(By.id("DownloadButton")).click();
    await driver.sleep(5 * 1000); // wait: Download 완료
    /* Download End */
  } catch (err) {
    console.log(err);
  }
  await driver.quit();
};
이렇게 코드를 입력해 준다.
파일 업로드와 다운로드
앞서 게시한 전체 코드가 꽤 직관적이라 금방 이해할 수 있을 것으로 예상된다. 그래서 구현 중에 겪었던 문제와 해결 과정을 위주로 작성하려고 한다.
문제점과 해결 과정
1. Chrome driver 설치
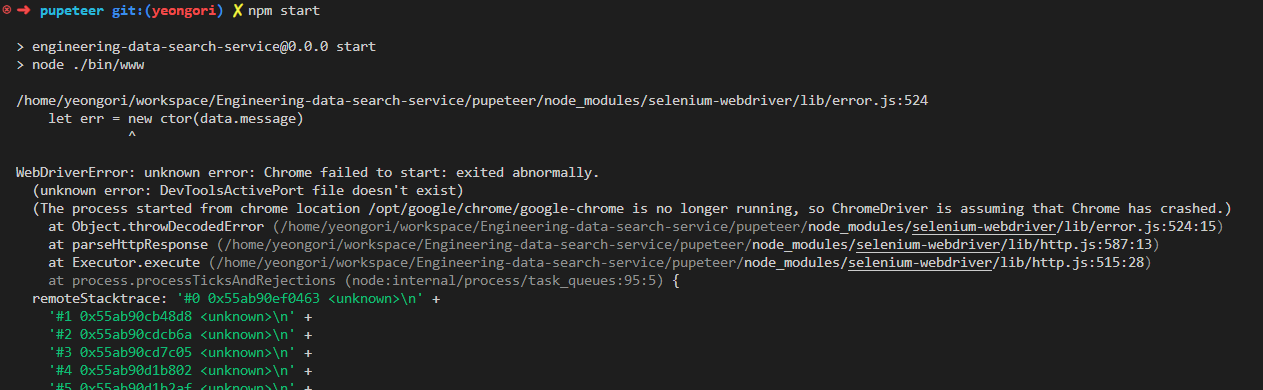
selenium으로 크롬 브라우저를 제어하기 위해서는 chrome driver를 설치해야 한다. wsl이 host os(window)에 다운로드된 chrome driver를 인식하지 못해 wsl 환경에서도 설치해주어야 한다.
만약 설치가 안 되어 있다면 다음과 같은 에러를 만났을 것이다.
WebDriverError: unknown error: Chrome failed to start: exited abnormally.
(unknown error: DevToolsActivePort file doesn't exist)
sudo apt-get update

sudo apt-get upgrade

sudo apt-get install wget	// wget 설치

wget --version				// 설치 확인


wget https://dl.google.com/linux/direct/google-chrome-stable_current_amd64.deb	// .deb 파일 설치

sudo apt-get --fix-broken install	// 위의 명령어가 실패했을 때 실행

sudo dpkg -i google-chrome-stable_current_amd64.deb	// 다운로드한 실행파일 실행

npm start
2. Chrome driver 옵션 설정
위의 명령어에서 밑의 코드를 빼먹으면 동일한 오류가 뜰 수 있다. Chrome driver의 옵션을 꼭 headless로 설정하자
chromeOptions.addArguments("--headless");
chromeOptions.addArguments("--disable-gpu");
chromeOptions.addArguments("--no-sandbox");
chromeOptions.setUserPreferences({
  "download.prompt_for_download": false,
  "download.directory_upgrade": true,
  "download.default_directory": downloadPath,
});
바로 이 부분인데 headless 옵션이란 말 그대로 창이 없다이다.
우리가 이 포스팅을 확인한 것을 확인해 보면 브라우저가 html, css, js 파일을 불러와 어떤 내용을 띄울지 결정하고 사용자에게 화면을 보여주는데 이 과정이 OS에 따라 실행 될수도, 안될 수도 있다. 이를 브라우저 화면을 가상으로 진행해주는 headless 모드가 해결한다.
chromeOptions.addArguments("--headless"); 를 명시해주자
3. Tag별 interaction
변환 사이트에서 변환할 도면 파일을 올리기 위해서는 아래의 버튼을 클릭해야 한다.
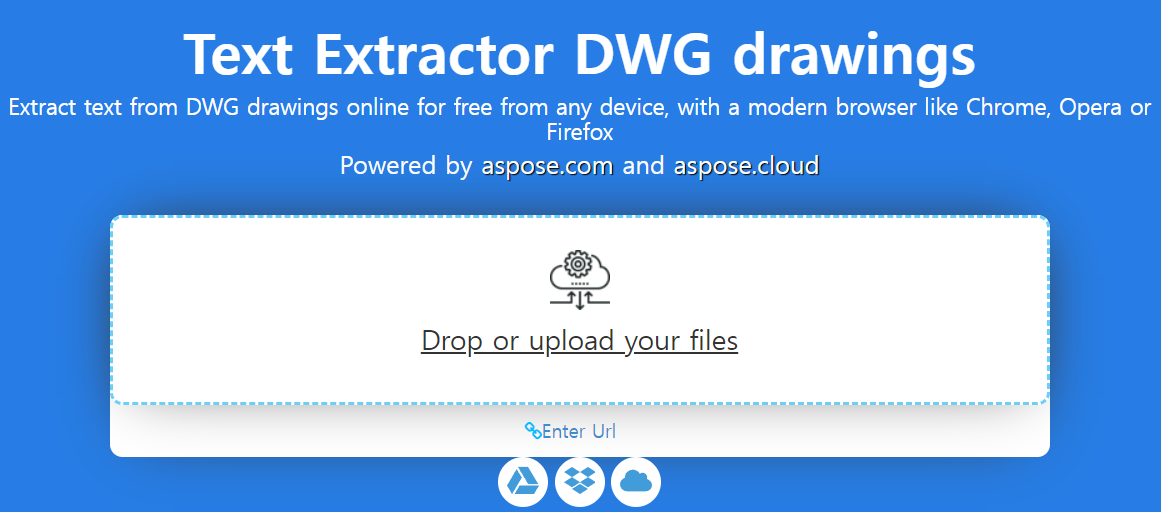
개발자 도구를 켜면 아래와 같은 화면을 볼 수 있는데
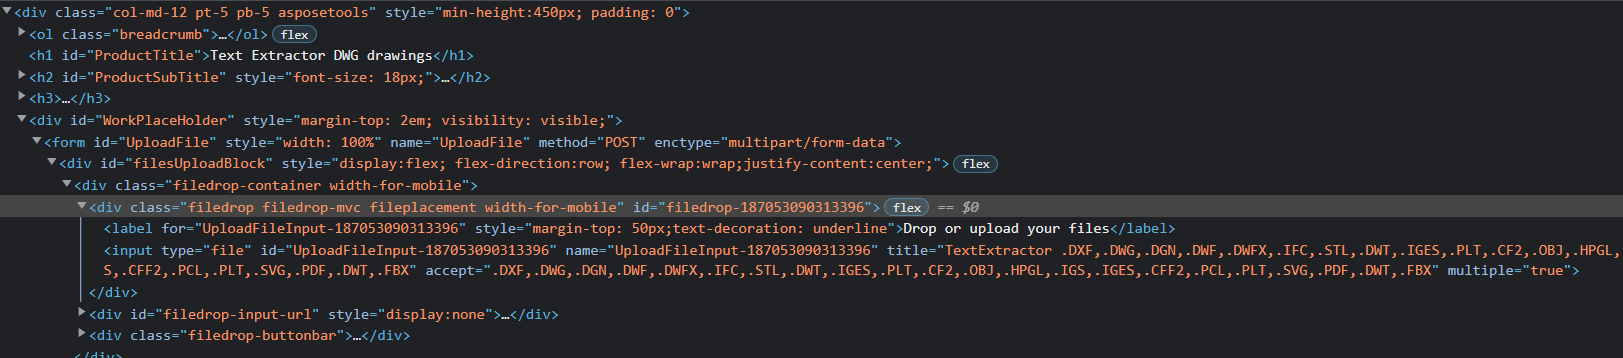
<div id="fileUploadBlock">
  ...
</div>
에 커서를 가져가 클릭을 하면 파일 업로드 창이 뜨는 것을 확인할 수 있었다. 이게 함정인데 그렇다고 div element를 사용해 sendKeys()라던지 click() 같은 상호작용 메소드를 호출하면 안 된다. 상호작용이 가능한 input element 등을 사용해야만 한다.
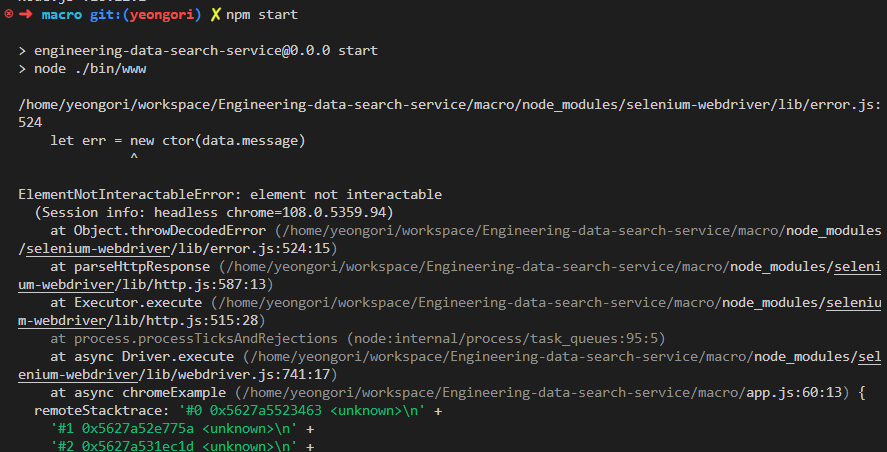
이를 무시하면 아래의 에러를 만날 수 있다.
ElementNotInteractableError: element not interactable
(Session info: headless chrome=108.0.5359.94)
아래의 코드를
  await driver
    .findElement(
      By.id("fileUploadBlock")
    )
    .sendKeys(
      "/home/yeongori/workspace/Engineering-data-search-service/macro/public/images/testfile1.dwg"
    );
다음과 같이 바꿔서 해결할 수 있었다.
  await driver
    .findElement(
      By.xpath(
        "//div[@class='filedrop filedrop-mvc fileplacement width-for-mobile']/input"
      )
    )
    .sendKeys(
      "/home/yeongori/workspace/Engineering-data-search-service/macro/public/images/testfile1.dwg"
    );
4. X-Path
이거 때문에 반나절을 날렸다. 변환 사이트에서 개발자 도구를 켜면 아래와 같은 화면을 볼 수 있다.
나는 저기 보이는 input element를 가져와야 한다. 이때 다음과 같이 작성하면 반나절을 날리는 것이다.
  await driver
    .findElement(
      By.id("UploadFileInput-187053090313396")
    )
    .sendKeys(
      "/home/yeongori/workspace/Engineering-data-search-service/macro/public/images/testfile1.dwg"
    );
새로고침 할 때마다 UploadFileInput-187053... 의 숫자 값이 계속해서 변한다. 그 때문에 고정된 값을 넣으면 driver가 해당 id를 가진 element를 찾지 못하는 것이다. 아마 크롤링을 막기 위한 조치인 것 같다. id 값은 변하지만, input tag의 위치는 변하지 않기 때문에 x-path를 사용해 input tag를 찾아가는 방법을 사용해서 해결해야 하겠다.
By.xpath("...")부분을 확인하자
By.xpath("/html/body/main/div/div/div/div[@id='WorkPlaceHolder']/form[@id='UploadFile']/div[@id='filesUploadBlock']/div[@class='filedrop-container width-for-mobile']/div[@class='filedrop filedrop-mvc fileplacement width-for-mobile']/input")

// "//" (descendant-or-self)를 사용해 축약

By.xpath("//div[@class='filedrop filedrop-mvc fileplacement width-for-mobile']/input")
5. Default download path 설정
파일 다운로드 버튼을 클릭하면 기본적으로 어플리케이션을 실행한 경로에 다운로드가 된다.
이것을 내가 원하는 경로로 변경하기 위해 setUserPreferences로 크롬 브라우저의 설정을 변경해준다.
const chromeOptions = new chromeDriver.Options();
const downloadPath = path.join("./public/downloads");

chromeOptions.addArguments("--headless");
chromeOptions.addArguments("--disable-gpu");
chromeOptions.addArguments("--no-sandbox");
chromeOptions.setUserPreferences({
  "download.default_directory": downloadPath,
});headless는 앞서 설명했고 disable-gpu는 headless모드라 필요 없는 gpu사용을 멈춰 실행속도를 늘리는 것이다. no-sandbox는 크롬의 보안 기능인 샌드박스를 비활성화 하는 것이다.

selenium 모듈의 소스 코드에서 크롬이 headless 모드에서의 download를 비활성화한다고 적혀있길래 추가해 주었는데 제거해도 동일하게 동작한다.
마지막으로 defualt_directory path를 설정해 주고 Builder를 만들 때 Option에 추가해주었다.
  const driver = await new Builder()
    .forBrowser(Browser.CHROME)
    .setChromeOptions(chromeOptions)
    .build();
여기까지 코딩을 한 후 테스트를했는데 파일이 다운로드가 안 되는 것이다..! 다운로드 버튼을 클릭한 것까지는 검증이 되었는데 그 어디에도 다운로드가 되지 않는 오류가 있었다.
알고 보니 await을 사용해 click()을 완료할 때까지는 실행 순서를 보장했지만, click으로 발생한 이벤트인 download가 완료될 때까지 기다리지 않고 driver.quit()로 끝내 버린 것이다. 이를 해결하기 위해 아래의 코드를 추가해 주었다.
    await driver.findElement(By.id("DownloadButton")).click();
    await driver.sleep(5 * 1000); // wait: Download 완료
이 코드가 정말 안 좋은 코드인 게 다운로드 시간을 예상할 수 없기 때문에 임의로 5초를 주었다. 네트워크 상황에 따라 0.1초가 될 수도 10초가 될 수도 있기 때문에 딱 다운로드 시간만큼만 기다려야 하는데 방법을 생각해봐야겠다.
결과 화면

이렇게 Nodejs, Selenium을 사용한 파일 업로드, 다운로드 기능을 구현하였다. 기능의 완성에만 초점을 맞춘 것이라 성능을 끌어올리는 방법을 리팩토링 때 생각해 보아야겠다.