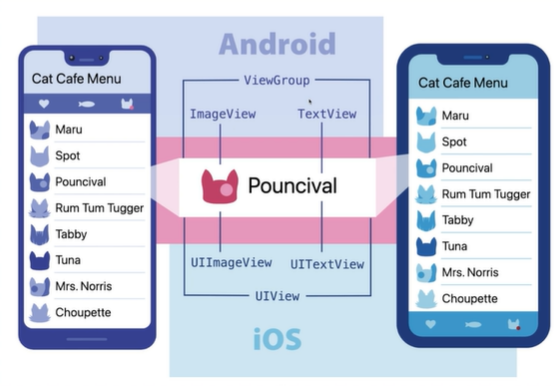
Core component
Android
ViewGroup - ImageView, TextView
UIView- UIImageView, UITextView
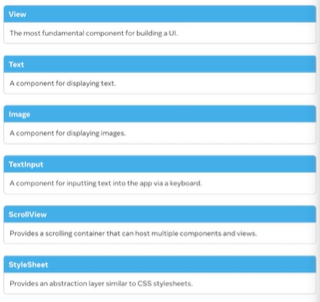
Basic Components
-View
-Text
-Image
-TextInput
-ScorllView
-StyleSheet
User Interface (사용자와 상호작용)
- Button
- Switch
List Views
-FlatList
-SectionList
Android Components and APIs
BackHandler
DrawerLayoutAndroid
PermissionAndroid
ToastAndroid
iOS Componets and APIs
ActionSheetIOS
import { StatusBar } from 'expo-status-bar';
import { StyleSheet, Text, View } from 'react-native';

export default function App() {
  return (
    <View style={styles.container}>
      <Text>Open up App.js to start working on your app!</Text>
      <StatusBar style="auto" />
    </View>
  );
}

const styles = StyleSheet.create({
  container: {
    flex: 1,
    backgroundColor: '#fff',
    alignItems: 'center',
    justifyContent: 'center',
  },
});
View
View는 component를 담기 위한 박스
View안에 Text와 StatusBar(상태바를 관리해주는)포함
StatusBar
Text
const styles = StyleSheet.create({
container: {
flex: 1,
backgroundColor: '#fff',
alignItems: 'center',
justifyContent: 'center',
},
text:{
fontSize:20,
fontWeight:"bold",
}
container라는 이름을 가진 style이 있음
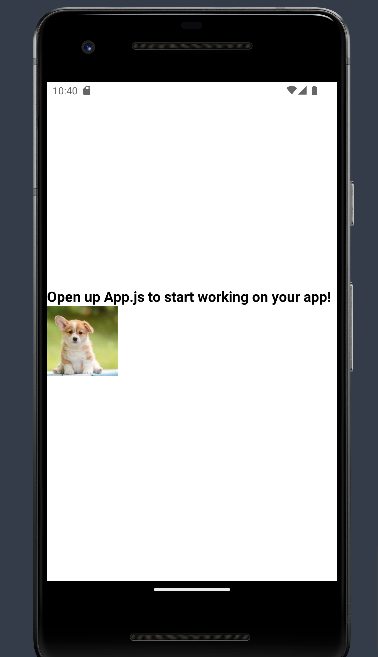
Image
절대 경로나 상대 경로 써주면 됨
width와 height 기입해야O
<Image source={require("./puppy.jpeg")} style={styles.local_image} />
<Image
source={{
uri: "https://vetmed.tamu.edu/news/wp-content/uploads/sites/9/2023/05/AdobeStock_472713009.jpeg",
}}
style={styles.local_image}
/>
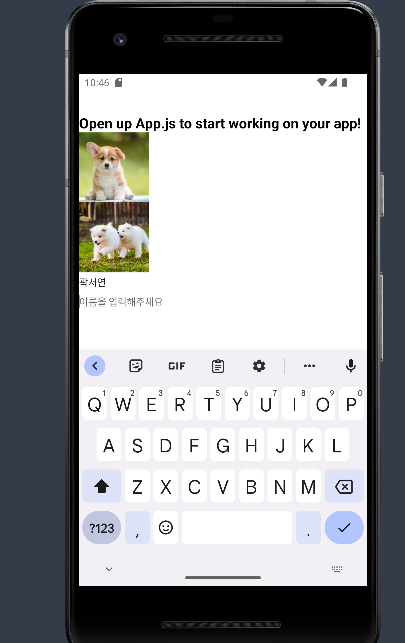
TextInput
import { statusBar } from "expo-status-bar";
import { Image, StyleSheet, Text, TextInput, View } from "react-native";

export default function App() {
return (
  <View style={styles.container}>
    <Text style={styles.text}>
      Open up App.js to start working on your app!
    </Text>
    <Image source={require("./puppy.jpeg")} style={styles.local_image} />
    <Image
      source={{
        uri: "https://vetmed.tamu.edu/news/wp-content/uploads/sites/9/2023/05/AdobeStock_472713009.jpeg",
      }}
      style={styles.local_image}
    />
    <TextInput value="곽서연" />
  </View>
);
}

const styles = StyleSheet.create({
container: {
  flex: 1,
  backgroundColor: "#fff",
  alignItems: "cenpmnter",
  justifyContent: "center",
},
text: {
  fontSize: 20,
  fontWeight: "bold",
},
local_image: {
  width: 100,
  height: 100,
},
});
ScrollView
  <ScrollView>
    <Image source={require("./puppy.jpeg")} style={styles.local_image} />
    <Image source={require("./puppy.jpeg")} style={styles.local_image} />
    <Image source={require("./puppy.jpeg")} style={styles.local_image} />
    <Image source={require("./puppy.jpeg")} style={styles.local_image} />
    <Image source={require("./puppy.jpeg")} style={styles.local_image} />
    <Image source={require("./puppy.jpeg")} style={styles.local_image} />
  </ScrollView>
Button
title(버튼 명)과 onPress(클릭했을 때 실행되는 동작) 이 필수 속성
<Button
title="Click Me!"
onPress={() => {
console.log("clicked!");
}}
/>
Switch
import { statusBar } from "expo-status-bar";
import {
  Image,
  ScrollView,
  StyleSheet,
  Text,
  TextInput,
  View,
  Button,
  Switch,
} from "react-native";

export default function App() {
  return (
    <View style={styles.container}>
      <Text style={styles.text}>
        Open up App.js to start working on your app!
      </Text>
      <Image source={require("./puppy.jpeg")} style={styles.local_image} />
      <Image
        source={{
          uri: "https://vetmed.tamu.edu/news/wp-content/uploads/sites/9/2023/05/AdobeStock_472713009.jpeg",
        }}
        style={styles.local_image}
      />
      <TextInput value="곽서연" />
      <TextInput placeholder="이름을 입력해주세요" />

      <Button
        title="Click Me!"
        onPress={() => {
          console.log("clicked!");
        }}
      />

      <Switch value={true} />
      <Switch value={false} />

      <ScrollView>
        <Image source={require("./puppy.jpeg")} style={styles.local_image} />
        <Image source={require("./puppy.jpeg")} style={styles.local_image} />
        <Image source={require("./puppy.jpeg")} style={styles.local_image} />
        <Image source={require("./puppy.jpeg")} style={styles.local_image} />
        <Image source={require("./puppy.jpeg")} style={styles.local_image} />
        <Image source={require("./puppy.jpeg")} style={styles.local_image} />
      </ScrollView>
    </View>
  );
}

const styles = StyleSheet.create({
  container: {
    flex: 1,
    backgroundColor: "#fff",
    alignItems: "cenpmnter",
    justifyContent: "center",
  },
  text: {
    fontSize: 20,
    fontWeight: "bold",
  },
  local_image: {
    width: 100,
    height: 100,
  },
});
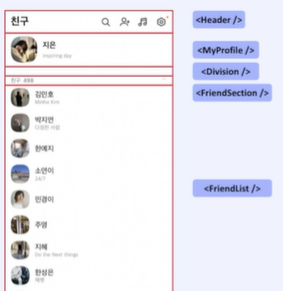
컴포넌트와 prop
컴포넌트의 의미
- 재사용 가능한 개별적인 여러 조각
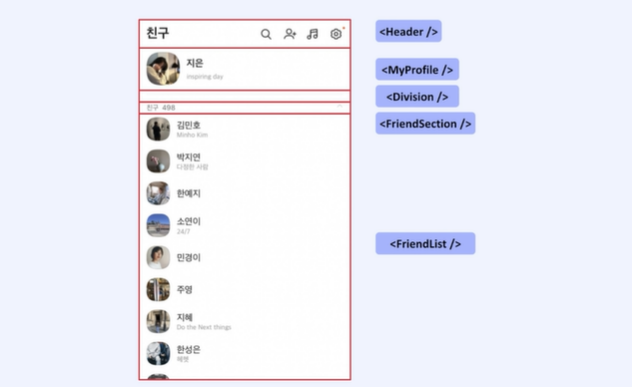
각 component는 props라는 객체 인자를 받을 수 있음
상위 component가 하위 component에게 내려주는 데이터라고 볼 수 있음
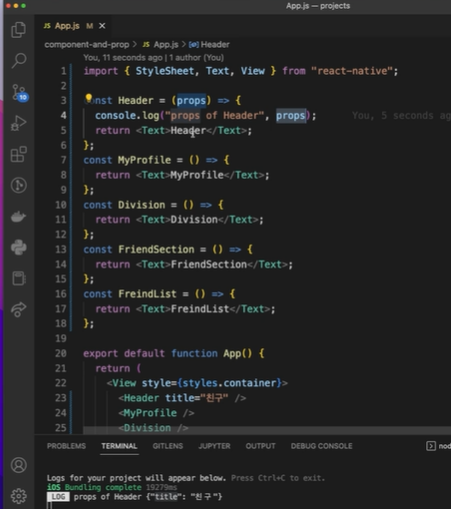
Header의 props가 title로 넘어온 것을 확인할 수 있음
여러 중복되는 코드를 줄일 수 있음
props의 객체 인자로 이름 등의 정보를 넣으면 됨
props는 읽기 전용이기 때문에 자식 component에서는 수정을 할 수 없음
변화하는 값은 state를 통해
컴포넌트의 종류
1) 클래스형 컴포넌트
- class 키워드 필요
- Component로 상속 받아야 함
- render() 메소드 반드시 필요
- state, lifeCycle 관련 기능 사용 가능
- 함수형 메모리 자원을 더 사용
2) 함수형 컴포넌트
- state, lifeCycle 관련 기능 사용, 불가능-> hook으로 해결
- 클래스형보다 메모리 자원을 덜 사용
- 컴포넌트 선언이 편함
- 공식문서에서도 함수형 컴포넌트 + hook 사용을 권장
import { statusBar } from "expo-status-bar";
import { StyleSheet, View, Text, Image } from "react-native";

const Header = (props) => {
  return <Text>{props.title}</Text>;
};
const MyProfile = () => {
  return (
    <Profile
      name="지은"
      uri="https://image.dongascience.com/Photo/2020/03/5bddba7b6574b95d37b6079c199d7101.jpg"
      profileSize={30}

    />
  );
};
const Division = () => {
  return <Text>Division</Text>;
};
const FriendSection = () => {
  return <Text>FriendSection</Text>;
};
const FriendList = () => {
  return (
    <View>
      <Profile
        name="지연"
        uri="https://image.dongascience.com/Photo/2020/03/5bddba7b6574b95d37b6079c199d7101.jpg"
        profileSize={30}
      />
      <Profile
        name="은수"
        uri="https://image.dongascience.com/Photo/2020/03/5bddba7b6574b95d37b6079c199d7101.jpg"
        profileSize={30}
      />
      <Profile
        name="상호"
        uri="https://image.dongascience.com/Photo/2020/03/5bddba7b6574b95d37b6079c199d7101.jpg"
        profileSize={30}
     />
      <Profile
        name="상윤"
        uri="https://image.dongascience.com/Photo/2020/03/5bddba7b6574b95d37b6079c199d7101.jpg"
        profileSize={30}
      />
      <Profile
        name="기호"
        uri="https://image.dongascience.com/Photo/2020/03/5bddba7b6574b95d37b6079c199d7101.jpg"
        profileSize={30}
      />
    </View>
  );
};
const Profile = (props) => {
  return (
    <View style={{ flexDirection: "row" }}>
      <Image
        source={{
          uri: props.uri,
        }}
        style={{
          width: props.profileSize,
          height: pros.profileSize,
        }}
      />

      <Text>{props.name}</Text>
    </View>
  );
};

export default function App() {
  return (
    <View style={styles.container}>
      <Header title="친구" />
      <MyProfile />
      <Division />
      <FriendSection />
      <FriendList />
    </View>
  );
}

const styles = StyleSheet.create({
  container: {
    flex: 1,
    backgroundColor: "#fff",
    alignItems: "center",
    justifyContent: "center",
  },
});
Profile을 함수형 Component로 작성
가독성 면에서 함수형 component가 훨씬 낫다
+) 주석은 Ctrl+/
class Profile extends React.Component {
  render() {
    return (
      <View sytle={{ flexDirection: "row" }}>
        <Image
          source={{
            uri: this.props.uri,
          }}
          style={{
            width: this.props.profileSize,
            height: this.props.profileSize,
          }}
        />
        <Text>{this.props.name}</Text>
      </View>
    );
  }
}
class형 component
