정적 Welcome 페이지 만들기
정적 페이지를 만들어보자.
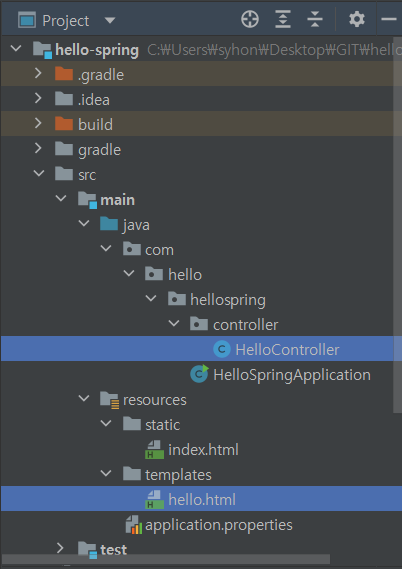
resources/static/index.html
<!doctype html>
<html lang="en">
<head>
    <meta charset="UTF-8">
    <meta name="viewport"
          content="width=device-width, user-scalable=no, initial-scale=1.0, maximum-scale=1.0, minimum-scale=1.0">
    <meta http-equiv="X-UA-Compatible" content="ie=edge">
    <title>Document</title>
</head>
<body>
    <h1>Hello Spring</h1>
</body>
</html>
동적 Welcome 페이지 만들기
thylmeleaf를 사용하여 동적 웹페이지를 만들어보자.
웹애플리케이션에서, 첫번째 진입점이 Controller 이다.

HelloController.java
package com.hello.hellospring.controller;

import org.springframework.stereotype.Controller;
import org.springframework.ui.Model;
import org.springframework.web.bind.annotation.GetMapping;

@Controller
public class HelloController {
    @GetMapping("hello") // HTTP Get 메서드
    public String hello(Model model){
        model.addAttribute("data", "hello!!");
        return "hello"; // ctrl + b 를 눌러 hello.html 파일로 점프 가능
    }
}
hello.html
<!DOCTYPE html>
<html xmlns:th="http://www.thymeleaf.org" lang="en">
<head>
    <meta charset="UTF-8">
    <title>Title</title>
</head>
<body>
    <p th:text="'안녕하세요 ' + ${data}">안녕하세요 손님</p>
</body>
</html>
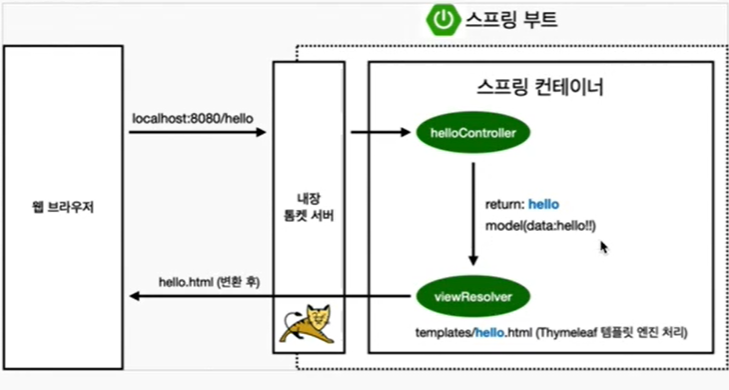
- 컨트롤러에서 return 값으로 문자를 반환하면 viewResolver 가 화면을 찾아서 처리한다.
- 스프링부트 템플릿엔진 기본 viewName 매핑resources:templates/+ {ViewName} +.html
참고
spring-boot-devtools 라이브러리를 추가하면, .html 파일을 컴파일만 해주면 서버 재시작 없이 View 파일 변경이 가능하다.
인텔리J 컴파일 방법: 메뉴 build > Recompile
