
지금 하고 있는 팀프로젝트에서 가장 중요한 작업은 날씨 정보가 담긴 데이터베이스를 화면단으로 보여주는 것이다.
난 이 작업이 백엔드에서 잘 해주면 되겠다고 생각했지만... 그들은 API를 데이터베이스로 정리해주는 역할만 할 뿐!
프론트엔드 담당인 내가 징검다리를 직접 만들어줘야 한다.
그래서 간단히 테스트 코드를 작성해보았다.
코드를 작성하기 전 준비 & 알아야할 점
- 이 test는 데이터를 화면에 가져오는 기능 뿐이다. 사용자가 데이터를 입력할 순 없다.
- Node.js와 npm, MySql, Vue.js, axios가 이미 설치되어 있어야 한다.
(그것까지 정리하면 너무 오래걸림...)- Vue.js에 대한 간단한 지식이 필요합니다.
STEP 1
파일을 baekend와 frontend로 나눠서 관리합니다.
vue create frontend로 설치하면 frontend 내에 vue 환경이 자동으로 설치되겠죠?
STEP 2
퍼블리싱을 해줍니다.
기능을 테스트 하는 것이기 때문에 스타일은 아주 간단하게 하였습니다.
frontend/src/components/CurrentWeather.vue
<template>
  <div>
    <ul>
      <li>
        <dt>날씨</dt>
        <dd>맑음</dd>
      </li>
      <li>
        <dt>현재기온</dt>
        <dd>28</dd>
      </li>
      <li>
        <dt>최고기온</dt>
        <dd>25</dd>
      </li>
      <li>
        <dt>최저기온</dt>
        <dd>30</dd>
      </li>
    </ul>
  </div>
</template>

<script>
export default {
  name: "CurrentWeather",
};
</script>

<style scoped>
* {
  margin: 0;
  padding: 0;
}

ul {
  margin: 20px;
}

li {
  display: flex;
  align-items: center;
  justify-content: start;
  margin-bottom: 8px;
  list-style-type: none;
}

dt {
  margin-right: 4px;
}
</style>
frontend/src/App.vue
<template>
  <div id="app">
    <CurrentWeather />
  </div>
</template>

<script>
import CurrentWeather from "./components/CurrentWeather.vue";

export default {
  name: "App",
  components: {
    CurrentWeather,
  },
};
</script>
결과물

STEP 3
axios를 활용해 App.vue에서 CurrentWeather.vue에게 데이터를 보냅니다.
frontend/src/App.vue
<template>
  <div id="app">
    <CurrentWeather :state="state.weather" />
  </div>
</template>

<script>
import CurrentWeather from "./components/CurrentWeather.vue";
import axios from "axios";
import { reactive } from "vue";

export default {
  name: "App",
  components: {
    CurrentWeather,
  },

  setup() {
    const state = reactive({
      weather: {
        weather: "비",
        curr_temp: 1,
        highest_temp: 2,
        lowest_temp: 0,
      },
    });
    axios.get("/api/weather").then((res) => {
      state.weather = res.data;
    });

    return {
      state,
    };
  },
};
</script>
state 안에 weather의 기본 값을 넣어줍니다.
만약 데이터를 받아오지 못했을 때 보여지는 값입니다.
frontend/src/components/CurrentWeather.vue
<template>
  <div>
    <ul>
      <li>
        <dt>날씨</dt>
        <dd>{{ state.weather }}</dd>
      </li>
      <li>
        <dt>현재기온</dt>
        <dd>{{ state.curr_temp }}</dd>
      </li>
      <li>
        <dt>최고기온</dt>
        <dd>{{ state.highest_temp }}</dd>
      </li>
      <li>
        <dt>최저기온</dt>
        <dd>{{ state.lowest_temp }}</dd>
      </li>
    </ul>
  </div>
</template>

<script>
export default {
  name: "CurrentWeather",

  props: {
    state: Object,
  },
};
</script>

<style scoped>
<!-- 위와 동일 -->
</style>
props를 이용하여App.vue에서 state를 받아옵니다. 데이터가 출력될 부분에 {{ state.state의 아이템 }}을 넣어주시면 됩니다.
frontend/vue.config.js
module.exports = {
  devServer: {
    proxy: {
      "/api": {
        target: "http://localhost:3000",
      },
    },
  },
};frontend의 port는 8080이지만 backend의 port는 3000이므로 이를 연결시켜주는 proxy를 작성합니다.
backend/index.js
const express = require("express");
const app = express();
const port = 3000;

const weather = {
  weather: "맑음",
  curr_temp: 24,
  highest_temp: 25,
  lowest_temp: 19,
};
app.get("/api/weather", (req, res) => {
  res.send(weather);
});

app.listen(port, () => {
  console.log(`Example app listening on port ${port}`);
});
데이터는 http://localhost:8080/api/weather에 존재하게 됩니다.
weather에 frontend에서의 state와 같은 변수명을 사용하여 데이터를 저장합니다.
app.get()~을 사용하여 res(response: 응답)에 weather을 보내줍니다.
frontend/src/App.vue
<template>
  <!-- 위와 동일 -->
</template>

<script>
<!-- 위와 동일 -->

export default {
  name: "App",
  components: {
    CurrentWeather,
  },

  setup() {
    const state = reactive({
      weather: {
        weather: "비",
        curr_temp: 1,
        highest_temp: 2,
        lowest_temp: 0,
      },
    });
    axios.get("/api/weather").then((res) => {
      state.weather = res.data;
    });

    return {
      state,
    };
  },
};
</script>axios.get()을 이용해 데이터를 받아옵니다.
데이터가 있는 곳에서 res의 data를 state의 weather에 넣어줍니다.
state와 backend의 weather 내 변수명들이 같지 않다면 오류가 발생합니다.
결과물

STEP 4
데이터베이스를 생성한다.
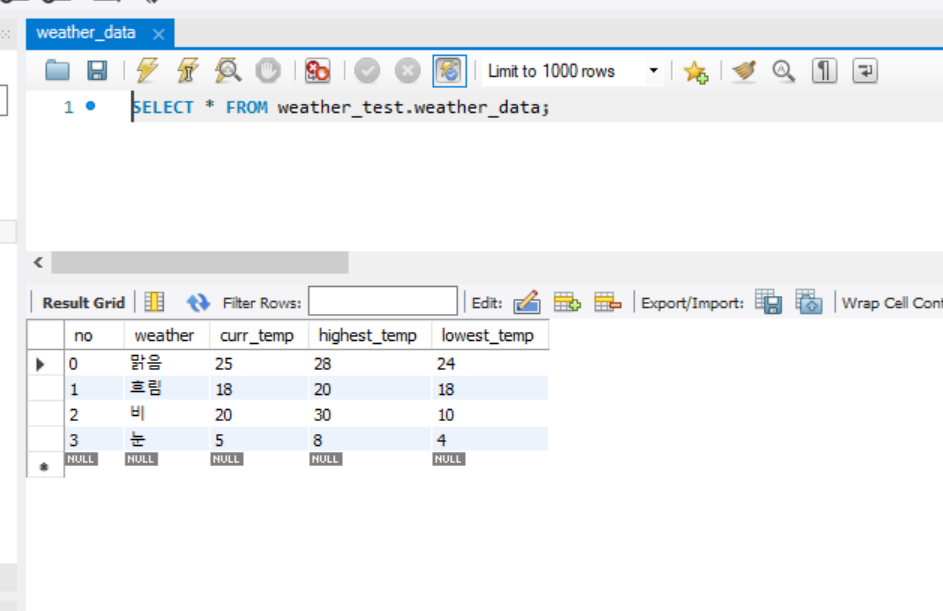
- 데이터베이스명: weather_test
- 테이블명: weather_data
- primary_key: no (안넣으면 나중에 테이블 수정 불가)
- 데이터: weather, curr_temp, highest_temp, lowest_temp
STEP 5
데이터베이스를 받아올 js 파일을 생성한 후 연동
backend/database.js
const mysql = require("mysql");
const connection = mysql.createConnection({
  host: "127.0.0.1",
  port: "1521",
  user: "root",
  password: "220723",
  database: "weather_test",
});

module.exports = connection;port, user, password만 사용자에 따라 바꿔주시면 됩니다.
backend/index.js
const express = require("express");
const app = express();
const port = 3000;
const database = require("./database");

app.get("/api/weather", (req, res) => {
  database.query("SELECT * FROM weather_data", (err, data) => {
    if (!err) {
      res.send({ data });
    } else console.log(err);
  });
});

app.listen(port, () => {
  console.log(`Example app listening on port ${port}`);
});
SELECT * FROM weather_data라는 쿼리를 직접 입력하고,
에러가 없다면 res에게 data를 전송합니다.
frontend/src/App.vue
<template>
  <div id="app">
    <CurrentWeather :state="state.data" />
  </div>
</template>

<script>
import CurrentWeather from "./components/CurrentWeather.vue";
import axios from "axios";
import { reactive } from "vue";

export default {
  name: "App",
  components: {
    CurrentWeather,
  },

  setup() {
    const state = reactive({
      data: {
        weather: "비",
        curr_temp: 1,
        highest_temp: 2,
        lowest_temp: 0,
      },
    });

    axios.get("/api/weather").then((res) => {
      state.data = res.data.data[1];
    });

    return {
      state,
    };
  },
};
</script>res의 data의 data 중 인덱스 1번째를 state.data에 넣는다.
frontend/src/components/CurrentWeather.vue
위와 동일결과물

App.vue 내 state.data = res.data.data[1];에서 인덱스 값을 바꿔주면 인덱스에 해당하는 값이 출력된다.
데이터베이스 기본 지식이 하나도 없는 상태에서 맨땅의 헤딩을 해보았다..
중간에 맛본 쓰린 오류들은 정리해서 따로 포스팅 해야겠다.