👨🏫수업의 목표는 혼자 할 수 있는것
스스로 되는가를 늘 확인하며 많은 연습 해보기
Chart.js 사용하여 Vue.js 차트 구현
[Node.js] 차트 생성 위한 백엔드 서버 생성
- 반복문 사용시 model별 key값 잘 확인하기!
고도의 추적게임... console 찍어보면 빨리찾을 수 있음!

1. 시간대별 주문내역 서버생성
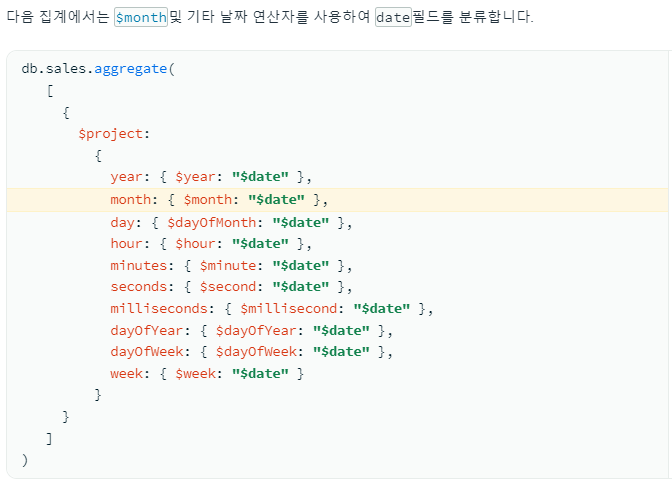
- const result1 > $project 에서
원하는 시간 데이터만 꺼내어 사용
🌎 참고 https://www.mongodb.com/docs/manual/reference/operator/aggregation/month/
시간대별 서버 생성시
한국시간으로 변환해야하니
timezone : 'Asia/Seoul'을 같이 작성해준다
➡️ 시간변환 해주지 않으면 9시간 오차가 일어나기 때문에
정확한 통계를 낼 수 없음!$project : { ... // 날짜중 해당 월 데이터만 꺼내기 month : { $month : { date : '$regdate', timezone : 'Asia/Seoul' } } , // 날짜중 시간 데이터만 꺼내기 hour : { $hour : { date : '$regdate', timezone : 'Asia/Seoul' } }, }
📁 exp_20220711/routes/food/fd_order.js
// 시간대별 주문내역
// 127.0.0.1:3000/api/fd_order/hourgroup.json
// 식당의 토큰
router.get("/hourgroup.json", auth.checkToken, async function (req, res, next) {
    try {
        // 토큰에서 식당 기본키/권한 정보 추출
        const fid = req.body.FID;
        const role = req.body.ROLE;

        // 로그인한 토큰이 식당권한이 맞는경우
        if(role === 'RESTAURANT'){
            // 메뉴에서 식당 기본키를 이용하여 해당하는 항목 가져오기
            const result = await Food.find({ restaurantcode : fid })
                            .select({ _id : 1 }) //메뉴번호만 가져오기
                            .sort({regdate:-1});

            // [ {_id : 11}, {_id : 12} ] .. => [11,12..] 배열 형식을 바꿔주어야 한다
            // 반복문 사용하여 배열형태 변환
            let arr = [];
            for( let tmp of result ) {
                arr.push( tmp._id );
            }

            const result1 = await Order.aggregate([
                {
                    $match : {
                        foodcode : {
                            $in : arr
                        }

                    }

                },
                {
                    // 가지고 와야 할 항목
                    $project : {
                        regdate : 1, // 날짜
                        cnt : 1, // 주문수량
                        // 날짜중 해당 월 데이터만 꺼내기
                        month : { $month : { date : '$regdate', timezone : 'Asia/Seoul' } } ,
                        // 날짜중 시간 데이터만 꺼내기
                        hour : { $hour : { date : '$regdate', timezone : 'Asia/Seoul' } },
                    }
                },
                {
                    $group : { // 시간을 기준으로 그룹화 하여 수량(cnt)의 합이 계산된 새 group생성
                        _id : '$hour', //주문된 시간별로 그룹화
                        sum : {$sum : '$cnt'}, // 해당시간에 판매된 수량의 총개수
                        count : {$sum : 1}
                        // x축 시간 y 축 주문수량의 그래프로 표현하면 위 데이터보다 직관적으로 이해하기 쉽다
                    }
                },
                {
                    $sort : {
                        _id : 1
                    }
                }

            ]);
            return res.send({ status: 200, result : result1 });
        }

        return res.send({ status: 0 });
    }
    catch (e) {
        console.error(e);
        return res.send({ status: -1, result: e });
      }
    });
2. 음식(메뉴)별 주문내역 서버생성
📁 exp_20220711/routes/food/fd_order.js
// 메뉴별 주문내역(많이 팔리는 메뉴 찾기)
// 127.0.0.1:3000/api/fd_order/menugroup.json
// 식당의 토큰
router.get("/menugroup.json", auth.checkToken, async function (req, res, next) {
    try {
        // 토큰에서 식당 기본키/권한 정보 추출
        const fid = req.body.FID;
        const role = req.body.ROLE;

        // 로그인한 토큰이 식당권한이 맞는경우
        if(role === 'RESTAURANT'){
            // 메뉴에서 식당 기본키를 이용하여 해당하는 항목 가져오기
            const result = await Food.find({ restaurantcode : fid })
                            .select({ _id : 1 }) //메뉴번호만 가져오기
                            .sort({regdate:-1});

            let arr = [];
            for( let tmp of result ) {
                arr.push( tmp._id );
            };

            const result1 = await Order.aggregate([
                {
                    // 일치조건
                    $match : {
                        foodcode : {
                            $in : arr
                        },
                        step : 1,
                    }

                },
                {
                    // 가지고 와야 할 항목
                    $project : {
                        foodcode : 1, // 음식코드
                        cnt : 1, // 주문수량
                    }
                },
                {
                    $group : { // 수량을 기준으로 그룹화 하여 수량(cnt)의 합이 계산된 새 group생성
                        _id : '$foodcode', // 주문된 메뉴코드별로 그룹화
                        sum : {$sum : '$cnt'}, // 해당시간에 판매된 수량의 총개수
                        count : {$sum : 1} // 주문건수
                        // x축 시간 y 축 주문수량의 그래프로 표현하면 위 데이터보다 직관적으로 이해하기 쉽다
                    }
                },
                {
                    $sort : {
                        _id : 1
                    }
                }

            ]);

            // order
            console.log('result1=>',result1);

            // 나중에 그래프 생성시 _id가 어떤 상품인지 정보가 필요함
            // _id의 메뉴 정보 가져오기
            let arr1 = [];
            for( let tmp of result1 ) {
                const result2 = await Food.findOne({ _id : tmp._id }).select({ name : 1, price : 1 });

                arr1.push({ group : tmp, food : result2 });
            };

            return res.send({ status: 200, result : arr1 });
    }
    return res.send({ status: 0 });
}
    catch (e) {
        console.error(e);
        return res.send({ status: -1, result: e });
      }
    });
3. 고객별 주문내역 서버생성
📁 exp_20220711/routes/food/fd_order.js
// 고객별 주문내역(많이 구매하는 고객 찾기)
// 127.0.0.1:3000/api/fd_order/customergroup.json
// 식당의 토큰
// { group : , customer : 고객이름, 연락처 }
router.get("/customergroup.json", auth.checkToken, async function (req, res, next) {
    try {
        // 토큰에서 식당 기본키/권한 정보 추출
        const fid = req.body.FID;
        const role = req.body.ROLE;

        // 로그인한 토큰이 식당권한이 맞는경우
        if(role === 'RESTAURANT'){
            // 메뉴에서 식당 기본키를 이용하여 해당하는 항목 가져오기
            const result = await Food.find({ restaurantcode : fid })
                            .select({ _id : 1 }) //메뉴번호만 가져오기
                            .sort({regdate:-1});

            let arr = [];
            for( let tmp of result ) {
                arr.push( tmp._id );
            };

            console.log('result=>', result);

            const result1 = await Order.aggregate([
                {
                    // 일치조건
                    $match : {
                        foodcode : {
                            $in : arr
                        },
                        step : 1,
                    }

                },
                {
                    // 가지고 와야 할 항목
                    $project : {
                        customercode : 1, // 고객코드(연락처)
                        cnt : 1, // 주문수량
                    }
                },
                {
                    $group : { // 수량을 기준으로 그룹화 하여 수량(cnt)의 합이 계산된 새 group생성
                        _id : '$customercode', // 주문된 고객코드별로 그룹화
                        sum : {$sum : '$cnt'}, // 고객별 판매된 수량의 총개수
                        count : {$sum : 1} // 주문건수
                        // x축 시간 y 축 주문수량의 그래프로 표현하면 위 데이터보다 직관적으로 이해하기 쉽다
                    }
                },
                {
                    $sort : {
                        _id : 1
                    }
                }

            ]);

            console.log('result1=>',result1);

            // 나중에 그래프 생성시 고객(_id)이 주문한 상품이 어떤 상품인지 정보가 필요함
            // 고객(_id)이 주문한 상품의 메뉴 정보 가져오기
            let arr1 = [];
            for( let tmp of result1 ) {
                const result2 = await Customer.findOne({ _id : tmp._id }).select({ _id : 1, name : 1 });

                arr1.push({ group : tmp, Customer : result2 });
            };

            return res.send({ status: 200, result : arr1 });
    }
    return res.send({ status: 0 });
}
    catch (e) {
        console.error(e);
        return res.send({ status: -1, result: e });
      }
    });
[Vue.js] 차트 생성
📁 fd_restaurant/src/components/order/
- HourChartPage.vue
- CustomerChartPage.vue
- FoodChartPage.vue
app.vue 라우트등록
차트 모듈 설치
https://www.chartjs.org/
chart.js페이지(2.9.4v) ➡️ package.json 에서 버전확인가능
CMD> npm install chart.js@2차트 생성
HourChartPage.vue ➡️ bar형태의 차트
	const barConfig = {
    	type : 'bar',
        data : {
        	labels : ['A', 'B', 'C'], //_id
        	datasets : [
                  		{
            		   label : '주문합계', //sum
            		   data : [12, 52, 23, 1, 1, 1, 1],
            		   backgroundColor : [ '#000000', '#000000', '#000000', '#000000', '#000000','#000000','#000000', ],
                       borderColor : [ '#666666', '#666666', '#666666', '#666666', '#666666', '#666666','#666666', ],
                       borderWidth : 1
                    },
                    {
                       label : '주문횟수', //count
                       data : [12, 52, 23, 1, 1, 1, 1],
                       backgroundColor : [ '#cccccc', '#cccccc', '#cccccc', '#cccccc', '#cccccc', '#cccccc', '#cccccc' ],
                       borderColor : [ '#666666', '#666666', '#666666', '#666666', '#666666', '#666666', '#666666' ],
                       borderWidth : 1
                    },
           	     ]
        	    },
          options : {
              title : {
                        display:true,
                        text : '메뉴별 주문내역'
                    },
               scales : {
                        yAxes : [{
                          ticks:{
                              beginAtZero : true,
                        }
                  }]
              }
          }};
FoodChartPage.vue ➡️ line형태의 차트
       const lineConfig  = {
                type : 'line',
                data : {
                    labels : ['1','2','3'],
                    datasets : [
                        {
                            label : '주문합계',
                            data : [15,20,13,50,1],
                            backgroundColor : "rgba(255,201,14,1)",
                            borderColor : "rgba(255,201,14,0.5)",
                            fill : false,
                            lineTension : 0
                        },
                        {
                            label : '주문횟수',
                            data : [65,70,8,1,1],
                            backgroundColor : "rgba(155,201,14,1)",
                            borderColor : "rgba(155,201,14,0.5)",
                            fill : false,
                            lineTension : 0
                        },
                    ]
            },
            options : {
                    title : {
                        display:true,
                        text : '메뉴별 주문내역'
                    },
                    scales : {
                        yAxes : [{
                            ticks:{
                                beginAtZero : true,
                            }
                        }]
                    }
                }
                };
CustomerChartPage.vue ➡️ bar형태의 차트
        const barConfig = {
                type : 'bar',
                data : {
                    labels : ['A', 'B', 'C'], //_id
                    datasets : [
                        {
                            label : '주문개수', //sum
                            data : [12, 52, 23, 1, 1],
                            backgroundColor : [ '#000000', '#000000', '#000000', '#000000', '#000000', ],
                            borderColor : [ '#666666', '#666666', '#666666', '#666666', '#666666' ],
                            borderWidth : 1
                        },
                        {
                            label : '주문건수', //count
                            data : [12, 52, 23, 1, 1],
                            backgroundColor : [ '#cccccc', '#cccccc', '#cccccc', '#cccccc', '#cccccc' ],
                            borderColor : [ '#666666', '#666666', '#666666', '#666666', '#666666' ],
                            borderWidth : 1
                        },

                    ]
                },
                options : {
                    title : {
                        display:true,
                        text : '고객별 주문내역'
                    },
                    scales : {
                        yAxes : [{
                            ticks:{
                                beginAtZero : true,
                            }
                        }]
                    }
                }
            };
차트 페이지 MQTT/서버 연결
고객 주문시 데이터 즉각수신 ➡️ 차트에 바로 반영
📁 fd_customer/src/components/OrderPage.vue
handleOrder()에서 보낼내용을type:order,code:주문번호로 설정해 두었었다const payload = JSON.stringify({ type : 'order', code : data.result._id });
📁 fd_customer/src/components/OrderPage.vue
MQTT구독 및 접속코드 작성
<template>
<div class="box">
<!-- {{state}} -->
<h3>주문페이지</h3>
<router-link to="/food"><button>이전페이지</button></router-link>
<button @click="handlePrev()">이전페이지</button>
<hr /><br />
<div class="box1">
<div>
<h4>상품이미지</h4>
<label class="lbl">주문수량</label>
<input type="number" style="border: 1px solid #cccccc; width:120px" v-model="cnt"/>
<!-- v-model="id" -->
<br />
<hr />
<br />
<button @click="handleOrder()">주문하기</button>
</div>
</div>
</div>
</template>
<script>
import { reactive, toRefs } from '@vue/reactivity'
import { useRoute, useRouter } from 'vue-router'
import { onMounted } from '@vue/runtime-core';
import axios from 'axios';
import mqtt from 'precompiled-mqtt';
export default {
setup () {
const route = useRoute();
const router = useRouter();
const state = reactive({
rcode : route.query.rcode,
menu : Number(route.query.menu),
cnt : 0,
token : sessionStorage.getItem("TOKEN1"),
host : '127.0.0.1', //mqtt broker 서버주소
port : 1884, //포트번호 web은 1884 , app은 1883으로 설정해두었다
options : {
clean : true, //세션초기화
reconnectPeriod : 20000, //재접속시간
clientId : 'web_cs_' + new Date().getTime(), //접속아이디 고유해야한다=> timestamp사용
username : 'aaa', //아이디
password : 'bbb', //비밀번호
},
// 접속했을떄 정보 보관 변수
client : null, //접속객체
});
onMounted(()=>{
mqttConnection();
});
const handleOrder = async() => {
if(confirm( '주문하시겠습니까?' )){
const url = `/api/fd_order/insert.json`;
const headers = {
"Content-Type":"application/json",
token : state.token
};
const body = {
"cnt" : state.cnt,
"foodcode" : state.menu
};
const { data } = await axios.post(url, body, {headers});
console.log(data);
if(data.status === 200){
// 실시간으로 식당으로 주문완료를 전송
// state.client 접속된 상태
// 데이터 보낼것 : 주문번호 => data.result._id
if(state.client !== null){
// 1. 보낼 토픽(고유정보 => 레스토랑의 고유정보 : 사업자번호 = rcode)
const topic = `/restaurant/${state.rcode}`;
// 2. 보낼내용(type:order로 code:주문번호)
		const payload = JSON.stringify({
			type : 'order',
			code : data.result._id
		});
// 3.qos(quality of service)
const qos = 0;
console.log('topic=>',topic);
console.log('payload=>', payload);
console.log('qos=>', qos);
// client에게 보냄(topic, paload, qos, error(혹시 에러나면 보낼 에러정보) )
state.client.publish(topic, payload, qos, error => {
if(error){
alert('mqtt오류');
}
});
}
alert('주문완료');
// 페이지이동
router.push({path:'/food', query:{ _id:state.rcode }});
}
}
else {
router.push({path:'/food', query:{_id:state.rcode}})
}
};
// 접속
const mqttConnection = () => {
const url = `ws://${state.host}:${state.port}`;
try {
state.client = mqtt.connect(url, state.options);
state.client.on('connect',() => {
console.log('connect success');
});
state.client.on('error', error => {
console.log('connect error', error);
});
} catch (e) {
// 오류났을경우
console.log('mqtt error', e)
}
};
const handlePrev = () => {
router.go(-1);
}
return { state, ...toRefs(state), handleOrder, handlePrev }
}
}
</script>
<style lang="css" scoped>
.box{
width: 800px;
border: 3px solid green;
padding: auto;
margin: auto;
}
.lbl {
display: inline-block;
width: 130px;
padding: 10px;
}
</style>ERD 설계 확장 ➡️
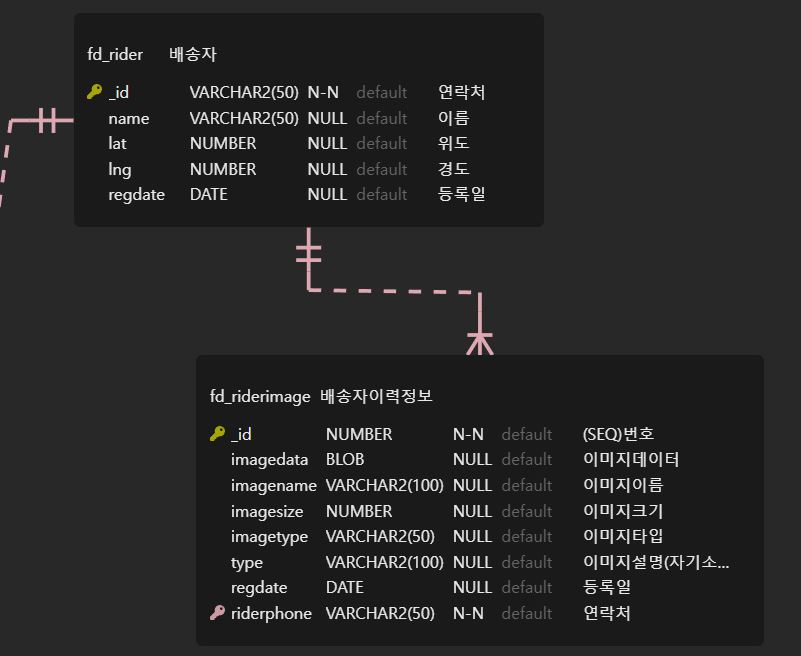
서버(백엔드) 생성
- 이력정보 추가(가능하면 여러개를 한번에)
127.0.0.1:3000/api/fd_riderimage/insert.json- 이력정보 조회(페이지네이션)
127.0.0.1:3000/api/fd_riderimage/select.json- 이력정보 삭제(가능하면 여러개를 한번에)
127.0.0.1:3000/api/fd_riderimage/select.json- 이력정보 수정(1개씩)
127.0.0.1:3000/api/fd_riderimage/select.json