👨🏫 오류잡을때 무조건 출력해보는 습관갖기!
어디를 고쳐야 할지 뭘 해야할지 모르고 다른곳을 고치거나 오류를 찾기가 더 힘들다
특별한 방법이 있는게 아니라 업무단위를 쪼개서 출력하며 오류 잡아내는 방법밖에 없다
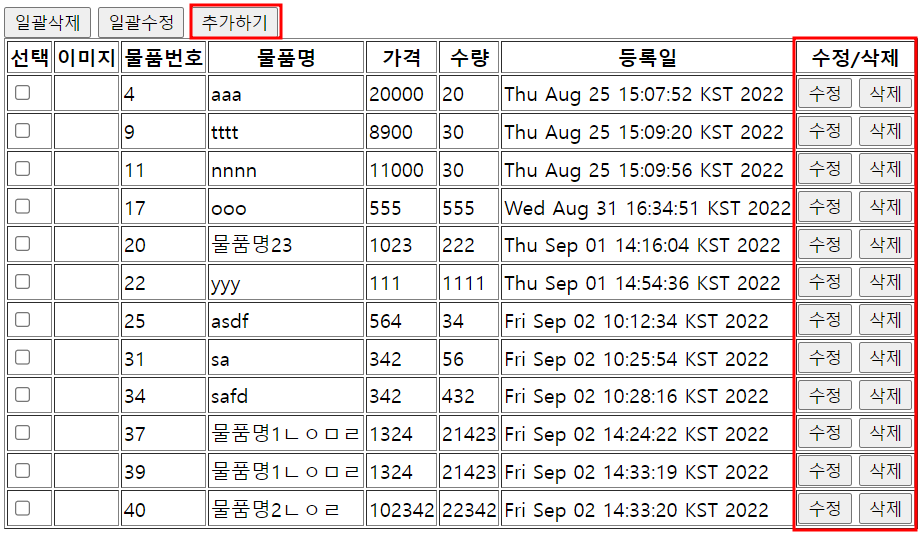
물품 1개씩 등록/삭제 + 추가하기
📁 itemlist.html
개별 등록 삭제 버튼 생성
<a><input type="submit”>⇒<a>태그 작동 안함,<form>태그에 반응하여 작동 함
<a><input type="button”>⇒<a>태그 작동 함,<form>태그에 반응하지 않음
➡️ 일괄삭제/수정 버튼은<input type="submit”>이기 때문에<form>태그에 반응한다
<form>내부의 추가하기 버튼과<table>내에 생성된 수정/삭제 추가하기 버튼은
<form>태그 내부에 있지만<a><input type="button”>이기 때문에
버튼 클릭시<form>태그에 반응하지 않고<a>태그에 반응한다
...
	<a th:href="@{/item/insertone.do}">
		<input type="button" value="추가하기" />
	</a>
...
<td>
    <input type="button" value="수정" />
    <input type="button" th:onclick="|javascript:deleteAction('${tmp.no}')|" value="삭제" />
</td>
...
    <script type="text/javascript">
        const deleteAction = ( no ) => {
            if(confirm('삭제할까요?')){
                // <form action="" method="post">
                const form = document.createElement("form");
                form.setAttribute("action", "[[@{/item/deleteone.do}]]");
                form.setAttribute("method", "post");

                    // <input type="text" value="13" name="no"
                const input1 = document.createElement("input");
                input1.setAttribute("type", "text");
                input1.setAttribute("name", "no");
                input1.setAttribute("value", no);

                form.appendChild(input1);
                document.body.appendChild(form);
                form.submit();
            }
        }
    </script>
📁 ItemController.java
- 물품 1개 등록페이지 생성시
<a>태그니까get을 사용한다- 원래는 페이지 규모가 클수록 파일을 따로 생성해주는게 관리하기가 좋다
물품 1개 등록페이지는 파일 따로 생성하기
return "item/insertone";⇒ 폴더명/파일명.html
// http://127.0.0.1:8080/ROOT/item/insertone.do
    // 물품 한개등록 버튼 클릭시
    @GetMapping(value = "/insertone.do")
    public String insertOne() {
        return "item/insertone";
    }
📁 item/insertone.html
name값은 데이터가 입력될 해당 entity의 변수명으로 맞춰준다- 파일첨부는
name을 엔티티 값이랑 똑같이 맞추면 안된다
➡️ 이미지뿐만 아니라 동영상, 파일첨부도 마찬가지!
*내용의input type은"text”가 아닌"textarea"를 사용하는게 맞다
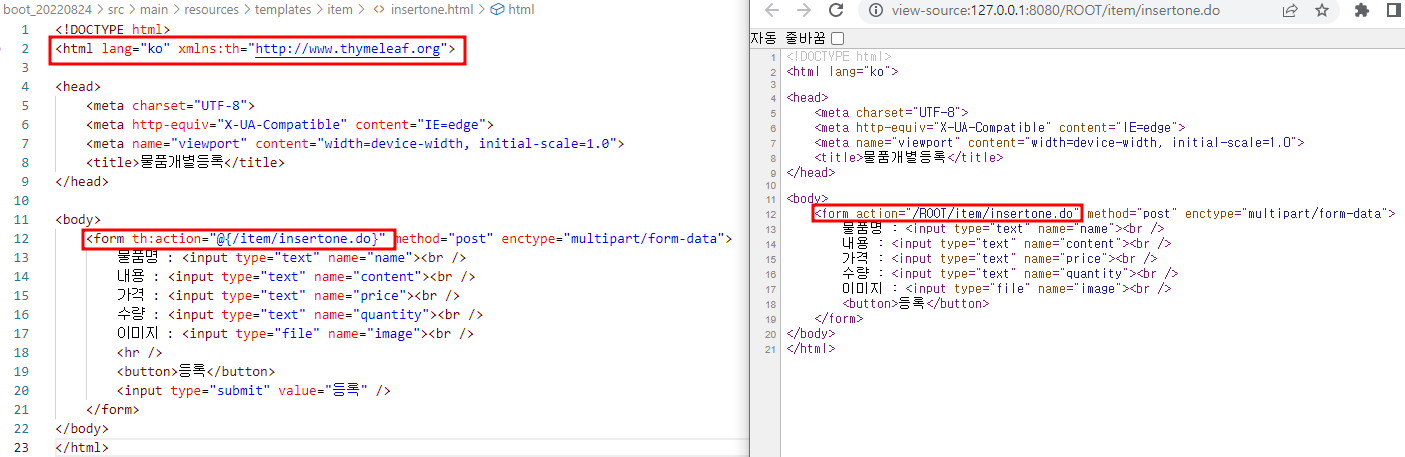
➡️ 내용이 많을 수 있기 때문이다- 크롬에서 페이지 소스 보기
Ctrl+U클릭시
thymeleaf사용하여 보낸action이 주소로 변환되어 있는것을 확인할 수 있다
<!DOCTYPE html>
<html lang="ko" xmlns:th="http://www.thymeleaf.org">

<head>
    <meta charset="UTF-8">
    <meta http-equiv="X-UA-Compatible" content="IE=edge">
    <meta name="viewport" content="width=device-width, initial-scale=1.0">
    <title>물품개별등록</title>
</head>

<body>
    <form th:action="@{/item/insertone.do}" method="post" enctype="multipart/form-data">
        물품명 : <input type="text" name="name"><br />
        내용 : <input type="text" name="content"><br />
        가격 : <input type="text" name="price"><br />
        수량 : <input type="text" name="quantity"><br />
        이미지 : <input type="file" name="image"><br />
        <hr />
        <button>등록</button>
        <input type="submit" value="등록" />
    </form>
</body>
</html>
📁 ItemController.java
post로 보낸다는 것은 DB처리하기 까지 시간을 버는것이라 생각하면 된다post사용시return에 html 넣지 않는게 좋다!
➡️ 새로고침시 화면에서 양식 다시 제출이 나온다post는 사용자에게 보여주기 위한 게 아니라 단순 정보 처리를 위한 것
➡️ DB 처리만 하고 사용자에게는get의 주소를 return 해줘야 한다! 최종적으로는get으로 가야함
호출하는 방식
C(컨트롤러) ⇒ S(서비스) 까진 똑같다!
- C(컨트롤러) ⇒ S(서비스) → repository = JPA
- C(컨트롤러) ⇒ S(서비스) → Mapper = mybatis
- C(컨트롤러) ⇒ S(서비스) → DB(JPA, mybatis(A,B))
💡 라이브러리 사용시에는 컨트롤러를 따로 생성하지 않아도 자동으로 생성된다
라이브러리도 C(컨트롤러) ⇒ S(서비스) 구조이다
컨트롤러를 제공받으면 DB를 가져오는 부분은 중간의 서비스를 상속받아 사용하면 된다
    // http://127.0.0.1:8080/ROOT/item/insertone.do
    // 물품 한개등록 버튼클릭시
    @GetMapping(value = "/insertone.do")
    public String insertOne() {
        return "item/insertone";
    }

    // 물품 한개 등록하기(DB+알림창)
    @PostMapping(value = "/insertone.do")
    public String insertPost(
            Model model,
            @ModelAttribute Item item,
            @RequestParam(name = "image") MultipartFile file) throws IOException {
        // 혼자 작업시엔 반드시 출력해보기
        // view에서 C(controller)에게 정확하게 데이터를 전달했는지 확인
        System.out.println(item.toString());
        // 파일은 자동으로 못들어오니까 수동으로 추가하고 첨부되었는지 확인
        if (!file.isEmpty()) {
            item.setFiledata(file.getBytes()); // byte는 오류 생길 수 있어서 오류처리 해준다
            item.setFilename(file.getOriginalFilename());
            item.setFilesize(file.getSize());
            item.setFiletype(file.getContentType());
        }

        // 서비스 호출해서 처리
        // 호출하는 방식 C(컨트롤러) ⇒ S(서비스) 까진 똑같아
        // C(컨트롤러) ⇒ S(서비스) →Mapper = mybatis
        // C(컨트롤러) ⇒ S(서비스) →DB(JPA, mybatis(A,B))
        int ret = itemService.insertItem(item);
        if (ret == 1) {
            // 성공시 알림페이지로
            // model로 msg와 url을 보냄
            model.addAttribute("msg", "물품이 등록되었습니다");
            model.addAttribute("url", "selectlist.do");

            // alert.html은 알림이 표시되고 a태그를 동작시킴
            return "alert";
        }
        // 실패시 다시 추가 페이지로 리턴
        return "redirect:/item/insertone.do"; // => @GetMapping(value = "/insertone.do")
        // return "item/insertok"; //사용하지 말기! POST를 보여주려 하는건 좋은 방법이 아니다! 사용자에겐 GET으로 보여주는게 좋음
    }

    // http://127.0.0.1:8080/ROOT/item/deleteone.do
    // 물품1개 삭제하기
    @PostMapping(value = "/deleteone.do")
    public String deleteOnePost(
        Model model,
        @RequestParam(name = "no") long no){
        int ret = itemService.deleteOneItem(no);
        if(ret == 1){
            // 성공시 알림페이지로
            // model로 msg와 url을 보냄
            model.addAttribute("msg", "물품이 삭제되었습니다");
            model.addAttribute("url", "selectlist.do");

            return "alert";
        }
        // 실패시 목록 페이지로 리턴
        return "redirect:/item/selectlist.do";
    }
<script> 사용하여 알림창 띄우기
📁 alert.html
- ItemController에서 보낸 msg와 url이용하여 script만 추가한다
➡️ msg를 이용하여 알림창을 띄우고 url로 이동한다- 공통으로 사용하기 위해서는 값을 지정해주는것이 아니라 컨트롤러에서 보낸 알림내용
alert(msg);과 이동할 위치location.href를 지정하여 사용한다
<!DOCTYPE html>
<html lang="ko" xmlns:th="http://www.thymeleaf.org">

<head>
    <meta charset="UTF-8">
    <meta http-equiv="X-UA-Compatible" content="IE=edge">
    <meta name="viewport" content="width=device-width, initial-scale=1.0">
    <script type="text/javascript">
        const msg = "[[${msg}]]";
        const url = "[[${url}]]";
        alert(msg);

        location.href = url;

    </script>
</head>
<body>
</body>
</html>
📁 ItemController.java
모델추가해서 보낼 내용
msg과url을 같이 전송
➡️ model로 msg와 url을 보냄
model.addAttribute("msg", "물품이 등록되었습니다");
            model.addAttribute("url", "selectlist.do");
이미지 파일도 추가한다
@RequestParam(name = "image") MultipartFile file삭제하기
📁 itemlist.html
스크립트를 추가하여
1.form생성
2.form.setAttribute("action", "[[@{/item/deleteone.do}]]");지정
3.form.setAttribute("method", "post");지정
4.<input>태그 생성input1.setAttribute("type", "text"); input1.setAttribute("name", "no"); input1.setAttribute("value", no);
...
<td>
<input type="button" value="수정" />
<input type="button" th:onclick="|javascript:deleteAction('${tmp.no}')|" value="삭제" />
</td>
</tr>
</table>
</form>
<script type="text/javascript">
const deleteAction = ( no ) => {
if(confirm('삭제할까요?')){
// <form action="" method="post">
const form = document.createElement("form");
form.setAttribute("action", "[[@{/item/deleteone.do}]]");
form.setAttribute("method", "post");
// <input type="text" value="13" name="no"
const input1 = document.createElement("input");
input1.setAttribute("type", "text");
input1.setAttribute("name", "no");
input1.setAttribute("value", no);
form.appendChild(input1);
document.body.appendChild(form);
form.submit();
}
}
</script>
...스크립트를 통한 채팅
서버에 대한 주소 관리파일을 따로 생성한다
소스코드에 서버주소 명시하는경우 추후에 수정이나 유지보수 하려면 다 찾아서 수정해야한다
➡️ 수정이나 관리하기에 비효율적이기 때문에 따로 파일 생성하여 한번에 관리하는게 좋다
📁 resources / global.properties
MQTT 설정
mqtt.broker = ws://1.234.5.158:11884
mqtt.username=ds606
mqtt.password=ds606

board.pagenation.count=10
📁 Application.java
Boot20220824Application.java
global.properties⇒ 임의로 만든파일이니 application 파일에 등록해준다
➡️@PropertySource사용하여 등록
// 사용자 정의 변수 속성값
@PropertySource("classpath:global.properties")
📁 HomeController.java
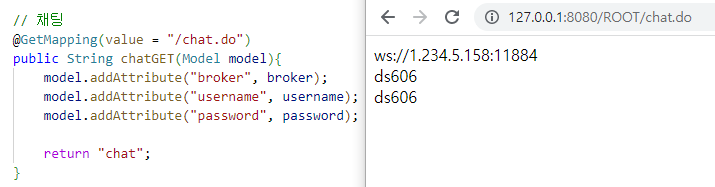
global.properties에 정의된 값이 들어간다
model정의해서 값 넣어주고chat으로 리턴한다
...
@Value("${mqtt.broker}")
    String broker;

    @Value("${mqtt.username}")
    String username;

    @Value("${mqtt.password}")
    String password;
...
@GetMapping(value = "/chat.do")
    public String chatGET(Model model){
        model.addAttribute("broker", broker);
        model.addAttribute("username", username);
        model.addAttribute("password", password);

        return "chat";
    }
...
📁 chat.html
chat.html생성하여 컨트롤러에서 보내준 model 값이 잘 오는지 확인- 스크립트안에 접속할떄 필요한 정보 생성 + 오류처리 + 콜백생성
- mqtt연동 라이브러리 사용
- 스크립트는 함수에 안넣었기 때문에 view의 onMounted와 같이 페이지 로딩시 바로 실행이 된다
메세지 발송은 함수로 생성하고 호출해야 실행된다! 함수를 생성하여 만들어주기- 함수 생성후 전송버튼에
<input type="button" value="전송" th:onclick="|javascript:|sendMessage" /><br />함수 호출 넣어주기Uint8Array형태로 온다!jsonparse사용하기


<!DOCTYPE html>
<html lang="ko" xmlns:th="http://www.thymeleaf.org">

<head>
    <meta charset="UTF-8">
    <meta http-equiv="X-UA-Compatible" content="IE=edge">
    <meta name="viewport" content="width=device-width, initial-scale=1.0">
    <title>채팅</title>
</head>

<body>
    <div th:text="${broker}"></div>
    <div th:text="${username}"></div>
    <div th:text="${password}"></div>
    <hr />

    <!-- id부여하는 이유 = 자바스크립트에서 사용해야하니까 -->
    <input type="text" placeholder="보낼내용입력" id="msg" />
    <input type="button" value="전송" th:onclick="|javascript:sendMessage()|" /><br />
    <div id="output" style="border: 1px solid slateblue; padding: 5px;">
        <!-- 여기에 받은 내용 표시 -->
        <div th:text=topic></div>
    </div>

    <script src="https://unpkg.com/mqtt@4.3.7/dist/mqtt.min.js" type="text/javascript"></script>
    <script type="text/javascript">
        const state = {
            url: "[[${broker}]]",
            client: '',
            options: {
                clean: true,
                reconnectPeriod: 20000, //재접속 시간
                client: 'ds207_' + new Date().getTime(), //clientid는 고유하게 가야한다 , 원래는 사용자 아이디가 와야하는데 new Date().getTime()를 넣었다
                username: "[[${username}]]",
                password: "[[${password}]]",
            },
            qos: 0
        }
            const output = document.getElementById("output");

        try {
            // 접속정보는 state.client에 있음
            state.client = mqtt.connect(state.url, state.options);
            // console.log(state.client);

            // 콜백 = 변경실시간 감지 mqtt에서는 3개의 오버라이드 사용했었다
            // 연결되었을때 콜백 생성
            state.client.on('connect', ()=>{
                console.log('connect success');
            });

            state.client.on('error', ()=>{
                console.log('connect error');
            });

            // 구독하기
            state.client.subscribe('ds606/#', {qos: state.qos}, (error, res)=> {
                if(error){ // 에러난경우 구독실패
                    console.log('subscribe error', error);
                    return;
                } //구독 성공한 경우
                console.log('subscribe success', res)
            })

            // 자바스크립트는 타입이 없으니 typeof로 지정해준다
            state.client.on('message', (topic, message)=>{
                console.log(typeof(topic), topic);
                console.log(typeof(message), JSON.parse(message));
                // 새로운것을 먼저 출력하고 기존것을 붙이니 출력화면에서 나중에 온 채팅이 맨 위에 위치하여 위쪽에서 입력받는것처럼 보인다
                output.innerHTML
                    = topic + " => " + message + "<br />"
                        + output.innerHTML;
            });

        } catch (e) {
            console.error(e);
        }

        // 실시간 채팅화면
        console.log("state.client " , state.client)
        state.client.on('message', (topic, message)=>{

                console.log(typeof(topic), topic);
                console.log(typeof(message), JSON.parse(message));
            });


        // 메시지 전송 함수
        const sendMessage = () => {
            // console.log('AAA');
            // const payload = "AAAAA" //이렇게 보내면 string형태로 오지 않는다 toString으로 변경 //json형태로 만들고 string화 한다
            // 메세지 전송시 : JSON.stringify , 메세지 수신시 : JSON.parse
            console.log("msg", msg);
            console.log("msgvalue", msg.value);

            const txt = document.getElementById("msg").value;

            const payload = JSON.stringify({
                type : 1,
                // msg : document.getElementById(msg).,
                msg : msg.value,
            })

            if(state.client){
                state.client.publish('ds606/ds207', payload, state.qos, error => {
                    if(error){
                        console.error('sendmessage error', error);
                        return;
                    }
                })
            }
        }
    </script>
</body>
</html>
input 에서 입력한 메세지를 출력하기
실습
➡️ 처음에는 함수에 값을 직접 넣어봤는데 비어있는 값이나[object Undefined]라고 출력 되었다
console.log 사용하며 값을 변경하여 넣어보니console.log("msg", msg);를 출력했을때
<input type="text" placeholder="보낼내용입력" id="msg" />를 확인할 수 있었고
msg의 값을 꺼내기 위해console.log("msg", msg.value);를 출력해보니 원하는 값을 찾을 수 있었고,msg.value를 넣어 출력하니 원하는 값이 나왔다
document.getElementById("msg").value;로도 값을 가져올 수 있다
실시간 채팅내용 화면 구현하기
실습2
const output = document.getElementById("output");
➡️ 새로운것을 먼저 출력하고 기존것을 붙이니
출력화면에서 나중에 온 채팅이 맨 위에 위치하여 위쪽에서 입력받는것처럼 보인다output.innerHTML = topic + " => " + message + "<br />" + output.innerHTML; });
aop
aop : 관심사 라고도 한다
모든 컨트롤러, 서비스, 저장소의 공통적인 작업을 수행하는곳이며
구조적으로 컨트롤러 이전에 위치하며 현재페이지를 세션에 기록하는 역할을 한다
세션정보에 따라 이동하는 페이지를 설정한다
또한 여러 클래스에 로깅이나 보안 및 트랜잭션 등 공통된 기능들이 흩어져 존재하는 경우 어플리케이션 전반에 걸쳐 공통되는 부가 기능들을 모아준다 ➡️ 공통작업은 aop에 기록하기!
공통된 기능들이 흩어져 존재하게 되는경우 수정 및 유지관리가 어려울 뿐만 아니라 트랜잭션과 로깅 및 보안 등의 부가 기능이 필요한 메서드마다 비슷한 코드를 중복해서 작성해야 하며, Service 및 클래스 전체가 비대해지게 된다
aop를 로그기록으로도 많이 짠다
오류잡는것도 경로 기록해서 처리하니 로그기록 aop는 중요하다
aop 라이브러리 추가
<!-- aop -->
<dependency>
<groupId>org.springframework.boot</groupId>
<artifactId>spring-boot-starter-aop</artifactId>
</dependency>
📁 aop / LogAspect.java 생성
@Around⇒ 내가 거쳐가는 루트만 기록
@Before⇒ 이전루트기록
package com.example.aop;
import org.aspectj.lang.ProceedingJoinPoint;
import org.aspectj.lang.annotation.Around;
import org.aspectj.lang.annotation.Aspect;
import org.springframework.stereotype.Component;
import lombok.extern.slf4j.Slf4j;
@Component
@Aspect
@Slf4j
public class LogAspect {
// 방문하고자 하는 클래스 등록
// ex) com.example.controller패키지의 모든 Controller의 모든 메소드
// 안에 서비스 넣어도 된다! 지금 작성한 코드는 모든 컨트롤러(*Controller = 파일명이 *이하로 끝나는)의 모든 메소드는 다 방문한다
@Around( "execution( * com.example.controller.*Controller.*(..)) or execution( * com.example.service.*Service.*(..) ) or execution( * com.example.repository.*Repository.*(..) )" )
public Object printLog(ProceedingJoinPoint joinPoint) throws Throwable{
String name = joinPoint.getSignature().getDeclaringTypeName();
if(name.contains("Controller")){
log.info("Controller => " + name + "." + joinPoint.getSignature().getName() + "()");
}
else if( name.contains("Service") ){
log.info("Service => " + name + "." + joinPoint.getSignature().getName() + "()");
}
else if( name.contains("Repository") ){
log.info("Repository => " + name + "." + joinPoint.getSignature().getName() + "()");
}
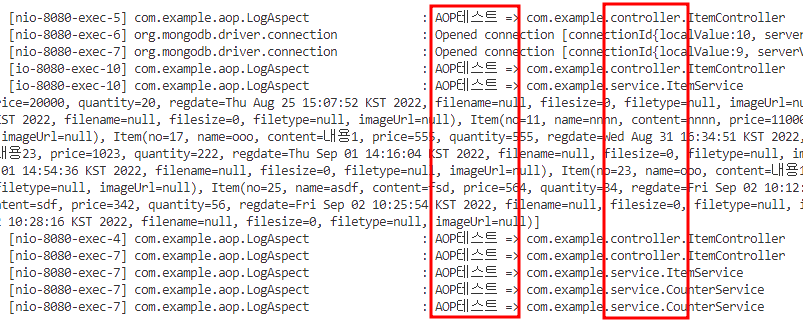
log.info("AOP테스트 => " + name.toString());
return joinPoint.proceed();
}
// @Before
}
📁 Application.java
Boot20220824Application.java
LogAspect.java⇒ 임의로 만든파일이니 application 파일에 등록해준다
// 아래 코드 추가
@ComponentScan(basePackages = {
...
	"com.example.aop" // aop
})
...
@EnableAspectJAutoProxy // AOP사용
...
🖥️ 결과
내가 웹에서 컨트롤러 이동시마다 해당 컨트롤러와 서비스의 이름이 찍힌다
어디를 거쳤는지 알 수 있다