[Vue.js] 매장용 메뉴등록
메뉴등록
메뉴등록기능
- 이미지 없을때 (noimage) 기본이미지 표시
- 이미지 등록시 이미지 미리보기 기능
handleInsert()> body로 데이터 전송시 파일이 첨부되었기 때문에FormData()형식을 사용하여 데이터를 전송
📁fd_restaurant/src/components/menu/InsertMenuPage.vue
<template>
    <div class="box">
        <div>
            메뉴명 : <input type="text" v-model="name" />
        </div>

        <div>
            가격 : <input type="text" v-model="price" />
        </div>

        <div>
            설명 : <input type="text" v-model="content" />
        </div>

        <div>
            <img :src="imageurl" style="width:100px" />
            이미지 : <input type="file" @change="handleImage($event)"/>
        </div>
        <br/>
        <hr/>
        <router-link to="/manage"><button>관리페이지로이동</button></router-link>
        <button @click="handleInsert">메뉴등록</button>
    </div>
</template>

<script>
import { reactive, toRefs } from '@vue/reactivity'
import { useRouter } from 'vue-router';
import axios from 'axios';
export default {
    setup () {

        const router = useRouter();

        const state = reactive({
            name 		: '',
            price	    : 0,
            content 	: '',
            image 		: null,
            imageurl 	: require('../../assets/noimage.jpg'),
            token 		: sessionStorage.getItem("TOKEN")
        });

        const handleImage = async(e) => {
            console.log('handleImage=>',e);
            if(e.target.files.length > 0){ //파일 첨부했을때
                state.image 	= e.target.files[0];
                state.imageurl  = URL.createObjectURL(e.target.files[0]);
            }
            else { //파일 첨부 취소했을때
                state.image		= null;
                state.imageurl  = require('../../assets/noimage.jpg');
            }
        }

        const handleInsert = async() => {
            const url	  = `/api/fd_food/insert.json`;
            const headers = {
                "Content-Type":"multipart/form-data",
                "token" 	  : state.token
                }

            const body = new FormData();
            body.append("name", state.name);
            body.append("content", state.content);
            body.append("price", state.price);
            body.append("image", state.image);

            const { data } = await axios.post(url, body, {headers});
            console.log(data);

            if( data.status === 200 ){
                alert('등록되었습니다!')
                router.push({path:'/manage'})
            }
        }

        return {
            state,
            ...toRefs(state),
            handleImage,
            handleInsert
            }
    }
}
</script>

<style lang="css" scoped>
.box{
    width	: 800px;
    border	: 5px double skyblue;
    padding	: auto;
    margin	: auto;
}

.lbl {
    display	: inline-block;
    width	: 130px
}

</style>
[Vue.js] 매장용 관리페이지
- 메뉴등록버튼 ➡️ 메뉴등록페이지로 이동
- 메뉴검색기능
- 페이지네이션
- 메뉴수정기능
- 메뉴삭제기능
- 메뉴수정페이지로 이동할때 주소에
_id표시되게 번호받기!
➡️<tbody>안의<tr>에서 반복문 돌고 있으니
함수안에 바로tmp._id를 넣어주면 된다
=handleUpdate(tmp._id)handleDelete(tmp._id)
💡 return에 ...toRefs(state) 사용시
v-model="state.text" ➡️ v-model="text" 로 사용할 수 있다
📁fd_restaurant/src/components/restaurant/ManagePage.vue
<template>
    <div class="box">
        <h3>메뉴관리페이지</h3>
        <router-link to="/insertmenu"><button>메뉴등록</button></router-link><br />
        <input type="text" placeholder="검색어를 입력하세요" v-model="text" @keyup="handleText" />

        <table border=1>
            <thead>
            <tr>
                <th>메뉴번호</th>
                <th>메뉴명</th>
                <th>가격</th>
                <th>설명</th>
                <th>등록일</th>
                <th>이미지</th>
                <th>판매유무</th>
                <th>버튼</th>
            </tr>
            </thead>
            <tbody>
                <tr v-for="tmp of state.rows" :key="tmp" :style="[ tmp.chk ===1 ? style : style1 ]">
                <td>{{tmp._id}}</td>
                <td>{{tmp.name}}</td>
                <td>{{tmp.price}}</td>
                <td>{{tmp.content}}</td>
                <td>{{tmp.regdate}}</td>
                <td>
                	<img v-if="tmp.chk===1" :src="tmp.imageurl" style="width:50px" />
                </td>
                <td>{{tmp.chk}}</td>
                <td>
                    <button @click="handleUpdate(tmp._id)">수정</button>
                    <button @click="handleDelete(tmp._id)">삭제</button>
                </td>
                </tr>
            </tbody>
        </table>

        <div v-for="tmp of state.pages" :key="tmp" style="display:inline-block">
            <button v-text="tmp" @click=handlePage(tmp)></button>
        </div>
    </div>
</template>

<script>
import { reactive, toRefs } from '@vue/reactivity'
import { onMounted } from '@vue/runtime-core';
import axios from 'axios';
import { useRouter } from 'vue-router';
export default {
    setup () {
        const router = useRouter();

        const state = reactive({
            rows : [],
            page : 1, //페이지번호
            text : '', //검색어
            token : sessionStorage.getItem("TOKEN"),
            style1 : { background: '#cccccc' }, //삭제된 항목
            style : { background: '#ffffff' }, //판매중 항목
            total : 0,
            pages : 0,
            name : '',
            price : 0,
            content : '',
            image : null,
            imageurl : require('../../assets/noimage.jpg'),
            _id : 0,
        });

        onMounted(()=> {
            handleData();
        });

        const handleData = async() => {
            const url 	  = `/api/fd_food/selectlist.json?page=${state.page}&text=${state.text}`;
            const headers = {
            "Content-Type":"application/json",
            "token" : state.token
            }
            const { data } = await axios.get(url, {headers});
            console.log(data);

            if(data.status === 200) {
                state.rows  = data.result
                state.total = data.total // 전체 개시물 개수
                state.pages = Math.floor((data.total - 1) / 10) + 1; // 페이지수 계산
                //=> 21개면 (21-1)/10 + 1 = 3
            }
        }

        const handleText = () => {
            // console.log("handleText=>")
            state.page = 1,
            handleData();
        };

        const handlePage = (currPage) => {
            state.page = currPage; // 클릭한 페이지
            handleData();
        };

        const handleUpdate = (menucode) => {
              router.push({path:'/updatemenu', query:{ _id: menucode }})
        }

        const handleDelete = async( menucode ) => {
            const url = `/api/fd_food/delete.json`;
            const headers = {
                "Content-Type":"application/json",
                "token"		  : state.token
                }
            const body = { _id : menucode }
            const { data } = await axios.delete(url, {headers:headers, data : body});
            // console.log(data);
            if(data.status === 200 ){
                alert('삭제되었습니다!');
                handleData();

            }

        }

        return {state, ...toRefs(state), handleText, handleUpdate, handlePage, handleDelete}
    }
}
</script>

<style lang="css" scoped>
.box{
    width	: 800px;
    border	: 5px double skyblue;
    padding	: auto;
    margin	: auto;
}

.lbl {
    display	: inline-block;
    width	: 100px
}
</style>
[Node.js] 고객용 메뉴목록 서버
obj.imageurl 에
&ts=${Date.now()}추가
obj.imageurl =/api/ex_food/image?_id=${obj._id};
➡️/api/ex_food/image_id=${obj._id}&ts=${Date.now()};
&ts=${Date.now()}= 타임스탬프 찍어주면 vue는 사진이 바뀔때마다 이미지를 다시 읽어와 갱신해준다🤯 기본이미지/바뀐이미지 미리보기가 작동하지 않음
<div>
	<img src="imageurl" style="width:50px" />
	이미지 : <input type="file" @change="handleImage($event)"/>
</div>
💡
img src="imageurl"➡️img :src="imageurl"
src앞에:(콜론)찍어주지 않아서 작동하지 않았다
- 개념참고 : 콜론의 의미 http://roomycode.blogspot.com/2016/09/jquery.html
📁exp_20220711/routes/food/fd_food.js
// 고객용 메뉴목록
// 고객은 토큰 없이 볼 수 있다
// req.query => page, text, rcode
// 조회조건 => {chk : 1, restaurantcode : 일치하는것}
// 127.0.0.1:3000/api/fd_food/select.json?rcode=000-00-0000&page=1&text=
router.get("/select.json", async function (req, res, next) {
try {
// ? rcode=000-00-00000 page=1 & text =a
const rcode = req.query.rcode;
const page = Number(req.query.page);
const text = req.query.text;
console.log(page);
console.log(text);
console.log(rcode);
// 조회조건
const query = {
chk : 1,
restaurantcode : req.query.rcode,
};
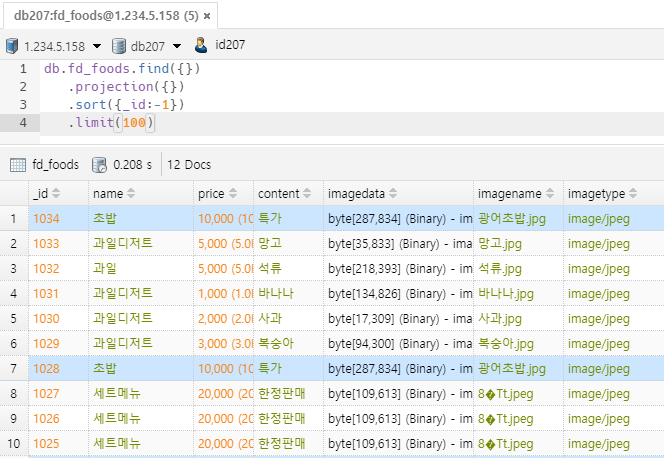
const project = {
imagedata:0, imagesize:0, imagename:0, imagetype: 0
};
const result = await Food.find(query).select(project)
.sort({name : 1}).skip( (page-1)*10 ).limit(10);
console.log(result);
// 전체개수 구하기
const total = await Food.countDocuments(query);
if(result !== null){
return res.send({ status: 200, result : result, total : total });
}
return res.send({ status: 0 });
}
catch (e) {
console.error(e);
return res.send({ status: -1, result: e });
}
});내가 등록한 메뉴목록 조회
.sort({name : 1}) ➡️ .sort({_id : 1})로 변경
최신등록한 메뉴가 상단에 위치하도록 설정
📁 exp_20220711//routes/fd_food.js
const result = await Food.find(query).select(project)
       .sort({_id : 1}).skip( (page-1)*10 ).limit(10);
         console.log(result);
메뉴수정
🤯 imagetype 타입설정오류
📁 exp_20220711/routes/fd_food.js
obj.imagetype = Number(req.file.mimetype);
            obj.imagesize = req.file.size;
결과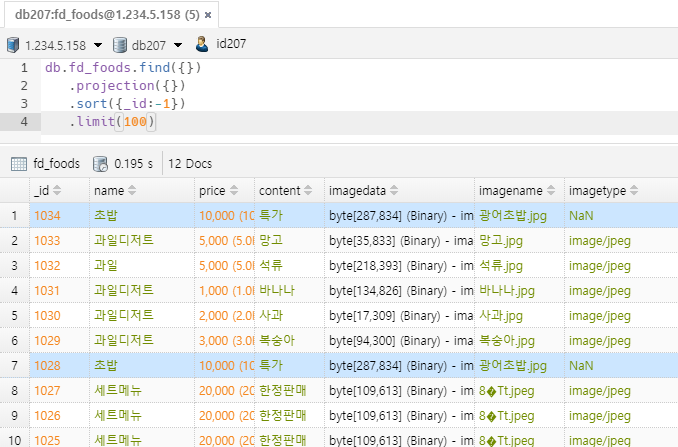
obj.imagedata = req.file.buffer;
            obj.imagename = req.file.originalname;
            obj.imagetype = req.file.mimetype;
            obj.imagesize = Number(req.file.size);
코드 수정 후 결과
[Node.js] 매장용 페이지 개별조회 (수정용)서버
📁exp_20220711/routes/food/fd_food.js
// [매장용] 수정용 1개 게시글 조회
// 127.0.0.1:3000/api/fd_food/select.json?_id=조회할메뉴번호
// 토큰 + { _id : 메뉴번호  }
router.get("/select.json",auth.checkToken, async function (req, res, next) {
    try {
        // 토큰에서 식당정보 추출
        const fid  = req.body.FID;
        const role = req.body.ROLE;

        // 권한정보가 식당이면
        if(role === 'RESTAURANT'){
            const query = {
            // 1)로그인 한 사용자의 데이터 이면서
            // 2)조회하고 싶은 메뉴 데이터 찾기
                restaurantcode : fid,
                _id : Number(req.query._id),
            };
            const project = { imagedata : 0, imagesize:0, imagename:0, imagetype: 0  } //이미지는 url 따로 생성해줘야함
            const result  = await Food.findOne(query).select(project)

            if(result !== null){
                // result 모델 객체는 새로운 변수 추가 불가!
                // 일반 object로 변환후 변수 추가하기
                let obj = result.toObject();
                obj.imageurl = `/api/fd_food/image?_id=${obj._id}&ts=${Date.now()}`
                return res.send({ status: 200, result : obj });
            }

        }

        return res.send({ status: 0 });
     }
    catch (e) {
        console.error(e);
        return res.send({ status: -1, result: e });
      }
    });
[Node.js] 매장용 가입회원 탈퇴여부 확인
탈퇴여부 확인용 chk항목 추가 (chk 1 = 탈퇴안함, 0 = 탈퇴함)
📁exp_20220711/model/fd_customermodel.js
//추후에 회원 탈퇴시 order 테이블안의 주문내역은 남아있기 때문에 chk값이 필요하다
chk        : { type: Number, default: 1 },
📁exp_20220711/routes/food/fd_customer.js 생성
📁exp_20220711/app.js에 등록
[Node.js] 고객용 회원가입 서버
📁exp_20220711/routes/food/fd_customer.js
// 회원가입
// 127.0.0.1:3000/api/fd_customer/join.json
router.post("/join.json", async function (req, res, next) {
    try {
        // 암호정보 hash
        const hashPw = crypto.createHmac( 'sha256', req.body._id + auth.hashSalt ).update( req.body.password ).digest('hex');

        const obj = new Customer();
        obj._id       = req.body._id
        obj.password  = hashPw;  // 암호
        obj.name      = req.body.name;  // 이름
        obj.post      = req.body.post;  // 우편번호
        obj.address   = req.body.address

        const result = await obj.save();
        console.log('result=>' , result);

        if(result !== null){
            return res.send({ status : 200, result : result })
        }

    }
    catch (e) {
        console.error(e);
        return res.send({ status: -1, result: e });
      }
    });
[Node.js] 고객용 로그인 서버
📁exp_20220711/routes/food/fd_customer.js
// 로그인
// 127.0.0.1:3000/api/fd_customer/login.json
router.post("/login.json", async function (req, res, next) {
    try {
        // 암호화 방식은 회원가입시와 동일해야한다
        const hashPw = crypto.createHmac( 'sha256', req.body._id + auth.hashSalt ).update( req.body.password ).digest('hex');

        const project = { _id : 1, name : 1 }
        const query = {
            _id      : req.body._id,
            password : hashPw,
            chk      : 1
        }

        const result = await Customer.findOne(query).select(project)
        console.log(result);

		// 내가 작성한 코드
        // if(result !== null){
        //     // 토큰에 포함할 내용(아이디와 권한정보(식당인지 고객인지))
        //     const data = { "FID" : result._id, "ROLE":"CUSTOMER" }
        //     console.log('data=>', data)
        //     // 토큰생성
        //     const token = auth.generateToken(data);
        //     console.log('token=>', token)
        //     // 결과반환
        //     return res.send({ status : 200, token : token })


		// 선생님 작성 코드
		if(result !== null){
			const token = auth.generateToken({FID : result._id, ROLE:"CUSTOMER"});
        	console.log('token=>', token)
        	return res.send({status:200, token:token});
          }
        return res.send({ status: 0 }); //위 조건 조회 후 결과가 없는경우 조회불가
     }
    catch (e) {
        console.error(e);
        return res.send({ status: -1, result: e });
      }
    });
fd_auth => FID ROLE 담겨있는 정보 꺼내는거?
회원정보 수정시 FID ROLE 안꺼내도 되는지
🤷회원정보 수정시 FID,ROLE 안꺼내도 되나요?
fd_auth 에서 FID, ROLE이 담겨있는 정보 꺼내는건가요?👨💻꺼내야 함!
FID, ROLE은 로그인시 토큰에 저장된 정보가 복원되어 가져옴
📁exp_20220711/token/fd_auth.js
FID, ROLE은fd_auth.js에서 토큰 생성시 가입 정보를 불러온다// 아래 4 변수 모두 이름을 임의로 지정해준것 req.body.FID = data.FID; req.body.ROLE = data.ROLE;
({FID : result._id, ROLE:"CUSTOMER"});
➡️ 이 내용,모양이 그대로 복원된다
🤷 ROLE의 값은 어디서 정해지나요?
👨💻
📁exp_20220711/routes/food/fd_restaurant.js 에서
로그인시 생성될ROLE(RESTAURANT)을 지정// 토큰에 포함할 내용(아이디와 권한정보(식당인지 고객인지)) const data = { "FID" : result._id, "ROLE":"RESTAURANT" }📁exp_20220711/routes/food/fd_restaurant.js 에서
로그인시 생성될ROLE(CUSTOMER)을 지정// 토큰에 포함할 내용(아이디와 권한정보(식당인지 고객인지)) const token = auth.generateToken({FID : result._id, ROLE:"CUSTOMER"});📁exp_20220711/token/fd_auth.js에서 변수명 지정
	//로그인시 생성했던 토큰 정보에 따라 복원
	//토큰 정보 꺼낸 후  req.body에 저장함
	req.body.FID = data.FID;
	req.body.ROLE = data.ROLE;
📁exp_20220711/model/fd_ordermodel.js 생성
📁exp_20220711/routes/food/fd_order.js 생성
📁exp_20220711/app.js에 등록
[Node.js] 고객용 주문 상태 변경
주문 상태 변경용 step 항목 추가 (step 1 = 주문, 2 = 주문취소)
📁exp_20220711/model/fd_ordermodel.js
// 주문 취소시에도 step값만 변경되기 때문에 확인 가능
step     : { type: Number, default: 1 }, // 1= 주문, 2=주문취소
[Node.js] 고객용 주문 취소하기
🔍주문취소 과정
- 주문한 고객 정보 가져오기
token
➡️ 고객 아이디FID, 고객 권한ROLE확인- 주문취소할 해당주문번호
_id확인token토대로 권한 확인role==='CUSTOMER'query에 주문정보 저장const query = { customercode : customerID, _id : _id };
query조건에 일치하는obj의 한가지 정보 찾기const obj = await Order.findOne(query);
- 찾아온 정보의
step,regated데이터 변경obj.step = 2 // 2(주문취소 상태)로 변경 obj.regdate = Date.now();
result에 변경된obj값 저장const result = await obj.save();
result!==null이면 출력
📁exp_20220711/routes/food/fd_order.js
// 주문취소하기
// step :1 => 2로 변경
// 토큰 + {"_id":"주문번호"}
// 127.0.0.1:3000/api/fd_order/delete.json
router.put("/delete.json", auth.checkToken, async function (req, res, next) {
try {
// 주문한 고객아이디
const customerID = req.body.FID;
// 고객의 권한
const role = req.body.ROLE
// 주문취소할 해당 주문번호
const _id = Number(req.body._id);
if(role === 'CUSTOMER'){
// 주문정보저장
const query = { customercode : customerID,
                _id          : _id };
// 쿼리 조건에 따라 일치하는 한가지 정보 찾기;
const obj = await Order.findOne(query);
obj.step = 2 // 2(주문취소 상태)로 변경
obj.regdate = Date.now();
const result = await obj.save();
console.log(result);
if(result !== null){
return res.send({ status:200, result : result })
}
}
return res.send({ status: 0})
}
catch (e) {
console.error(e);
return res.send({ status: -1, result: e });
}
});🤷 📁exp_20220711/routes/food/fd_order.js 에서
주문 취소하기 서버구현시 왜_id를 사용하나요..?👨💻 📁exp_20220711/routes/food/fd_ordermodel.js을 확인해보면
_id는 주문번호를 의미
foodcode(메뉴코드)로 데이터를 주문취소를 진행하게 되면
해당하는 메뉴코드의 데이터를 전부취소한다{ _id(주문번호) : 101 ,foodcode(메뉴코드) : 짜장면, cnt(수량) : 2개 } { _id(주문번호) : 102 ,foodcode(메뉴코드) : 짜장면, cnt(수량) : 1개 } { _id(주문번호) : 103 ,foodcode(메뉴코드) : 짜장면, cnt(수량) : 3개 }
- ex) 나는 주문번호 102만 취소하고 싶음
➡️_id(주문번호)로 지워야 함- ex2) 나는 짜장면 주문건 모두 다 취소하고 싶음
➡️foodcode(음식번호)로 지워야함
🤷 📁exp_20220711/routes/food/fd_order_js
주문내역에서order:result와tmp의 차이
- arr.push ({ order : result, food : result1 })
➡️ {order : 로그인 고객이 주문한 모든 주문결과,
food : 음식1가지} 의 반복- arr.push({ order : tmp, food : result1 })
➡️ {order : 로그인 고객의 해당상품의 주문결과만,
food : 해당음식} 의 반복
💡
result값을tmp에 임시로 넣어 조건query에 해당하는 값만 반복문에서 추출해낸다
[Vue.js] 프로젝트 빌드
- 고객용
http://127.0.0.1:3000/ ➡️ naver.com- 매장(식당용)
http://127.0.0.1:3000/restaurant ➡️ naver.com/restaurant
📁 fd_restaurant/vue.config.js
주소뒤에 추가할문자 publicPath 넣어준다
const { defineConfig } = require('@vue/cli-service')
module.exports = defineConfig({
  transpileDependencies: true,
  devServer : {
    proxy : {
      '/api': {
        target : 'http://127.0.0.1:3000',
        changeOrigin : true,
        logLevel : 'debug'
      }
    },
    port:8081
  },
  publicPath : '/restaurant' //주소뒤에 붙임

})
- port : 8081 => 개발용 서버
- 실제 서비스용 포트 = 3000번 = 백엔드의 포트번호와 같다
서버배포
cmd > npm run build📁 vue/fd_restaurant/dist 파일 생성됨
배포할 파일 생성 ➡️ 실제 소스가 아닌 빌드된 배포용 소스파일!
📁exp_20220711/public/restaurant 폴더 생성하기
해당 위치에 dist 파일안에 생성된 폴더 전부 복붙하기
- 고객용 배포 파일
고객용 주소 = http://127.0.0.1:3000/
📁exp_20220711/public/안에 배포용 소스파일 넣으면 된다
➡️ 주소뒤에 아무것도 없으니까public파일 안에 넣기- 매장(식당)용 배포 파일
매장용 주소 = http://127.0.0.1:3000/restaurant
📁exp_20220711/public/restaurant 안에 배포용 소스파일 넣으면 된다
➡️ 주소뒤에 restaurant 있으니까public/restaurant파일 안에 넣기
📁exp_20220711/routes/index.js
// 고객용 vue 프로젝트
// 127.0.0.1:3000 => 고객용 public
// public/index.html을 읽어서 표시하라
router.get('/', function(req, res, next) {
  res.sendFile(path.json(__dirname, '../public', 'index.html'));
});

// 매장(식당)용 vue 프로젝트
// 127.0.0.1:3000/restaurant => 매장(식당)용 public
// public/restaurant/index.html을 읽어서 표시하라
router.get('/restaurant', function(req, res, next) {
  res.sendFile(path.json(__dirname, '../public/restaurant', 'index.html'));
});
[Vue.js] 고객용 프로젝트 생성
vue 폴더
CMD> vue create fd_customer

CMD> cd fd_customer
CMD> npm i axios --save
CMD> npm i vue-router@next --save
CMD> npm i vuex --save
📁 vue/fd_customer/vue.config.js
port 8082로 설정
const { defineConfig } = require('@vue/cli-service')
module.exports = defineConfig({
  transpileDependencies: true,
  devServer : {
    proxy : {
      '/api': {
        target : 'http://127.0.0.1:3000',
        changeOrigin : true,
        logLevel : 'debug'
      }
    },
    port:8082
  },
})
📁 vue/fd_customer/src/routes 폴더 생성
📁 vue/fd_customer/src/routes/index.js 파일 생성
📁 vue/fd_customer/src/components 하위에 페이지 생성
- JoinPage.vue
- LoginPage.vue
- LogoutPage.vue
- MainPage.vue
- MyPage.vue
📁 vue/fd_customer/src/App.vue
template 안에 <router-view></router-view>
📁 vue/fd_customer/src/main.js등록
import { createApp } from 'vue'
import App from './App.vue'

import routes from './routes/index';
import stores from './stores/index';

const app = createApp(App);
app.use(routes);
app.use(stores);
app.mount('#app')
[Vue.js] 고객용 회원가입 화면
📁 vue/fd_customer/src/components/JoinPage.vue
- 스크립트 필요할때는
onMounted상태로 많이 사용할것- vue에서 스크립트 사용가능하지만 사용 가능한 형태로 변경해야함
- 결제 서비스, 카카오 로그인, 주소(우편번호) 검색 기능 등
kakao 우편번호 서비스 이용
https://postcode.map.daum.net/guide
사용자가 선택한값 이용
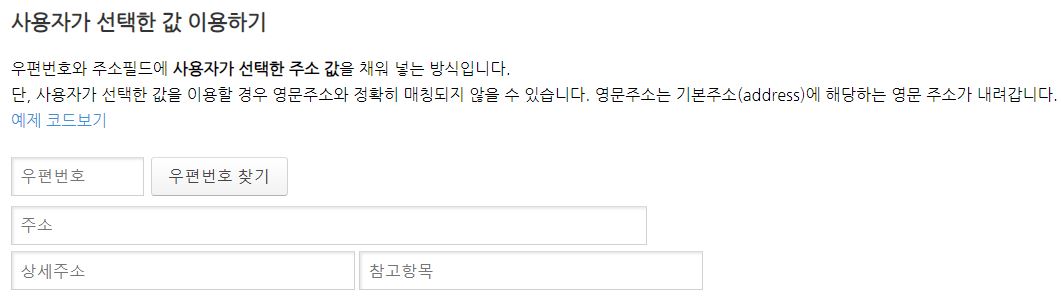
💡 예제코드보기 에서 코드를 확인해보면
자바스크립트 언어로 작성되어 있어 뷰에 바로 적용할 수 없다
➡️ 뷰에서는 const 함수 형태로 로 변형하여 사용
onMounted (()=> {
            // <script src 링크를 t1.daumcdn.net/mapjsapi/bundle/postcode/prod/postcode.v2.js 넣어주기 위해
            // script태그생성
            let script = document.createElement('script');
            // script src= url 추가
            script.setAttribute('src', 'http://t1.daumcdn.net/mapjsapi/bundle/postcode/prod/postcode.v2.js');
            // document에 추가하기
            document.head.append(script);

            // 기본적으로 vue에는 window를 가지고 있음.
            // window안에 스크립트를 가져와서 daum을 출력
            // window안에 daum이 추가됨 = window.daum
            console.log(window);

        });

        const sample6_execDaumPostcode = () => {
        new window.daum.Postcode({
            oncomplete: function(data) {
                // 팝업에서 검색결과 항목을 클릭했을때 실행할 코드를 작성하는 부분.

                // 각 주소의 노출 규칙에 따라 주소를 조합한다.
                // 내려오는 변수가 값이 없는 경우엔 공백('')값을 가지므로, 이를 참고하여 분기 한다.
                var addr = ''; // 주소 변수
                var extraAddr = ''; // 참고항목 변수

                //사용자가 선택한 주소 타입에 따라 해당 주소 값을 가져온다.
                if (data.userSelectedType === 'R') { // 사용자가 도로명 주소를 선택했을 경우
                    addr = data.roadAddress;
                } else { // 사용자가 지번 주소를 선택했을 경우(J)
                    addr = data.jibunAddress;
                }

                // 사용자가 선택한 주소가 도로명 타입일때 참고항목을 조합한다.
                if(data.userSelectedType === 'R'){
                    // 법정동명이 있을 경우 추가한다. (법정리는 제외)
                    // 법정동의 경우 마지막 문자가 "동/로/가"로 끝난다.
                    if(data.bname !== '' && /[동|로|가]$/g.test(data.bname)){
                        extraAddr += data.bname;
                    }
                    // 건물명이 있고, 공동주택일 경우 추가한다.
                    if(data.buildingName !== '' && data.apartment === 'Y'){
                        extraAddr += (extraAddr !== '' ? ', ' + data.buildingName : data.buildingName);
                    }
                    // 표시할 참고항목이 있을 경우, 괄호까지 추가한 최종 문자열을 만든다.
                    if(extraAddr !== ''){
                        extraAddr = ' (' + extraAddr + ')';
                    }
                    // 조합된 참고항목을 해당 필드에 넣는다.
                    document.getElementById("sample6_extraAddress").value = extraAddr;

                } else {
                    document.getElementById("sample6_extraAddress").value = '';
                }

                // 아래 코드 작성하면 데이터가 입력된채 유지된다!
                // 안넣으면 상세주소에 입력시 기존 입력 우편번호 사라짐
                state.post = data.zonecode;
                state.address1 = addr;


                // 우편번호와 주소 정보를 해당 필드에 넣는다.
                document.getElementById('sample6_postcode').value = data.zonecode;
                document.getElementById("sample6_address").value = addr;
                // 커서를 상세주소 필드로 이동한다.
                document.getElementById("sample6_detailAddress").focus();
            }
        }).open();
    }