Querydsl과 No-Offset으로 커서 기반 페이지네이션(Cursor-Based Pagination) 구현하기
📍 Cursor-Based Pagination 구현
📍 Querydsl 간단하게 알아보기
Offset, No-Offset Pagination이란?(feat. Slice, Page) 글을 읽으시면 2배 더 자세히 이해하실 수 있습니다.
🔎 No-Offset Pagination이란?
위의 글에서도 적었지만 간단하게만 설명하자면 offset을 이용하지 않고 마지막으로 조회한 데이터의 아이디와 size를 이용하여 조회한다. Cursor-Based Pagination 이라고도 부른다.
⚙️ 구현
거두절미하고 바로 구현을 해보자.
프로젝트 환경
- Java: 17
- Spring Boot: 3.3.8
- Dependency
dependencies {
    implementation 'org.springframework.boot:spring-boot-starter-data-jpa'
    implementation 'org.springframework.boot:spring-boot-starter-web'

    runtimeOnly 'com.mysql:mysql-connector-j'

    compileOnly 'org.projectlombok:lombok'
    annotationProcessor 'org.projectlombok:lombok'

    testImplementation 'org.springframework.boot:spring-boot-starter-test'
    testRuntimeOnly 'org.junit.platform:junit-platform-launcher'

    //test 롬복 사용
    testCompileOnly 'org.projectlombok:lombok'
    testAnnotationProcessor 'org.projectlombok:lombok'

    // querydsl
    implementation 'com.querydsl:querydsl-jpa:5.0.0:jakarta'
    annotationProcessor "com.querydsl:querydsl-apt:5.0.0:jakarta"
    annotationProcessor "jakarta.annotation:jakarta.annotation-api"
    annotationProcessor "jakarta.persistence:jakarta.persistence-api"

    //test
    testImplementation 'org.springframework.boot:spring-boot-starter-test'
    testRuntimeOnly 'com.h2database:h2'
}
프로젝트(Post 폴더) 구조
프로젝트의 구조는 다음과 같다.
.
├── controller
│   └── PostController.java
├── domain
│   └── Post.java
├── dto
│   ├── PostMapper.java
│   ├── request
│   │   ├── DeletePostRequest.java
│   │   ├── RegisterPostRequest.java
│   │   ├── SimplePostRequest.java
│   │   └── UpdatePostRequest.java
│   └── response
│       ├── DeletePostResponse.java
│       ├── PagePostResponse.java
│       └── SimplePostResponse.java
├── exception
│   └── PostErrorCode.java
├── repository
│   ├── PostCustomRepository.java
│   ├── PostCustomRepositoryImpl.java
│   └── PostRepository.java
└── service
    └── PostService.java
PostRepository
package com.spring.post.repository;

import java.util.List;

import org.springframework.data.jpa.repository.JpaRepository;
import org.springframework.data.jpa.repository.Query;
import org.springframework.stereotype.Repository;

import com.spring.post.domain.Post;

@Repository
public interface PostRepository extends JpaRepository<Post, Long>, PostCustomRepository {

	@Query("SELECT p FROM Post p JOIN FETCH p.user")
	List<Post> findAll();
}
JpaRepository와 PostCusstomRepository 인터페이스를 상속받는다.
PostCustomRepository
먼저 Repository부터 살펴보겠다.
package com.spring.post.repository;

import com.spring.post.dto.response.PagePostResponse;
import org.springframework.data.domain.Pageable;

public interface PostCustomRepository {

    public PagePostResponse searchPostByPagination(Long postId, Pageable pageable);
}
searchByPagination 메서드의 매개변수로 마지막으로 조회한 게시물 아이디와 Pageable을 넘겨주었다.
PostCustomRepositoryImpl
package com.spring.post.repository;

import static com.spring.post.domain.QPost.post;

import com.querydsl.core.types.dsl.BooleanExpression;
import com.querydsl.jpa.impl.JPAQueryFactory;
import com.spring.post.domain.Post;
import com.spring.post.dto.PostMapper;
import com.spring.post.dto.response.PagePostResponse;
import com.spring.post.dto.response.SimplePostResponse;
import java.util.List;
import lombok.RequiredArgsConstructor;
import org.springframework.data.domain.Pageable;
import org.springframework.data.domain.SliceImpl;
import org.springframework.stereotype.Repository;

@Repository
@RequiredArgsConstructor
public class PostCustomRepositoryImpl implements PostCustomRepository {

    private final JPAQueryFactory queryFactory;

    @Override
    public PagePostResponse searchPostByPagination(Long postId, Pageable pageable) {
    	// querydsl을 이용해서 Post Pagination
        List<Post> result = queryFactory
                .selectFrom(post)
                .where(postIdLt(postId)) // postId(마지막으로 조회한 post 아이디) 이후부터 조회
                .orderBy(post.id.desc()) // postId 내림차순 정렬
                .limit(pageable.getPageSize() + 1) // pageSize보다 1개 더 가져옴
                .fetch();

        Long lastPostId =
                result.size() > pageable.getPageSize() - 1 ? result.get(pageable.getPageSize() - 1).getId() : null;

        List<SimplePostResponse> content = PostMapper.toPagePostResponses(result, pageable.getPageSize());

        boolean hasNext = false;
        if (result.size() > pageable.getPageSize()) {
            result.subList(0, pageable.getPageSize());
            hasNext = true;
        }

        return new PagePostResponse(new SliceImpl<>(content, pageable, hasNext), lastPostId);
    }

    private BooleanExpression postIdLt(Long postId) {
        return postId != null ? post.id.lt(postId) : null;
    }
}
PostCustomRepositoryImpl은 Querydsl을 이용해서 구현했다.
❓ Querydsl이란?
QueryDSL은 타입 안전한(Typesafe) SQL과 JPQL 쿼리를 생성할 수 있도록 도와주는 프레임워크이다.
JPA(Java Persistence API)와 함께 사용되며, 동적 쿼리를 가독성 좋고 안전하게 작성할 수 있게 해준다.
타입 안전한 SQL
JPQL이나 네이티브 쿼리는 문자열 기반이라 런타임에서 오류가 발생할 수 있지만, QueryDSL은 컴파일 타임에 오류를 잡을 수 있다.
동적 쿼리 작성이 편리
BooleanBuilder 또는 Predicate을 활용하여 조건을 유연하게 추가/제거할 수 있다.
❓ 왜 PageSize보다 1을 더 가져올까?
      List<Post> result = queryFactory
             	.selectFrom(post)
                .where(postIdLt(postId)) // postId(마지막으로 조회한 post 아이디) 이후부터 조회
                .orderBy(post.id.desc()) // postId 내림차순 정렬
                .limit(pageable.getPageSize() + 1) // pageSize보다 1개 더 가져옴
                .fetch();
위의 Query문에서 limit 절을 보면 pageable.getPageSize() + 1 크기의 Page를 가져온다.
그 이유는 밑에 코드에서 알 수 있다.
        Long lastPostId =
                result.size() > pageable.getPageSize() - 1 ? result.get(pageable.getPageSize() - 1).getId() : null;
result.size() > pageable.getPageSize() - 1 이 조건문이 의미하는 바는 다음 페이지가 존재하는지를 알기 위함이다.
예를 들어 PageSize가 5라고 했을 때 pageable.getPageSize() + 1 는 6이 되면 다음 페이지가 존재한다는 의미이므로 마지막 pageId를 반환하고, 만약 6 미만이 되면 다음 페이지가 존재하지 않는 것이므로 null을 반환한다.
		boolean hasNext = false;
        if (result.size() > pageable.getPageSize()) {
            result.subList(0, pageable.getPageSize());
            hasNext = true;
}SliceImpl<>에 content, pageable, hasNext 를 담아야 하므 같은 원리로 hasNext도 구해서 담아준다.
PagePostResponse를 만든 이유는 SliceImpt<> 에 lastPostId를 같이 반환하기 위해서이다.
PostService
package com.spring.post.service;

import com.spring.common.exception.runtime.BaseException;
import com.spring.post.domain.Post;
import com.spring.post.dto.PostMapper;
import com.spring.post.dto.request.DeletePostRequest;
import com.spring.post.dto.request.RegisterPostRequest;
import com.spring.post.dto.request.SimplePostRequest;
import com.spring.post.dto.request.UpdatePostRequest;
import com.spring.post.dto.response.DeletePostResponse;
import com.spring.post.dto.response.PagePostResponse;
import com.spring.post.dto.response.SimplePostResponse;
import com.spring.post.exception.PostErrorCode;
import com.spring.post.repository.PostRepository;
import com.spring.user.domain.User;
import com.spring.user.exception.UserErrorCode;
import com.spring.user.repository.UserRepository;
import java.util.List;
import lombok.RequiredArgsConstructor;
import org.springframework.data.domain.Pageable;
import org.springframework.stereotype.Service;
import org.springframework.transaction.annotation.Transactional;

@Service
@RequiredArgsConstructor
public class PostService {

	private final PostRepository postRepository;
	private final UserRepository userRepository;

	// 생략...

	public PagePostResponse searchPostByPagination(Long postId, Pageable pageable) {
		return postRepository.searchPostByPagination(postId, pageable);
	}
postRepository의 searchPostByPagination 를 controller 단에 반환해준다.
PostController
package com.spring.post.controller;

import com.spring.post.dto.PostMapper;
import com.spring.post.dto.request.DeletePostRequest;
import com.spring.post.dto.request.RegisterPostRequest;
import com.spring.post.dto.request.UpdatePostRequest;
import com.spring.post.dto.response.DeletePostResponse;
import com.spring.post.dto.response.PagePostResponse;
import com.spring.post.dto.response.SimplePostResponse;
import com.spring.post.service.PostService;
import java.util.List;
import lombok.RequiredArgsConstructor;
import org.springframework.data.domain.Pageable;
import org.springframework.http.ResponseEntity;
import org.springframework.web.bind.annotation.DeleteMapping;
import org.springframework.web.bind.annotation.GetMapping;
import org.springframework.web.bind.annotation.PatchMapping;
import org.springframework.web.bind.annotation.PathVariable;
import org.springframework.web.bind.annotation.PostMapping;
import org.springframework.web.bind.annotation.RequestBody;
import org.springframework.web.bind.annotation.RequestMapping;
import org.springframework.web.bind.annotation.RequestParam;
import org.springframework.web.bind.annotation.RestController;

@RestController
@RequestMapping("/api/post")
@RequiredArgsConstructor
public class PostController {

	private final PostService postService;

	// 생략...

	@GetMapping("/paging")
	public ResponseEntity<PagePostResponse> getPostByPagination(
			Pageable pageable,
			@RequestParam(required = false) Long postId) {
		PagePostResponse response = postService.searchPostByPagination(postId, pageable);

		return ResponseEntity.ok(response);
	}

}
postId에 @RequestParam(required = false) 를 달아주는 이유는 처음 페이징을 할 때는 postId를 알지 못하기 때문이다.
✅ 실행 결과
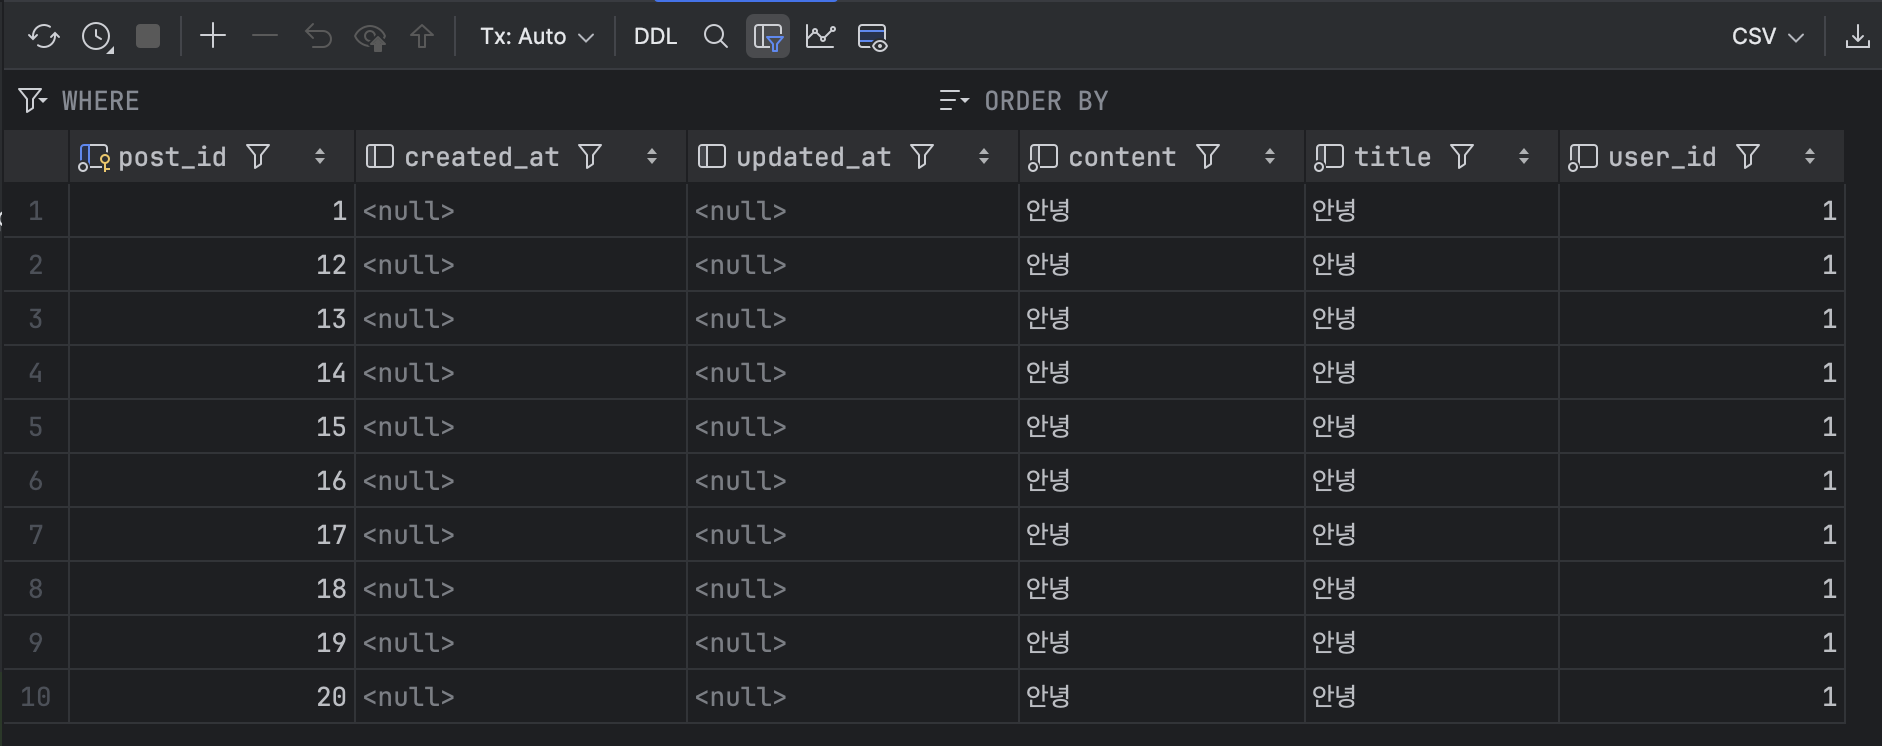
테이블에 임의로 데이터를 넣어주었다.
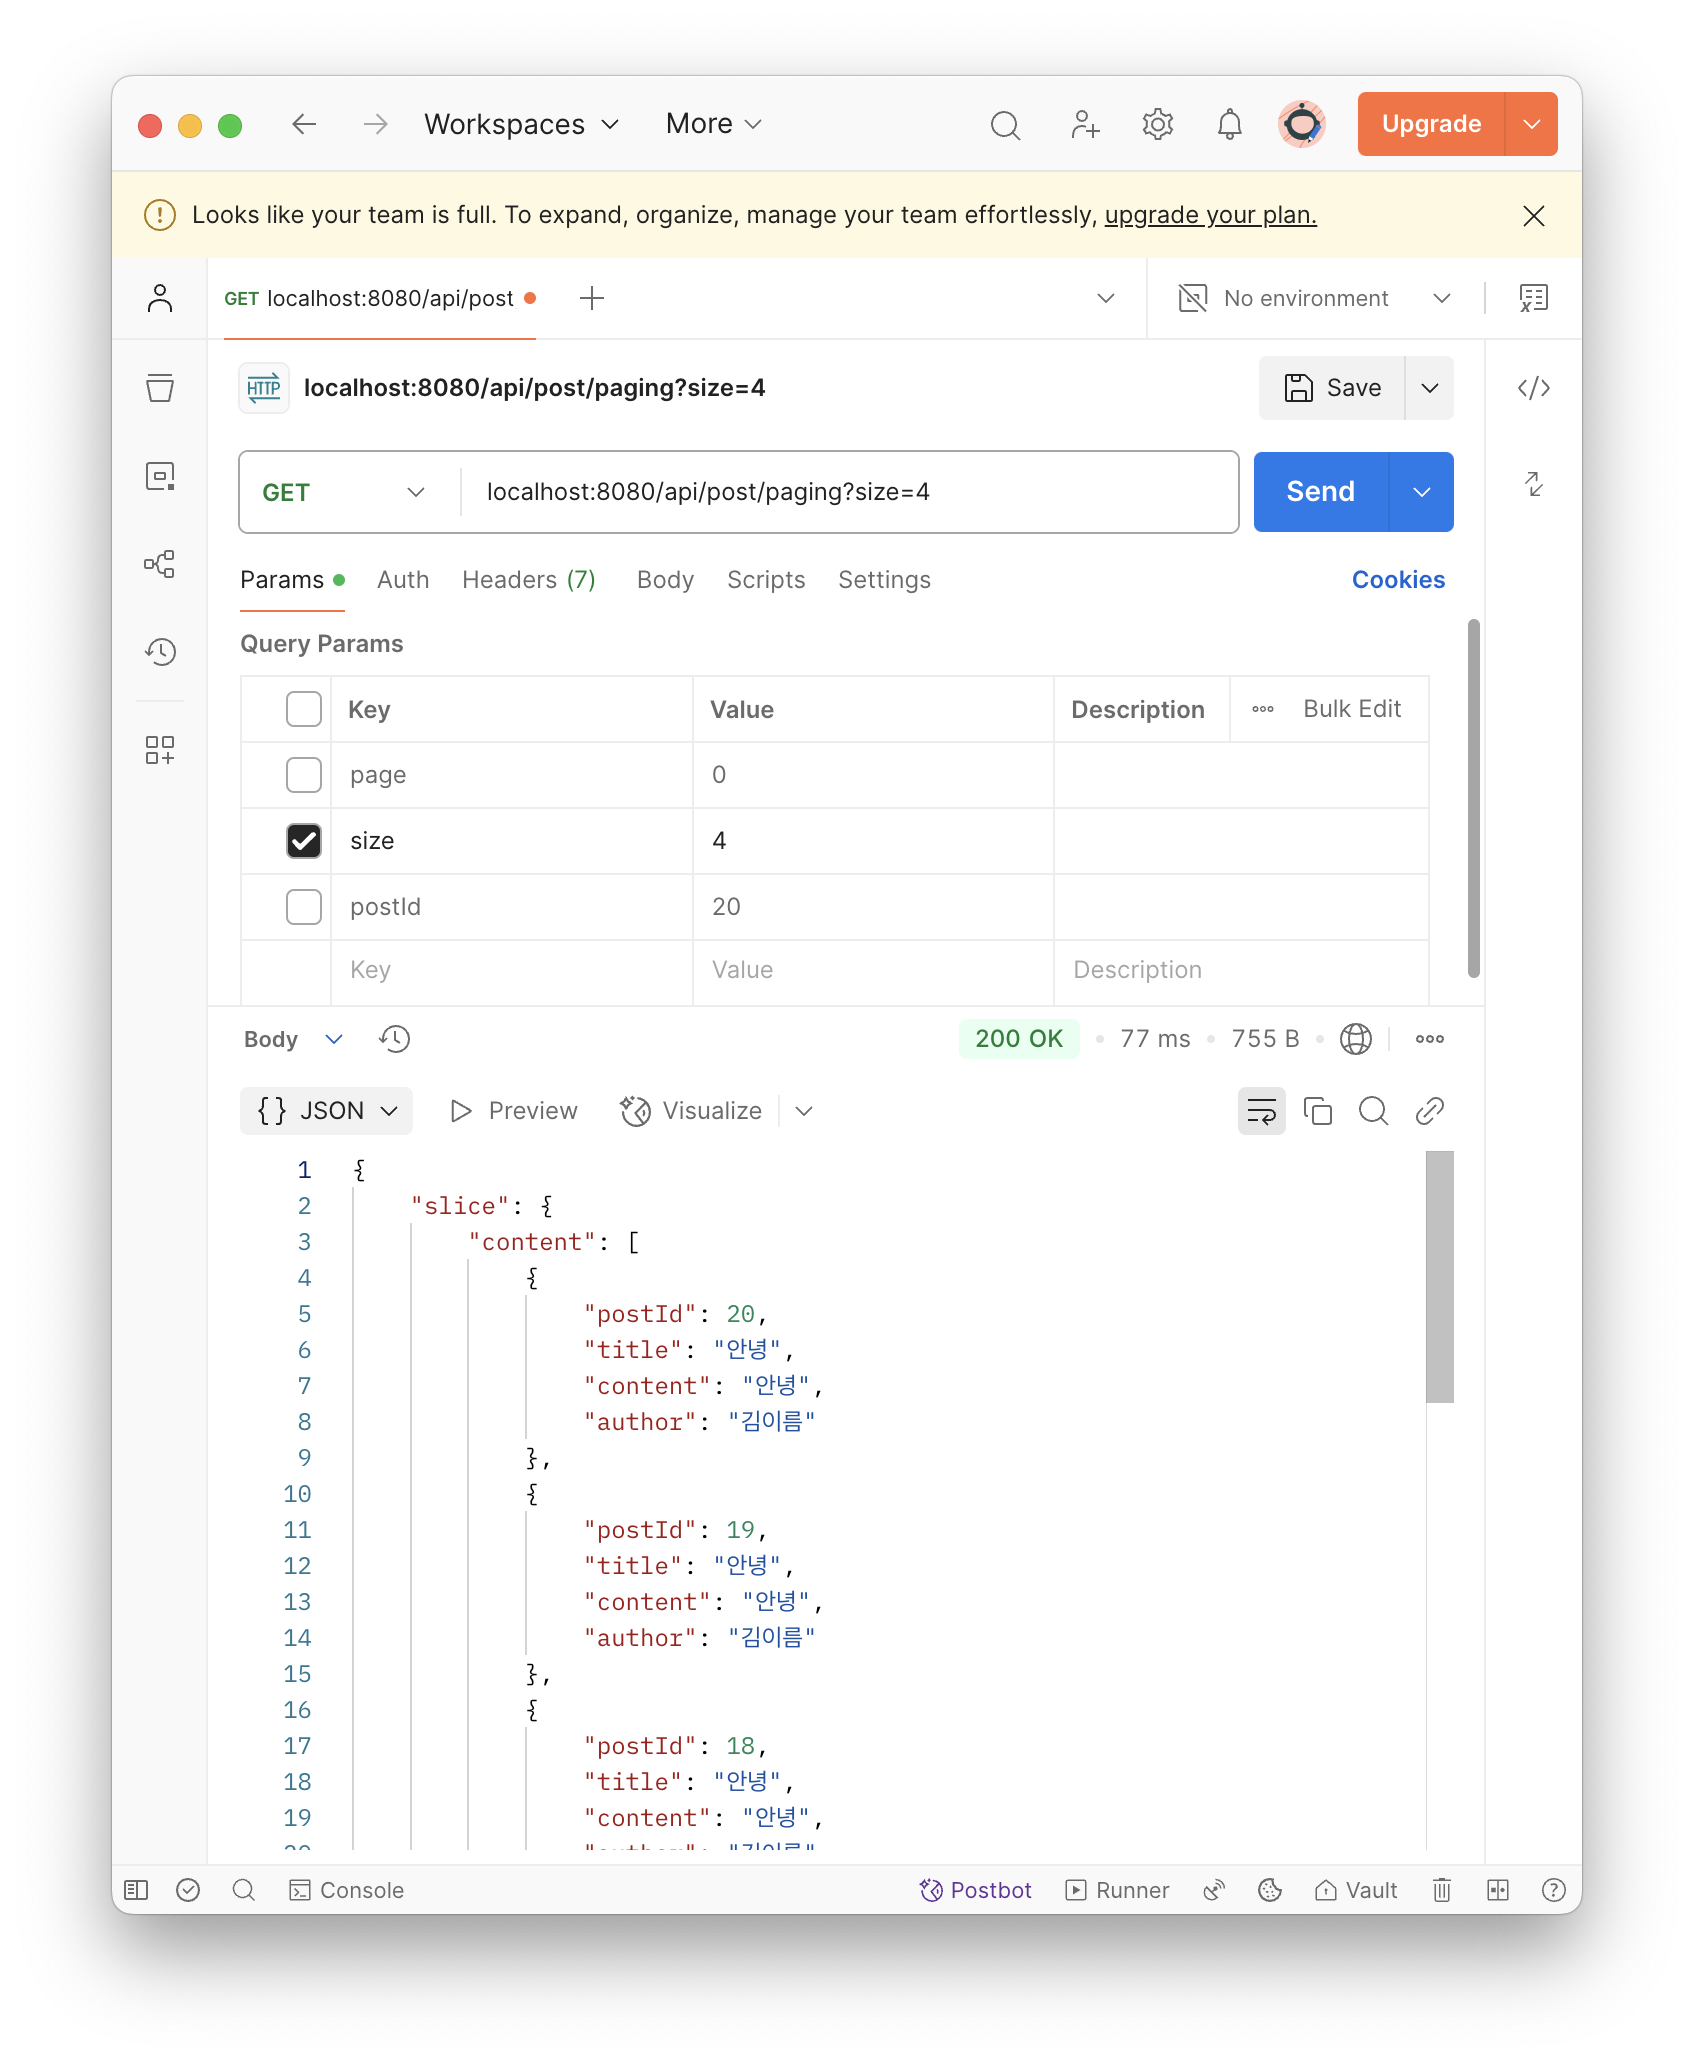
size를 정해서 넣으면 첫 페이지가 잘 나온다.
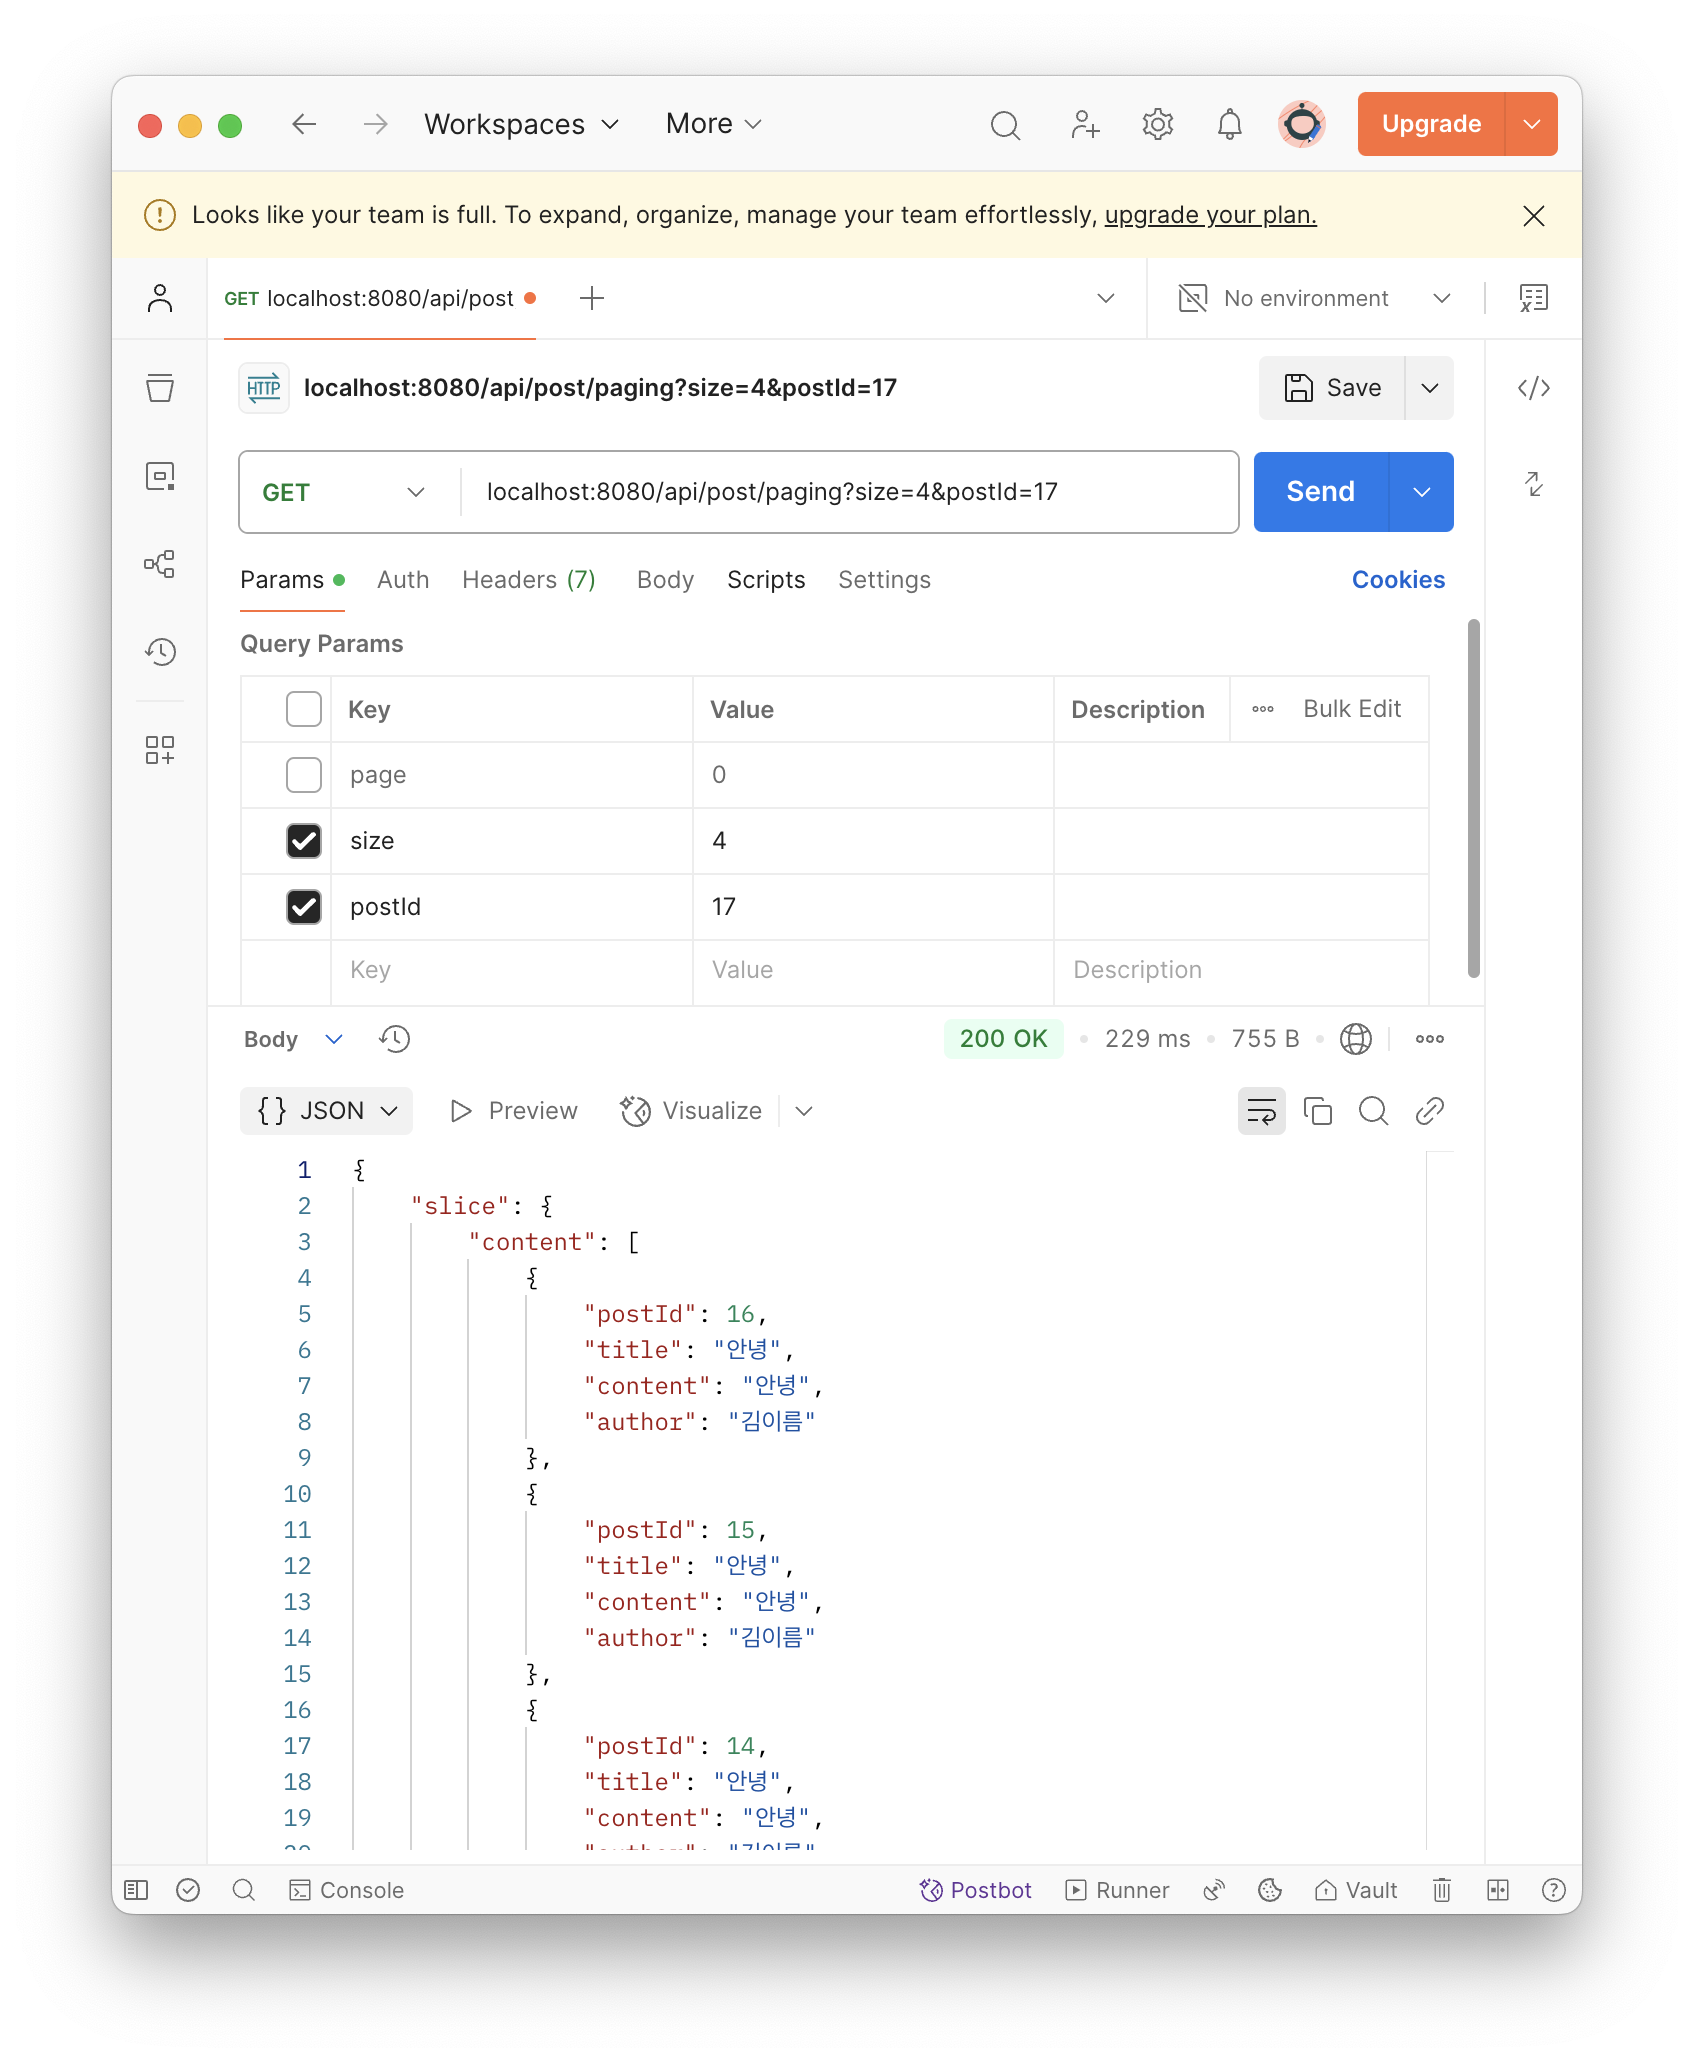
이후 반환된 lastPostId도 request에 넣어주면 다음 페이지도 잘 나온다.

좋은 지식 공유 감사드려요~^^ 다음 포스트도 기대하고 있겠습니다😎