URL https://memememaker.netlify.app/
THE CANVAS API
JS에서 canvas를 사용해 브라우저에 2D 혹은 3D 그래픽을 그릴 수 있다
html에서는 canvas 한 번 써주는 게 전부이고,
나머지 작업은 대부분 js에서 이루어진다
JS에서 canvas 불러오기
const canvas = document.querySelector("canvas");
context 작성
- context는 캔버스에 그림을 그릴 때 사용하는 붓이다.
-const ctx = canvas.getContext('2d'); //ctx=context
캔버스 크기 설정
- css에서 캔버스 크기 설정을 한 후 js에서도 작성해준다.
canvas.height = 800; canvas.width = 800; - 이후에는 width 와 height를 js에서만 수정할 것임 (css에서 X)
캔버스 위에 도형 그리기
-
canvas 좌표 시스템:
캔버스 좌상단이 좌표 0.0, 가로 X, 세로 Y -
선으로 사각형 그리는 함수
moveTo(x, y);-> 브러쉬의 좌표를 움직여줌
lineTo(x, y);-> 라인을 그려줌const canvas = document.querySelector('canvas'); const ctx = canvas.getContext('2d'); //ctx=context canvas.height = 800; canvas.width = 800; ctx.moveTo(50, 50); ctx.lineTo(150, 50); ctx.lineTo(150, 150); ctx.lineTo(50, 150); ctx.lineTo(50, 50); ctx.stroke(); -
사각형 함수로 사각형 그리기
ctx.rect(x, y, w, h);사각형 선 그리기
ctx.stroke(); / ctx.fill();테두리만 채우기/ 전체 채우기
beginPath();새 경로 시작하기(앞의 코드에 영향을 주지 않는다)const canvas = document.querySelector('canvas'); const ctx = canvas.getContext('2d'); //ctx=context canvas.height = 800; canvas.width = 800; ctx.rect(50, 50, 100, 100); //rect(); moveTo,lineTo를 이용한 사각형 그리기를 한번에 하는 함수 ctx.stroke(); -
사각형 채우는 함수 fillRect 작성
ctx.fillRect(x값, y값, w값, h값); -
원을 그리는 함수
ctx.arc(x좌표, y좌표, 반지름, startangle, 2 * endangle);ctx.arc(250, 100, 50, 0, 2 * Math.PI); ctx.fill();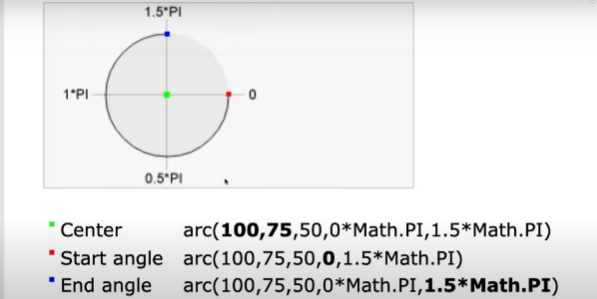
PAINTING BOARD
<input id="line-width" type="range" min="1" max="10" value="5" step="0.5" />
<input type="color" id="color" />
<input type="file" accept="image/* multiple">
type="range"범위를 지정할 수 있는 형태의 폼이 생성된다
type="color"색상을 지정할 수 있는 형태의 폼이 생성된다
type="file"원하는 파일을 불러올수있는 폼이 생성된다
min="1"범위의 최소값 지정한다
max="10"범위의 최대값 지정한다
value="5"범위의 기본설정 값 지정한다
step="0.5"범위의 단계 지정한다
accept="image/*"지정한 값만 들고 올수있도록 제한하는 역할을 한다
multiple유저가 파일을 여러개 업로드 할 수 있다
forEach()를 사용하기 위해서는 array어야 하기 때문에 객체인 const colorOptions를 배열로 바꾸기 위해 Array.from을 앞에 붙인다
const colorOptions = Array.from(
  document.getElementsByClassName('color-option'));

colorOptions.forEach((color) => color.addEventListener('click', onColorClick));

);
MEME MAKER

.createObjectURL();
해당 파일의 브라우저 메모리 URL을 알아낼 수 있다
유저가 파일을 업로드한 브라우저 안에서만 사용할 수 있는 URL이다 ->인터넷에 없는 파일
생성자 함수 만드는 방법
const image= new Image();  //생성자 함수로 object로 반환
document.createElement("img")
//위 두개는 같은 말이다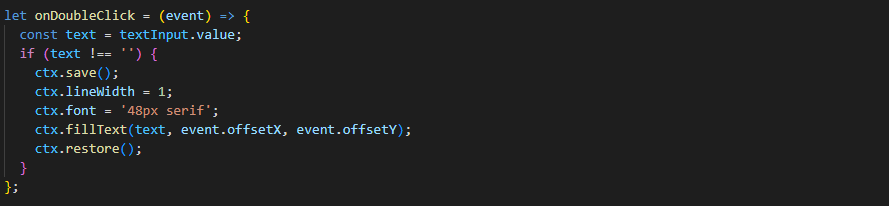
.save() 현재 상태, 색상,스타일 등을 저장한다(save를 사용하기 직전의 모든 상태를 저장해둔다)
save와 restore사이에는 어떤 수정을 하던 저장이 되지 않는다
.restore()여기서 이전에 저장된 상태로 돌아간다

canvas.toDataURL 캔버스태그의 메소드로 캔버스에 있는 그림 데이터를 URL로 변환해준다
css
<label></label>을 사용하여 input을 button처럼 꾸밀 수 있다
label의 for을 input과 동일하게 주고
원래의 input을 display:none으로 숨긴다
html

<label for="file">
   Add Photo
<input type="file" accept="image/*" id="file"/>
</label>
css
input#file {
display: none;
}