복습
시그널을 사용할 때 exit를 이용해서 종료하도록 할 수 있다. 만약 안하면 무한루프 때문에 끝나지 않아 kill을 사용해야 한다
일반 함수는 main에서 호출하지만 signal_handler는 커널이 호출한다
sleep이랑 alarm은 같은 타이머를 쓴다 -> 같이 안쓰는 것이 좋음
루프를 실행시키고
~/ipc$ ./sigkill 3219 2를 하면 바로 알람으로 간다
이 알람도 없애고 싶으면
~/ipc$ ./sigkill 3219 9명령을 통해 죽인다
어제 만들었던 계정인 pi를 없애려 한다
~$ sudo deluser pi
/home$ sudo rm -rf pi/
시그널
- 세마포어, 메시지큐, 공유메모리 모두 IPC 이다
- 기계어가 바뀌면 2개 이상의 32비트 기계어가 나올 수 있다
- 멀티프로세스는 모든 프로세스를 균등하게 쓰게 커널이 관리한다
- 변수 하나라도 전역변수라면 뮤텍스/세마포어로 경쟁관계를 해결해야함(동기화)
요즘 면접에서 통신과 스레드에 관련한 내용을 잘 물어봄
~/ipc$ cp -r /mnt/lect_nfs/iot_socket .
~/ipc/iot_socket$ chmod u-x *
~/ipc/iot_socket$ make
~/ipc/iot_socket$ ./iot_client 10.10.15.71 5000 9
나의 iot 패스워드는 9번이다
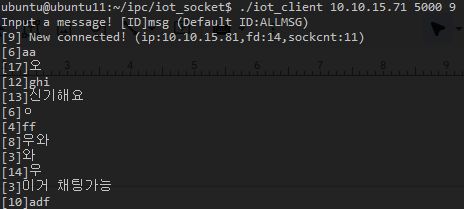
이렇게 채팅 가능
그런데 모든 사람들에게 말할 필요 없다
패킷도 손해이고 sleep상태도 깨울 수 있다
그래서 개인톡이 필요한데
[IDLIST]를 치면 현재 보낼 수 있는 id들이 나오고
[30] 이런식으로 치면 개인메시지를 보낼 수 있다
vi에서 검색 : /검색내용
다음 내용 n 누르면 된다
메인 프로세스에서 클라이언트 연결이 되면 각각 스레드를 만든다
(pthread_create)
스레드는 클라이언트와 1:1통신함
뮤텍스 락/언락은 화장실 문 잠그기로 이해하면 편하다
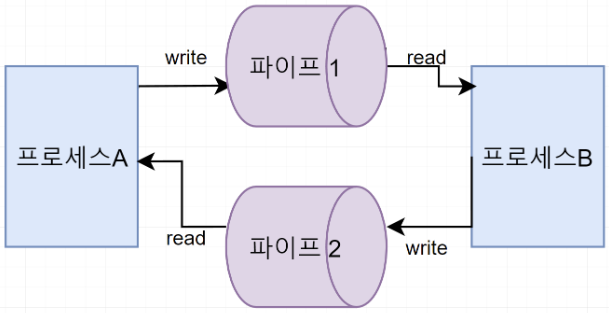
PIPE
지금까지 시그널을 봤고 이제 pipe를 볼 것이다
프로세스 간 통신이다
파이프를 하나만 만들면 단방향 통신이 된다
그래서 하나 더 만들어서 서로 통신이 되게 한다
  1 #include <stdio.h>
  2 #include <stdlib.h>
  3 #include <unistd.h>
  4 #define MSGSIZE 255
  5
  6 char* msg = "Hello Child Process!";
  7 int main()
  8 {
  9         char buf[255];
 10         int fd[2], pid, nbytes;
 11         if(pipe(fd) < 0) // pipe(fd)로 파이프 생성
 12                 exit(1);
 13         pid = fork(); // 이 함수 실행 다음 코드부터 부모/자식 프로세스로 나뉨
 14         if (pid > 0) { // 부모 프로세스에는 자식프로세스의 pid값이 들어감
 15                 printf("parent PID: %d, child PID: %d\n", getpid(), pid);
 16                 write(fd[1], msg, strlen(msg)); // fd[1]에 write한다.
 17                 exit(0);
 18         }
 19         else { // 자식프로세스에는 pid값이 0이 됨
 20                 printf("child PID: %d\n", getpid());
 21                 nbytes = read(fd[0], buf, MSGSIZE); // fd[0]을 읽음
 22                 printf("%d %s\n", nbytes, buf);
 23                 exit(0);
 24         }
 25         return 0;
 26 }
getpid 자기 자신 id 읽기
pid 자식 프로세스의 id 읽기
Message Queue
buffer에 저장된 순서대로 FIFO를 따른다
(stack은 LIFO)
통신간 임시 기억장치라고 보면 된다
키를 이용해서 메시지 큐 번호를 지정한다
1 #include <stdlib.h>
2 #include <stdio.h>
3 #include <string.h>
4 #include <sys/msg.h>
5
6 // 메세지 타입을 설정하는 부분
7 typedef struct msgbuf {
8 long type;
9 char text[50];
10 } MsgBuf;
11
12 int main(void) {
13 int msgid, len;
14 MsgBuf msg;
15 key_t key = 1234;
16 msgid = msgget(key, IPC_CREAT|0644); // 메세지 큐 생성
17
18 if(msgid == -1) { // 메세지 큐가 생성이 안된 경우
19 perror("msgget");
20 exit(1);
21 }
22
23 msg.type = 1;
24 strcpy(msg.text, "Hello Message Queue!\n");
25
26 if(msgsnd(msgid, (void *)&msg, 50, IPC_NOWAIT) == -1) { // 메세지 큐
전송 실패
27 perror("msgsnd");
28 exit(1);
29 }
30 return 0;
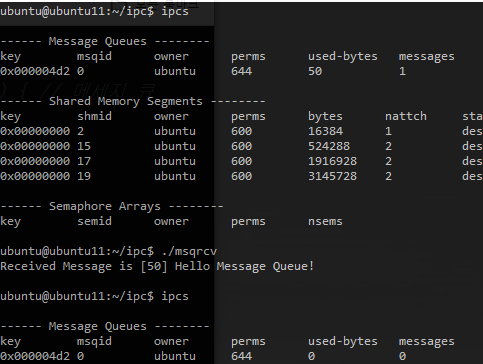
31 }~/ipc$ ipcs
그냥 할 땐 없지만 실행시키고 하면
~/ipc$ gcc messagequeue.c -o messagequeue
~/ipc$ ./messagequeue
~/ipc$ vi msqrcv.c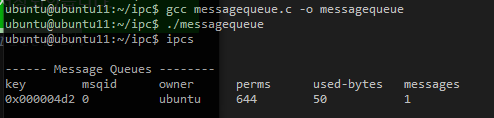
메시지 큐에 1234 키가 찍힌다
파라미터 등 모르는 것은 man 찍어서 확인할 수도 있지만 보기 어려우면 www.joinc.co.kr에서 확인할 수도 있다
wait : 데이터가 비어있으면 슬립모드
nowait : 바로 0 출력
50바이트 가져온다
코드 하단부의 ctl 함수를 주석처리하면 가져와도 안사라지고, 주석풀면 0바이트 될 때 사라진다
공유 메모리
  1 #include <string.h>
  2 #include <sys/types.h>
  3 #include <sys/ipc.h>
  4 #include <sys/shm.h>
  5 #include <sys/wait.h>
  6 #include <unistd.h>
  7 #include <stdlib.h>
  8 #include <stdio.h>
  9
 10 int main(void) {
 11         int shmid, pid;
 12         char *shmaddr_parent, *shmaddr_child; // 공유 메모리 영역을 할당할 >    포인터 변수
 13         shmid = shmget((key_t)1234, 10, IPC_CREAT|0664); // 키값 생성
 14         if(shmid == -1) {
 15                 perror("shmget error\n");
 16                 exit(1);
 17         }
 18
 19         pid = fork(); // 자식 프로세스 생성
 20         if(pid > 0) { // 2.부모 프로세스
 21                 wait(0); // 자식 프로세스의 exit() 호출까지 대기
 22                 shmaddr_parent = (char *)shmat(shmid, (char *)NULL, 0);
 23                 printf("%s\n", shmaddr_parent); // 공유 메모리 값을 읽음(rea    d)
 24                 shmdt((char *)shmaddr_parent);  // detach
 25         }
 26         else { // 1.자식 프로세스
 27                 shmaddr_child = (char *)shmat(shmid, (char *)NULL, 0); // 공
    유 메모리 키를 변수에 매핑, attach
 28                 strcpy((char *)shmaddr_child, "Hello Parent!"); // 공유 메모
    리에 쓰기(write)
 29                 shmdt((char *)shmaddr_child); // 포인터 변수를 공유 메모리에
    서 해제
 30                 exit(0);
 31         }
 32         shmctl(shmid, IPC_RMID, (struct shmid_ds *)NULL); // 공유메모리를 커
    널영역에서 삭제
 33         return 0;
 34 }
인터럽트
i/o 자원관리 방법 중 효과적이고 멀티 프로세스 지원을 위한 필수 조건이다
대부분 인터럽트는 허용을 안해서 막을 수 있다
not mask 인터럽트는 못막는다(위급상황 대비)
인터럽트 및 타이머 등은 디바이스 드라이브에서 다룰 것이다
jiffies_64는 시스템 시작부터 1초씩 증가하는 것
가상 파일 시스템(VFS)
파일과 주변장치 간 공통된 표준 시스템
리눅스 파일 시스템
윈도우는 c,d,e,f,... 드라이브가 있지만 리눅스는 루트 디렉토리를 기준으로 트리 구성이다
~/pi_bsp/rootfs/yocto/poky$ source oe-init-build-env환경변수인데, 터미널마다 실행해줘야 한다
그러고나서 build로 이동하니까
cd tmp/deploy/images/raspberrypi4 해준다
sd카드를 빼서 우분투에 연결한다
sudo mount /dev/sdb1/ /media/ubuntu/bootfs  // gui 환경이 아니면 이 두개를 해줘야한다
sudo mount /dev/sdb2/ /media/ubuntu/rootfs

~/pi_bsp/rootfs/yocto/poky/build/tmp/deploy/images/raspberrypi4$ sudo umount /dev/sdb?  // 마운트 해제 해주고

~/pi_bsp/rootfs/yocto/poky/build/tmp/deploy/images/raspberrypi4$ sudo dd if=core-image-minimal-raspberrypi4.ext3 of=/dev/sdb2 bs=1M status=progress
SD카드 다시 빼서 pi에 넣어준다
comport로 보면
id는 root, pw는 없다
하지만 ssh 패키지가 없기 때문에 푸티는 안된다
사용자 정의 레이어/레시피 추가 및 빌드
~/pi_bsp/rootfs/yocto/poky$ cp /mnt/lect_nfs/meta-rpilinux.tar .
~/pi_bsp/rootfs/yocto/poky$ tar xvf meta-rpilinux.tar

~/pi_bsp/rootfs/yocto/poky/build/conf$ vi bblayers.conf
ssh 추가하는 것
~/pi_bsp/rootfs/yocto/poky/build$ bitbake -s core-images/core-image-minimal | grep openssh
-s 옵션은 확인하는 명령어

~/pi_bsp/rootfs/yocto/poky/build$ bitbake -c cleanall core-image-minimal
-c 옵션은 clear하는 명령어

~/pi_bsp/rootfs/yocto/poky/build$ bitbake rpilinux-image
여기까지 하고 SD카드 다시 빼서 우분투로 간다
그리고 /dev/sdb?를 umount를 한다
~/pi_bsp/rootfs/yocto/poky/build/tmp/deploy/images/raspberrypi4$ sudo mkfs.ext3 /dev/sdb2   // 파일 시스템 포맷
y
하면 자동으로 write 한다

~/pi_bsp/rootfs/yocto/poky/build/tmp/deploy/images/raspberrypi4$ sudo  e2label /dev/sdb2 rootfs
라벨링 해준다
다시 usb 뺐다가 끼면

약30기가정도이다
~/pi_bsp/rootfs/yocto/poky/build/tmp/deploy/images/raspberrypi4$ sudo tar xvfp rpilinux-image-raspberrypi4.tar.bz2 -C /media/ubuntu/rootfs/
ssh도 들어가 있는 모습
다시 SD카드로 라즈베리파이 부팅후 root 입력한다
그리고 adduser pi 명령어로 패스워드를 raspberry로 설정한다
다시 키면 된다
raspberrypi4:~$ su - root
우분투에서 arm용으로 빌드된 파일을 가져올 것이다

scp main_arm pi@10.10.15.212:~
yes
raspberry

su - pi
./main_arm
실행이 잘 된다
나만의 파일 시스템 하나 만들어서 파일을 옮길 수 있다
ununtu에서 sudo adduser pi
만들어주고,
~/pi_bsp/rootfs/yocto/poky$ source oe-init-build-env
~/pi_bsp/rootfs/yocto/poky/build$ bitbake rpilinux-image
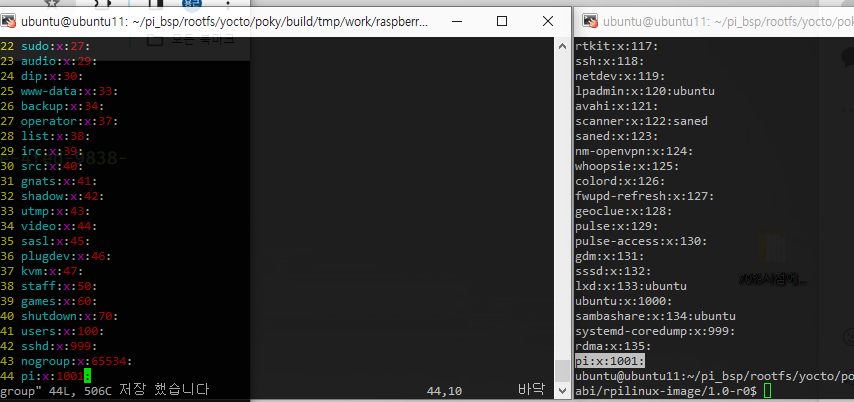
~/pi_bsp/rootfs/yocto/poky/build/tmp/work/raspberrypi4-poky-linux-gnueabi/rpilinux-image/1.0-r0/rootfs/home$ mkdir pi
~/pi_bsp/rootfs/yocto/poky/build/tmp/work/raspberrypi4-poky-linux-gnueabi/rpilinux-image/1.0-r0/rootfs/home$ sudo chown pi:pi pi
소유자 변경하고
~/pi_bsp/rootfs/yocto/poky/build/tmp/work/raspberrypi4-poky-linux-gnueabi/rpilinux-image/1.0-r0/rootfs/home$ su - pi
pi로 가서
/home/ubuntu/pi_bsp/rootfs/yocto/poky/build/tmp/work/raspberrypi4-poky-linux-gnueabi/rpilinux-image/1.0-r0/rootfs/home$ chmod 755 pi
해준다
그리고
/home/ubuntu/pi_bsp/rootfs/yocto/poky/build/tmp/work/raspberrypi4-poky-linux-gnueabi/rpilinux-image/1.0-r0/rootfs/home$ cd pi/
/home/ubuntu/pi_bsp/rootfs/yocto/poky/build/tmp/work/raspberrypi4-poky-linux-gnueabi/rpilinux-image/1.0-r0/rootfs/home/pi$ cp ~ubuntu/linuxC/main_arm .
복사한다
vi /etc/passwd
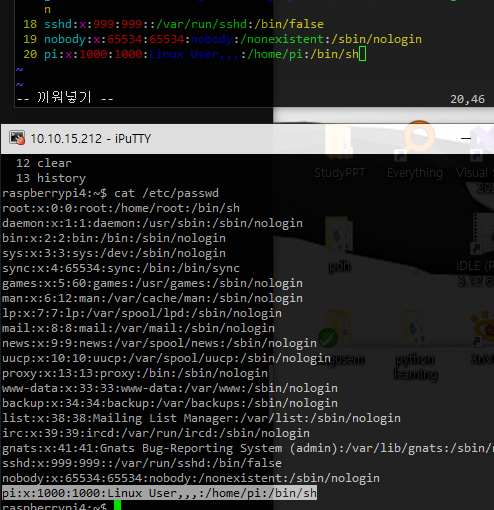
vi /etc/group
su root로 가서
cat vi /etc/shadow

나갈때 exit 하면 pi에서 우분투로 된다
~/pi_bsp/rootfs/yocto/poky/build$ bitbake -f rpilinux-image -c rootfs~/pi_bsp/rootfs/yocto/poky$ source oe-init-build-env
~/pi_bsp/rootfs/yocto/poky/build$ bitbake core-image-full-cmdline원래는 일일이 파일들을 옮겨서 만들어야 했지만 yocto를 이용하면 layer, recipe를 만들어놨기 때문에 쉽게 파일 시스템을 구축할 수 있다
~/pi_bsp/rootfs/yocto/poky/build$ bitbake -c cleanall core-image-minimal