윤지수님의 Node.js 웹개발로 알아보는 백엔드 자바스크립트의 이해 강의를 보고 블로깅하였습니다.
Express 기반 웹서버 구동
const express = require("express");
const app = express();
const port = 8000;

app.listen(port, () => {
  console.log("start port ? ", port);
});
( 결과 )

URL Routing
- html 파일 위치 (app/test.html)
const express = require("express");
const app = express();
const path = require("path");
const port = 8000; // localhost:8000 또는 127.0.0.1:8000

app.listen(port, () => {
  console.log("start port ? ", port);
});

app.get("/", (req, res) => {
  res.sendFile(path.join(__dirname, "../app", "test.html"));
});
/home/heaeun/Desktop/exTes/server/
__dirname: 바로 현재 위치를 가리키는 Node.js의 전역 변수__filename: 현재 파일 이름
제로초님 블로그글
아, Node.js 환경에서 디렉토리 주소를 다룰 때는 항상path 모듈을 사용하세요!path.join메소드를 사용하면 디렉토리 주소 구분자가/인지\인지 상관없이 환경에 맞게 주소를 완성해줍니다. (\와/는맥, 리눅스, 윈도우 OS에 따라 다릅니다) 그리고 .(현재 폴더)과 ..(상위 폴더)도 알아서 계산해서 해당 주소를 표시해주기 때문에 주소를 어떻게 써야할 지 헷갈릴 때 사용하세요.
static 디렉토리 설정
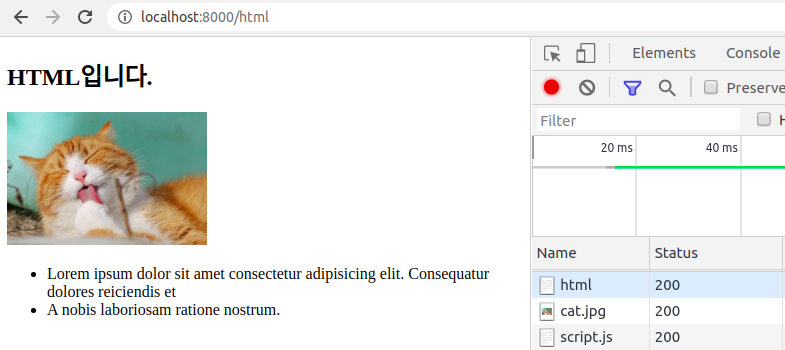
변경되지 않는 정적인 static 파일(js, static, image 등등)은 요청받는대로 서버에서 바로바로 처리해주는 것이 좋다. 이렇게 하기위해서는 static 디렉토리를 express에 등록해주는 절차가 필요하다.
<!-- test.html -->

<body>
  <h2>HTML입니다.</h2>
    <p><img src="cat.jpg" width="200" alt="고양이 이미지" /></p>
    <ul>
      <li>
        Lorem ipsum dolor sit amet consectetur adipisicing elit. Consequatur
        dolores reiciendis et
      </li>
      <li>
        A nobis laboriosam ratione nostrum.
      </li>
    </ul>
    <script src="script.js"></script>
</body>
위의 html이 실행되면 js파일과 img를 서버에 요청하게 될텐데, 아래의 코드와같이 static 디렉토리를 express에 등록해주면 서버에서 바로바로 처리가 가능하다.
// server.js

const path = require("path");
const port = 8000;
// localhost:8000 또는 127.0.0.1:8000
// localhost === 127.0.0.1
app.listen(port, () => {
  console.log("start port ? ", port);
});

app.use(express.static("app")); // 스테틱 디렉토리(app)를 express에 static으로 등록한다.

app.get("/", (req, res) => {
  res.send("<h1>hi friend!!</h1>");
});

app.get("/html", (req, res) => {
  res.sendFile(path.join(__dirname, "../app", "test.html"));
});-
스태틱 디렉토리 등록 전
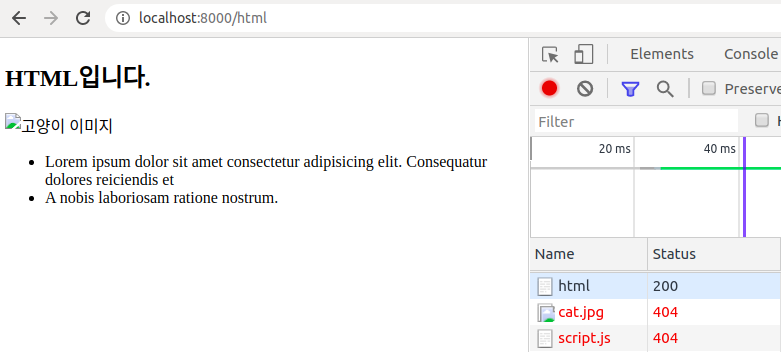
-
스태틱 디렉토리 등록 후
post 요청 처리
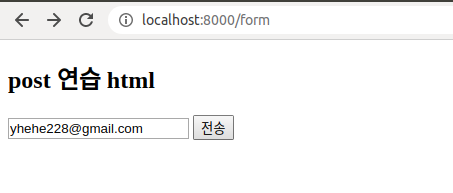
일단 post 요청을 위해 form.html을 만들어준다.
<body>
  <h2>post 연습 html</h2>
  <form action="/email_post" method="POST">
    <input type="text" name="email" placeholder="email을 입력하세요" />
    <input type="submit" value="전송" />
  </form>
</body>
server.js에서 /email_post 라우트에 대한 post요청 응답을 처리한다.
// server.js
const express = require("express");
const app = express();
const path = require("path");
const port = 8000;
const bodyParser = require("body-parser");
app.listen(port, () => {
console.log("start port ? ", port);
});
// post
// post요청에 의해 서버에서 오는 응답을 처리해준다
app.use(bodyParser.json()); // 서버에서 오는 응답이 json일 경우
app.use(bodyParser.urlencoded({ extended: true })); // 서버에서 오는 응답이 json이 아닐 경우
// urlencoded => 한글이나 특수문자를 인코딩해서 처리를 하겠다.
app.get("/form", (req, res) => {
res.sendFile(path.join(__dirname, "../app", "form.html"));
});
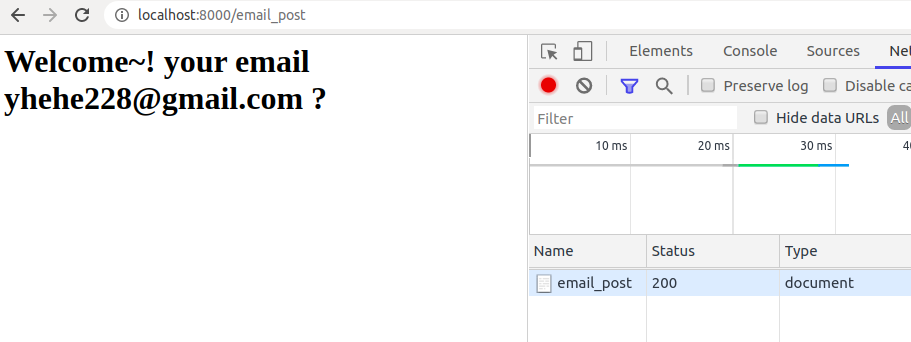
app.post("/email_post", (req, res) => {
res.send(`<h1>Welcome~! your email ${req.body.email} ? </h1>`); // bodyParser가 req.body에 담김
console.log(req.body.email);
// data를 어떻게 받지? => bodypaser를 설치해야함 => npm install body-parser
// body-parser에 대해 알아보기
});- form.html
- 전송버튼 클릭후

👩🏻💻 🚀