Assimp를 이용해서 .fbx 파일을 불러오기
- Assimp (Open Asset Import Library) : 3D 모델 파일을 손쉽게 불러오기 위해 만들어진 오픈소스 라이브러리
- 게임 엔진, 그래픽 렌더러, 툴 등에서 FBX, OBJ, Collada, glTF 같은 다양한 3D 포맷을 통합된 방식으로 읽어올 수 있게 해줌
fbx파일 불러오기
-
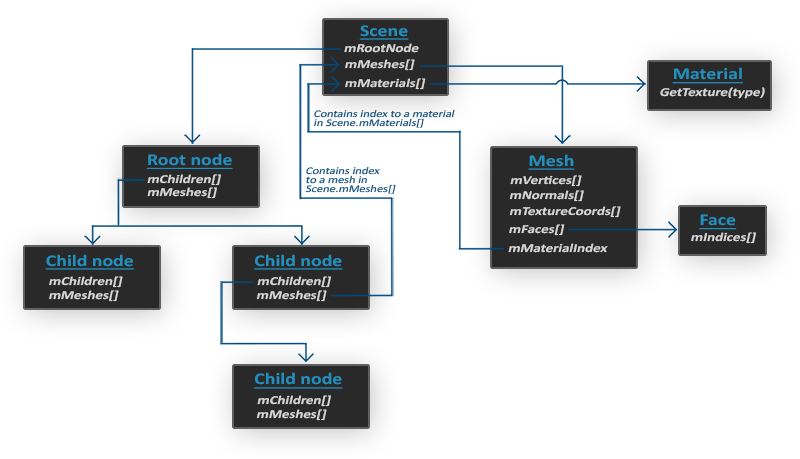
.fbx파일은 오브젝트에mehs,material,texture,light등의 정보가 모두 적용된 완성된 오브젝트 파일이며, 트리구조로 되어 있다. -
.fbx파일을 불러오기 위해서는Assimp라는 외부 라이브러리를 사용외부 라이브러리 사용법
Assimp검색 후 github에서 전체 코드 다운 받기
→ 만약 받은 파일에 솔루션 파일이 있다면 바로 사용, 없다면 cmake를 사용해서 솔루션파일 생성 및 실행
→ 필요한 코드만 가져와서 사용 -
Assimp를 통해서fbx파일을 불러오기 위해서Enginepch.h에 추가해주기
// Assimp
#include <Assimp/Importer.hpp>
#include <Assimp/scene.h>
#include <Assimp/postprocess.h>


// Libs
#pragma comment(lib, "d3d11.lib")
#pragma comment(lib, "d3dcompiler.lib")

#ifdef _DEBUG
#pragma comment(lib, "DirectXTex/DirectXTex_debug.lib")
#pragma comment(lib, "FX11/Effects11d.lib")
#pragma comment(lib, "Assimp/assimp-vc143-mtd.lib")
#else
#pragma comment(lib, "DirectXTex/DirectXTex.lib")
#pragma comment(lib, "FX11/Effects11.lib")
#pragma comment(lib, "Assimp/assimp-vc143-mt.lib")
#endif
AssimpTool 프로젝트
Assimp를 사용해줄 프로젝트 생성- 기본적인 설정 해주기 (이전 프로젝트 셋팅글 참고)
https://velog.io/@yido/D3D-%ED%94%84%EB%A1%9C%EC%A0%9D%ED%8A%B8-%EC%84%A4%EC%A0%95 Assimp를 사용할 Convert클래스 생성filesystem을 사용해서 파일 로드 후,scene에 할당
Convert.h
#pragma once

class Converter
{
public:
	Converter();
	~Converter();

public:
	void ReadAssetFile(wstring file);

public:
	wstring _assetPath = L"../Resources/Assets/";
	wstring _modelPath = L"../Resources/Models/";
	wstring _texturePath = L"../Resources/Textures/";
private:
	shared_ptr<Assimp::Importer> _importer;

	const aiScene* _scene;		// 로드했을 때 가장 상위
};
Convert.cpp
#include "pch.h"
#include "Converter.h"
#include <filesystem> // c++17부터 지원
#include "Utils.h"

Converter::Converter()
{
	_importer = make_shared<Assimp::Importer>();
}

Converter::~Converter()
{
}

void Converter::ReadAssetFile(wstring file)
{
	wstring fileStr = _assetPath + file;

	// 파일 가져오기
	auto p = filesystem::path(fileStr);
	assert(filesystem::exists(p));

	_scene = _importer->ReadFile(
		Utils::ToString(fileStr),
		aiProcess_ConvertToLeftHanded |
		aiProcess_Triangulate | 			// 삼각형 단위만
		aiProcess_GenUVCoords | 			// UV좌표 생성
		aiProcess_GenNormals | 				// 노멀 매핑
		aiProcess_CalcTangentSpace
	);

	assert(_scene != nullptr);
}
AssimpTool
- 이전
Client프로젝트에서Demo클래스와 비슷하게 사용되는 용도
// AssimpTool.h
#pragma once
#include "IExecute.h"

class AssimpTool : public IExecute
{
public:

	void Init() override;
	void Update() override;
	void Render() override;
};


// AssimpTool.cpp

#include "pch.h"
#include "AssimpTool.h"
#include "Converter.h"

void AssimpTool::Init()
{
	{
		shared_ptr<Converter> converter = make_shared<Converter>();

		// FBX -> Memory
		converter->ReadAssetFile(L"House/House.fbx");

		// Memory -> CustomData(file)

		// CUstumData(file) -> Memory
	}

}

void AssimpTool::Update()
{
}

void AssimpTool::Render()
{
}
VertexData
VertexData에서 계층구조에 맞게끔 기본적인 구조체 변경
struct VertexTextureNormalTangentBlendData
{
	Vec3 position = { 0, 0, 0 };
	Vec2 uv = { 0, 0 };
	Vec3 normal = { 0, 0, 0 };
	Vec3 tangent = { 0, 0, 0 };
	Vec4 blendIndices = { 0, 0, 0, 0 };
	Vec4 blendWeights = { 0, 0, 0, 0 };
};
AsTypes
- 사용할
Bone,Mehs,Material구조체 생성
#pragma once

using VertexType = VertexTextureNormalTangentBlendData;

struct asBone
{
	string name;
	int32 index = -1;
	int32 parent = -1;
	Matrix transform;
};

struct asMesh
{
	string name;
	aiMesh* mesh;	//async에서 로드한 메쉬
	vector<VertexType> vertices;
	vector<uint32> indices;

	int32 boneIndex;
	string materialName;
};

struct asMaterial
{
	string name;
	Color ambient;
	Color diffuse;
	Color specular;
	Color emissive;

	string diffuseFile;
	string specularFile;
	string normalFile;
};
참고자료
Assimp 계층구조
무료 모델 사이트
참고 강의
첨부자료 출처

게임 클라이언트 프로그래머 준비중 (공부 및 기록용)