Viewport
개념
렌더링된 이미지(씬)를 실제 화면에 출력하는 “창(Window)” 또는 “영역”을 의미합니다.
즉,
GPU가 그린 결과물을 “어디에, 어떤 크기로 보여줄지” 정의하는 화면 공간입니다.
게임 엔진에서는 카메라가 본 장면을 Viewport에 출력합니다.
| 구분 | 설명 |
|---|---|
| 렌더링 영역 정의 | 프레임 버퍼의 어떤 부분에 그림을 그릴지 결정 |
| 좌표 변환 (NDC → 화면 공간) | 정규화된 좌표(-1~1)를 실제 픽셀 좌표로 변환 |
| 화면 비율 유지 | 해상도나 창 크기에 맞게 카메라 비율을 조정 |
| 멀티 뷰 지원 | 에디터나 분할 화면에서 여러 Viewport로 장면을 동시에 표시 가능 |
우리가 만든 Dx코드에서는 현재 Graphics에 들어가있다.
이거를 우리는 카메라에 넣는 것도 방법이 될 수는 있지만, 3D에서 2D 변환할 때 프로젝선을 하기 위한 중요한 역할이 뷰포트이기 때문에 뷰포트를 따로 관리해주도록 하자.
실습
Viewport 클래스를 생성해주자.
Viewport
Viewport.h
#pragma once
class Viewport
{
public:
	Viewport();
	Viewport(float width, float height, float x = 0, float y = 0, float minDepth = 0, float maxDepth = 1);
	~Viewport();

	// Graphics에 있던 함수
	void RSSetViewport();
	void Set(float width, float height, float x = 0, float y = 0, float minDepth = 0, float maxDepth = 1);

	float GetWidth() { return _vp.Width; }
	float GetHeight() { return _vp.Height; }

	Vec3 Project(const Vec3& pos, const Matrix& W, const Matrix& V, const Matrix& P);
	Vec3 Unproject(const Vec3& pos, const Matrix& W, const Matrix& V, const Matrix& P);

private:
	D3D11_VIEWPORT _vp;
};
Viewport.cpp
#include "pch.h"
#include "Viewport.h"

Viewport::Viewport()
{
	Set(800, 600);
}

Viewport::Viewport(float width, float height, float x, float y, float minDepth, float maxDepth)
{
	Set(width, height, x, y, minDepth, maxDepth);
}

Viewport::~Viewport()
{
}

void Viewport::RSSetViewport()
{
	DC->RSSetViewports(1, &_vp);
}

void Viewport::Set(float width, float height, float x, float y, float minDepth, float maxDepth)
{
	_vp.TopLeftX = x;
	_vp.TopLeftY = y;
	_vp.Width = width;
	_vp.Height = height;
	_vp.MinDepth = minDepth;
	_vp.MaxDepth = maxDepth;
}
Viewport::Project()
- 이 공식을 이용해서 코드 작성
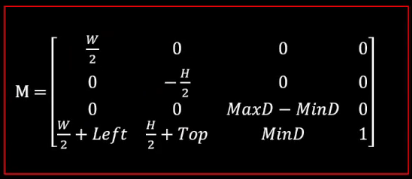
Vec3 Viewport::Project(const Vec3& pos, const Matrix& W, const Matrix& V, const Matrix& P)
{ // pos는 임의의 로컬에 있는 좌표로 생각
	Matrix wvp = W * V * P;

	Vec3 p = Vec3::Transform(pos, wvp); // 프로젝션이 된 다음의 좌표

	p.x = (p.x + 1.0f) * (_vp.Width / 2) + _vp.TopLeftX;
	p.y = (-p.y + 1.0f) * (_vp.Height / 2) + _vp.TopLeftY;
	p.z = p.z * (_vp.MaxDepth - _vp.MinDepth) + _vp.MinDepth;

	return p;
}

Vec3 Viewport::Unproject(const Vec3& pos, const Matrix& W, const Matrix& V, const Matrix& P)
{
	Vec3 p = pos;

	p.x = 2.f * (p.x - _vp.TopLeftX) / _vp.Width - 1.f;
	p.y = -2.f * (p.y - _vp.TopLeftY) / _vp.Height + 1.f;
	p.z = ((p.z - _vp.MinDepth) / (_vp.MaxDepth - _vp.MinDepth));

	Matrix wvp = W * V * P;
	Matrix wvpInv = wvp.Invert();

	p = Vec3::Transform(p, wvpInv);
	return p;
}
Graphics
D3D11_Viewport로 만들었던viewport를Viewport클래스 타입으로 수정SetViewport()에 변수도width, height, x, y, minDepth, maxDepth를 받아주자
Graphics.h
class Graphics
{
	DECLARE_SINGLE(Graphics);

public:
	void SetViewport(float width, float height, float x = 0, float y = 0, float minDepth = 0, float maxDepth = 1);
	Viewport& GetViewport() { return _viewport; }

private:
    Viewport _viewport;
}
Graphics.cpp
void Graphics::Init(HWND hwnd)
{
	_hwnd = hwnd;

	CreateDeviceAndSwapChain();
	CreateRenderTargetView();
	CreateDepthStencilView();
	SetViewport(GAME->GetGameDesc().width, GAME->GetGameDesc().height); // 수정 코드
}

void Graphics::RenderBegin()
{
	_deviceContext->OMSetRenderTargets(1, _renderTargetView.GetAddressOf(), _depthStencilView.Get()); // depth stencil view 추가 (깊이값 추가)
	_deviceContext->ClearRenderTargetView(_renderTargetView.Get(), (float*)(&GAME->GetGameDesc().clearColor));
	// depth stencil view 클리어 추가, ClearDepthStencilView 추가 이유 : 깊이값과 스텐실 값을 초기화 하기 위해
	// Depth가 1.0f인 이유 : 깊이값은 0~1사이의 값으로 1.0f가 가장 멀리있는 값이기 때문
	_deviceContext->ClearDepthStencilView(_depthStencilView.Get(), D3D11_CLEAR_DEPTH | D3D11_CLEAR_STENCIL, 1.0f, 0);
	_viewport.RSSetViewport(); // 수정 코드
}

// 추가
void Graphics::SetViewport(float width, float height, float x, float y, float minDepth, float maxDepth)
{
	_viewport.Set(width, height, x, y, minDepth, maxDepth);
}
ViewportDemo
- 테스트를 하기 위한 메인클래스 생성
#include "pch.h"
#include "ViewportDemo.h"
#include "GeometryHelper.h"
#include "Camera.h"
#include "GameObject.h"
#include "CameraScript.h"
#include "MeshRenderer.h"
#include "Mesh.h"
#include "Material.h"
#include "Model.h"
#include "ModelRenderer.h"
#include "ModelAnimator.h"
#include "Mesh.h"
#include "Transform.h"
#include "VertexBuffer.h"
#include "IndexBuffer.h"
#include "Light.h"
#include "TextureBuffer.h"
#include "Viewport.h"

void ViewportDemo::Init()
{
	//RESOURCES->Init();

	_shader = make_shared<Shader>(L"23.RenderDemo.fx");

	// Camera
	{
		auto camera = make_shared<GameObject>();
		camera->GetOrAddTransform()->SetPosition(Vec3{ 0.f, 0.f, -5.f });
		camera->AddComponent(make_shared<Camera>());
		camera->AddComponent(make_shared<CameraScript>());
		CUR_SCENE->Add(camera);
	}

	// Light
	{
		auto light = make_shared<GameObject>();
		light->AddComponent(make_shared<Light>());
		LightDesc lightDesc;
		lightDesc.ambient = Vec4(0.4f);
		lightDesc.diffuse = Vec4(1.f);
		lightDesc.specular = Vec4(0.1f);
		lightDesc.direction = Vec3(1.f, 0.f, 1.f);
		light->GetLight()->SetLightDesc(lightDesc);
		CUR_SCENE->Add(light);
	}


	// Mesh
	// Material
	{
		shared_ptr<Material> material = make_shared<Material>();
		material->SetShader(_shader);
		auto texture = RESOURCES->Load<Texture>(L"Veigar", L"..\\Resources\\Textures\\veigar.jpg");
		material->SetDiffuseMap(texture);
		MaterialDesc& desc = material->GetMaterialDesc();
		desc.ambient = Vec4(1.f);
		desc.diffuse = Vec4(1.f);
		desc.specular = Vec4(1.f);
		RESOURCES->Add(L"Veigar", material);
	}

	for (int32 i = 0; i < 1; i++)
	{
		auto obj = make_shared<GameObject>();
		obj->GetOrAddTransform()->SetLocalPosition(Vec3(0.f));
		obj->AddComponent(make_shared<MeshRenderer>());
		{
			obj->GetMeshRenderer()->SetMaterial(RESOURCES->Get<Material>(L"Veigar"));
		}
		{
			auto mesh = RESOURCES->Get<Mesh>(L"Sphere");
			obj->GetMeshRenderer()->SetMesh(mesh);
			obj->GetMeshRenderer()->SetPass(0);
		}

		CUR_SCENE->Add(obj);
	}

	//RENDER->Init(_shader);
}

void ViewportDemo::Update()
{
	// 첫번째 결과를 위한 코드
	static float width = 800.f;
	static float height = 600.f;
	static float x = 0.f;
	static float y = 0.f;

	ImGui::InputFloat("Width", &width, 10.f);
	ImGui::InputFloat("Height", &height, 10.f);
	ImGui::InputFloat("X", &x, 10.f);
	ImGui::InputFloat("Y", &y, 10.f);

	GRAPHICS->SetViewport(width, height, x, y);

    // 두번째 결과를 위한 코드
    static Vec3 pos = Vec3(2, 0, 0);
	ImGui::InputFloat3("Pos", (float*)& pos);

	Viewport& vp = GRAPHICS->GetViewport();

	Vec3 pos2D = vp.Project(pos, Matrix::Identity, Camera::S_MatView, Camera::S_MatProjection);

	ImGui::InputFloat3("Pos2D", (float*)&pos2D);

	{
		Vec3 temp = vp.Unproject(pos2D, Matrix::Identity, Camera::S_MatView, Camera::S_MatProjection);
		ImGui::InputFloat3("Recalc", (float*)&temp);
	}
}
void ViewportDemo::Render() {}
결과
- 첫번째, 뷰포트의 크기가 줄어들면 시야각도 줄어드는 효과가 나타난다.
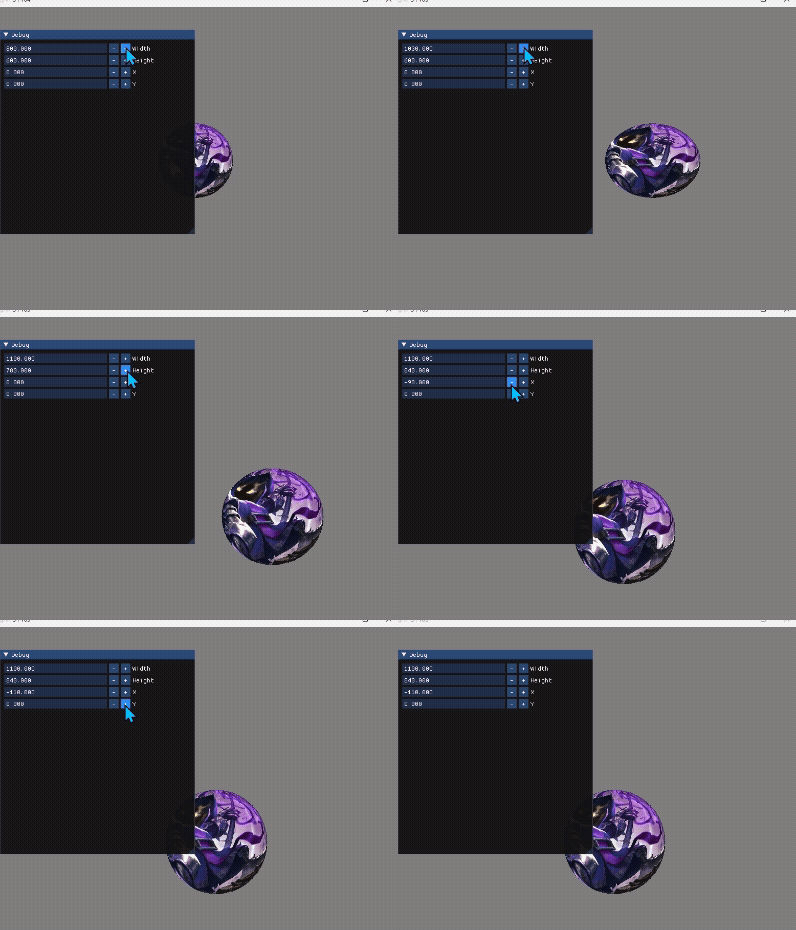
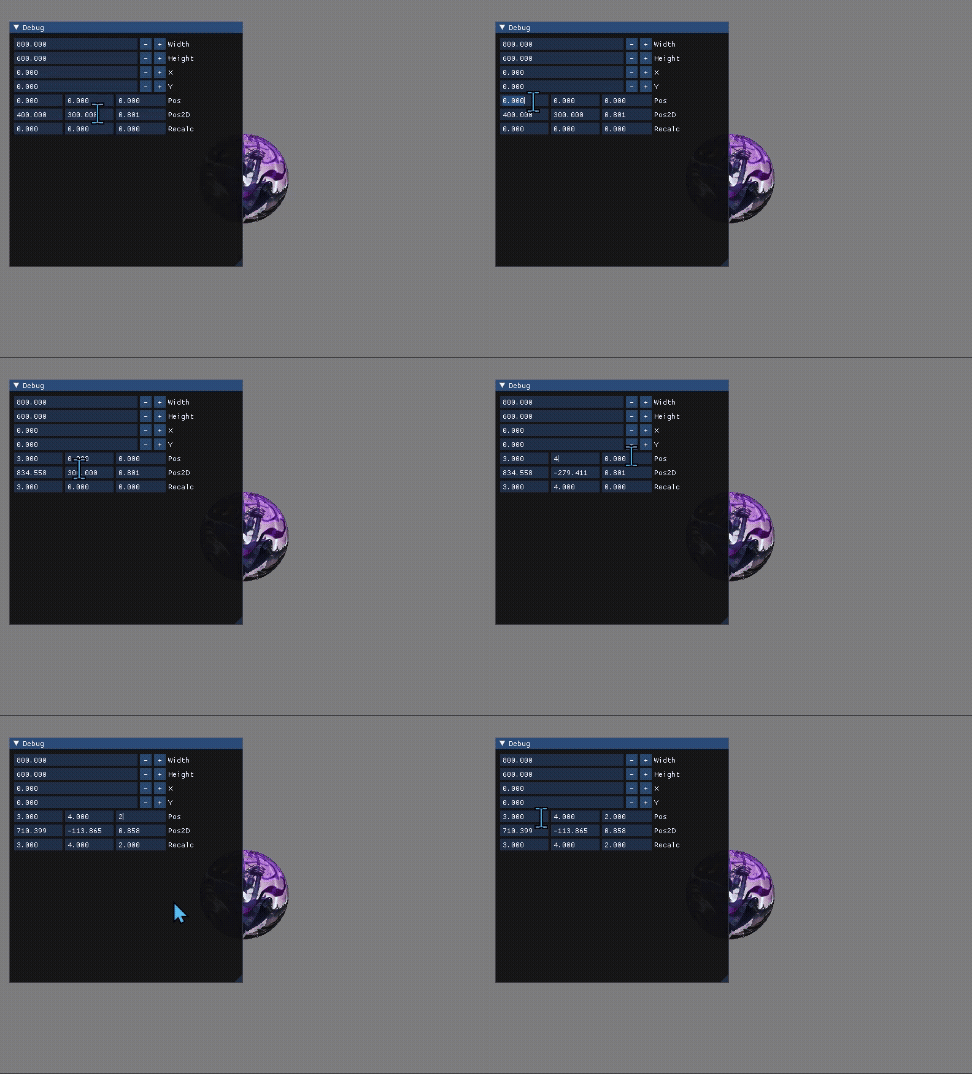
- 두번째, 프로젝션이 어떻게 동작하는지를 위한 결과이다.
pos2D는 2D좌표, pos는 3D좌표
참고 강의

게임 클라이언트 프로그래머 준비중 (공부 및 기록용)