Intro
Inflearn 의 'Spring Cloud로 개발하는 마이크로서비스 애플리케이션(MSA)-이도원 개발자님' 의 강의를 들으며 Automatic API Config Server를 공부하면서 배운것들을 정리/리마인드 겸, 또한 나중에 빠른 사용을 위한 Master Code를 남기기 위해 글을 올린다.
- Dependencies 추가
<dependency> <groupId>org.springframework.cloud</groupId> <artifactId>spring-cloud-starter-config</artifactId> </dependency> <dependency> <groupId>org.springframework.cloud</groupId> <artifactId>spring-cloud-starter-bootstrap</artifactId> </dependency> - bootstrap.yml 추가
spring:
	cloud:
    config:
      uri: ${서버IP}:${server포트}
      name:: ${가져올 yml 파일 이름}
변경된 설정정보 가져오는 방법
- 서버 재기동
- Actuator refresh
- Application 상태, 모니터링
- Metric 수집을 위한 Http End Point 를 제공해준다.
https://docs.spring.io/spring-boot/docs/current/reference/html/actuator.html
- Spring cloud bus 사용
여러 환경에서의 설정파일 가져오기
Spring Actuator
<dependency>
    <groupId>org.springframework.boot</groupId>
    <artifactId>spring-boot-starter-actuator</artifactId>
</dependency>- Security
/actuator/**을 모두 접속가능하도록 한다.- 이로써 actuator의 web end point에 접근이 가능하도록 해야한다!
- yml
include 내용은 공식 reference 들을 통해서 확인할 수 있다. refresh : post로 전송시, 해당 파일을 반영된 서버를 확인할 수 있다.management: endpoints: web: exposure: include: refresh, health, beans, busrefresh, info, metrics, prometheus
Gate-way with Actuator
- 위의 설정과 동일
- Bean 추가
// Client 가 요청했던 정보를 Memory에 담아서 저장한다. // 이후에 httpTrace를 통해서 확인할 수 있다. @Bean public HttpTraceRepository httpTraceRepository() { return new InMemoryHttpTraceRepository(); } - application.yml의 SERVICE에 Actuator 정보 추가
spring:
	cloud:
		gateway:
			routes:
				- id: ${SERVICE-ID}
				  uri: lb://${SERVICE-NAME-IN-EUREKA}
				  predicates:
				    - Path=/${SERVICE-URL}/actuator/**
				    - Method=GET,POST # GET과 POST를 둘다 사용할 수도 있음!
				  filters:
				    - RemoveRequestHeader=Cookie
				    - RewritePath=/user-service/(?<segment>.*), /$\{segment} # 해당되는 url을 재생성
→ 결론적으로 이렇게 사용하는것도 직접 하는것보다는 효율적이지만, 썩 편리하지는 않다!!
- 파일시스템 / remote-git
-
config service의 yml 파일 설정
# Master Config yml
spring:
  application:
    name: config-service
  cloud:
    config:
      server:
				# 파일시스템을 사용하는 경우 (Native)
				native:
					# Mac : file://${user.home}/${file Location}
					# window : file:///${user.home}/${file Location}
					search-locations: file:///${user.home}/{file location}

				# Git을 사용하는경우
        git:
#          uri: file://{file location with absolute url} # local git을 가져오기

          uri: https://github.com/yimo22/config.git # 원격에 있는 git으로 가져오기
#          username: ${name}       # 만약 private으로 된 경우, ID와 PW 입력
#          password: ${password}
-
→ 모든 서버에 적용하기에는 다소 무리가 있다!
수백개의 Micro Service에 대해서는 모든 것을 refresh 시키기에는 번거롭다
—> 따라서 MS(Micro Service)가 효율적으로 변경되기 위해 Spring Cloud Bus 를 사용하여 관리한다
Spring Cloud Bus
Pre-info
- AMQP (Advanced Message Queuing Protocol), 메시지 지향 미들웨어를 위한 개방향 표준 응용 계층 프로토콜 이다.
- 메시지 지향, 큐잉, 라우팅(P2P, Publisher-Subscriber), 신뢰성, 보안
- Erlang, RabbitMQ 에서 사용한다.
- Kafka 프로젝트
- Apache Software Foundation 이 Scalar 언어로 개발한 오픈소스 메시지 브로커 프로젝트
- 분산형 스트리밍 플랫폼
- 대용량의 데이터를 처리 가능한 메시지 시스템
- Rabbit MQ
- 메시지 브로커
- 초당 20+ 메시지를 소비자에게 전달
- 메시지 전달 보장, 시스템 간 메시지 전달
- 브로커, 소비자 중심
- Kafka
- 초당 100k+이상의 이벤트 처리
- pub/sub, topic 에 메시지 전달
- ACK를 기다리지 않고 전달 가능
- 생산자 중심
→ Kafka 가 좀더 대용량의 데이터를 처리할경우 적합, RabbitMQ는 좀더 작은 규모의 데이터를 처리할때 적합하다!
About
- 여러 분산시스템의 노드(Micro Service)를 경량 메시지 브로커(Rabbit MQ)와 연결
- 상태 및 구성에 대한 변경사항을 연결된 노드에게 전달(Broadcast)
장점
- p2p 방식(direct)보다 중간에 Middleware를 두어 좀더 안정적으로 운영이 가능하다
- 상대방에 개의치 않고 필요한 사항만을 얻을 수 있어 효율적이다.
Config
- Config Server의 dependency check
<!-- Spring Cloud Config 서버 사용을 위한 Library --> <dependency> <groupId>org.springframework.cloud</groupId> <artifactId>spring-cloud-config-server</artifactId> </dependency> <!-- amqp 프로토콜을 사용하기 위한 Library --> <dependency> <groupId>org.springframework.boot</groupId> <artifactId>spring-boot-starter-amqp</artifactId> <version>2.7.13</version> </dependency> <!-- rebuilding 작업이 필요없이 설정을 위한 라이브러리 추가 --> <dependency> <groupId>org.springframework.cloud</groupId> <artifactId>spring-cloud-starter-bootstrap</artifactId> </dependency> <!-- actuator 추가 --> <dependency> <groupId>org.springframework.boot</groupId> <artifactId>spring-boot-starter-actuator</artifactId> </dependency> - API-Gateway Service, 이하 다른 모든 MS(MicroService)에 MQ를 위한 Library 추가
<dependency>
    <groupId>org.springframework.boot</groupId>
    <artifactId>spring-boot-starter-amqp</artifactId>
</dependency>
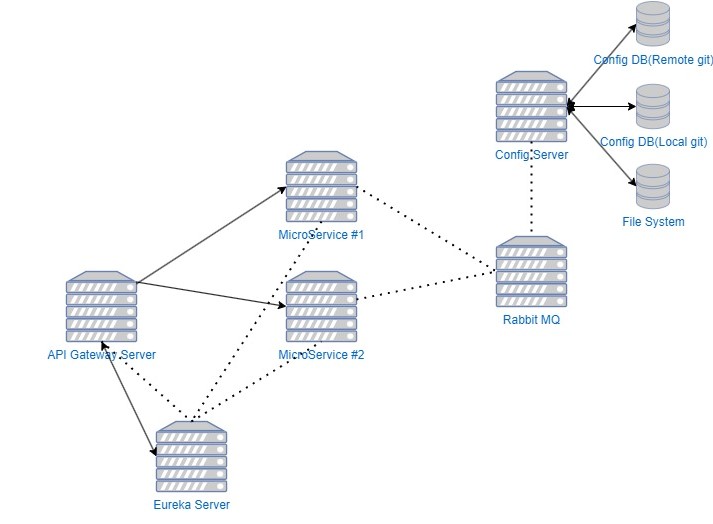
Architecture
소감
- 자동화 빌드/배포 및 MS(MicroService)를 분리하여 Gateway Server를 구축해보니 상당히 재밌었다.
- 더 많은, 대규모 시스템 아키텍처를 직접 타이핑해보고 개발하고 공부해보고 싶다

Viva La Vida!