
NodePort는 Kubernetes에서 외부에서 클러스터 내부의 서비스로 접근할 수 있도록 해주는 서비스 유형이다. 이 실습을 통해 NodePort의 동작 방식을 확인하고, 외부에서 서비스에 접근하는 방법을 테스트해볼 것이다.
1. NodePort의 개념
✅ NodePort란?
- 외부에서 클러스터 내부의 서비스로 접근 가능한 서비스 유형
- 각 노드의 특정 포트(NodePort)를 열어 외부에서 접근 가능
- 기본 포트 범위:
30000-32767 - 클러스터 내부에서는 ClusterIP를 통해 접근 가능하고, 외부에서는 NodePort를 통해 접근 가능
🛠 실습 목표
- NodePort 서비스가 생성되면 외부에서 접근 가능한 포트가 열리는지 확인
- NodePort를 통해 외부에서 직접 접근 테스트
- 여러 Pod으로 트래픽이 분산되는지 확인
- Pod이 변경될 때에도 서비스가 유지되는지 검증
2. NodePort 서비스 생성
📌 Deployment 및 Service 파일 생성
1️⃣ Nginx Deployment 생성
먼저 nginx를 실행하는 Deployment를 생성한다.
apiVersion: apps/v1
kind: Deployment
metadata:
  name: nginx-deployment
spec:
  replicas: 3
  selector:
    matchLabels:
      app: nginx
  template:
    metadata:
      labels:
        app: nginx
    spec:
      containers:
      - name: nginx
        image: nginx:latest
        ports:
        - containerPort: 80
적용 후 확인:
kubectl apply -f deployment.yaml
kubectl get pods -l app=nginx -o wide
2️⃣ NodePort 서비스 생성
apiVersion: v1
kind: Service
metadata:
  name: nginx-service
spec:
  type: NodePort
  selector:
    app: nginx
  ports:
    - protocol: TCP
      port: 80
      targetPort: 80
      nodePort: 30080  # 30000~32767 범위에서 지정 가능
적용 후 서비스 확인:
kubectl apply -f service.yaml
kubectl get svc nginx-service -o wide
✅ 예상 출력
NAME            TYPE       CLUSTER-IP       EXTERNAL-IP   PORT(S)         AGE
nginx-service   NodePort   10.97.67.52      <none>        80:30080/TCP    1m
3. 서비스 접근 테스트
1️⃣ 클러스터 내부에서 ClusterIP로 접근
kubectl exec -it test-pod -- wget -qO- http://10.97.67.52✅ 정상 동작 시, Nginx 기본 페이지 출력
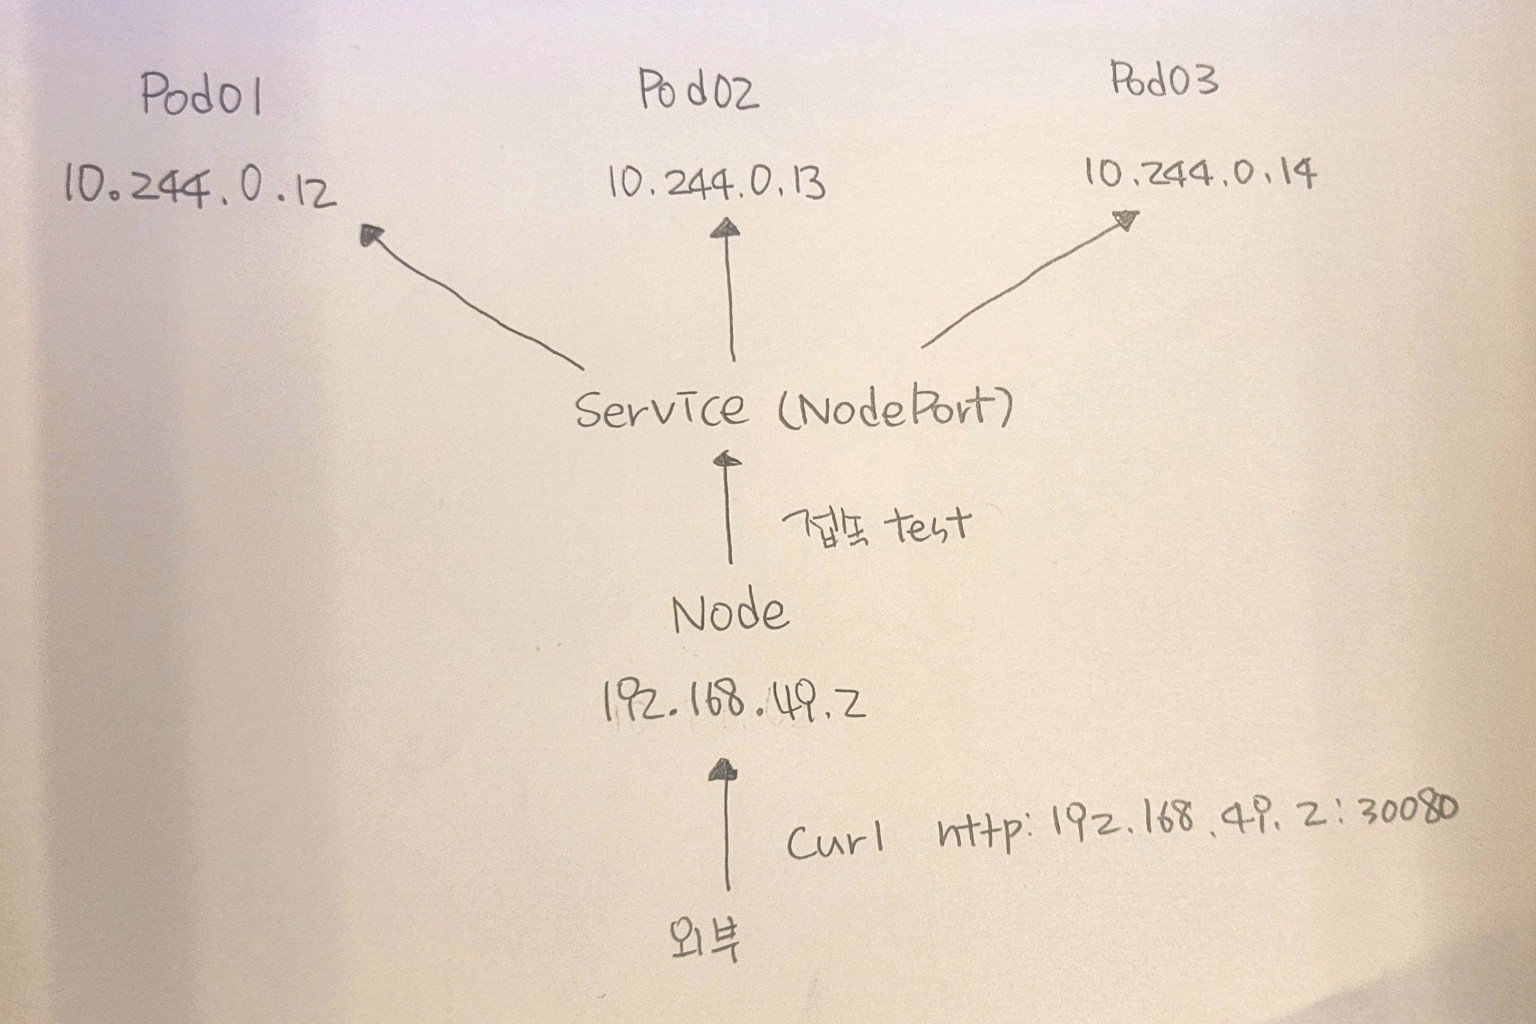
2️⃣ 외부에서 NodePort로 접근
curl http://<노드IP>:30080🔹 노드의 IP 확인
kubectl get nodes -o wide✅ 정상 동작 시, Nginx 기본 페이지 출력
4. 로드밸런싱 테스트
kubectl exec -it test-pod -- sh -c "for i in {1..5}; do wget -qO- http://10.97.67.52; sleep 1; done"✅ 예상 출력
<h1>Pod: nginx-deployment-xxxxx</h1>
<h1>Pod: nginx-deployment-yyyyy</h1>
<h1>Pod: nginx-deployment-zzzzz</h1>- 여러 번 요청을 보냈을 때 서로 다른 Pod이 응답하는지 확인.
5. Pod 삭제 후 서비스 유지 확인
1️⃣ 기존 Pod IP 확인
kubectl get pods -o wide2️⃣ 특정 Pod 삭제
kubectl delete pod <POD_NAME>3️⃣ 새로운 Pod 생성 후 서비스 확인
kubectl get pods -o wide
kubectl get endpoints nginx-service
kubectl exec -it test-pod -- wget -qO- http://10.97.67.52
✅ Pod이 삭제되고 다시 생성되더라도, NodePort를 통해 계속 접근 가능해야 함.
6. 마무리
✔ NodePort 서비스가 노드의 외부 포트를 통해 접근 가능함을 확인
✔ 노드의 IP와 NodePort를 사용해 외부에서 접근 가능
✔ 여러 Pod으로 로드밸런싱이 수행되는지 테스트
✔ Pod이 삭제되어도 서비스가 유지되는지 확인
➡ **NodePort는 간단한 외부 접근을 제공하지만, 클라우드 환경에서는 LoadBalancer 서비스와 함께 사용하는 것이 일반적이다.