교재
책 : 초보 웹 개발자를 위한 스프링5 프로그래밍 입문 챕터 11, 12, 13, 14
pom.xml
<project xmlns="http://maven.apache.org/POM/4.0.0" xmlns:xsi="http://www.w3.org/2001/XMLSchema-instance" xsi:schemaLocation="http://maven.apache.org/POM/4.0.0 https://maven.apache.org/xsd/maven-4.0.0.xsd">
  <modelVersion>4.0.0</modelVersion>
  <groupId>in.wonj</groupId>
  <artifactId>sp5-wonjin</artifactId>
  <version>0.0.1-SNAPSHOT</version>
  <packaging>war</packaging>

  <dependencies>
	<dependency>
  		<groupId>javax.servlet</groupId>
  		<artifactId>javax.servlet-api</artifactId>
  		<version>4.0.1</version>
  	</dependency>
  	<dependency>
  		<groupId>javax.servlet.jsp</groupId>
  		<artifactId>javax.servlet.jsp-api</artifactId>
  		<version>2.3.3</version>
  		<scope>provided</scope>
  	</dependency>
  	<dependency>
  		<groupId>javax.servlet</groupId>
  		<artifactId>jstl</artifactId>
  		<version>1.2</version>
  	</dependency>

  	<dependency>
  		<groupId>org.springframework</groupId>
  		<artifactId>spring-jdbc</artifactId>
  		<version>5.3.22</version>
  	</dependency>
  	<dependency>
  		<groupId>org.springframework</groupId>
  		<artifactId>spring-webmvc</artifactId>
  		<version>5.3.22</version>
  	</dependency>

  	<dependency>
  		<groupId>org.apache.tomcat</groupId>
  		<artifactId>tomcat-jdbc</artifactId>
  		<version>10.0.23</version>
  	</dependency>
 	<dependency>
  		<groupId>mysql</groupId>
  		<artifactId>mysql-connector-java</artifactId>
  		<version>8.0.30</version>
  	</dependency>

	<dependency>
			<groupId>javax.validation</groupId>
			<artifactId>validation-api</artifactId>
			<version>1.1.0.Final</version>
		</dependency>
		<dependency>
			<groupId>org.hibernate</groupId>
			<artifactId>hibernate-validator</artifactId>
			<version>5.4.2.Final</version>
		</dependency>
		<dependency>
			<groupId>com.fasterxml.jackson.core</groupId>
			<artifactId>jackson-databind</artifactId>
			<version>2.9.4</version>
		</dependency>
		<dependency>
			<groupId>com.fasterxml.jackson.datatype</groupId>
			<artifactId>jackson-datatype-jsr310</artifactId>
			<version>2.9.4</version>
		</dependency>
  </dependencies>

  <build>
  	<plugins>
	  	<plugin>
	  		<groupId>org.apache.maven.plugins</groupId>
	  		<artifactId>maven-compiler-plugin</artifactId>
	  		<version>3.10.1</version>
	  		<configuration>
	  			<release>18</release>
	  			<encoding>utf-8</encoding>
	  		</configuration>
	  	</plugin>
  		<plugin>
  			<groupId>org.apache.maven.plugins</groupId>
  			<artifactId>maven-war-plugin</artifactId>
  			<version>3.3.2</version>
  		</plugin>
  	</plugins>
  </build>

</project>
경로 변수
// TestController.java
package controller;
...
import org.springframework.web.bind.annotation.RequestParam;
@Controller
public class TestController {
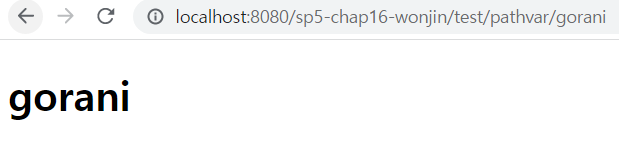
@GetMapping("test/pathvar/{var}")
public String pathvar(@PathVariable("var") String v, Model model) {
model.addAttribute("pathvar", v);
return "testPathvarView";
}
}<!-- testPathvarView.jsp -->
<%@ page contentType="text/html; charset=utf-8" %>
<!DOCTYPE html>
<html>
<body>
<h1>${pathvar}</h1>
</body>
</html>요청 파라미터
파라미터를 보내고 받을 뷰
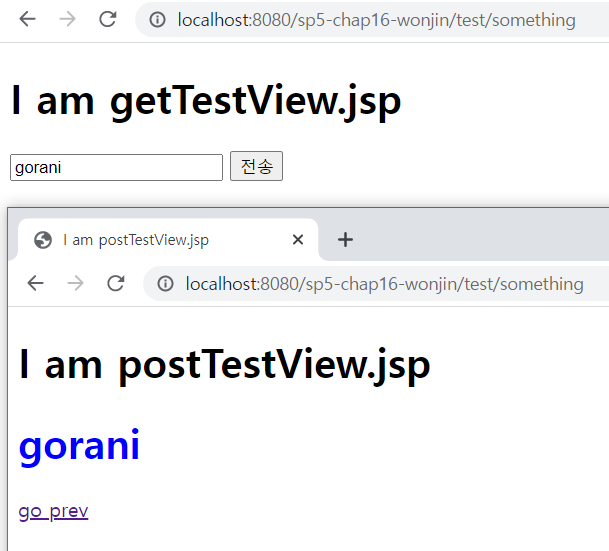
<!--  testGetView.jsp  -->
<%@ page contentType="text/html; charset=utf-8" %>
<%@ taglib prefix="spring" uri="http://www.springframework.org/tags" %>

<!DOCTYPE html>
<html>
<head><title>I am getTestView.jsp</title></head>
<body>
	<h1>I am getTestView.jsp</h1>
	<form action="./something" method="post">
		<input type="text" placeholder="전송할 데이터" name="formdata" />
		<input type="submit" value="전송" />
	</form>
</body>
</html>

<!--  testPostView.jsp -->
<%@ page contentType="text/html; charset=utf-8" %>
<%@ taglib prefix="c" uri="http://java.sun.com/jsp/jstl/core" %>

<!DOCTYPE html>
<html>
<head><title>I am postTestView.jsp</title></head>
<body>
	<h1>I am postTestView.jsp</h1>
	<h1 style="color:blue;"> ${ formdata } </h1>

	<a href="<c:url value="/test/something" />" >go prev</a>
</body>
</html>
HttpServletRequest.getParameter()로 받기
package controller;

import javax.servlet.http.HttpServletRequest;

import org.springframework.stereotype.Controller;
import org.springframework.ui.Model;
import org.springframework.web.bind.annotation.GetMapping;
import org.springframework.web.bind.annotation.PostMapping;

@Controller
public class TestController {
	@GetMapping("test/something")
	public String somethingMethod() {
		return "testGetView";
	}

	@PostMapping("test/something")
	public String somethingMethod(HttpServletRequest req, Model model) {
		String data = req.getParameter("formdata");

		if (data == null)
			return "testGetView";

		model.addAttribute("formdata", data);
		return "testPostView";
	}
}
@RequestParam으로 받기
속성
- value
- required (기본값 true)
- defaultValue
package controller;

import ...

@Controller
public class TestController {
	@GetMapping("test/something")
	public String get() {
		return "testGetView";
	}

	@PostMapping("test/something")
	public String post(@RequestParam(value="formdata", defaultValue="아무것도 없잖아") String data, Model model) {
		model.addAttribute("formdata", data);
		return "testPostView";
	}
}
커맨드 객체
요청 파라미터 받기
form으로부터 받을 파라미터들을 갖는 클래스를 커맨드 객체로 사용할 수 있다.
커맨드 객체는 파라미터들을 저장할 필드와 getter/setter를 가져야 한다.
JSP에서 접근할 때 커맨드객체 타입의 첫글자를 소문자로 바꾼 이름을 사용한다.
커맨드객체의 별칭을 지정하려면 요청매핑메소드 인수에 @ModelAttribute를 붙인다.
@ModelAttribute("별칭") TestCmd testCmd
// TestCmd.java
package test;
public class TestCmd {
private String txt;
private Boolean chk;
public String getTxt() {
return txt;
}
public void setTxt(String txt) {
this.txt = txt;
}
public Boolean getChk() {
return chk;
}
public void setChk(Boolean chk) {
this.chk = chk;
}
}
// TestController.java
package controller;
import ...
@Controller
public class TestController {
@GetMapping("test/something")
public String get() {
return "testGetView";
}
@PostMapping("test/something")
public String post(TestCmd testCmd) {
return "testPostView";
}
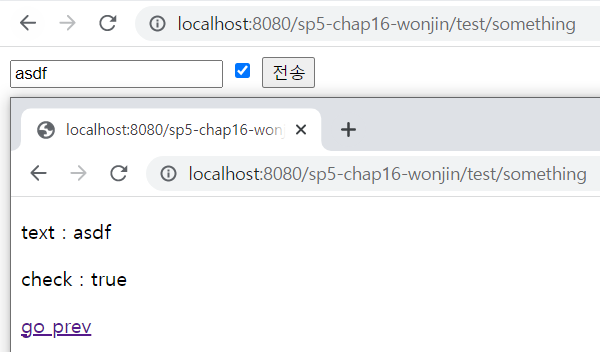
}<!-- testGetView.jsp -->
<%@ page contentType="text/html; charset=utf-8" %>
<!DOCTYPE html>
<html>
<body>
<form action="./something" method="post">
<input type="text" placeholder="전송할 데이터" name="txt" />
<input type="checkbox" name="chk" value="true" />
<input type="submit" value="전송" />
</form>
</body>
</html>
<!-- testPostView.jsp -->
<%@ page contentType="text/html; charset=utf-8" %>
<%@ taglib prefix="c" uri="http://java.sun.com/jsp/jstl/core" %>
<!DOCTYPE html>
<html>
<body>
<p> text : ${testCmd.txt} </p>
<p> check : ${testCmd.chk} </p>
<a href="<c:url value="/test/something" />" >go prev</a>
</body>
</html>spring form 태그
위 코드에 spring form태그를 적용하면 아래처럼 다시 쓸 수 있다.
get()메소드에도 커맨드 객체를 전달한다.
커맨드 객체 별칭은 cmd로 정했다.
// TestController.java
package controller;
import org.springframework.web.bind.annotation.ModelAttribute;
...

@Controller
public class TestController {
	@GetMapping("test/something")
	public String get(@ModelAttribute("cmd") TestCmd testCmd) {
		return "testGetView";
	}

	@PostMapping("test/something")
	public String post(@ModelAttribute("cmd") TestCmd testCmd) {
		return "testPostView";
	}
}
<!-- testGetView.jsp -->
<%@ page contentType="text/html; charset=utf-8" %>
<%@ taglib prefix="form" uri="http://www.springframework.org/tags/form" %>
<!DOCTYPE html>
<html>
<body>
<form:form action="./something" modelAttribute="cmd">
<form:input path="txt" />
<form:checkbox path="chk" />
<input type="submit" value="전송" />
</form:form>
</body>
</html>
<!-- testPostView.jsp -->
<%@ page contentType="text/html; charset=utf-8" %>
<%@ taglib prefix="c" uri="http://java.sun.com/jsp/jstl/core" %>
<!DOCTYPE html>
<html>
<body>
<p> text : ${cmd.txt} </p>
<p> check : ${cmd.chk} </p>
<a href="<c:url value="/test/something" />" >go prev</a>
</body>
</html>커맨드 객체 중첩
커맨드 객체 안에 다른 클래스타입의 필드를 넣어 중첩시킬 수 있다.
e.g. 아래 OuterCmd타입도 커맨드객체가 될 수 있다.
// OuterCmd.java
public class OuterCmd {
    private InnerCmd nested;
    private Double outerdb;
    // getter setter 생략
}

// InnerCmd.java
public class InnerCmd {
    private int innerint;
    private String innerstring;
    // getter setter 생략
}
커맨드 객체 검증
Validator와 Errors객체
Validator를 구현한 클래스와 Errors 객체를 요청매핑 메소드 인수로 넘기어 커맨드 객체를 검증할 수 있다. (TestCmdValidator)
Validator를 구현하려면 두 가지 메소드를 오버라이드 해야 한다.
supports(Class<?> clazz):커맨드객체.class.isAssignable(clazz)를 리턴한다.validate(Object target, Errors errors): 커맨드 객체를 검증하는 코드로, 특정 조건에 해당하면 reject한다.
Errors객체는 두 가지 리젝트 메소드를 갖는다.
reject("에러 코드")reject("리젝트 대상", "에러 코드")
// TestController.java
...
@Controller
public class TestController {
	@GetMapping("test/something")
	public String get(@ModelAttribute("cmd") TestCmd testCmd) {
		return "testGetView";
	}

	@PostMapping("test/something")
	public String post(@ModelAttribute("cmd") TestCmd testCmd, Errors errors) {
		new TestCmdValidator().validate(testCmd, errors);

		if(errors.hasErrors())
			return "testGetView";
		else
			return "testPostView";
	}
}

// TestCmd.java
public class TestCmd {
	private String txt;
	private Boolean chk;
	// getter setter 생략
}

// TestCmdValidator.java
import org.springframework.validation.Errors;
import org.springframework.validation.ValidationUtils;
import org.springframework.validation.Validator;

public class TestCmdValidator implements Validator{
	@Override
	public boolean supports(Class<?> clazz) {
		return TestCmd.class.isAssignableFrom(clazz);
	}

	@Override
	public void validate(Object target, Errors errors) {
		TestCmd cmd = (TestCmd)target;

		if(cmd.getChk() == null || !cmd.getChk())
			errors.rejectValue("chk", "required");

		// 검증 방법 1 : 직접 검사
		if(cmd.getTxt() == null || cmd.getTxt().trim().isEmpty())
			errors.rejectValue("txt", "required");

		// 검증 방법 2 : ValidationUtils
		ValidationUtils.rejectIfEmptyOrWhitespace(errors, "txt", "required");
	}

}
<!-- testGetView.jsp -->
<%@ page contentType="text/html; charset=utf-8" %>
<%@ taglib prefix="form" uri="http://www.springframework.org/tags/form" %>
<!DOCTYPE html>
<html>
<body>
<form:form action="./something" modelAttribute="cmd">
<p>
<form:input path="txt" />
<form:errors path="txt" />
</p>
<p>
<form:checkbox path="chk" />
<form:errors path="chk" />
</p>
<input type="submit" value="전송" />
</form:form>
</body>
</html>// label.properties
required=입력필요
required.txt=텍스트 입력필요
required.chk=체크 필요Validator 범위
@Valid로 Validator를 실행하려면 특정 범위로 등록해야 한다.
Validator는 아래 두 가지 범위가 있다.
- 글로벌 범위 ( WebMvcConfigurer 구현 메소드에서 설정 )
OptionalValidatorFactoryBean:@EnableWebMvc가 등록하는 기본 글로벌 Validatorpublic Validator getValidator()오버라이드 : 사용자 정의 글로벌 Validator 등록
- 컨트롤러 범위 ( 컨트롤러에서 설정 )
@InitBinder protected void initBinder(WebDataBinder)정의 : 사용자 정의 컨트롤러 Validator 등록
글로벌 범위 Validator는 다음과 같이 등록 한다.
@Configuration
@EnableWebMvc
public class MvcConfig implements WebMvcConfigurer {
	...
	@Override
	public Validator getValidator() {
		return new TestCmdValidator();
	}
}
컨트롤러 범위 Validator는 다음과 같이 등록한다.
// TestController.java
@Controller
public class TestController {
	...
	@InitBinder
	protected void initBinder(WebDataBinder binder) {
		binder.setValidator(new TestCmdValidator());
	}
}
WebDataBinder객체는 Validator 목록을 저장한다.
기본적으로 글로벌 Validator를 갖고 있다.이 때, 아래 둘 중 하나를 호출하면 컨트롤러 범위 Validator가 글로벌 범위 Validator보다 우선 적용된다.
setValidator(): 글로벌 Validator를 지우고 새로운 컨트롤러 범위 Validator 등록addValidator(): 글로벌 Validator 뒤에 컨트롤러 범위 Validator 등록
Bean Validation
커맨드 객체에 어노테이션을 붙인 뒤 글로벌 벨리데이터 OptionalValidatorFactoryBean 로 검증할 수 있다.
// TestCmd.java
import javax.validation.constraints.AssertTrue;
import org.hibernate.validator.constraints.NotBlank;

public class TestCmd {
	@NotBlank
	private String txt;
	@AssertTrue
	private Boolean chk;
	// getter setter 생략
}
@Valid
Validator의 범위를 지정하거나 커맨드 객체에 Bean Validation을 적용한 뒤 커맨드 객체 인수에 @Valid를 붙이면 적용가능한 Validator를 찾아 검증을 수행한다.
@Controller
public class TestController {
	...
	@PostMapping("test/something")
	public String post(@Valid @ModelAttribute("cmd") TestCmd testCmd, Errors errors) {
		if(errors.hasErrors())
			return "testGetView";
		else
			return "testPostView";
	}
}
세션
상태를 유지하기 위해 사용한다.
셋 중 하나로 구현할 수 있다.
- HttpSession
- Cookie
- 외부 DB
아래 내용은 HttpSession으로 구현한 것이다.
요청매핑 메소드에서 세션 객체 접근
인수로 HttpSession을 받는 경우 아래와 같이 접근한다.
@Controller
public class TestController {
...
	@PostMapping("test/something")
	public String post(TestCmd testCmd, Errors errors, HttpSession session) {
		session.something();
	}
}
인수로 HttpServletRequest를 받는 경우 아래와 같이 접근한다.
@Controller
public class TestController {
...
	@PostMapping("test/something")
	public String post(TestCmd testCmd, Errors errors, HttpServletRequest req) {
        HttpSession session = req.getSession();
		session.something();
	}
}세션에 객체 추가/삭제
@Controller
@RequestMapping("/test")
public class TestController {
	@PostMapping("/set")
	public String set(Cmd cmd, HttpSession session) {
		session.setAttribute("속성 이름", cmd);
		return "뷰 이름";
	}

	@GetMapping("/refresh")
	public String refresh(HttpSession session) {
		session.invalidate();
		return "뷰 이름";
	}
}
동작하는 예시
test/something에서 폼을 작성하고 제출해 세션 데이터를 등록한다.
test/data로 요청하면 세션 데이터를 볼 수 있다.
test/refresh로 요청하면 세션 데이터를 날린다.
// TestController.java
...
@Controller
@RequestMapping("/test")
public class TestController {
	@GetMapping("/something")
	public String get(@ModelAttribute("cmd") TestCmd testCmd) {
		return "testGetView";
	}

	@PostMapping("/something")
	public String post(@Valid @ModelAttribute("cmd") TestCmd testCmd, Errors errors, HttpSession session) {
		if(errors.hasErrors())
			return "testGetView";

		session.setAttribute("testCmdInSession", testCmd);
		return "testPostView";
	}

	@GetMapping("/refresh")
	public String refresh(HttpSession session) {
		session.invalidate();
		return "testRefreshView";
	}

	@GetMapping("/data")
	public String data() {
		return "testSessionView";
	}
}
<!--  testGetView.jsp  -->
<%@ page contentType="text/html; charset=utf-8" %>
<%@ taglib prefix="form" uri="http://www.springframework.org/tags/form" %>
<%@ taglib prefix="c" uri="http://java.sun.com/jsp/jstl/core" %>
<html>
<body>
	<form:form action="./something" modelAttribute="cmd">
		<p>
			<form:input path="txt" />
			<form:errors path="txt" />
		</p>
		<p>
			<form:checkbox path="chk" />
			<form:errors path="chk" />
		</p>
		<input type="submit" value="전송" />
	</form:form>

	<ul style="margin-top:32px; border-top:2px solid black;">
		<li><a href="<c:url value="/test/refresh" />">세션 데이터 지우기</a></li>
		<li><a href="<c:url value="/test/data" />">세션 데이터 보기</a></li>
	</ul>
</body>
</html>

<!--  testPostView.jsp -->
<%@ page contentType="text/html; charset=utf-8" %>
<%@ taglib prefix="c" uri="http://java.sun.com/jsp/jstl/core" %>
<html>
<body>
	<p> text : ${cmd.txt} </p>
	<p> check : ${cmd.chk} </p>
	<a href="<c:url value="/test/something" />" >go prev</a>
</body>
</html>

<!--  testRefreshView.jsp -->
<%@ page contentType="text/html; charset=utf-8" %>
<%@ taglib prefix="c" uri="http://java.sun.com/jsp/jstl/core" %>
<html>
<body>
	<p> 세션 정보를 지웠습니다. </p>
	<a href="<c:url value="/test/something" />" >go prev</a>
</body>
</html>

<!--  testGetView.jsp  -->
<%@ page contentType="text/html; charset=utf-8" %>
<%@ taglib prefix="c" uri="http://java.sun.com/jsp/jstl/core" %>
<html>
<body>
	<c:if test="${ empty testCmdInSession }">
		<p> 세션 데이터가 없습니다. </p>
	</c:if>

	<c:if test="${ !empty testCmdInSession }">
		<p> Session data </p>
		<ul>
			<li> ${ testCmdInSession.txt } </li>
			<li> ${ testCmdInSession.chk } </li>
		</ul>
	</c:if>

	<a href="<c:url value="/test/something" />" >go prev</a>
</body>
</html>
쿠키
쿠키 읽기
@Controller
@RequestMapping("/test")
public class TestController {
	@GetMapping("/something")
	public String set(Cmd cmd, @CookieValue(value="쿠키 이름", required=false) Cookie cookie, Model model) {
        String v = cookie.getValue();
		model.addAttribute("iamcookie", v);
		return "뷰 이름";
	}
}
쿠키 생성하기
@Controller
@RequestMapping("/test")
public class TestController {
	@GetMapping("/something")
	public String set(Cmd cmd, HttpServletResponse res) {
        Cookie cookie = new Cookie("쿠키 이름" , 값);
        cookie.setPath("/");
        cookie.setMaxAge(53535353);

        res.addCookie(cookie);

		return "뷰 이름";
	}
}cookie.setPath(): 참고cookie.setMaxAge(): 쿠키 유효기간 설정. 0이면 즉시 소멸
동작하는 예시
// TestController.java
...
@Controller
@RequestMapping("/test")
public class TestController {
	@GetMapping("/something")
	public String get(
			@ModelAttribute("cmd") TestCmd testCmd,
			@CookieValue(value="txtCookie", required=false) Cookie txtCookie,
			@CookieValue(value="chkCookie", required=false) Cookie chkCookie ) {

		if(txtCookie != null)
			testCmd.setTxt(txtCookie.getValue());
		if(chkCookie != null)
			testCmd.setChk(true);

		return "testGetView";
	}

	@PostMapping("/something")
	public String post(@Valid @ModelAttribute("cmd") TestCmd testCmd, Errors errors, HttpServletResponse res) {
		if(errors.hasErrors())
			return "testGetView";

		Cookie txtCookie = new Cookie("txtCookie", testCmd.getTxt());
		txtCookie.setPath("/");
		txtCookie.setMaxAge(53535353);

		Cookie chkCookie = new Cookie("chkCookie", "true");
		chkCookie.setPath("/");
		if(testCmd.getChk())
			chkCookie.setMaxAge(53535353);
		else
			chkCookie.setMaxAge(0);

		res.addCookie(txtCookie);
		res.addCookie(chkCookie);

		return "testPostView";
	}
}
<!-- testGetView.jsp -->
<%@ page contentType="text/html; charset=utf-8" %>
<%@ taglib prefix="form" uri="http://www.springframework.org/tags/form" %>
<%@ taglib prefix="c" uri="http://java.sun.com/jsp/jstl/core" %>
<html>
<body>
<form:form action="./something" modelAttribute="cmd">
<p>
<form:input path="txt" />
<form:errors path="txt" />
</p>
<p>
<form:checkbox path="chk" />
<form:errors path="chk" />
</p>
<input type="submit" value="전송" />
</form:form>
</body>
</html>
<!-- testPostView.jsp -->
<%@ page contentType="text/html; charset=utf-8" %>
<%@ taglib prefix="c" uri="http://java.sun.com/jsp/jstl/core" %>
<html>
<body>
<p> text : ${cmd.txt} </p>
<p> check : ${cmd.chk} </p>
<a href="<c:url value="/test/something" />" >go prev</a>
</body>
</html>핸들러 인터셉터
여러 컨트롤러에 동일한 기능을 적용하고자 할 때 인터셉터를 사용할 수 있다.
org.springframework.web.HandlerInterceptor
적용 가능 시점
아래 세 시점에 적용 할 수 있다.
** REQ:HttpServletRequest / RES:HttpServletResponse
boolean preHandle(REQ, RES, Object handler): 컨트롤러 실행 이전void postHandle(REQ, RES, Object handler, ModelAndView): 컨트롤러 실행 이후void afterCompletion(REQ, RES, Object handler, Exception): 응답 전송 이후
구현
HandlerInterceptor를 구현하는 클래스를 만들고
WebMvcConfigurer클래스에서 적용 범위를 정해 등록한다.
경로 지정시에 ant경로패턴을 사용한다. (참고 : Ant경로패턴)
*: 0개 이상의 문자**: 0개 이상의 경로?: 1개 문자
// SomethingInterceptor.java
...
public class SomethingInterceptor implements HandlerInterceptor {
    @Override
    public boolean preHandle(
            HttpServletRequest req,
            HttpServletResponse res,
            Object handler) throws Exception {
        HttpSession session = req.getSession(false);
        if (session == null)
            return false;
        else
            return true;
    }
}

// MvcConfig.java
...
@Configuration
@EnableWebMvc
public class MvcConfig implements WebMvcConfigurer {
    ...
    @Bean
    public SomethingInterceptor somethingInterceptor() {
        return new SomethingInterceptor();
    }

    @Override
    public void addInterceptors(InterceptorRegistry reg) {
      reg.addInterceptor(somethingInterceptor())
          .addPathPatterns("/test/**"); // ant경로패턴
    }
}