
안녕하세요! 오늘은 Nest.js에서 파일 업로드하기라는 주제로 글을 작성해보려고 합니다. 이전에 Express.js에서 했던 파일 업로드를 Nest.js 방식으로 해보도록 하겠습니다.
1. Multer Option 작성하기 🧧
이전에 Express 환경에서 파일 업로드를 진행하려면 Multer 라이브러리를 사용하여 업로드를 진행했었는데요, Nest.js에서도 마찬가지입니다. 뮬터 코드를 작성하도록 하겠습니다.
저는 src/lib/multerOptions.ts라는 파일을 만든 다음, 아래의 코드를 작성해주었습니다.
import HttpError from "exception/HttpError";
import { existsSync, mkdirSync } from "fs";
import { diskStorage } from "multer";
import getProcessEnv from "./getProcessEnv";
import uuidRandom from "./uuidRandom";

export const multerOptions = {
  fileFilter: (request, file, callback) => {
    if (file.mimetype.match(/\/(jpg|jpeg|png)$/)) {
      // 이미지 형식은 jpg, jpeg, png만 허용합니다.
      callback(null, true);
    } else {
      callback(new HttpError(400, '지원하지 않는 이미지 형식입니다.'), false);
    }
  },

  storage: diskStorage({
    destination: (request, file, callback) => {
      const uploadPath: string = 'public';

      if (!existsSync(uploadPath)) {
        // public 폴더가 존재하지 않을시, 생성합니다.
        mkdirSync(uploadPath);
      }

      callback(null, uploadPath);
    },

    filename: (request, file, callback) => {
      callback(null, uuidRandom(file));
    }
  })
}

export const createImageURL = (file): string => {
  const serverAddress: string = getProcessEnv('SERVER_ADDRESS');

  // 파일이 저장되는 경로: 서버주소/public 폴더
  // 위의 조건에 따라 파일의 경로를 생성해줍니다.
  return `${serverAddress}/public/${file.filename}`;
}
위의 파일에서 storage 객체에 있는 uuidRandom 함수의 코드는 아래와 같습니다.
(목적: 파일이름 암호화)
import { extname } from 'path';
import { v4 as uuid } from 'uuid';

export default (file): string => {
  const uuidPath: string = `${uuid()}${extname(file.originalname)}`;
  return uuidPath;
}
2. Controller와 Service 작성하기 📈
컨트롤러와 서비스는 위의 코드에 비해서 단순하고 짧은 구조로 이루어져 있습니다. 바로 코드를 작성해보도록 해보겠습니다.
upload.controller.ts 컨트롤러 파일에 아래와 같이 작성해주었습니다.
UseInterceptor 데코레이터 부분을 주의해서 봐주세요!
import { Controller, Post, UploadedFiles, UseGuards, UseInterceptors } from '@nestjs/common';
import { FilesInterceptor } from '@nestjs/platform-express';
import { multerOptions } from 'lib/multerOptions';
import UploadService from './upload.service';
import AuthGuard from 'middleware/auth';

@Controller('uploads')
export default class UploadController {
  constructor(
    private readonly uploadService: UploadService,
  ) {}

  @UseInterceptors(FilesInterceptor('images', null, multerOptions))
  // FilesInterceptor 첫번째 매개변수: formData의 key값,
  // 두번째 매개변수: 파일 최대 갯수
  // 세번째 매개변수: 파일 설정 (위에서 작성했던 multer 옵션들)

  @Post('/')
  @UseGuards(new AuthGuard())
  public uploadFiles(
    @UploadedFiles() files: File[],
  ) {
    const uploadedFiles: string[] = this.uploadService.uploadFiles(files);

    return {
      status: 200,
      message: '파일 업로드를 성공하였습니다.',
      data: {
        files: uploadedFiles,
      },
    };
  }
}
아래는 upload.service.ts 서비스 파일 코드입니다.
import { Injectable } from "@nestjs/common";
import { createImageURL } from "lib/multerOptions";

@Injectable()
export default class UploadService {
  public uploadFiles(files: File[]): string[] {
    const generatedFiles: string[] = [];

    for (const file of files) {
      generatedFiles.push(createImageURL(file));
      // http://localhost:8080/public/파일이름 형식으로 저장이 됩니다.
    }

    return generatedFiles;
  }
}
위처럼 컨트롤러와 서비스 코드는 모두 끝마쳤습니다. 마지막으로 main.ts 부분을 만져주도록 하겠습니다.
3. main.ts 파일 수정하기 😀
정적 파일의 경로는 위에서 선언했던 http://localhost:8080/public 형식으로 되어있습니다. 그렇기 때문에 정적 파일 경로와 API 경로를 명확하게 구분 지어줘야 컴파일러가 인식이 가능합니다. 🥴
이전에 Express.js에서 파일 업로드를 진행해보신분들에게 익숙한 express.static 설정을 해주도록 하겠습니다. 아래의 코드를 추가해주세요!
const app: NestExpressApplication = await NestFactory.create<NestExpressApplication>(AppModule);
app.use('/public', express.static(join(__dirname, '../public')));
만약 설정을 해주지 않는다면 404 cannot get /public 형식의 오류문이 발생하게 됩니다.
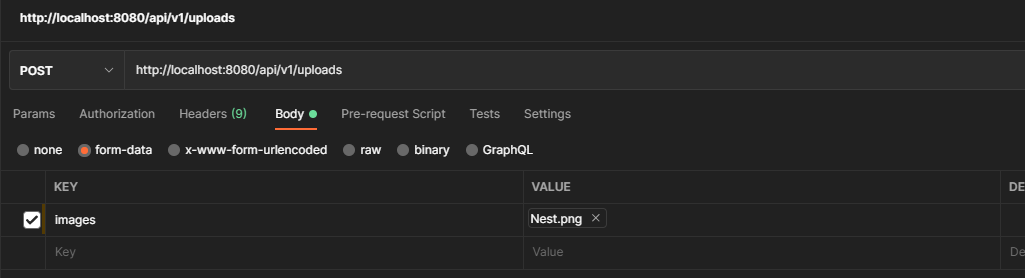
4. 테스트 진행
이제 위에서 작성했던 모든 글들에 대한 테스트를 진행하도록 하겠습니다.
포스트맨을 실행한 다음 filesInterceptor 안의 설정들에 따른 formData 설정을 해준다음, 전송해보세요!
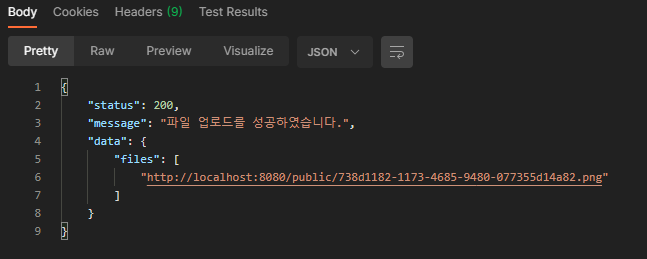
저는 업로드된 파일의 경로가 올바르게 응답문으로 받을 수 있었습니다.
이제 해당 파일의 경로를 웹에서 띄워보도록 하겠습니다.
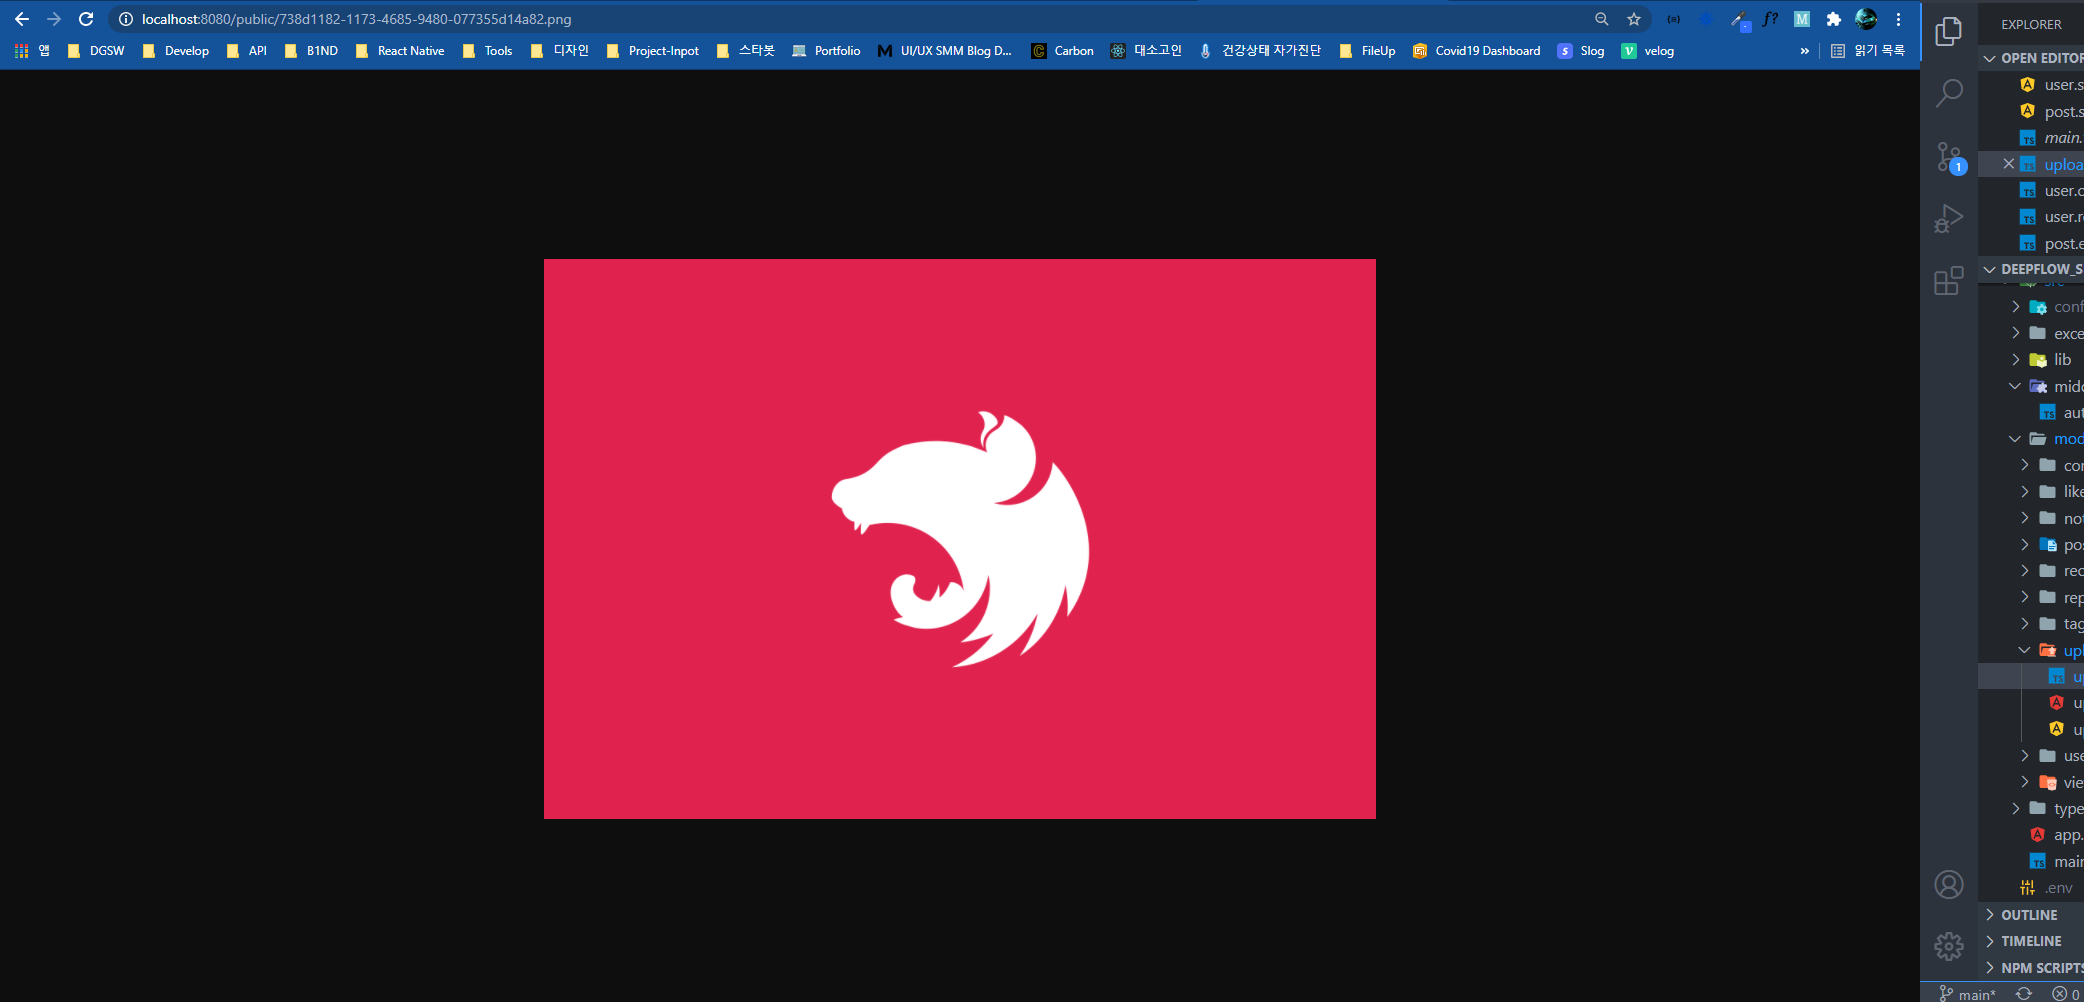
짜잔! 방금 포스트맨에서 업로드 한 이미지가 올바르게 출력됨을 확인할 수 있었습니다. 😍

그리고 파일 업로드를 진행할때마다 루트 디렉토리의 public 폴더에 사진들이 잘 저장됨을 알 수 있습니다. 😍
오늘은 이상으로 글을 마치도록 하겠습니다. 궁금한점이 있으시다면 댓글로 남겨주세요.
글 읽어주셔서 감사합니다! 😀


이거 코드 볼 수 있을까요?