28. Array, LinkedList에 대해 설명하고 각각 사용법 설명
🍡 Array vs LinkedList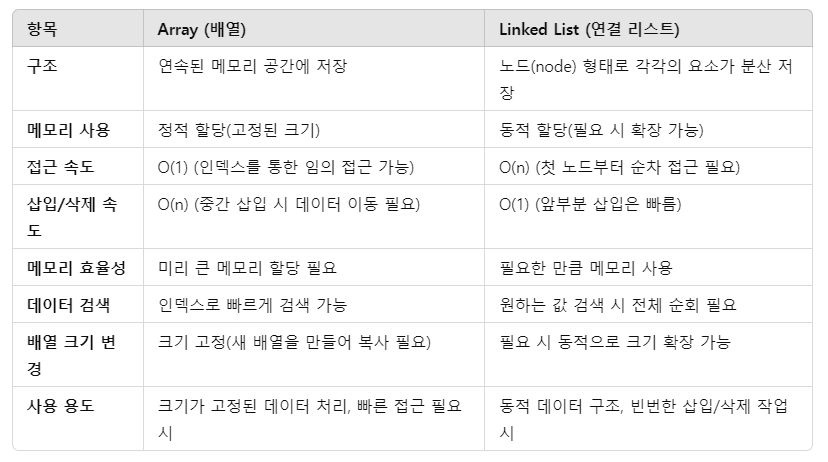
🍡 Linked List 사용 이유
- 동적 메모리 할당 : 미리 크기를 정의하지 않아도 되며, 필요할 때마다 요소 추가 가능
- 빠른 삽입/삭제 : 배열은 요소의 추가나 삭제 시 뒤의 요소를 이동시켜야 하지만, Linked List는 포인터만 수정하면 되므로 효율적
- 유연한 메모리 관리 : 리스트의 요소들은 메모리상에 연속적으로 저장되지 않으므로, 비연속적인 메모리 공간을 활용할 수 있다.
- 삽입/삭제가 빈번한 작업에 적합 : 데이터가 자주 변동되거나, 중간 지점에서 삽입 및 삭제가 자주 일어나는 경우 적합하다.
🍡 Linked List의 실제 사용 예시
- Undo/Redo 기능 구현 : 텍스트 편집기에서 이전 작업으로 되돌아가능 기능
- 음악 플레이어 : 다음 곡, 이전 곡으로 이동하는 기능 구현
- 큐와 스택 구현 : 기본 큐/스택의 구조로 사용
- 그래프와 트리의 구현 : 인접 리스트를 통해 그래프 표현
🍡 구현 예시
🖥️ JavaScript

// 노드 클래스 정의
class Node {
  constructor(value) {
    this.value = value;
    this.next = null;
  }
}

// 단일 연결 리스트 클래스 정의
class LinkedList {
  constructor() {
    this.head = null;
    this.tail = null;
    this.length = 0;
  }

  // 리스트 끝에 노드 추가
  append(value) {
    const newNode = new Node(value);
    if (!this.head) {
      this.head = newNode;
      this.tail = newNode;
    } else {
      this.tail.next = newNode;
      this.tail = newNode;
    }
    this.length++;
  }

  // 리스트의 첫 번째 노드 삭제
  removeFirst() {
    if (!this.head) return null;
    const removedNode = this.head;
    this.head = this.head.next;
    this.length--;
    if (this.length === 0) {
      this.tail = null;
    }
    return removedNode.value;
  }

  // 리스트의 요소를 모두 출력
  print() {
    let current = this.head;
    let result = [];
    while (current) {
      result.push(current.value);
      current = current.next;
    }
    console.log(result.join(" -> "));
  }
}

// 사용 예시
const list = new LinkedList();
list.append(10);
list.append(20);
list.append(30);

list.print(); // 출력: 10 -> 20 -> 30

list.removeFirst(); // 첫 번째 노드(10) 삭제
list.print(); // 출력: 20 -> 30
위 코드의 주요 포인트
Node클래스 : 각각의 노드가 값과, 다음 노드를 가리키는 포인터를 가짐LinkedList클래스 : 리스트의 삽입, 삭제, 출력 등의 메서드를 제공- 삽입/삭제 시간 복잡도 : O(1)로 매우 효율적

아무튼, 개발자