1. 관련 링크
2. 연결
git bash 로 최초 연결.git 폴더 생성 및 remote 저장소 연결
git config --global user.name "[이름]"
git config --global user.email [이메일]
git init
git remote add origin [git 주소]
2-1. 자격 증명
- 기존 Github 계정 연결 해제 : 자격 증명 관리자 > Windows 자격 증명 > 제거
Sign in with a code 팝업 > 계정 로그인 시 아래 링크로 이동됨- git bash 명령어
2-2. 업데이트
git remote update : 등록된 모든 원격 저장소의 정보를 최신 상태로 업데이트
$ git remote update

gremote: Enumerating objects: 12695, done.
remote: Counting objects: 100% (4/4), done.
remote: Compressing objects: 100% (3/3), done.
remote: Total 12695 (delta 1), reused 3 (delta 1), pack-reused 12691
Receiving objects: 100% (12695/12695), 55.69 MiB | 21.17 MiB/s, done.
Resolving deltas: 100% (2789/2789), done.
From https://github.com/ynjch97/TestProj
 * [new branch]      TestProjmain   -> origin/TestProjmain
 * [new branch]      TestProjquasar -> origin/TestProjquasar
2-3. Pull/Push 테스트
main Branch 로부터 Pull 받고, Push 하기
git pull origin main
git add [올릴 파일명]
git commit -m "[커밋 메세지]"
git push -u origin main
3. Pull
- Pull = Fetch + Merge
- 특정 Branch에서 Pull :
git pull origin [Branch명]
3-1. 특정 폴더만 Pull
- https://y00n-lee.tistory.com/39
- 선택한 특정 폴더 Pull 받는 순간 다른 폴더 및 파일들은 사라짐
- Sparse checkout : 저장소의 특정 폴더나 파일만 보이도록 하는 기능
- sparseCheckout 활성화 :
git config core.sparseCheckout true
- Pull 받고 싶은 특정 폴더명 선택 :
echo "[폴더명]" >> .git/info/sparse-checkout
~\.git\info 경로에 sparse-checkout 파일 생성된 것 확인
- Pull :
git pull origin main
4. Add
- 업로드 할 파일 add :
git add [올릴 파일명]
- add 이전으로 돌아가기 :
git reset HEAD
4-1. 삭제된 파일 Commit
- 필요 없는 파일 정리를 위한 옵션 -u (삭제한 파일 반영 시)
git add -u [파일명 또는 *]
4-2. 반영 상태 확인
git status
5. Commit & Push
- Commit :
git commit -m "[커밋 메세지]"
- Push :
git push -u origin TestProjmain
5-1. 수정/삭제된 파일만 Commit
- 수정 또는 삭제된 파일만 Commit : 옵션
-a
- 파일명 수정한 경우에는 add 에
-u 옵션을 넣지 않은 채 commit 에 -a 옵션을 넣어줘야 함
git commit -a -m "[커밋 메세지]"
5-2. 누락되는 파일 발생
.gitignore 에 등록하지 않았는데 누락된 파일이 있다면, git bash 에서 add 수행.gitignore 파일 확인하기 : ./.gitignore- 아래 내용 확인됨
$ git add TestProj/node_modules
The following paths are ignored by one of your .gitignore files:
TestProj/node_modules
hint: Use -f if you really want to add them.
hint: Turn this message off by running
hint: "git config advice.addIgnoredFile false"
5-2-1. Use -f if you really want to add them
- LF will be replaced by CRLF in 해결 방안
git add TestProj/node_modules 명령어 입력warning: in the working copy of 'TestProj/node_modules/prettier/esm/parser-postcss.mjs', LF will be replaced by CRLF the next time Git touches itgit config --global core.autocrlf true 명령어 입력 후 다시 add
- core.autocrlf = true (CRLF > LF 변경)
- core.autocrlf = false (기본 설정, 플랫폼(OS) 상관없이 줄바꿈에 대한 문자열 그대로 인식해 저장 (문제발생 가능성 존재))
- core.autocrlf = input (LF를 line ending으로 사용)
git config --global core.autocrlf true
git reset HEAD
git add -f TestProj/.quasar/*
git add -f TestProj/node_modules/*
🔶 LF, CRLF
- LF(Line-Feed)
- Mac, Linux (Unix 계열) 줄바꿈 문자열 = \n
- ASCII 코드 = 10
- CR(Carriage-Return)
- Mac 초기 모델 줄바꿈 문자열 = \r
- ASCII 코드 = 13
- CRLF (Carriage-Return+Line-Feed)
- Windows, DOS 줄바꿈 문자열 = \r\n
- CR(\r) + LR(\n) 두 동작을 합쳐서 (\r\n)
5-3. Commit Conflict 해결
- Commit > Pull > Conflict 발생 시
- Commit 건 우클릭 -> Reset -> HARD 이후 Commit 건을 다시 Push 후 Pull 받으면 됨
- Pull 을 취소하려면 다음과 같이 진행
git reset HEAD^
git fetch --all (remote 소스 받기)
git checkout origin/staging src/main/webapp/jsp/file_name.jsp (remote 소스로 overwrite)
6. Fetch
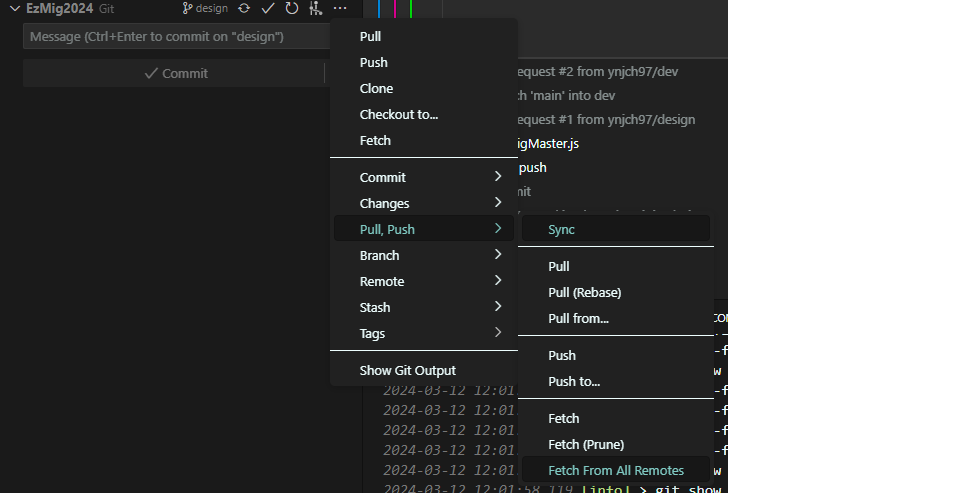
git fetch --all : 모든 원격 저장소의 모든 remote tracking branch를 업데이트- VSCode > Source Control > Pull, Push > Git Fetch From All Remotes
7. Branch
git branch
git branch -v
git branch -r
7-1. Branch 생성 및 이동
git checkout [브랜치명]
git checkout -b [브랜치명]
git push origin [브랜치명]
git branch [브랜치명] master
git branch --set-upstream-to origin/[Branch명]
7-2. Branch 삭제
git branch -D [브랜치명]
git push origin --delete [브랜치명]
8. Merge
- Git Branch 를 다른 Branch 로 합치는 과정
TestProjynjch Source Control > ··· > Branch > Merge Branch > orgin/TestProjmain- Push (Sync Changes 버튼) 수행
- git bash 명령어
git merge TestProjmain
git push -u origin TestProjynjch
8-1. Branch 와 main 소스 Merge 하기
- Merge 할 때 충돌 발생 시, diff Tool 을 이용하여 비교 (WinMerge)
git checkout main
git merge [브랜치명]
8-2. 다른 Branch 커밋 내용을 내 Branch 에 가져오기
git cherry-pick : 다른 Branch에 있는 커밋을 선택적으로 내 Branch에 적용시킬 때 사용하는 명령어

- Branch Y의 커밋 중 76ae30ef와 13af32cc 만 골라 현재 Branch인 X에 적용
git cherry-pick 76ae30ef 13af32cc
git cherry-pick --continue
git cherry-pick --abort
- merge commit을 cherry-pick 할 때
git cherry-pick -m 1 <merge_commit_hash>
8-3. test Branch에서 작업한 것 중 특정 파일만 master 에 반영시키기
git checkout test
git pull
git checkout master
git pull
git checkout origin/test src/main/java/com/ynjch/petmily/controller/user/UserControllor.java
git commit -m "[커밋 메세지]"
git push -u origin master
8-4. test Branch에서 작업한 것 중 특정 커밋만 master 에 반영시키기
git checkout test
git pull
git checkout master
git cherry-pick 584a586
git commit -m "[커밋 메세지]"
git push -u origin master
9. .gitignore
.git 이 있는 최상위 경로에 .gitignore 파일 생성
# .gitignore 파일 생성
TestProj/node_modules
TestProj/.quasar
.gitignore
$ ./.gitignore
./.gitignore: line 3: TestProj/node_modules: Is a directory
./.gitignore: line 4: TestProj/.quasar: Is a directory
9-1. 캐시 삭제 처리
- Repository에 이미 파일들이 포함되어 있으면 .gitignore 적용이 안될 수 있음
- 아래 git bash 캐시 삭제 명령어를 통해 해결
git rm -r --cached .
git add .
git commit -m "Untrack files in .gitignore"
git push -u origin TestProjynjch
10. Tag
- 릴리즈 버전 등 소스코드의 특별한 버전을 기록하는 데에 사용
- Git Tag 관련 명령어 정리 링크
- Tag 유형
- Lightweight : 특정 커밋에 대한 포인터 역할만 수행
- Annotated : Git 데이터베이스에 완전한 객체로 저장되어 태그한 사람의 이름과 이메일, 날짜, 태그 메시지 등을 함께 저장
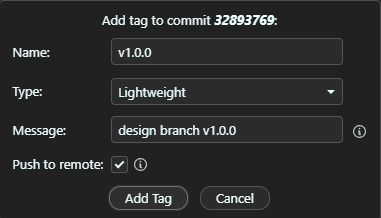
- 위와 같이
v1.0.0 Tag 를 추가하면 ~/releases/tag/v1.0.0 경로에서 관련 내용 확인 가능
11. GitHub 협업
11-1. 원본 저장소와 동기화
- Fork한 저장소는
origin 으로, 원본 저장소는 upstream 으로 저장소 등록
git remote add upstream https://github.com/ynjch97/Stockid.git
git remote add origin https://github.com/KMJHere/Stockid.git
- 나의 원격 저장소 소스 pull 및 main Branch 선택
git pull origin main
git checkout main
- 원본 저장소와 동기화 및 나의 저장소에 merge
git fetch upstream main
git merge upstream/main
11-2. 원본 저장소에 Pull Request
- 로컬 저장소에서 commit 및 push
- GitHub > 나의 Repository > New pull request
- 원본 Repository의 Branch 선택 및 나의 Repository Branch 선택 후 Pull Request
- 수락이 되면 위의 동기화 과정 반복
- 참고 https://andamiro25.tistory.com/193
12. Eclipse
- Git Repository 에 소스 커밋하기
- Pull 받은 후 Git Staging 에서 Commit
- 프로젝트 우클릭 > Team > Push Branch Staging
- Team > Pull
13. VSCode
13-1. 확장 프로그램
- Commit Message Editor : 에디터 창에서 커밋 내용을 작성할 수 있음
- Git Graph : GIT 그래프 및 파일 Diff
- 같은 Branch 내 차이점은
View Diff with Working File 으로 확인하는 것이 보기 편리
- Git History : 개별 파일에 대한 히스토리 내역을 조회
- 각 파일을 우클릭 >
Git: View File History
13-2. 조작법
- 업로드 할 파일 add : Source Control > Changes to Staged Changes

