Appium (Android, iOS)을 사용한 모바일 테스트 자동화
etc
Appium이란?
- 자동화 라이브러리
- iOS, Android, Windows, Mobile Web, Hybrid App 지원
- 오픈소스
개념
철학
- 자동화를 위해 앱을 다시 컴파일하거나 수정하지 않는다.
- 테스트를 작성하고 실행하기 위해서 특정 언어나 프레임워크에 종속되지 않는다.
- 자동화 API 관해 시간을 낭비해서는 안된다.(표준화 관련)
- 오픈소스이다!
디자인
철학1) Vendor가 제공하는 자동화 프레임 워크를 내부적으로 사용하여 충족함
- iOS 9.3 이상 : XCUITest(Apple)
- iOS 9.3 이하 : UIAutomation(Apple)
- Andorid 4.3 이상 : UiAutomator / UiAutomator2 (Google)
- Windows : WinAppDriver (Microsoft)
철학2) Vendor 가 제공한 프레임워크를 하나의 API 인 WebDriver API로 래핑하여 사용
- 클라이언트-서버 프로토콜(JSON Wire Protocol)를 사용
- 이 API는 여러 언어를 지원한다. (Ruby, Python, Java, JS, PHP, C#, RobotFramework)
클라이언트는 단순히 HTTP 클라이언트로 원하는 방식에 코드를 작성할 수 있기 때문에
Appium 및 WebDriver 는 기술적으로 '테스트 프레임 워크'가 아닌 '자동화 라이브리러리'에 가깝다고 한다.
철학3) WebDriver는 웹 브라우저 자동화를 위한 표준임
클라이언트 / 서버 아키텍처
- Appium은 REST API를 제공하는 웹 서버를 가진다.
- 클라이언트로부터 연결 및 명령을 수신하고 모바일에서 해당 명령을 실행하여 결과를 HTTP로 응답
튜토리얼
환경
- Mac OS (Catalina)
- Andorid Studio
- Java 1.8.0_202
- Nodejs 12
- Xcode
목표
Android, iOS 앱 테스팅
(공식 문서를 참고한다.)
설치
Appium 설치
Appium을 설치하기 위해서 2가지 방법을 제공한다.
NPM을 통한 설치Application설치 (Mac, Windows, and Linux 지원) 앱 릴리즈 정보
여기서는 NPM을 통해 설치를 진행합니다.
nodejs가 설치되지 않은 사용자는 https://nodejs.org/ 를 통해 설치한다.
npm i -g appium
# 설치 확인
appium -v
> 1.20.2
Appium 환경
필요한 드라이버 및 설치환경을 appium-doctor를 통해 확인 할 수 있습니다.
특정 플랫폼만 필요한 경우 appium-doctor --ios --android 플래그를 입력해주세요.
npm i -g appium-doctor
# 최초 실행
appium-doctor
#실행시 설정에 관련되어 진단하여 설정이 필요한 내용에 대해 나온다.
info AppiumDoctor Appium Doctor v.1.16.0
info AppiumDoctor ### Diagnostic for necessary dependencies starting ###
info AppiumDoctor  ✔ The Node.js binary was found at: /Users/username/.nvm/versions/node/v12.21.0/bin/node
info AppiumDoctor  ✔ Node version is 12.21.0
info AppiumDoctor  ✔ Xcode is installed at: /Applications/Xcode.app/Contents/Developer
info AppiumDoctor  ✔ Xcode Command Line Tools are installed in: /Applications/Xcode.app/Contents/Developer
info AppiumDoctor  ✔ DevToolsSecurity is enabled.
info AppiumDoctor  ✔ The Authorization DB is set up properly.
WARN AppiumDoctor  ✖ Carthage was NOT found!
info AppiumDoctor  ✔ HOME is set to: /Users/username
WARN AppiumDoctor  ✖ ANDROID_HOME environment variable is NOT set!
WARN AppiumDoctor  ✖ JAVA_HOME environment variable is NOT set!
WARN AppiumDoctor  ✖ adb, android, emulator could not be found because ANDROID_HOME or ANDROID_SDK_ROOT is NOT set!
WARN AppiumDoctor  ✖ Cannot check $JAVA_HOME requirements since the environment variable itself is not set
.... #optional 관련
info AppiumDoctor ### Manual Fixes Needed ###
info AppiumDoctor The configuration cannot be automatically fixed, please do the following first:
WARN AppiumDoctor  ➜ [For lower than Appium 1.20.0] Please install Carthage. Visit https://github.com/Carthage/Carthage#installing-carthage for more information.
WARN AppiumDoctor  ➜ Make sure the environment variable ANDROID_HOME is properly configured for the Appium process. Refer https://github.com/appium/java-client/blob/master/docs/environment.md for more details.
WARN AppiumDoctor  ➜ Make sure the environment variable JAVA_HOME is properly configured for the Appium process. Refer https://github.com/appium/java-client/blob/master/docs/environment.md for more details.
WARN AppiumDoctor  ➜ Manually configure ANDROID_HOME and run appium-doctor again.
WARN AppiumDoctor  ➜ Set $JAVA_HOME environment variable to the root folder path of your local JDK installation
내용을 확인하여 하나씩 수정해보겠습니다.
1.20.0 이하 버전인 경우 Carthage를 설치
- Carthage Github 공식 페이지
- 설치는 여러가지 방법을 제공하고 있습니다. (Installer, Homeberw, MacPorts, From source)
여기서는 Homebrew를 통해 설치하도록 합니다.
brew install carthageANDROID_HOME, JAVA_HOME 설정
vim ~/.zshrc
# 아래 내용을 각자의 환경에 맞게 세팅
# ANDROID_HOME은 안드로이드 스튜디오에 깔려있는 SDK 경로를 지정하였음.
export ANDROID_HOME=/Users/username/Library/Android/sdk
export JAVA_HOME=/Library/Java/JavaVirtualMachines/jdk1.8.0_202.jdk/Contents/Home

## 터미널에서 정상적으로 반영되었는지 확인
echo $ANDROID_HOME
> /Users/username/Library/Android/sdk
echo $JAVA_HOME
> /Library/Java/JavaVirtualMachines/jdk1.8.0_202.jdk/Contents/Home
재실행 결과
appium-doctor
info AppiumDoctor Appium Doctor v.1.16.0
info AppiumDoctor ### Diagnostic for necessary dependencies starting ###
info AppiumDoctor  ✔ The Node.js binary was found at: /Users/username/.nvm/versions/node/v12.21.0/bin/node
info AppiumDoctor  ✔ Node version is 12.21.0
info AppiumDoctor  ✔ Xcode is installed at: /Applications/Xcode.app/Contents/Developer
info AppiumDoctor  ✔ Xcode Command Line Tools are installed in: /Applications/Xcode.app/Contents/Developer
info AppiumDoctor  ✔ DevToolsSecurity is enabled.
info AppiumDoctor  ✔ The Authorization DB is set up properly.
info AppiumDoctor  ✔ Carthage was found at: /usr/local/bin/carthage. Installed version is: 0.37.0
info AppiumDoctor  ✔ HOME is set to: /Users/username
info AppiumDoctor  ✔ ANDROID_HOME is set to: /Users/username/Library/Android/sdk
info AppiumDoctor  ✔ JAVA_HOME is set to: /Library/Java/JavaVirtualMachines/jdk1.8.0_202.jdk/Contents/Home
info AppiumDoctor    Checking adb, android, emulator
info AppiumDoctor      'adb' is in /Users/username/Library/Android/sdk/platform-tools/adb
info AppiumDoctor      'android' is in /Users/username/Library/Android/sdk/tools/android
info AppiumDoctor      'emulator' is in /Users/username/Library/Android/sdk/emulator/emulator
info AppiumDoctor  ✔ adb, android, emulator exist: /Users/username/Library/Android/sdk
info AppiumDoctor  ✔ 'bin' subfolder exists under '/Library/Java/JavaVirtualMachines/jdk1.8.0_202.jdk/Contents/Home'
info AppiumDoctor ### Diagnostic for necessary dependencies completed, no fix needed. ###
전부 정상적으로 세팅되었다고 확인할 수 있습니다.(옵션 제외)
Web Driver 라이브러리(클라이언트)
Appium은 Web Driver(API) 라이브러리를 통해서 HTTP 통신을 통해 테스팅을 진행합니다.
테스트할 클라이언트 (iOS, Web, Android 등) 각각에 맞는 라이브러리 의존성을 설정할 필요가 있습니다.
클라이언트 라이브러리 목록
- Ruby
- Python
- Java
- JS(Node.js)
- JS(Web)
- Objective C
- PHP
- C# (.NET)
- RobotFramework
샘플 실행
기본적으로 디바이스가 연결되어 있는 상태에서 진행됩니다.
- 사용 단말기: 갤럭시 노트5, 아이패드 미니5
샘플 코드
https://github.com/appium/appium 프로젝트 다운로드 또는
git clone https://github.com/appium/appium.gitappium 실행
appium
# 실행 시
[Appium] Welcome to Appium v1.20.2
[Appium] Appium REST http interface listener started on 0.0.0.0:4723
안드로이드 테스팅
안드로이드 스튜디오에서 해당 단말기가 연결되어야 합니다.
- android-create-session.test.js
# 다운로드 받은 샘플프로젝트 내 javascript-webdriverio폴더를 경로로 설정해야합니다
pwd
> {smaplecode}/sample-code/javascript-webdriverio
npm i
#설치 완료후
npx mocha npx mocha test/basic/android-create-session.test.js

#테스트 결과
...
    ✓ should create and destroy a session (780ms)


  1 passing (12s)
- android-create-web-session.test.js
실행했는데 다음과 같이 에러가 발생하였다.
2021-04-26T04:39:52.033Z ERROR webdriver: Request failed with status 500 due to unknown error: An unknown server-side error occurred while processing the command. Original error: No Chromedriver found that can automate Chrome '90.0.4430'. You could also try to enable automated chromedrivers download server feature. See https://github.com/appium/appium/blob/master/docs/en/writing-running-appium/web/chromedriver.md for more detailshttps://github.com/appium/appium/blob/master/docs/en/writing-running-appium/web/chromedriver.md
위의 링크에서 내용을 확인해보니, Chrome을 통합 테스트는 단말기에서 사용하는 크롬 버전에 따라 대응되는 Chromedriver를 Appium에서 설치해야한다고한다.
Appium이 1.8.0 이상이라면, 아래의 커맨드로 실행하면 자동으로 chromedriver를 설치해준다.
appium --allow-insecure chromedriver_autodownloadnpx mocha test/basic/android-create-web-session.test.js
# 실행시 로그
...
2021-04-26T04:53:53.451Z INFO webdriver: RESULT Google
✓ should create and destroy Android browser session (17589ms)
iOS 실제 단말기 테스팅
iOS는 시뮬레이터 또는 실제 단말기로 테스트를 할 수 있는데 시뮬레이터가 아닌 실제 단말기로 진행
AppiumXCUITest Driver Real Device Setup
해당 가이드를 참고하여 진행하였음.
실제 단말기(real device)로 실행하기 위해서는 appium-ios-device 패키지를 설치해야하지만, Appium 1.15.0 이상 부터는 해당 패키지를 포함하고 있기 때문에 별도의 설치를 진행하지 않는다.
XCUITest Driver를 통해 iOS 단말기를 제어하는데, 이는 WebDriverAgent-Runner 라는 Helper App을 통해서 테스트를 처리한다.
사전 조건
- host platform이
macOS인 경우에만 지원 Xcode가 설치되어있어야함.- 연결된 실제 장치는 신뢰할 수 있어야하며(디바이스 등록 필요), WebDriverAgent 서명과 함께 올바르게 구성되어야함.
- 최소 Xcode SDK 버전은 10.2 (iOS 12.2)임, 이전 버전 테스트 시 이전 버전의 드라이버를 사용해야함.
- Web view를 테스트하려면 디버깅이 가능해야함. (Safari 원격 디버깅이 되야함)
++ 실제 테스트 환경
- 단말기와
appium서버는 동일한 네트워크에 있어야함 (MacBook 핫스팟을 통해 와이파이 연결함) TEAMID필요develoment용으로 배포한 테스팅용 ipa 파일을 준비
위의 내용은 변할 수 있으므로 아래의 링크를 참조한다.
appium-xcuitest-driver
simulator 실행과 real device 실행은 device capability 선언 시 udid 키값이 있는 경우에 따라서 분기처리된다. 연결된 단말기의udid는 아래의 명령어로 확인할 수 있다.
# xcode 12 미만
instruments -s devices
# xcode 12 이상
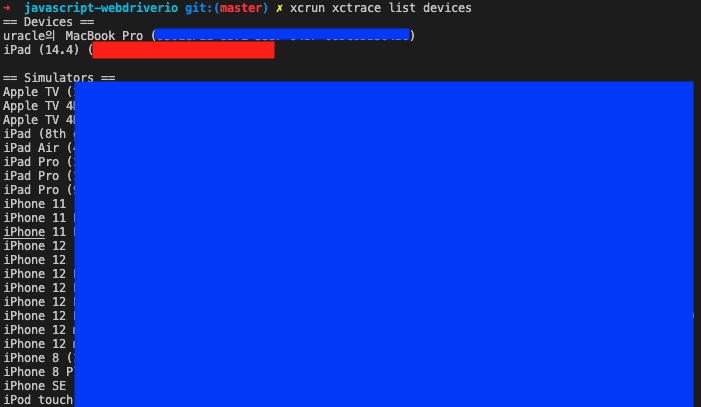
xcrun xctrace list devices하게되면 설치된 단말기를 확인 할 수 있다.
아래의 이미지의 빨간박스 부분이 현재 연결한 iPad의 udid이다.
webdriverio code-sample 프로젝트로 돌아와서
helpers/caps.js 파일을 열어서 아래 내용처렁 수정한다.
const iosCaps = {
    platformName: 'ios',
  automationName: 'XCUITest',
  xcodeSigningId: 'iPhone Developer',
  udid: '{UDID}', // 조회한 udid를 입력
  xcodeOrgId: '{TEAMID}',// 사이닝시 사용한 TEAMID
  deviceName: 'iPad', // 단말기 이름
  platformVersion: '14.4', // 플랫폼 버전
}helpers/apps.js에서 ipa 경로를 지정
exports.iosTestApp = '/Users/username/sample-project.ipa' // ipa 파일 경로test/basic/ios-create-session.test.js 내
..생략
const element = await client.findElement('class name', 'XCUIElementTypeApplication');
    await client.getElementAttribute(element.ELEMENT, 'name').then((attr) => {
      assert.equal(attr, 'sample-project'); // 이 부분에 준비한 ipa 앱 이름을 작성
    });
ios-create-session.test.js 실행
npx mocha test/basic/ios-create-session.test.js

ERROR webdriver: Request failed with status 500 due to unknown error: An unknown server-side error occurred while processing the command. Original error: Unable to launch WebDriverAgent because of xcodebuild failure: xcodebuild failed with code 65
여기서 정상적으로 테스트가 진행되시는 경우 자동설정이 되신것이므로 그대로 사용하시면됩니다.
위와같이 xcodebuild failed with code 65 에러가 나오시는 경우 아래의 가이드를 참고하세요.
(Xcode Automatically manage signing이 정상적으로 동작하지않는다-_-)
- npm 경로를 확인
which npm
# nvm으로 설치한 경우 아래와같은 경로임
/Users/username/.nvm/versions/node/v12.21.0/bin/npmappium/node_module/appium-webdriveragent경로로 이동하여 디렉터리 생성
cd /Users/username/.nvm/versions/node/v12.21.0/lib/node_modules/appium/node_modules/appium-webdriveragent

mkdir -p Resources/WebDriverAgent.bundle
만약, Appium 버전이 1.20 이하인 경우 아래의 명령어를 실행해야함
./Scripts/bootstrap.sh -d- Xcode로
appium-webdriveragent프로젝트 실행
TARGETS내WebDriverAgentLib,WebDriverAgentRunner사이닝 설정
가이드에서는 bundle identifier를 수정하여 사이닝 문제를 해결하였으나 어찌됬든
WebDriverAgentRunner만 빌드되면 됨.
이 부분은 wildcard가 적용된
Provisioning Profile을 사용하여 빌드함
- 이후 아래 명령어를 입력하여 빌드
<udid> 부분을 연결된 단말기의 udid로 변환하여 실행하여야합니다.
xcodebuild -project WebDriverAgent.xcodeproj -scheme WebDriverAgentRunner -destination 'id=<udid>' test정상적으로 실행시, 아래와 같은 로그를 확인할 수 있다.
2021-04-27 13:18:32.906168+0900 WebDriverAgentRunner-Runner[2084:1039622] Built at Apr 27 2021 13:18:01
2021-04-27 13:18:32.916584+0900 WebDriverAgentRunner-Runner[2084:1039622] ServerURLHere->http://192.168.2.14:8100<-ServerURLHere
2021-04-27 13:18:32.917047+0900 WebDriverAgentRunner-Runner[2084:1039814] Using singleton test manager
이러한 로그와 함께 단말기에 WebDriverAgentRunner가 설치되어 있을껍니다.
여기서 ServerURLHere 부분의 http://192.168.2.14:8100은 WDA URL이기때문에 따로 복사해두셔야합니다.
이후 다시 helpers/caps.js로 이동하여 수정합니다.
const iosCaps = {
    platformName: 'ios',
  automationName: 'XCUITest',
  xcodeSigningId: 'iPhone Developer',
  udid: '{UDID}', // 조회한 udid를 입력
  xcodeOrgId: '{TEAMID}',// 사이닝시 사용한 TEAMID
  wdaBaseUrl: "{WDA URL}",//192,168.2.14:8100
  deviceName: 'iPad', // 단말기 이름
  platformVersion: '14.4', // 플랫폼 버전
};

const iosWebCaps = {
    platformName: 'ios',
  automationName: 'XCUITest',
  xcodeSigningId: 'iPhone Developer',
  udid: '{UDID}', // 조회한 udid를 입력
  xcodeOrgId: '{TEAMID}',// 사이닝시 사용한 TEAMID
  wdaBaseUrl: "{WDA URL}",//192,168.2.14:8100
  deviceName: 'iPad', // 단말기 이름
  platformVersion: '14.4', // 플랫폼 버전
  browserName: 'Safari'
};
WebDriverAgentRunner설치 이후에는appium을 새로 시작해야 정상동작합니다.
iOS Testing
npx mocha test/basic/ios-create-session.test.js
# 결과
...
✓ should create and destroy IOS sessions (1299ms)


  1 passing (13s)

npx mocha test/basic/ios-create-web-session.test.js
# 결과
...
✓ should create and destroy IOS Safari session (50816ms)


  1 passing (51s)
마지막 iOS 까지 정상적으로 테스트를 진행하였습니다.
수정되는 부분이 많기때문에 무작정 글을 따라하시기 보다 공식 가이드 내용을 확인하시어 진행하시길 바랍니다.
감사합니다.
Reference
http://appium.io/
https://github.com/appium/appium-doctor
https://github.com/appium/appium-ios-device
https://github.com/appium/appium-xcuitest-driver
https://github.com/webdriverio/webdriverio
https://webdriver.io/
