폴리필이란 특정 자바스크립트의 API를 지원하지 않는 구형 브라우저에게
해당 API의 기능을 제공하는데 필요한 코드를 의미한다.
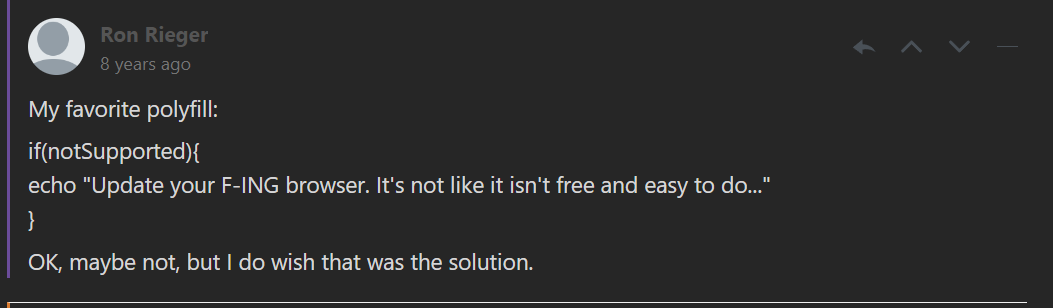
좀 더 자세한 내용은 폴리필이란 단어를 제안한 이의 포스팅을 통해 보도록 하자
Where polyfill came from / on coining the term
폴리필은 차갑다 ..
시작하는 이유
나는 배열의 API 를 몇 개만 특정적으로 사용해봤을 뿐 정확하게 알고 있다는 느낌이 들지 않았다.
그래서 MDN 이나 교재를 더 읽어볼까 하다가
읽어보는 것보다 직접 만들어보는게 더 재밌고 깊게 배울 수 있을 것 같아
폴리필을 구현해보도록 하려고 한다.
구현해보는 API 들의 순서는 MDN 에 기술된 메소드들의 순으로 하도록 한다.
또한 메소드에 대한 모든 설명의 출처는 MDN 이다.
순서에 맞지 않지만
Array.isArray쪽을 먼저 보고 해당 글들을 보는 것을 추천한다.
ECMAScript2024에서 생각하는 자바스크립트에서의Array에 대해 볼 수 있다.
Array.prototype.at
Array 인스턴스의 at() 메서드는 정숫값을 받아 해당 인덱스에 있는 항목을 반환하며,
양수와 음수를 사용할 수 있습니다. 음의 정수는 배열의 마지막 항목부터 거슬러 셉니다.at(index);index 값을 넣어 반환값을 가져오면 되는 프로토타입 메소드
Array.prototype.atCustom = function (index) {
  const indexInteger = Math.floor(index);
  return this[indexInteger < 0 ? this.length + indexInteger : indexInteger];
};

tester.crossTest(Array.prototype.at, Array.prototype.atCustom, 42);
tester.crossTest(Array.prototype.at, Array.prototype.atCustom, -42);
모두 통과 ~!!
Array.prototype.concat
Array 인스턴스의 concat() 메서드는 두 개 이상의 배열을 병합하는 데 사용됩니다.
이 메서드는 기존 배열을 변경하지 않고, 새 배열을 반환합니다.concat();
concat(value0);
concat(value0, value1);
concat(value0, value1, /* …, */ valueN);만일 인자로 들어온 배열에 [1,2,3,['a' , 'b']] 이런 경우에는 얕게 합쳐진다.
Array.prototype.concatCustom = function (...args) {
  const result = [...this];
  for (let index = 0; index < args.length; index += 1) {
    const target = args[index];
    if (Object.prototype.hasOwnProperty.call(target, 'length')) {
      for (let subIndex = 0; subIndex < target.length; subIndex += 1) {
        result[result.length] = target[subIndex];
      }
    } else {
      result[result.length] = target;
    }
  }
  return result;
};

args = [1, 2, 3, ['a', 'b'], true, false];
tester.crossTest(Array.prototype.concat, Array.prototype.concatCustom, args);
통과 ~!!
Array.prototype.copyWithin
Array 인스턴스의 copyWithin() 메서드는 배열의 일부를 같은 배열의 다른 위치로 얕게 복사하며,
배열의 길이를 수정하지 않고 해당 배열을 반환합니다.copyWithin(target, start);
copyWithin(target, start, end);copyWithin 은 배열에서 target 인덱스 위치부터 start ~ end - 1 인덱스 사이의 값을 얕게 복사하여 덮어 씌운다.
이후 덮어 씌워진 원본 배열을 반환한다.
이 때 인덱스들은 음수도 사용 가능하며 음수일 경우엔 끝에서부터 센다.
Array.prototype.copyWithinCustom = function (target, start, end = this.length) {
  /* 정수 형 변환 */
  [target, start, end] = [
    Math.floor(target),
    Math.floor(start),
    Math.floor(end),
  ];

  /* 음수일 경우엔 인덱스 값 변경 */
  target = target < 0 ? this.length + target : target;
  start = start < 0 ? this.length + start : start;
  end = end < 0 ? this.length + end : end;

  if (target >= this.length || start > end) return this;

  /* start 부터 end-1 까지의 복사본 생성 */
  const copiedArr = { length: 0 };
  for (let index = 0; index < end - start; index += 1) {
    copiedArr[index] = this[start + index];
    copiedArr.length += 1;
  }

  for (let index = 0; index < copiedArr.length; index += 1) {
    this[target + index] = copiedArr[index];
  }

  return this;
};

/* 테스트케이스를 생각해보자
1. start < target < end [정상작동]
2. target < start < end [정상작동]
3. end < target < start [작동X]
4. end < start < target [작동X]
*/
모두 통과 ~!!
생각보다 오래 걸렸다. copiedArr 를 담는 것 까진 쉽게 됐는데
원본 데이터에서 copiedArr 의 값으로 변경하는 것을 생각하는게
왜이리 오래걸렸을까
컥
🙅♂️테스트코드 한계점
사실 맨 처음에 테스트 코드를 만들어서 올렸었는데 의미가 없는 것 같아 3일차인 현재 게시글에서 지웠다.
맨 처음 작성했던 테스트 코드는 ...args 인수에 따라 결과가 바뀌는게 아니라
생성되는 배열에 따라서만 결과가 바뀐다.
그러니 다양한 인수에 따른 테스트 케이스를 고려 할 수 없기 때문에
고쳐야 한다.
또한 배열에 있는 값이 모두 숫자형이라는 한계점이 존재하기 때문에
간단한 메소드인 경우에만 사용하도록 하고
다양한 테스트 케이스가 필요한 메소드에 대해서는 직접 다양한 테스트 케이스 조건을 만들고
반복문을 이용해 다양하게 테스트를 해봐야겠다.
Array.prototype.entries
Array.prototype.entries()
Array 인스턴스의 entries() 메서드는 배열의 각 인덱스에 대한 키/값 쌍을
포함하는 새 배열 반복자 (en-US) 객체를 반환합니다.entries();entries() 메소드는 이터레이터 객체를 반환하며
이터레이터 객체가 반환하는 이터레이터 리절트는
{value : [index , value] , done : boolean} 다음처럼 생겼다.
console.dir 을 통해 반환되는 이터레이터 객체의 생김새를 봐보자
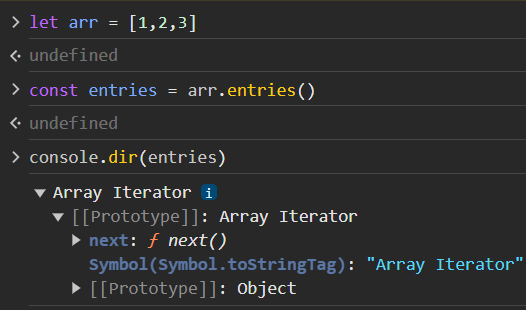
next 메소드를 가지며 Symbol(Symbol.toStringTag) 프로퍼티를 갖는 이터레이터 객체를 반환한다.
이터레이터 객체가 반환되는 것의 포인트는 for of 문을 사용 가능해진다는 것이다. for of 문은 해당 객체가 가지고 있는 [Symbol.iterator] 프로퍼티에 접근하여 이터레이터 객체를 받는다
이후 이터레이터의 next() 메소드를 호출하여 반복문을 도는 것이다.
Array.prototype.entriesCustom = function () {
  let idx = 0;
  const length = this.length;
  const data = this;

  const iterator = {
    next() {
      return {
        /* next 메소드는 idx , length , data 를 참조하는
        클로저 함수
        */
        value: idx < length ? [idx, data[idx]] : undefined,
        done: idx++ < length ? false : true,
      };
    },
    [Symbol.iterator]() {
      return this; /* for of 문으로 호출되면 iterator 자기 자신을*/
    },
    [Symbol.toStringTag]: 'My custom entries',
  };
  return iterator;
};

const arr = [1, 2, 3];
const iterator = arr.entriesCustom();
for (let key of iterator) {
  console.log(key);
  /*
  [ 0, 1 ]
  [ 1, 2 ]
  [ 2, 3 ]
  */
}
[Symbol.toStringTag]프로퍼티를 넣는 이유는 반환되는 이터레이터 객체를console.log나console.dir하였을 때 이터레이터의 내부가 보이는 것이 아닌 선택한 문자열이 나오게 하기 위함이였다.다만 나는 구현을 하지 못했다. 슬프게도 .. 좀 더 생각해봐야겠다.
Array.prototype.entires로 생성된 이터레이터 객체는[Symbol.iterator]프로퍼티가 없는데 어떻게for of문으로 순회가 가능할까 뒤져봤는데
>
[Symbol.iterator]프로퍼티를 갖는 객체를 상속받아 생성된 객체였다.좀더 공부하고 보니
Array자체에 내부 프로퍼티로[Symbol.iterator]가 존재한다.
그래서 해당 프로퍼티가 상속 된 것 같다 :)
Array.prototype.every
Array 인스턴스의 every() 메서드는 배열의 모든 요소가 제공된 함수로
구현된 테스트를 통과하는지 테스트합니다.

이 메서드는 불리언 값을 반환합니다.every(callbackFn);
every(callbackFn, thisArg);every() 메서드는 순회 메서드입니다. 배열의 각 요소에 대해 제공된
callbackFn 함수를 한 번씩 호출하고,
callbackFn이 거짓 값을 반환할 때까지 호출을 반복합니다. 거짓 요소가 발견되면
every()는 즉시 false를 반환하고 배열 순회를 중지합니다.
그렇지 않고 callbackFn이 모든 요소에 대해 참 값을 반환하면,
every()는 true를 반환합니다.포인트
every메소드에 전달되는callback함수는index , element , array ( 자신을 호출한)를 인수로 받는다.every메소드에 전달되는 콜백 함수는 자신을 호출한 배열의 형태를 변경시키는 것이 가능하다.- 희소배열의 경우에는 콜백함수를 시행하지 않는다.
Array.prototype.everyCustom = function (callbackFn, thisArg = this) {
  for (let index = 0; index < this.length; index += 1) {
    if (!index in thisArg) continue;
    if (!callbackFn(thisArg[index], index, thisArg)) return false;
  }
  return true;
};
테스트 케이스를 작성해보자
let arr = Array.from({ length: 10 }, (_, idx) => idx + 1);

const test1 = (elem) => typeof elem === 'number'; /* true */
const test2 = (elem, index) => elem > index; /* true */
const test3 = (elem, index, thisArg) => {
  /* 원본 배열의 형태를 바꾸는 콜백 함수
  원본 배열의 값을 하나씩 pop() 하여
  결국 length 는 값에 들은 elem 보다 작은 값이 나와야 함
  false
  */
  thisArg.pop();
  return thisArg.length > elem;
};

console.log(arr.everyCustom(test1)); // true
console.log(arr.everyCustom(test2)); // true
console.log(arr.everyCustom(test3)); // false
console.log(arr); // [1,2,3,4,5]
구우우웃~~
Array.prototype.fill
Array.prototype.fill()
Array 인스턴스의 fill() 메서드는 배열의 인덱스 범위 내에 있는 모든 요소를
정적 값으로 변경합니다. 그리고 수정된 배열을 반환합니다.fill(value);
fill(value, start);
fill(value, start, end);포인트 >

Array.prototype.fillCustom = function (value, start = 0, end = this.length) {
  /* 기본 조건 */
  if (start < -this.length) start = 0;
  if (start > this.length) return this;
  if (end < -this.length) end = 0;
  if (end >= this.length) end = this.length;

  /* start 와 end 정수로 형변환 하기 */
  [start, end] = [Math.floor(start), Math.floor(end)];
  /* 음수일 경우 형 변환 */
  start = start < 0 ? this.length + start : start;
  end = end < 0 ? this.length + end : end;
  /* start 와 end 가 적절하지 않을 경우 실행하지 않음 반환 */
  if (start > end) return this;

  let index = start;
  while (index < end) {
    this[index] = value;
    index += 1;
  }
  return this;
};
기본 조건에 맞춰 값들을 설정해줬다.
이번에는 테스트코드를 작성해보자
테스트코드
const testCustomfill = (array, testNum = 100000) => {
  /* test에 사용할 array 의 길이는 100 */
  let trial = 0;
  let value, start, end;
  while (trial < testNum) {
    let arr1 = [...array];
    let arr2 = [...array];

    value = Math.random();
    start = Math.floor(Math.random() * 100);
    end = Math.floor(Math.random() * 100);

    start = Math.random() > 0.5 ? start : -start;
    end = Math.random() > 0.5 ? end : -end;

    arr1.fill(value, start, end);
    arr2.fillCustom(value, start, end);

    for (let index = 0; index < arr1.length; index += 1) {
      if (arr1[index] !== arr2[index]) return '실패';
    }
    trial += 1;
  }
  return '통과';
};

let array = Array.from({ length: 100 }, (_, index) => index);
console.log(testCustomfill(array)); // 통과
얄루
Array.prototype.filter
Array 인스턴스의 filter() 메서드는 주어진 배열의 일부에 대한
얕은 복사본을 생성하고, 주어진 배열에서 제공된 함수에 의해
구현된 테스트를 통과한 요소로만 필터링 합니다.filter(callbackFn);
filter(callbackFn, thisArg);포인트
- 호출한 배열의 얕은 복사본을 반환한다.
callbackFn은elem , index, array를 인수로 받는다.
Array.prototype.filterCustrom = function (callbackFn, thisArg = this) {
  const { length } = this;
  const resultArr = [];
  for (let index = 0; index < length; index += 1) {
    const elem = this[index];
    if (!elem) continue;
    if (callbackFn(elem, index, thisArg)) resultArr.push(elem);
  }
  return resultArr;
};
얄루 ~~
Array.prototype.find
Array 인스턴스의 find() 메서드는 제공된 배열에서 제공된
테스트 함수를 만족하는 첫 번째 요소를 반환합니다.
 테스트 함수를 만족하는 값이 없으면 undefined가 반환됩니다.

배열에서 찾은 요소의 인덱스가 필요한 경우, findIndex()를 사용하세요.
값의 인덱스를 찾아야 하는 경우, indexOf()를 사용하세요.
 (findIndex()와 유사하지만, 테스트 함수를 사용하는 것 대신
 각 요소가 값과 동일한지 확인합니다.)
배열에 값이 존재하는지 찾아야 하는 경우, includes()를 사용하세요.
 이 역시 테스트 함수를 사용하는 것 대신 각 요소가 값과 동일한지
 확인합니다.
제공된 테스트 함수를 만족하는 요소가 있는지 찾아야 하는 경우, some()을 사용하세요.find(callbackFn);
find(callbackFn, thisArg);포인트
- callbackFn은 값이 할당된 인덱스뿐만 아니라 배열의 모든 인덱스에 대해 호출됩니다. 희소 배열의 빈 슬롯은 undefined와 동일하게 동작합니다.
희소배열의 경우에도 동일하게 작동하는구나
Array.prototype.findCustom = function (callbackFn, thisArg = this) {
  const { length } = this;
  for (let index = 0; index < length; index += 1) {
    const elem = this[index];
    if (callbackFn(elem, index, thisArg)) return elem;
  }
  return undefined;
};
굿 쉽다쉬워
Array.prototype.findIndex
Array.prototype.findIndex()
findIndex() 메서드는 주어진 판별 함수를 만족하는 배열의
첫 번째 요소에 대한 인덱스를 반환합니다. 만족하는 요소가 없으면 -1을 반환합니다.

판별 함수를 만족하는 첫번째 인덱스 대신 값을 반환하는 find() 메서드도 참고하세요.Array.prototype.findIndexCustom = function (callbackFn, thisArg = this) {
const { length } = this;
for (let index = 0; index < length; index += 1) {
const elem = this[index];
if (callbackFn(elem, index, thisArg)) return index;
}
return -1;
};쉽다쉬워
Array.prototype.findLast
Array.prototype.findLast()
Array 인스턴스의 findLast() 메서드는 배열을 역순으로 순회하며
제공된 테스트 함수를 만족하는 첫 번째 요소의 값을 반환합니다.
테스트 함수를 만족하는 요소가 없으면 undefined가 반환됩니다.
포인트
나는 이름만 보고 아 ~ 반복문을 다 돌고나서 조건을 만족하는 마지막 값을 찾으면 되겠구나 했는데
??? : ㅋㅋ 배열의 마지막부터 순회하면 되는디 ㅋㅋ
와우 이렇게 돌아가더라 왜 그걸 생각못했지 !
Array.prototype.findLastCustom = function (callbackFn, thisArg = this) {
  const { length } = this;
  for (let index = length - 1; index > 0; index -= 1) {
    const elem = this[index];
    if (callbackFn(elem, index, thisArg)) return elem;
  }
  return undefined;
};
가볍고 가볍고
Array.prototype.findLastIndex
Array.prototype.findLastIndex()
findLastIndex() 메서드는 배열을 역순으로 순회하며 주어진 판별 함수를
만족하는 만족하는 배열의 첫번째 요소의 인덱스를 반환합니다.
만족하는 요소가 없으면 -1을 반환합니다.

인덱스 대신 판별함수를 만족하는 마지막 값을 반환하는findLast()메서드도 참고하세요.findLastIndex(callbackFn);
findLastIndex(callbackFn, thisArg);Array.prototype.findLastIndexCustom = function (callbackFn, thisArg = this) {
const { length } = this;
for (let index = length - 1; index > 0; index -= 1) {
const elem = this[index];
if (callbackFn(elem, index, thisArg)) return index;
}
return -1;
};가볍고 가볍고
아니 근데 어쩔땐 return 값이 -1 , undefined냐
진짜 열받네
Array.prototype.flat()
Array 인스턴스의 flat() 메서드는 모든 하위 배열 요소가
지정된 깊이까지 재귀적으로 연결된 새 배열을 생성합니다.flat();
flat((depth = 1));
/* depth 는 평탄화 할 깊이 */포인트
depth에 적힌 깊이 만큼의 희소배열은 무시한다.const arr = [1, , 2, [3, , 4, [5, , 6]]]; console.log(arr.flat(depth = 1)); /* [ 1, 2, 3, 4, [ 5, <1 empty item>, 6 ] ] */ 얕은 복사본을 return 한다.
오 .. 조금 어렵다 생각해보자
재귀함수를 이용해야 하며 재귀 함수의 중단 조건은 두 가지다.
- 배열의 모든 원소가 중첩되지 않은 상태이거나
- 인수로 받은
depth이상 재귀 함수가 실행 되었을 때
콜스택에 쌓이는 재귀 함수에서 인수로 받은 depth 에 접근하려면
클로저 함수 형태로 사용해야겠구나
오마이갓 이번엔 진짜 오래걸렸다
재귀함수는 항상 할 때 마다 헷갈리는 것 같다
Array.prototype.flatCustom = function (depth = 1) {
  if (!depth) return this;
  const { length } = this;
  const result = [];

  const recursionFunc = (elem, depth) => {
    /*
    recursionFunc은 상위 렉시컬 환경의 depth 를 참조하는 클로저 함수
    depth가 0이거나 배열이 아닌 경우 result 추가 후 종료 */
    if (!depth || !elem.length) {
      result.push(elem);
      return;
    }

    /*
    인수로 넘겨 받은 elem 이 배열일 경우 elem 을 순회하며 recursionFunc 재귀호출
    재귀호출 시 depth 를 1 감소 시킨 후 호출하도록 함
    */
    const { length } = elem;
    depth -= 1;
    for (let index = 0; index < length; index += 1) {
      if (index in elem) recursionFunc(elem[index], depth);
    }
  };

  for (let index = 0; index < length; index += 1) {
    const elem = this[index];
    if (!elem) continue; /* 희소배열 경우엔 무시하도록 함 */
    recursionFunc(elem, depth);
  }
  return result;
};
flatCustom 함수는 this 배열을 모두 순회하며 희소값인 경우에는 건너 뛰고 희소값이 아닌 경우엔 recursionFunc 을 호출한 후 결과값을 담은 result 배열을 반환한다.
그럼 recurssionFunc 에 대해 생각해보자
우선적으로 recursionFunc 은 함수를 호출한 상위 렉시컬 환경의 result , depth 값에 접근하거나 수정 할 수 있는 클로저 함수이다.
recurssionFunc 은 세 가지 조건에 따라 행동 양상이 존재한다.
-
depth가 0일 때
depth가 0이되면 인수로 받은elem이 배열이건 아니건 상관없이result값에 추가하고 종료한다. -
depth가 0이 아니고elem이 배열이 아닌 경우
elem이 배열이 아니라면result값에 추가하고 종료 한다. -
depth가 0이 아니며elem이 배열일 경우
length프로퍼티가 존재하는elem인 경우elem을 순회하며recursionFunc을 재귀 호출한다.
재귀 호출 할 때 평탄화 작업이 이뤄지기 때문에depth값을 1 감소 시킨 후 인수로 넘겨준다.
테스트 코드
const testCustomflat = (arr, maxNestedLevel) => {
  const { length } = arr;
  for (let nestLevel = 1; nestLevel < maxNestedLevel; nestLevel += 1) {
    const original = arr.flat(nestLevel);
    const custom = arr.flatCustom(nestLevel);

    for (let index = 0; index < length; index += 1) {
      if (original[index].toString() !== custom[index].toString()) {
        console.log('실패');
        return;
      }
    }
    console.log(original);
    console.log(custom);

    console.log('통과');
  }
};

const testCases = [
  [[1, 2, [3, 4, [5, 6]], 7, [8, 9]], 3],
  [[1, [2, [3, [4, [5, [6, [7, [8, [9]]]]]]]]], 8],
  [[1, [2, [3, [4, [5, [6, [7, [8, [9]]]]]]]], 10], 8],
  [[1, 2, 3, 4, 5, 6, 7, 8, 9], 1],
  [[[1], [2], [3], [4], [5], [6], [7], [8], [9]], 9],
  [[1, [2, [3, [4, [5, [6, [7, [8, [9]]]]]]]], [10, [11, [12]]]], 11],
  [
    [
      [1, 2, 3],
      [4, 5, 6],
      [7, 8, 9],
    ],
    3,
  ],
  [[1, [2, [3, [4, [5, [6, [7, [8, [9]]]]]]]], 10, [11, [12, [13, [14]]]]], 12],
];

testCases.forEach((testcase) => {
  testCustomflat(...testcase);
});
엄청나게 중첩 시킨 테스트 케이스들과 해당 케이스의 최대 중첩 개수를 인수로 받아
0부터 최대 중첩개수까지 모두 flat() , flatCustom() 함수의 실행 결과 배열을 비교한다.
비교 할 때 원소값들이 객체나 배열인 경우에는 비교 연산자로 비교가 불가능하다.
그래서toString을 사용해주었다.
모두 잘 통과한다 구우웃 이렇게 뿌듯 할 수가 ㅎㅎ
Array.prototype.flatMap
Array 인스턴스의 flatMap() 메서드는 배열의 각 요소에 주어진 콜백 함수를 적용한 다음
그 결과를 한 단계씩 평탄화하여 형성된 새 배열을 반환합니다.

이 메서드는 map() 뒤에 깊이 1의 flat()을 붙이는
(arr.map(...args).flat())과 동일하지만,
두 메서드를 따로 호출하는 것보다 약간 더 효율적입니다.flatMap(callbackFn);
flatMap(callbackFn, thisArg);처음본다 신기하다.
flatMap 은 인수로 받은 callbackFn 이 배열의 원소값을 [] 에 담아 반환 할 경우 해당 결과 값을 1번만 평탄화 한 후 반환한다.
const arr1 = [1, 2, 3, 4];

arr1.map((x) => [x * 2]);
// [[2], [4], [6], [8]]

arr1.flatMap((x) => [x * 2]);
// [2, 4, 6, 8]

// 오직 한 단계만 평탄화됩니다.
arr1.flatMap((x) => [[x * 2]]);
// [[2], [4], [6], [8]]
마치 다음처럼 말이다.
Array.prototype.flatMapCustom = function (callbackFn, thisArg = this) {
  const { length } = this;
  const result = [];

  for (let index = 0; index < length; inde
       x += 1) {
    const elem = thisArg[index];
    if (index in thisArg) {
      const subResult = callbackFn(elem, index, thisArg);
      if (subResult.length) {
        for (let subIndex = 0; subIndex < subResult.length; subIndex += 1) {
          result.push(subResult[subIndex]);
        }
      } else {
        result.push(subResult);
      }
    }
  }
  return result;
};
한단계만 평탄화하면 되니 콜백 함수의 반환값이 배열일 경우 반복문을 통해 평탄화 작업을 해주었다.
Array.prototype.forEach
Array.prototype.forEach()
Array 인스턴스의 forEach() 메서드는 각 배열 요소에 대해
제공된 함수를 한 번씩 실행합니다.forEach(callbackFn);
forEach(callbackFn, thisArg);Array.prototype.forEachCustom = async function (callbackFn, thisArg = this) {
/* 비동기 함수들을 async/await 하는 커스텀 forEach */
const { length } = thisArg;
for (let index = 0; index < length; index += 1) {
const elem = await thisArg[index];
console.log(`이벤트 루프에서 ${elem}이 콜스택에 담겼어요`);
if (index in thisArg) callbackFn(elem, index, thisArg);
}
console.log('콜스택 종료');
};포인트
forEach는 희소값에 대해서는 순회하지 않는다.forEach에선 명시적으로 이터레이션을 중단 할 방법이 존재하지 않는다.forEach문에서는 동기함수를 기대하며 비동기 함수의 경우async/await가 불가능하다.
forEach 문은 비동기 함수를 기다리지 않고 이터레이션 한다.
그렇기에 반복문을 이용해 비동기 함수들을 순회하고 싶다면 for of 문이나 map , filter , reduce 와 같은 메소드를 async/await 선언문과 함께 사용해야 한다.
왜
forEach는 비동기 함수를 기다리지 않나요 ?
async/await를 이용해 비동기 함수를 동기 함수처럼 사용하기 위해선 해당 함수가async로 정의되어 있어야await선언을 통해 동기함수처럼 멈춰둘 수 있다.하지만
Array.prototype.forEach에 선언되어 있는 메소드는async로 선언되어있지 않기 때문에 불가능하다.
const asyncIterable = [
new Promise((resolve) =>
setTimeout(() => {
resolve(1);
}, 1000),
),
new Promise((resolve) =>
setTimeout(() => {
resolve(2);
}, 1000),
),
new Promise((resolve) =>
setTimeout(() => {
resolve(3);
}, 1000),
),
];
const forOfPromise = async (iterable) => {
for await (const promise of iterable) {
console.log(promise);
}
};
forOfPromise(asyncIterable);
asyncIterable.forEach((promise) => console.log(promise));/* forOfPromise 는 이벤트 루프에 넘어갔음으로 콜스택엔 forEach 문이 먼저 실행됨 */
Promise { <pending> }
Promise { <pending> }
Promise { <pending> }
/* 콜스택에서 forEach 문이 제거되고 for of 문에서
Promise 객체들이 settle 될 때 마다 로그됨 */
1
2
3그럼 forEachCustom 에서 async/await 로 선언해줘볼까 ?
Array.prototype.forEachCustom = async function (callbackFn, thisArg = this) {
  /* 비동기 함수들을 async/await 하는 커스텀 forEach */
  const { length } = thisArg;

  for (let index = 0; index < length; index += 1) {
    const elem = await thisArg[index];
    console.log(`이벤트 루프에서 ${elem}이 콜스택에 담겼어요`);

    if (index in thisArg) callbackFn(elem, index, thisArg);
  }
  console.log('콜스택 종료');
};
asyncIterable.forEachCustom((promise) => console.log(promise));
console.log('forEach문은 이벤트 루프로 빠져나가서 제가 먼저 실행됩니다');forEach문은 이벤트 루프로 빠져나가서 제가 먼저 실행됩니다
이벤트 루프에서 1이 콜스택에 담겼어요
1
이벤트 루프에서 2이 콜스택에 담겼어요
2
이벤트 루프에서 3이 콜스택에 담겼어요
3
콜스택 종료Array.prototype.from
Array.from() 정적 메서드는 순회 가능 또는 유사 배열 객체에서
얕게 복사된 새로운 Array 인스턴스를 생성합니다.Array.from(arrayLike);
Array.from(arrayLike, mapFn);
Array.from(arrayLike, mapFn, thisArg);오 ..
Array.from에서 이렇게 많은 인수들이 사용되는지 몰랐다.
포인트
Array.from(obj, mapFn, thisArg)는 중간 배열을 생성하지 않는다는 점과 배열이 아직 생성 중이기 때문에 전체 배열 없이 두 개의 인수(element, index)만 받는다는 점을 제외하면Array.from(obj).map(mapFn, thisArg)과 동일한 결과를 가져옵니다.희소값은 무시한다.
희소값을 무시하는 행위들은 형식화된 배열에서 특히 중요하다고 하는데
형식화된 배열에 대해 찾다보니, 배열의 개념에 대해서 더 공부해야 할 필요성을 느꼈다. 나는 동적 배열만 사용해봤다 보니 정적 배열에 대한 개념이 부족한 것 같다.
이 부분에 대해서는 따로 더 공부해봐야겠다.
👀 희소배열에서 희소값 올바르게 걸러내는 방법을 찾았다.
동적배열의 특징을 생각해봐야 한다 !!
위에서는 희소값을 걸러내기 위해 여태 if (elem) 처럼 사용했는데 이 방법들은 모두 자동 형변환을 이용해서 undefined 를 걸러내기 위함이였다.
하지만 생각해보면 이같은 방법은 0 , '0' , false 와 같은 값까지 걸러내기 때문에 적절한 방법이 아녔다.
자바스크립트의 동적 배열은 정적 배열을 사용하는 언어들처럼 메모리 공간에 원소들을 삽입하는 것이 아닌
순회 가능한 객체 형태로 생성된다.
그러니 정적 배열의 경우엔 array[index] 로 접근하면
메모리 공간에서 index * array 의 원소크기 에 담긴 원소 값으로 접근 가능했으나
자바스크립트에선 연속되지 않은 메모리 공간에 특정 원소들을 넣어두고, 각 index 들은 원소들의 주소를 참조하는 자료 구조 형태로 존재한다.
오 마이 갓 그래서 정적 배열을 사용하는 경우가 메모리 관리에 더 좋다는 이유가 이런거였구나
물론 엄격하게 메모리 공간을 할당하고 삭제하는 것도 이유지만 말이다
그래서 !!!!
희소값 (undefined , null , NaN 이 아닌 정말 아무것도 없는) 의 경우엔 메모리에 원소값 자체가 할당되지 않기 때문에 자바스크립트에서 인덱스 자체가 존재하지 않는다!!!
const sparseArr = [1, 2, , 3, undefined, null, NaN];

for (let index = 0; index < sparseArr.length; index += 1) {
  process.stdout.write(index in sparseArr ? 'true ' : 'false ');
} // true true false true true true true
애초에 희소배열 (배열은 이터러블하고 프로토타입이 존재하는 럭키 객체) 의 희소값은 인덱스 (사실은 프로퍼티입니다) 자체가 존재하지 않는다고!@!@!@!@@!
객체를 생성 할 때 희소값 자체는 프로퍼티키 자체를 생성하지 않는다.

그래서 희소배열에서 희소값을 걸러낼 때는 인덱스가 해당 배열에 존재하는지 안하는지만 확인하면 된다.
여태 위에서 적은 코드들을 모두 수정하고 와야지 ..
수정 완료
간간히 수정하다보니
thisArg를 인수로 받는 메소드에서도 계속thisArg가 아닌this를 대상으로 한 코드가 몇 개 있어 수정했다.
Array.fromCustom = function (arrayLike, mapFn, thisArg = arrayLike) {
  const baseFunc = (num) => num;
  mapFn = mapFn || baseFunc;
  const result = [];

  for (let index = 0; index < thisArg.length; index += 1) {
    const elem = thisArg[index];
    if (index in thisArg) {
      result[index] = mapFn(thisArg[index], index);
    } else {
      result[index] = undefined;
    }
  }
  return result;
};

const sparseArr = [1, 2, , 3, undefined, null, NaN];

console.log(Array.from(sparseArr)); /* [ 1, 2, undefined, 3, undefined, null, NaN ]  */
console.log(Array.fromCustom(sparseArr));
/* [ 1, 2, undefined, 3, undefined, null, NaN ]  */
다시 본론으로 돌아와 Array.from !!
잘 작동합니다 룰루랄라
Array.prototype.includes
Array 인스턴스의 includes() 메서드는 배열의 항목에 특정 값이 포함되어 있는지를
판단하여 적절히 true 또는 false를 반환합니다.includes(searchElement)
includes(searchElement, fromIndex)포인트
fromIndex는 정수형으로 전환되며fromIndex가 적절하지 않을 경우에는false값을 반환한다.- 희소값이 존재하는 희소배열의 경우에는
undefined로 평가된다.

Same Value Zero
includes 는 Same Value Zero 를 따른다.
Same Value Zero 는 숫자 0 (+0 과 -0)은 같은 값으로 취급하며
NaN 들도 같은 값으로 취급한다.
const num1 = NaN;
const num2 = NaN;
console.log(-0 === 0); // true
console.log(num1 === num2); // false
console.log(typeof num1 === 'number'); // true
console.log(typeof num2 === 'number'); // true
엄격한 동등인
===에서NaN들은 모두 다른 값으로 취급된다.
Array.prototype.includesCustom = function (searchElement, fromIndex = 0) {
  /* fromIndex 정수형 변환 */
  if (fromIndex < -this.length) fromIndex = 0;
  if (fromIndex >= this.length) return false;
  fromIndex = fromIndex < 0 ? this.length + fromIndex : fromIndex;

  for (let index = fromIndex; index < this.length; index += 1) {
    const elem = this[index];
    if (elem !== elem && searchElement !== searchElement) return true;
    if (elem === searchElement) return true;
  }
  return false;
};
구현 완료 ~~
NaN 일 때는 toString 하고 비교 할까 하다가 MDN 에서 사용한 코드를 이용해봤다.
Array.prototype.indexOf
Array.prototype.indexOf()
Array 인스턴스의 indexOf() 메서드는 배열에서 주어진 요소를
찾을 수 있는 첫 번째 인덱스를 반환하고, 찾을 수 없는 경우 -1을 반환합니다.indexOf(searchElement)
indexOf(searchElement, fromIndex)포인트
- 희소 배열의 경우 희소값은 건너 뛴다
Array.prototype.indexOfCustom = function (searchElement, fromIndex = 0) {
  if (fromIndex < -this.length) fromIndex = 0;
  if (fromIndex >= this.length) return false;
  fromIndex = fromIndex < 0 ? this.length + fromIndex : fromIndex;

  for (let index = fromIndex; index < this.length; index += 1) {
    if (index in this && this[index] === searchElement) return index;
  }
  return -1;
};
index in 으로 희소값 쌈뽕하게 해결
⭐ Array.isArray
Array.isArray()
Array.isArray() 정적 메서드는 전달된 값이 Array인지 판단합니다.Array.isArray(value)와 나는 엄청 쉽게 끝날줄 알았는데 생각보다 많은 내용을 배웠다.
시도 해 볼 수 있지만 정답이 아닌 방법들
Array.isArray 메소드 없이 어떻게 Array 인지 확인 할 수 있는지 생각해보고 그 방법들이 왜 문제인지 생각해보자
1.
typeof로 해볼까 ?
typeOf 는 자료형을 확인하는 것이지를 확인하는 것이다.
배열을 typeOf 로 하면 객체 자료형이기에 Object 로 나온다.
2.
length있고 이터러블 하고 프로토타입 같으면 되는거 아냐 ?
아니다
Object 로 생성된 객체에서 length 프로퍼티가 존재 할 수 있고
객체 내에서 이터러블하도록 [Symbol.iterator] 를 추가 해줄 수도 있고
그 수많은 프로토타입을 다 비교할껀가 ? 그리고 그런 프로토타입도 객체에서 오버라이딩 해서 설정 할 수 있지 않은가
3.
instanceOf로 하면 되잖아 ?
instanceOf 는 해당 객체의 constructor 를 확인한다.
그럼 모든 배열들은 constructor 가 Array 니까 마치 instanceOf 가 정답일 것만 같다.
아닙니다
세 가지 문제점이 존재한다.
상속받아 만들어진 배열의
instanceOfclass SsamBBongArray extends Array {} const SbArr = new SsamBBongArray(1, 2, 3); console.log(SbArr); /* SsamBBongArray(3) [ 1, 2, 3 ]*/ console.log(Array.isArray(SbArr)); /* true */ console.log(Array.isArray(SbArr instanceof Array)); /* false */
Array 를 상속받은 SsamBbongArray 를 만들었다.
SbArr 의 constructor 는 SsamBbongArray 다.
그래서 instanceof 는 false 를 가리킨다.
하지만 isArray 는 true 를 가리킨다.
어떤 차이일지 곰곰히 생각해보자
다른 프레임의
Array는 ?
다른 프레임이라는 것의 의미를 생각해보자
모든 자바스크립트 파일은 각 html마다 개별적인 global function 이 존재한다.
이 때 HTML 문서에서 다른 HTML 문서를 불러와 사용하는 iframe 을 사용했다고 생각해보자
그렇게 된 경우 불러와진 iframe 에서 script 파일간의 자료들은 공유되지만 각자의 생성자 자체는 다르기 때문에
다른 결과를 초래한다.
<!-- Frame 1 -->
<!DOCTYPE html>
<html>
  <head></head>
  <body>
    <script>
      var arrayInFrame1 = [1, 2, 3];
    </script>
  </body>
</html>

<!-- Frame 2 -->
<!DOCTYPE html>
<html>
  <head></head>
  <body>
    <script>
      // In Frame 2, checking if arrayInFrame1 is an instance of Array from Frame 1
      var isArray = arrayInFrame1 instanceof Array; // Might not work as expected
      console.log(isArray); // Could be false, even though arrayInFrame1 is an array
    </script>
  </body>
</html>
더 많은 글
Determining with absolute accuracy whether or not a JavaScript object is an array
Understanding Array.isArray Polyfill
constructor프로퍼티는 어떤 객체든 변경 할 수 있다.
그냥 obj.constructor = ''function Array() { [native code] }' 이런식으로 바꿔버리면 누구나 constructor 가 Array 들과 같을 수 있다.
아니 그냥 __proto__ 확인하면 되지 ~!
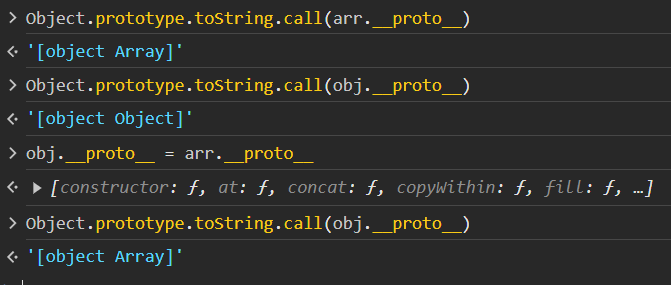
이 또한 .__proto__ 로 접근하면 값을 Array 랑 동일하게 변경시켜버릴 수 있다.
이것도 그냥 배열 아닌데도 __proto__ 만 변경해버리면 그게 과연 Array 일까 ?
ECMAScript 가 생각하는 자바스크립트에서의 배열
잘 감이 안온다 .
ECMAScript 2024 를 둘러보자
ECMAScript 2024를 둘러보니 답이 나왔다 !!

와 프록시 객체라는 것도 있구나
이것도 나중에 공부해봐야지
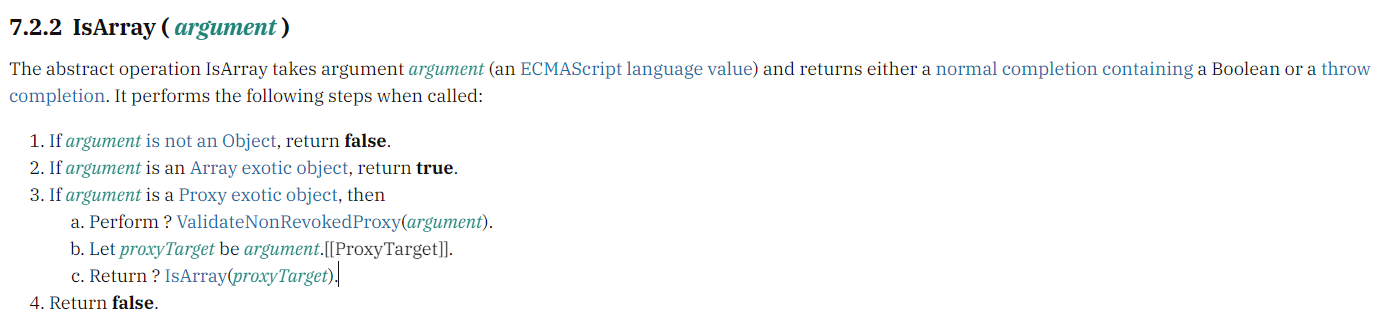
ECMAScript 가 생각하는 Array 는 생성자가 Array 냐 아니냐가 중요한게 아니였다.
Function.Array 라는 것은 자바스크립트가 생각하는 배열의 정의를 만족시키는 자료구조를 생성시키는 클래스이다.
자바스크립트가 생각하는 Array 는 Array exotic object 이다.
우선 객체이면서 Array exotic object 인지를 확인한다.
가상 객체로 둘러싼
Proxy객체의 경우 내부 프로퍼티로 들어가 둘러싸진 객체가Array exotic object인지 확인한다는 내용이다.
Array exotic object
그럼 Array exotic object 가 뭔데 ?
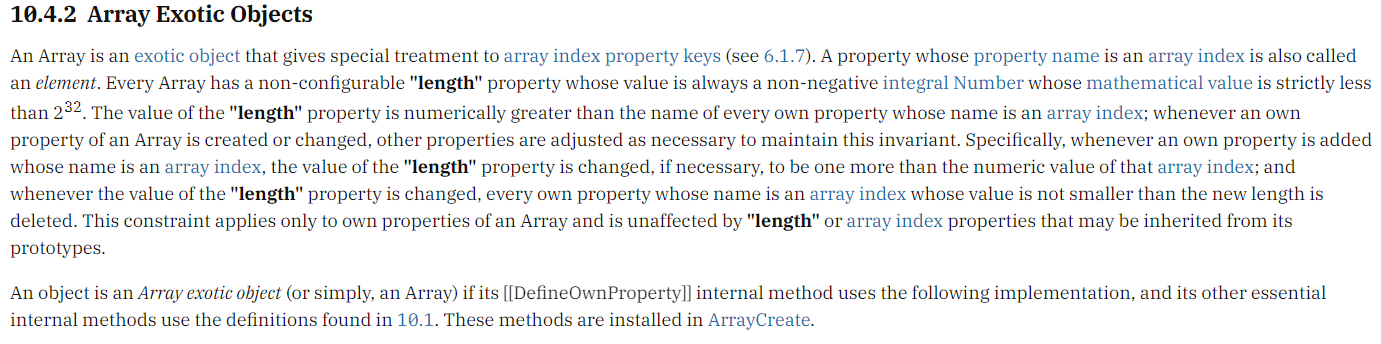
length프로퍼티를 가지고 있어야 한다.- 객체의 프로퍼티들은 모두 0 이상의 정수형이여야 하며 연속된 숫자여야 한다.
length프로퍼티들은 객체의 프로퍼티 (인덱스 역할)들보다 항상 1 만큼 더 커야 한다.- 배열의 특정 값이 추가되거나 삭제되어도 2번과 3번 조건을 만족해야 한다.
- 객체의 프로퍼티 값들은 를 초과 할 수 없다.
배열내 원소들이 개 이상 일 수 없는 이유는 엔진이 인식하는 정수의 최대 범위가 0~-1 까지이기 때문이다.
이런 조건들을 만족하는 것을 Array exotic object 라고 하며 , 이런 특정 객체를 Array 라고 하는구나 !!!!
와우!@!@!!@!@!!!!!!
내가 생각하는 Array.isArray 의 폴리필
Array.isArrayCustom = function isArray(value) {
  try {
    /* Array exotic object 인지 확인하자 */
    if (typeof value !== 'object') return false;
    /* 배열의 메소드지만 현재 커스텀하여 상속시킨 메소드가 많아 이것만 좀 양해 바람 */
    const copiedValue = [...value];
    const { length } = copiedValue;
    const properties = Object.keys(copiedValue);
    /* length 가 정수형이면서 2**32 미만인지 확인하기 */
    if (!Number.isInteger(length) || length >= 2 ** 32) return false;
    /* 객체의 length 와 프로퍼티 개수가 맞는지 확인하기  */
    if (length !== properties.length) return false;
    /* 인덱스 역할을 하는 프로퍼티들이 순차적인 정수형인지 확인하기 */
    for (let index = 0; index < length; index += 1) {
      /* Object.keys 는 문자형으로 생성되기 때문에 얕은 비교 사용 */
      if (index != properties[index]) return false;
    }
    /*
    값이 추가되고 제거 될 때 length 프로퍼티 값이 변경되는지 확인하기
    */
    const originalLength = length;
    copiedValue.push('temp value');
    if (originalLength !== copiedValue.length - 1) return false;
    copiedValue.pop();
    if (originalLength !== copiedValue.length) return false;
    /* 인덱스 역할을 하는 프로퍼티 키의 최대값이 2 ** 32 -1 미만인지 확인하기 */
    copiedValue[2 ** 32 - 1] = 'temp value';

    if (copiedValue.length !== originalLength) return false;
    return true;
  } catch (e) {
    return false;
  }
};
EMCAScript 2024 에 기술된 내용으로 폴리필을 작성해봤다.
최대한
Array의API를 사용하지 않으려 노력했으나 값을 제거 할 때pop이 아닌delete를 사용하니 해당 인덱스의 값이 희소값이 되어length가 변하지 않더라그래서
push , pop , spread 문법정도만 사용했다.
spread문법은 왜 사용했나면 반복문으로 직접 넣어주려다가 내가 이미Array.prototype.custom..시리즈를 많이 넣어둬서 반복문에서 걸러지지 않더라
결국 해당 폴리필에서 시사하는 바는 결국
너의 constructor 가 무엇이 됐건 상관 없고
너는 Array Exotic Object 를 만족하니 ? 인 것 같다.
이렇게 하게되면 어떤 프레임에서 생성된 Array 거나 Array 를 몇 번이건 상속 받아 생성된 객체건
해당 조건을 만족만 하면 Array 로 취급할 수 있을 거라 생각한다.
다만 문제점은 어떤 값을 추가하고 제거하는 메소드의 명을
pop, push로 고정시킨다는점이다.처음에는
Array.prototype.pop.call를 사용할까 생각했지만 만약 상속받아 생성된 인스턴스라면, 본인 생성자의 메소드를 사용해야 할 것이라 생각했기 때문에이 점은 아쉽지만 어쩔 수 없는 것 같다.
프록시 객체일 때 내부 슬롯까지 들어가는 건 내가 아직 프록시 객체를 안써봐서 ..
Array.prototype.join
Array 인스턴스의 Join() 메서드는 배열의 모든 요소를 쉼표나 지정된 구분 문자열로
구분하여 연결한 새 문자열을 만들어 반환합니다.
배열에 항목이 하나만 있는 경우, 해당 항목은 구분 기호를 사용하지 않고 반환됩니다.join()
join(separator)포인트
- 문자열로 변환된 모든 배열 요소가 하나의 문자열로 결합됩니다. 요소가 undefined, null인 경우, "null" 또는 "undefine" 문자열 대신 빈 문자열로 변환됩니다.
- 배열이 순환 배열(자체 요소를 포함)인 경우, 브라우저는 순환 참조를 무시하여 무한 재귀를 방지합니다.
const arr = [1, 2, , 3];
console.log(arr); // 1,2,,3
console.log([1, undefined, 2].join()); // 1,,2
🤔 순환 배열
const arr = [];
arr.push(1, 2, arr, 3);
console.log(arr); // <ref *1> [ 1, 2, [Circular *1], 3 ]
순환 배열은 배열 내의 아이템의 메모리 주소가 해당 배열의 메모리 주소를 가리키고 있는 것을 의미한다.
객체의 참조는 값에 의한 참조가 아닌 주소에 의한 참조이다.
이에 위 순환 배열같은 경우에서 두 번째 원소를 가리키면 이는 자기 자신의 메모리 주소를 가리키게 되기에
console.log(arr === arr[2]); // join해당 비교 연산자는 같은 true 를 가리키게 된다.
join 메소드는 순환 참조로 인해 생귀는 재귀적 문제를 방지하기 위해
순환 참조를 무시하며 순환 참조일 경우엔 빈 문자열을 반환한다.
const arr = [];
arr.push(1, 2, arr, 3);
console.log(arr.join(':')); // 1:2::3 Array.prototype.joinCustom = function (seperator = ',') {
const { length } = this;
if (!length) return '';
let result = '';
for (let index = 0; index < length; index += 1) {
let item = this[index];
item = item !== this ? item ?? '' : '';
result += item + (index < length - 1 ? seperator : '');
}
return result;
};길이가 없을 때는 빈 문자열을 반환하고
옵셔널 체이닝을 이용해 undefied , null 일 경우엔 빈 문자열
또한 순환 참조일 경우에도 빈문자열이 되게 삼항연산자로 변경해주었다.
그리고 seperator 도 마지막 글자가 아닐 때에만 추가 하도록 하였다.
삼항연산자 쓰니까 아주 건방지고 있어보인다.
Array.prototype.keys
Array.prototype.keys()
Array 인스턴스의 keys() 메서드는 배열의 각 인덱스에 대한 키를 포함하는
새로운 배열 반복자 (en-US) 객체를 반환합니다.keys()포인트
Array.prototype.keys()에서 희소배열의 경우 희소값은undefined로 취급한다.
const arr = [1, , 2];
const iterator = arr.keys();
console.log(iterator); // Object [Array Iterator] {}
console.log(iterator.next()); // { value: 0, done: false }
console.log(iterator.next()); // { value: 1, done: false }
console.log(iterator.next()); // { value: 2, done: false }
console.log(iterator.next()); // { value: undefined, done: true }
keys() 는 이터레이터 객체를 반환하는구나
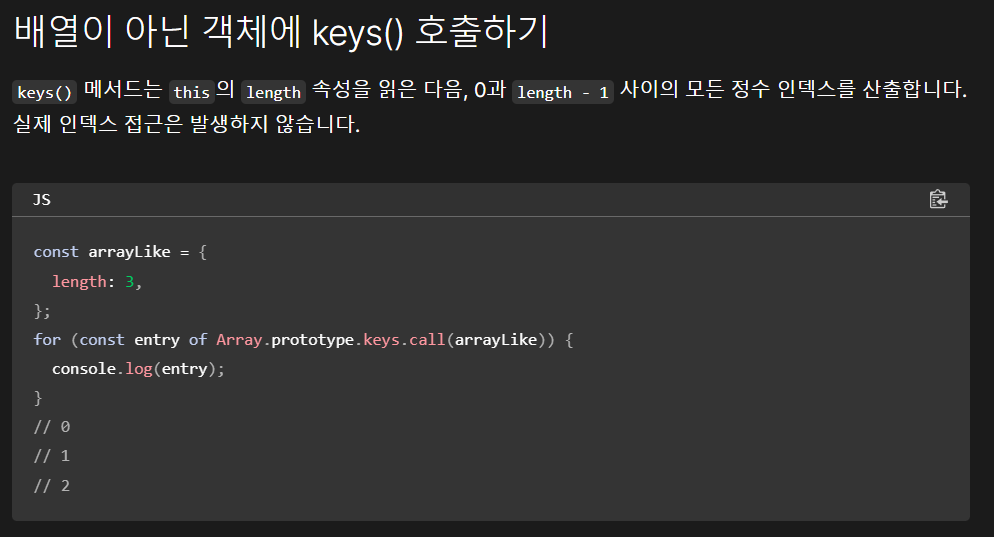
해당 프로토타입 메소드는 모두 Array Exotic Object 에 대해서 작동하기에 length 값만 알면 되겠구나 !
실제로 length 만 가지고 있는 객체에서도 다른 프로퍼티 신경 안쓰고 length 프로퍼티만 본다고 한다.
Array.prototype.keysCustom = function () {
  const { length } = this;
  let cur = 0;
  return {
    [Symbol.toStringTag]: 'Array Iterator',
    [Symbol.iterator]() {
      return this; /* for of 문 실행 도리 때 이터레이터 객체 자신을 반환*/
    },
    next() {
      return {
        value: cur < length ? cur : undefined,
        done: cur++ < length ? false : true,
      };
    },
  };
};
뿜
예전에 entires 에서 iterator 객체를 만들어봤으니 쉽게 풀렸다.
Array.prototype.lastIndexOf
Array.prototype.lastIndexOf()
Array 인스턴스의 lastIndexOf() 메서드는 배열에서 특정 요소를 찾을 수 있는
마지막 인덱스를 반환하거나, 해당 요소가 없으면 -1을 반환합니다.

배열은 fromIndex에서 시작하여 역방향으로 검색됩니다.lastIndexOf(searchElement)
lastIndexOf(searchElement, fromIndex)포인트
- 엄격한 동등 연산자
===를 사용한다. 그로 인해NaN값 같은 경우는 찾을 수 없다.
Array.prototype.lastIndexOfCustom = function (
  searchElement,
  fromIndex = this.length - 1,
) {
  const { length } = this;
  fromIndex = Math.floor(fromIndex); /* 정수 형변환 */

  if (fromIndex < -length) return -1;
  fromIndex = fromIndex < 0 ? length + fromIndex : fromIndex; /* 양수 형변환 */
  /* length 보다 길 경우 length - 1 */
  fromIndex = fromIndex > length ? length - 1 : fromIndex;

  for (let index = fromIndex; index > 0; index -= 1) {
    if (this[index] === searchElement) return index;
  }
  return -1;
};
뺌
Array.prototype.map
map() 메서드는 배열 내의 모든 요소 각각에 대하여 주어진 함수를 호출한 결과를
모아 새로운 배열을 반환합니다.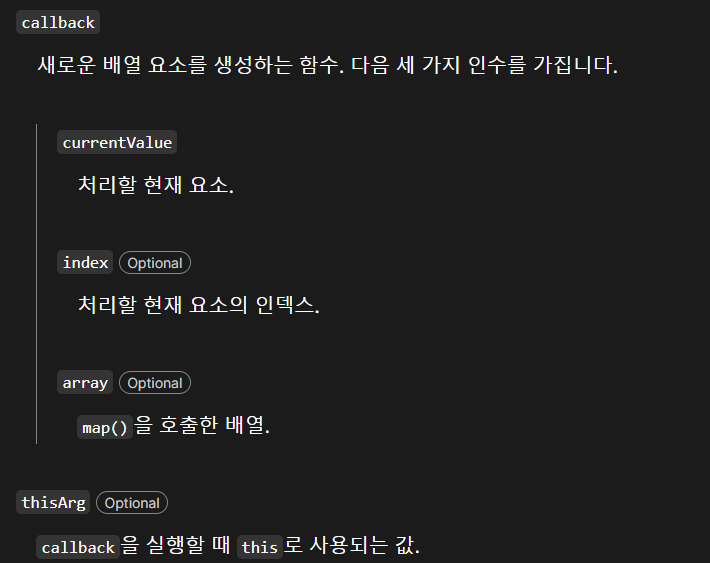
map 은 콜백 함수와 thisArg 를 인수로 받고
콜백 함수는 elem , index , thisArg 를 인수로 받는다.
const arr = [1, 2, , 3, 4];
arr.map((...rest) => {
  console.log(rest);
});
/**
[ 1, 0, [ 1, 2, <1 empty item>, 3, 4 ] ]
[ 2, 1, [ 1, 2, <1 empty item>, 3, 4 ] ]
[ 3, 3, [ 1, 2, <1 empty item>, 3, 4 ] ]
[ 4, 4, [ 1, 2, <1 empty item>, 3, 4 ] ]
*/
희소 배열의 경우 희소값은 인식하지 않는구나
Array.prototype.mapCustom = function (callbackFn, thisArg = this) {
  const { length } = this;

  const resultArr = [];
  for (let index = 0; index < length; index += 1) {
    if (index in thisArg) {
      const elem = thisArg[index];
      resultArr[index] = callbackFn(elem, index, thisArg);
    }
  }
  return resultArr;
};
뺌 ~ map 은 새로운 배열을 만들어 반환하기 때문에 resultArr 에 callbackFn 의 반환값을 담아주었다.
Array.of
Array.of() 메서드는 인자의 수나 유형에 관계없이 가변 인자를 갖는 새 Array 인스턴스를 만듭니다.

Array.of()와 Array 생성자의 차이는 정수형 인자의 처리 방법에 있습니다.
Array.of(7)은 하나의 요소 7을 가진 배열을 생성하지만
Array(7)은 length 속성이 7인 빈 배열을 생성합니다.Array.of(element0[, element1[, ...[, elementN]]])Array.ofCustrom = function (...elements) {
const resultArr = [];
for (let index = 0; index < elements.length; index += 1) {
resultArr[index] = elements[index];
}
return resultArr;
};뺌 ~ rest 문법으로 쉽게 구현했다.
그럼 ES6 이전엔 어떻게 했을까 ?
내부 프로퍼티인
[[arguments]]를 사용했을겁니다람쥐
Array.ofCustom = function () {
  const resultArr = [];
  for (let index = 0; index < arguments.length; index += 1) {
    resultArr[index] = arguments[index];
  }
  return resultArr;
};
Array.prototype.pop
Array.prototype.pop()
pop() 메서드는 배열에서 마지막 요소를 제거하고 그 요소를 반환합니다.arr.pop();pop 은 배열의 마지막 요소를 배열에서 제거하고 마지막 요소를 반환한다.
처음에 이걸 어떻게 구현할까, 어떻게 해야 상수시간만에 구현 할 수 있을까
좀 고민했다.
원래 같으면 배열 자체를 연결리스트로 구현하여 pop 을 상수시간만에 똑 떼어내서
연결하면 되는데 자바스크립트의 배열은 연결리스트보다 객체에 가깝기 때문에
상수시간만에 제거한다는 것 자체의 개념이 잘 감이 안왔다.
하지만 제맘대로인 언어에서는 제맘대로 행동해버리면 되쥬 ? ㅋㅋ
그래서 나도 제맘대로 행동했다.
JS 에서 어떤 배열의 인덱스가 아닌 값을 조회하면 undefined 가 나오지 않던가
그래서 나도 그렇게 제맘대로 행동했다.
Array.prototype.popCustom = function () {
  const { length } = this;
  if (!length) return undefined;

  const lastElement = this[length - 1];
  this[length - 1] = undefined;
  this.length -= 1;
  return lastElement;
};
ㅋㅋ 그냥 빼버리고 마지막 인덱스는 undefined 를 참조하게 만들어버렸다.
오마이갓
JS너는 계획이 다 있었구나밑에서
Array.prototype.reverse를 공부하면서 느꼈는데 그냥length값만 변경하면 자동으로 배열 자체가 변경이 된다.
왜냐면Array의 인덱스들은 항상length보다 1 작아야 하니까 !!
Array.prototype.popCustom = function () {
  const { length } = this;
  if (!length) return undefined;

  const lastElement = this[length - 1];
  this.length -= 1;
  return lastElement;
};
따라서 불필요하게 마지막 인덱스의 값을 undefined 로 할 필요가 없었다.
Array.prototype.push
push() 메서드는 배열의 끝에 하나 이상의 요소를 추가하고, 배열의 새로운 길이를 반환합니다. arr.push(element1[, ...[, elementN]])좀 더 로우레벨로 쓸 수 있게 레스트 문법도 안써야지
Array.prototype.pushCustom = function () {
  const { length: originalLength } = this;
  for (let index = 0; index < arguments.length; index += 1) {
    this[originalLength + index] = arguments[index];
  }
  return this.length;
};
Array.prototype.reduce
reduce() 메서드는 배열의 각 요소에 대해 주어진 리듀서 (reducer) 함수를
실행하고, 하나의 결과값을 반환합니다.arr.reduce(callback[, initialValue])콜백함수에 대한 개념이 부족했을 때 머리를 지끈거리게 했던
reduce
reduce 메소드는 콜백함수와 initialValue 를 선택적으로 받는다.
인수로 받은 콜백함수를 리듀스 함수라고 하기로 했을 때
리듀스 함수는 4가지 값을 인수로 받는다.
- 누산기 (
acc) - 현재 값 (
cur) - 현재 인덱스 (
idx) - 원본 배열 (
src)

Array.prototype.reduceCustom = function (callbackFn, initialValue) {
  const { length } = this;
  if (!length) return new Error('This array is empty!');
  let index = initialValue === undefined ? 1 : 0;
  let acc = initialValue === undefined ? this[0] : initialValue;

  for (index; index < this.length; index += 1) {
    if (index in this) {
      const cur = this[index];
      acc = callbackFn(acc, cur, index, this);
    }
  }
  return acc;
};
구현하기 전에 엄청 고민을 했는데
사용 명세서에 나온 기능들을 따라하다보니 생각보다 쉽게 구현이 되었다.
initialValue 값에 따라서 시작 부분과 맨 처음 acc 값만 다르게 설정해주고
순회해주면 되었다.
룰루랄라
Array.prototype.reduceRight
이건 Array.prototype.reduce 를 우측에서부터 돌리면 된다 :)
Array.prototype.reduceRightCustom = function (callbackFn, initialValue) {
  const { length } = this;
  if (!length) return new Error('This array is empty!');
  let index = initialValue === undefined ? length - 2 : length - 1;
  let acc = initialValue === undefined ? this[length - 1] : initialValue;

  for (index; index > -1; index -= 1) {
    if (index in this) {
      const cur = this[index];
      acc = callbackFn(acc, cur, index, this);
    }
  }
  return acc;
};
설명 생략!!
Array.prototype.reverse
reverse() 메서드는 배열의 순서를 반전합니다.
첫 번째 요소는 마지막 요소가 되며 마지막 요소는 첫 번째 요소가 됩니다.a.reverse();포인트
reverse는 희소값또한 포함하여 반전시킨다.
Array.prototype.reverseCustom = function () {
  const { length } = this;
  let firstIndex = 0;
  for (firstIndex; firstIndex < Math.floor(length / 2); firstIndex += 1) {
    const lastIndex = length - 1 - firstIndex;
    [this[firstIndex], this[lastIndex]] = [this[lastIndex], this[firstIndex]];
  }
  return this;
};
좌우값을 반전시키면 되니 배열의 중간부분을 기준으로 앞단과 뒷단의 값을 변경시켜주었다.
const arr1 = [1, 2, , 3, 4, 5];
const arr2 = [1, 2, , 3, 4, 5];

console.log(arr1.reverse()); // [ 5, 4, 3, <1 empty item>, 2, 1 ]
console.log(arr2.reverseCustom()); // [ 5, 4, 3, undefined, 2, 1 ]
다만 반복문에서 희소값 같은 경우는 reverse 메소드는 <1 empty item> 이 추가되는데
내가 만든 것은 undefined 로 평가되어 반전된다.
물론 인덱스로 접근하거나 배열의 길이는 두개 모두 같다.
흠 .. 희소값인지를 확인하는것은 쉬운데
희소값일 때 empty item 을 어떻게 추가 시킬까 .. 고민해봐야지
방법을 찾아냈다 !!
Array.prototype.reverseCustom = function () {
  const { length } = this;
  let firstIndex = 0;
  for (firstIndex; firstIndex < Math.floor(length / 2); firstIndex += 1) {
    const lastIndex = length - 1 - firstIndex;
    /* 희소값인 경우 기억하자 */
    const isEmpty = !(firstIndex in this && lastIndex in this);
    const emptyIndex = firstIndex in this ? firstIndex : lastIndex;

    [this[firstIndex], this[lastIndex]] = [this[lastIndex], this[firstIndex]];

    if (isEmpty) {
      delete this[emptyIndex];
    }
  }
  return this;
};
배열에서 length 프로퍼티 값을 변경시키지 않아 값을 삭제하면
해당 값이 empty item 이 된다 !!
그래서 isEmpty 로 first , last Index 중 empty item 인 것이 있는지 찾고
isEmpty 일 때 삭제할 인덱스를 emptyIndex 에 설정해주었다.
firstIndex , lastIndex값이 서로 뒤바뀐 후 삭제할 것이기에 반대로 설정했다.
const arr1 = [1, 2, , 3, 4, 5, 6];
const arr2 = [1, 2, , 3, 4, 5, 6];

console.log(arr1.reverse()); // [ 6, 5, 4, 3, <1 empty item>, 2, 1 ]
console.log(arr2.reverseCustom()); // [ 6, 5, 4, 3, <1 empty item>, 2, 1 ]
Array.prototype.shift
shift() 메서드는 배열에서 첫 번째 요소를 제거하고, 제거된 요소를 반환합니다.
이 메서드는 배열의 길이를 변하게 합니다..shift()shift 는 배열의 첫번째 값을 제거하고 길이를 변경한다.
shift 의 시간 복잡도는 O(N) 으로 첫 번째 값 이후의 것들을 모두 앞의 인덱스로 변경 시켜야하기 때문이다.
Array.prototype.shiftCustom = function () {
  const { length } = this;
  if (!length) return undefined;
  const firstValue = this[0];
  for (let index = 1; index < length; index += 1) {
    this[index - 1] = this[index];
    if (!(index in this)) {
      /* 이동시킨 값이 희소값이라면 제거하여 희소배열 형태 유지하기 */
      delete this[index - 1];
    }
  }
  this.length -= 1;
  return firstValue;
};
사실 연결리스트 형태로 구현되어 있다면 이것도 상수시간 만에 되는데 ..
자바스크립트는 객체 타입이기 때문에 으갸갹
만약 코테에서 해당 기능을 쓸거면 어레이를 상속받아 연결리스트 형태로 구현해둬야겠다.
⏰ 좀 더 빠르고 효율적으로 해볼까 ?
그런데 문득 궁금해졌다.
희소값인 경우를 유지하기 위해 index in this 를 많이 사용하는데
in 은 전체 프로퍼티를 모두 순회하는거 아닌가 ? 하는 생각이 들었다.
그래서 실제로 shift 와 shiftCustom 의 작동 시간을 확인해봤다.
const arr = Array.from({ length: 2 ** 25 }, (_, idx) => idx);
const startTime = new Date().getMilliseconds();
// arr.shift(); 27ms
arr.shiftCustom(); // 63ms
const endTime = new Date().getMilliseconds();
console.log(`${endTime - startTime}ms`);
이런식으로 비교해봤을 때 내가 만든 커스텀 함수가 약 2.5배정도 더 오래걸리는 모습을 볼 수 있다.
물론 기본적으로 구현된 함수들은 더 하위레벨의 언어로 구현되어 속도가 빠르다고 하기도 하지만
우선적으로 내가 만든 폴리필은 비효율적인 것들이 몇 가지 존재한다.
index in this를 모든 원소마다 해야하나 ?
차라리empty item인 애들을 미리 거른다음에 해쉬 형태로 저장하자
아니다 내가 틀렸다.
in메소드는 선형적으로 탐색하는 것이 아니라 해쉬 형태로 탐색한다고 한다.
처음에 해당 어레이가 가지고 있는 인덱스들을 선형적으로 탐색하여Map에 담아주고has메소드를 써보려고 했드니 그러니까300ms이상 걸리더라
우선은 지금이 최선인걸로 ..오히려 이럴 때는 자바스크립트의 배열이 객체 형태인 것이 더 도움이 되는 것 같기도 하다.
Array.prototype.slice
slice() 메서드는 어떤 배열의 begin 부터 end 까지(end 미포함)에 대한
얕은 복사본을 새로운 배열 객체로 반환합니다.

원본 배열은 바뀌지 않습니다.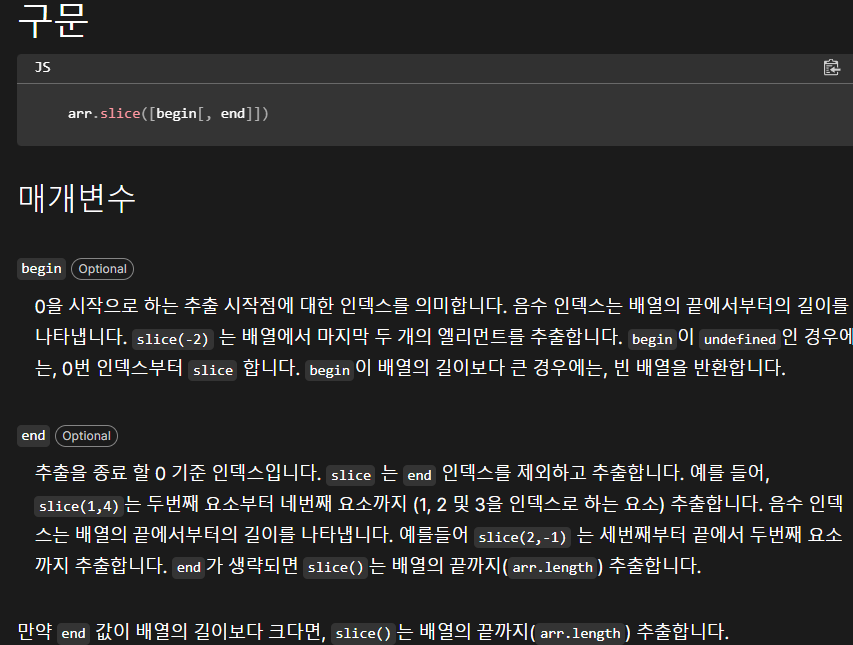
Array.prototype.sliceCustom = function (begin = 0, end = this.length) {
  const { length } = this;
  /* 정수 형변환 */
  [begin, end] = [Math.floor(begin), Math.floor(end)];
  /* 양수 형변환 */
  begin = begin < 0 ? length + begin : begin;
  end = end < 0 ? length + end : end;

  if (begin > length) return [];
  const resultArr = [];

  for (let index = 0; index < end - begin; index += 1) {
    resultArr[index] = this[index + begin];
    if (!(index + begin in this)) {
      delete resultArr[index];
    }
  }
  return resultArr;
};
희소값인 경우엔 제거해주자
형변환 하도 했더니 기계처럼 슉슉 나간다
Array.prototype.some
some() 메서드는 배열 안의 어떤 요소라도 주어진 판별 함수를
적어도 하나라도 통과하는지 테스트합니다.
만약 배열에서 주어진 함수가 true을 반환하면 true를 반환합니다.
그렇지 않으면 false를 반환합니다. 이 메서드는 배열을 변경하지 않습니다.
// 화살표 함수
some((element) => { /* … */ })
some((element, index) => { /* … */ })
some((element, index, array) => { /* … */ })
// 콜백 함수
some(callbackFn)
some(callbackFn, thisArg)
// 인라인 콜백 함수
some(function (element) { /* … */ })
some(function (element, index) { /* … */ })
some(function (element, index, array) { /* … */ })
some(function (element, index, array) { /* … */ }, thisArg)포인트
- 빈배열에선 항상
false- 희소값에 대해서는 콜백함수를 호출하지 않음
Array.prototype.someCustom = function (callbackFn, thisArg = this) {
  const { length } = thisArg;
  if (!length) return false
  for (let index = 0; index < length l index += 1){
    if (index in thisArg){
      if (callbackFn(thisArg[index] , index , thisArg)) return true
    }
  }
  return false
};
쉽게 뚝딱뚝딱
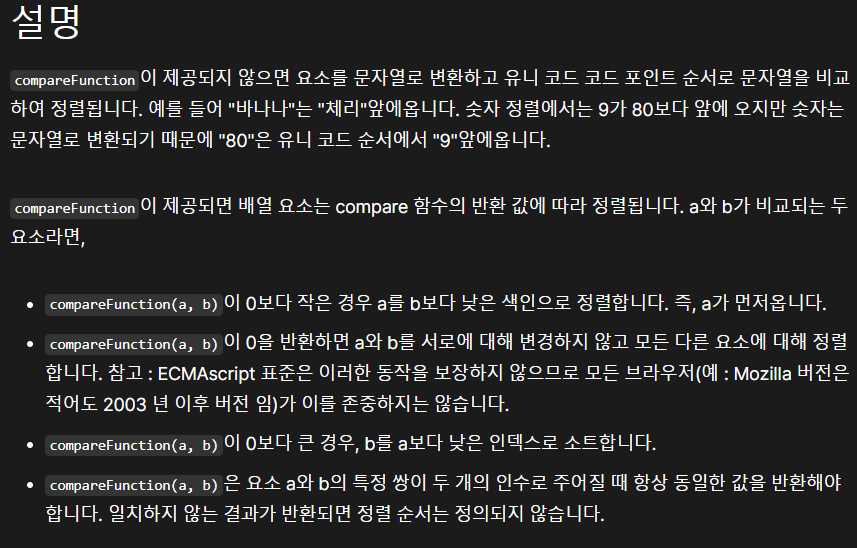
Array.prototype.sort
sort() 메서드는 배열의 요소를 적절한 위치에 정렬한 후 그 배열을 반환합니다.
정렬은 stable sort가 아닐 수 있습니다.
기본 정렬 순서는 문자열의 유니코드 코드 포인트를 따릅니다.

정렬 속도와 복잡도는 각 구현방식에 따라 다를 수 있습니다.arr.sort([compareFunction]);포인트
- 콜백함수로 들어가는
compareFucntion은 반환값에 따라 다르게 행동한다.
- 콜백함수가 지정해지지 않았을 때 배열의 아이템들은 문자열로 변환 후 유니코드 로 변경되어 계산된다.
Array.prototype.sortCustom = function (callbackFn) {
callbackFn =
callbackFn || ((a, b) => a.toString().localeCompare(b.toString()));
let trial = 0;
const recursion = (start, end) => {
for (let index = start; index < end; index += 1) {
if (callbackFn(this[index], this[index + 1]) <= 0) continue;
[this[index], this[index + 1]] = [this[index + 1], this[index]];
trial += end - 1;
if (start < end - 1) {
recursion(start, end - 1);
}
}
};
recursion(0, this.length - 1);
console.log(`전체 순회 횟수 : ${trial}`);
return this;
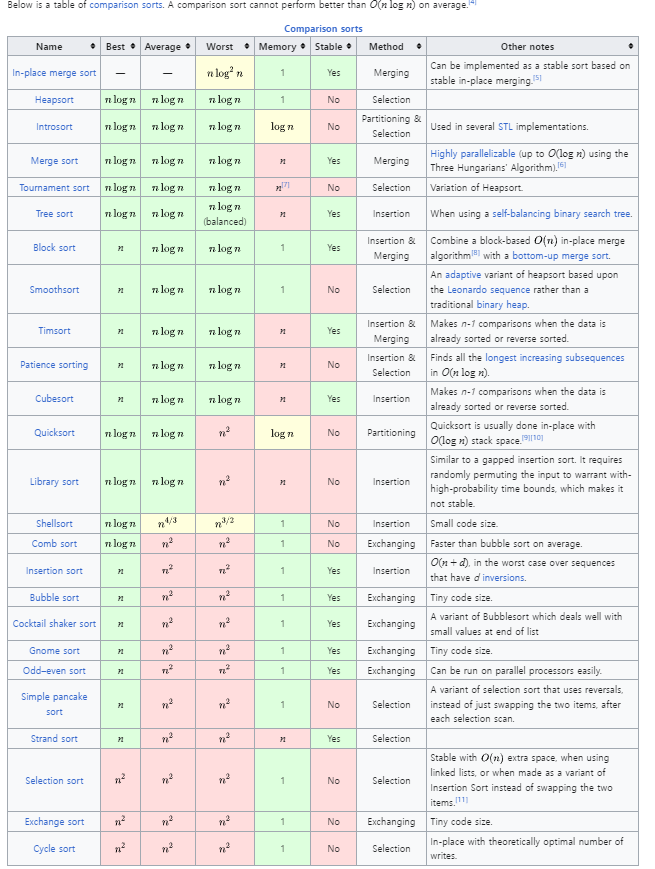
};정렬 알고리즘에 대해서 잘 몰라서 명시되어있는 설명대로 구현해봤는데
알고보니 이게 Bubble sort 라고 한다.
재밌다 나중에 정렬 알고리즘도 열심히 파봐야겠다 :)
지금 드는 생각은 굳이 반복문으로 다 돌아야하나 ? 바로 이전꺼만 확인하면 되지 않나 ..
이런 생각이 들기는 한다.
오 마이 갓 왜이렇게 많아 ㅋㅋㅋㅋㅋㅋㅋㅋㅋㅋㅋㅋㅋㅋㅋㅋㅋㅋ
테스트
const createRandomArray = () => {
  return Array.from({ length: 1000 }, () =>
    Math.floor(Math.random() * (1000 + 1 - 0)),
  );
};
다음처럼 랜덤한 어레이를 생성하는 함수를 만들고
const arr1 = createRandomArray();
const arr2 = [...arr1];
arr1.sort();
arr2.sortCustom();

console.log(arr1.every((num, index) => num === arr2[index])); //true

const arr3 = createRandomArray();
const arr4 = [...arr3];
arr3.sort((a, b) => b - a);
arr4.sort((a, b) => b - a);
console.log(arr3.every((num, index) => num === arr4[index])); //true
짜잔 통과한다 야호
Array.prototype.splice
splice() 메서드는 배열의 기존 요소를 삭제 또는 교체하거나 새 요소를 추가하여 배열의 내용을 변경합니다.array.splice(start[, deleteCount[, item1[, item2[, ...]]]])포인트
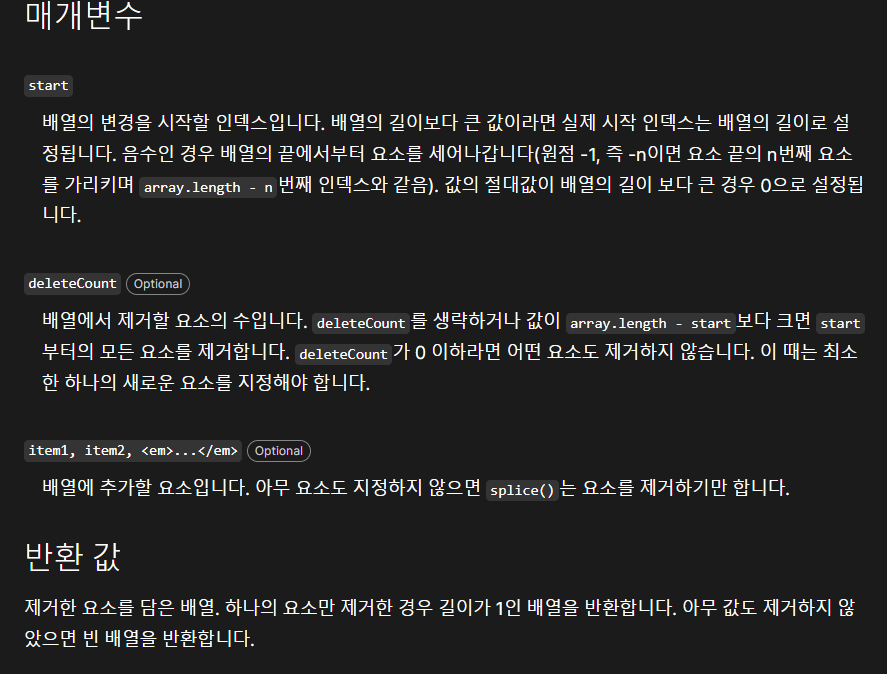
splice 메소드를 구현하기 위해서는 몇 가지 확인해야 하는 경우가 존재했다.
-
start의 범위가 적절한지 확인해야 한다.
배열의 길이보다start가 크면length로 , 0보다 작으면 절대값이 배열의 길이보다 큰지 아닌지에 따라0 or length + start로 변경해줘야 한다. -
deleteCount의 범위가 적절한지 확인해야 한다.
아무런 값도 들어오지 않으면start이후로 모두splice해버리는 것이니length + start로 설정해줘start이후의 값을 모두splice해야 한다.
음수 값이 들어오면 0으로 설정해줘야 한다.
혹은 deleteCount 가 배열의 길이보다 길다면 length - start 로 설정해줘야 한다.
splice할 범위에 따라 원소들의 인덱스를 이동 시켜야 하는데 이동 시키는 알고리즘이 다르다.
deleteCount > items.length인 경우
추가되는 것보다 더 많이 삭제되기 때문에splice되는 부분 이후의 인덱스들을 좌측으로 이동시켜줘야 한다. 그렇기에splice되는 배열의 시작 부분부터 배열의 마지막까지 이동하며 좌측으로 옮긴다.deleteCount < items.length인 경우
삭제되는 것보다 더 많이 추가되기 때문에splice되는 부분 이후의 인덱스들을 우측으로 이동시켜야 한다. 그렇기에 배열의 마지막부터splice되는 부분의 시작점까지 이동하며 우측으로 옮겨야 한다.모두 옮기는 범위는
|items.length - deleteCount|이다.
- 원소들을 삭제한 것이 아니라 인덱스값에 따라 변경시켰기 때문에 만약
deleteCount > items.length라면 배열의 길이를 조정해줘야 한다.
Array.prototype.spliceCustom = function (start, deleteCount, ...items) {
  const { length } = this;
  const returnArr = [];

  if (Math.abs(start) > length) {
    start = start > 0 ? length : 0;
  }
  start = start > 0 ? start : length + start;

  deleteCount = deleteCount || length - start;
  deleteCount = deleteCount < 0 ? 0 : deleteCount;
  deleteCount = Math.min(deleteCount, length - start);

  const offset = Math.abs(items.length - deleteCount); // start 이후의 원소들이 이동해야 하는 거리

  /** splice 시킬 배열들을 골라두기 */
  for (let index = 0; index < deleteCount; index += 1) {
    returnArr[index] = this[start + index];
  }

  /** items.length < deleteCount , items.length < deleteCount 경우에 따라
  기존 원소들의 인덱스 변경 방식 다르게
  */
  if (items.length < deleteCount) {
    for (let index = start; index < length - deleteCount; index += 1) {
      this[index] = this[index + deleteCount];
    }
  }

  if (items.length > deleteCount) {
    for (let index = length - 1; index >= start; index -= 1) {
      this[index + offset] = this[index];
    }
  }
  /** start부터 item 원소 설정해주기 */

  for (let index = 0; index < items.length; index += 1) {
    this[start + index] = items[index];
  }

  /* this.length를 변경하여 배열 설정해주기 */
  if (deleteCount > items.length) this.length -= items.length - deleteCount;
  return returnArr;
};
빼앰
하고나서 알쏭달쏭해서 테스트케이스들을 가지고 실험해봤다.
const testCustomSplice = () => {
  const arr = [1, 2, 3, 4, 5];
  const testCases = [
    // Case 1: 0 < start < length, deleteCount = 2, items = [7, 8]
    [2, 2, 7, 8],
    // Case 2: start < 0 < length, deleteCount = 3, items = [7, 8]
    [-2, 3, 7, 8],
    // Case 3: 0 < start < deleteCount < length, deleteCount = 3, items = [7, 8]
    [1, 3, 7, 8],
    // Case 4: start < 0 < deleteCount < length, deleteCount = 3, items = [7, 8]
    [-2, 3, 7, 8],
    // Case 5: 0 < start < length < deleteCount, deleteCount = 6, items = [7, 8]
    [1, 6, 7, 8],
    // Case 6: 0 < length < start < deleteCount, deleteCount = 3, items = [7, 8]
    [6, 3, 7, 8],
    // Case 7: 0 < start < length < items.length, deleteCount = 2, items = [7, 8, 9]
    [2, 2, 7, 8, 9],
    // Case 8: 0 < start < items.length < length, deleteCount = 2, items = [7, 8]
    [2, 2, 7, 8],
    // Case 9: 0 < length < start < items.length, deleteCount = 2, items = [7, 8]
    [6, 2, 7, 8],
    // Case 10: start < 0 < length, deleteCount = 2, items = [7, 8]
    [-2, 2, 7, 8],
    // Case 11: 0 < start < deleteCount < length, deleteCount = 3, items = [7, 8]
    [1, 3, 7, 8],
  ];

  for (let index = 0; index < testCases.length; index += 1) {
    const arr1 = [...arr];
    const arr2 = [...arr];
    const testCase = testCases[index];
    const return1 = arr1.splice(...testCase);
    const return2 = arr2.splice(...testCase);

    const arrResult = arr1.every((elem, idx) => elem === arr2[idx]);
    const returnResult = return1.every((elem, idx) => elem === return2[idx]);

    console.log(
      `testCase${index + 1} ${arrResult && returnResult ? '통과' : '실패'}`,
    );
    console.log(`정답 반환 값 : ${return1} 정답 배열 : ${arr1}`);
    console.log(`나의 반환 값 : ${return2} 나의 배열 : ${arr2}`);
  }
};

testCustomSplice();
모두 통과한다 룰루랄라
생각보다 오래걸렸다.
Array.prototype.unshift
Array.prototype.unshift()
unshift() 메서드는 새로운 요소를 배열의 맨 앞쪽에 추가하고, 새로운 길이를 반환합니다.

arr.unshift([...elementN]);
unshift 는 배열의 첫째 인덱스부터 ...elementN 에 담긴 값들을 담고
배열의 길이를 반환한다.
splice 에서 했던 것과 비슷하게 사용하면 될 것 같다.
Array.prototype.unshiftCustom = function (...elementN) {
  if (!elementN) return this.length;
  const offset = elementN.length;
  const { length } = this;
  for (let index = 0; index < length; index += 1) {
    this[index + offset] = this[index];
  }
  for (let index = 0; index < offset; index += 1) {
    this[index] = elementN[index];
  }
  return this.length;
};
쉽게 구현 완료 ~!!
Array.prototype.values
Array.prototype.values()
values() 메서드는 배열에서 각 인덱스에 대한 값을 순회하는 array iterator 객체를 반환합니다.

values()
Array.prototype.values === Array.prototype[Symbol.iterator]; // true
포인트
Array.prototype.values는Array내장에 구현된 이터리에터 객체와 같다.
Array.prototype.valuesCustom = function () {
  const { length } = this;
  let index = 0;
  return {
    [Symbol.iterator]() {
      return this;
    },

    next: () => {
      return {
        value: index < length ? this[index] : undefined,
        done: index++ < length ? false : true,
      };
    },
  };
};
Array.prototype.with
Array.prototype.with()
Array 인스턴스의 with() 메서드는 주어진 인덱스의 값을 변경하기 위해
대괄호 표기법을 사용하는 것의 복사 버전입니다.

이 함수는 지정된 인덱스의 요소가 지정된 값으로 대체된 새 배열을 반환합니다.

array.with(index, value)
특정 배열의 원소를 인덱스로 접근하여 값을 변경한 새 배열을 반환하는 메소드이다.
원본 배열은 변경되지 않는다.
이 때 형 변환이 이뤄진 index 값이 배열의 길이보다 클 경우 RangeError 를 반환한다.
Array.prototype.withCustom = function (index, value) {
  index = Math.floor(index);
  index = index < 0 ? this.length + index : index;
  if (index >= this.length) throw new RangeError(`${index} 는 안돼 ~! `);
  const resultArr = [];

  for (let idx = 0; idx < this.length; idx += 1) {
    if (idx === index) resultArr[idx] = value;
    else resultArr[idx] = this[idx];
  }
  return resultArr;
};
회고
하루에 3개씩 해서 이주일 정도 잡고 했었는데
너무 질질끄는 것 같아서 그냥 5일동안 이것만 잡고 끝내버렸다.
후련하기도 하면서 많이 배운 것 같기도 하고 재밌다.
하길 잘 했다.
나중에 시간이 나면 Promise 와 관련된 것들도 한 번 해봐야겠다. :)