
Client Component
클라이언트 컴포넌트란 , 인터렉티브한 UI 를 위해 서버 단에서 prerender 된 후 클라이언트 단에서 hydrate 되는 컴포넌트를 칭한다.
hydrate ?
Hydration is like watering the “dry” HTML with the “water” of interactivity and event handlers.
리액트의 코어 멤버인 Dan Abramov 가 설명한 hydrate 는 위 설명처럼 인터렉티브하지 않은 건조한 UI 를 인터렉티브한 촉촉한 UI 로 만드는 과정을 의미한다.
Client Compoent 의 이점
Client Component 는 클라이언트 단에서 재실행 된다는 점에서 다음과 같은 이점들을 같는다.
state와 같은 상태에 따라 값이 유동적으로 변하는 컴포넌트를 생성 할 수 있다.
Server Component 는 정적인 컴포넌트로, 인터렉션에 따라 실행되는 것이 아닌 서버에서 렌더링 된 결과를 보여주는 것에 집중한다.
하지만 Client Component 는 클라이언트 단에서 관리되고 변경되는 다양한 state 에 따라 인터렉티브한 UI 를 보여주기 위해 설계되었다.
이에 클라이언트 단에서 구동되는 자바스크립트 코드에 영향을 받는 Client Component 를 이용해 인터렉티브한 UI 를 생성 할 수 있다.
- 브라우저의
API를 이용 할 수 있다.
클라이언트 단에서 실행되는 자바스크립트 코드로 구성되어 있기 때문에 브라우저의 API 등을 이용 할 수 있다.
Pre-Render되기 때문에FCP까지의 시간이 짧다.
Client Component 라고 해서 클라이언트 단에서만 실행되는 것이 아니라, 서버 단에서 미리 Pre-Render 된다.
물론
Client단에서 실행되기 전까진 인터렉티브한UI를 만드는 것은 불가능하다.
이러한 Pre-Rendner 를 통해 FCP 까지의 시간이 짧아 UX 를 늘릴 수 있다.
Client Component 사용법
Client Component 는 'use client' 를 상단에 정의해줌으로서 사용 할 수 있다.
NextJS 는 'use client' 로 선언된 문구를 통해 각 컴포넌트 모듈들의 boundary 를 정의한다.
boundary 를 정의한다 ?
NextJS 에서의 컴포넌트들은 모두 export , import 로 불러오는 module 형태이다.
이 때 각 module 들의 import 를 통해 각 컴포넌트들의 의존성을 파악 할 수 있다.
NextJS 는 'use client' 로 정의된 컴포넌트에서 import 해오는 모듈들을 모두 Client Component 로 정의한다.
이렇게 의존성에 따라 Client , Server Component 를 구분하는 boundary 를 정하는 이유는 사실 매우 명확하다.
'use client';

import { useState } from 'react';

import FancyButton from '@/src/components/FancyButton';
import FancyCount from '@/src/components/FancyCount';

const Home = () => {
  const [count, setCount] = useState<number>(0);
  const handleClick = () => setCount(count + 1);
  return (
    <>
      <FancyCount>{count}</FancyCount>
      <FancyButton handleClick={handleClick} />
    </>
  );
};

export default Home;
다음과 같이 'use client' 로 정의된 Home 컴포넌트는 Client Component 이다.
이 때 Home 컴포넌트에선 클라이언트 단에서 필요한 로직 (state , eventHandler) 들을 import 한 컴포넌트들에게 내려주고 컴포넌트를 구성한다.
이에 NextJS 는 암묵적으로 Client Component 와 의존성이 있는 모든 컴포넌트는 모두 Client Component 로 정의해버린다.
/* FancyCount 는 암묵적으로 use client 로 선언된다. */
import styled from 'styled-components';

const FancyCountView = styled.h1`
  color: tomato;
`;

const FancyCount = ({ children }: { children: number }) => {
  return <FancyCountView>{children}</FancyCountView>;
};

export default FancyCount;
만약 암묵적으로 정의해버리지 않고 FancyCount , FancyButton 등을 기본값인 서버 컴포넌트로 정의해버린다면 상태 값에 따라 렌더링 되는 값이 변경되거나
onClick 이벤트를 부착하는 행위를 할 때 마다 컴파일 에러가 발생하게 될 것이다.
이렇게 Client Component 와 의존성이 존재하는 컴포넌트를 Client Component 로 암묵적으로 정의해주는 특성으로 인해 하위 컴포넌트들에서 불필요하게 'use client' 로 정의해주는 불필요한 반복을 하지 않아도 된다.
Client Component 는 어떻게 렌더링 될까 ?
어떻게 서버 컴포넌트와 클라이언트 컴포넌트가 브라우저 단에서 렌더링 되는지를 비교하기 위해
서버 컴포넌트와 클라이언트 컴포넌트들을 이용한 페이지를 생성해보았다.
'use client';

import ServerComponent from '@/src/components/ServerComponent';
import ClientComonent from '@/src/components/ClientComponent';

const Home = () => {
  return (
    <>
      <ServerComponent /> // 서버 컴포넌트
      <ClientComonent /> // 클라이언트 컴포넌트
    </>
  );
};

export default Home;
const boxStyle = {
padding: '30px',
backgroundColor: '#aaa',
margin: '16px',
};
const ServerComponent = () => {
return (
<div style={{ ...boxStyle }}>
<h1>서버 컴포넌트</h1>
</div>
);
};
export default ServerComponent;'use client';
import { useState } from 'react';
const boxStyle = {
padding: '30px',
backgroundColor: '#aaa',
margin: '16px',
};
const ClientComonent = () => {
const [count, setCount] = useState<number>(0);
return (
<div style={{ ...boxStyle }}>
<h1>{count}</h1>
<button onClick={() => setCount(count + 1)}>Click Me!</button>
</div>
);
};
export default ClientComonent;이후 서버에서 받은 HTML 파일의 생김새를 살펴보자
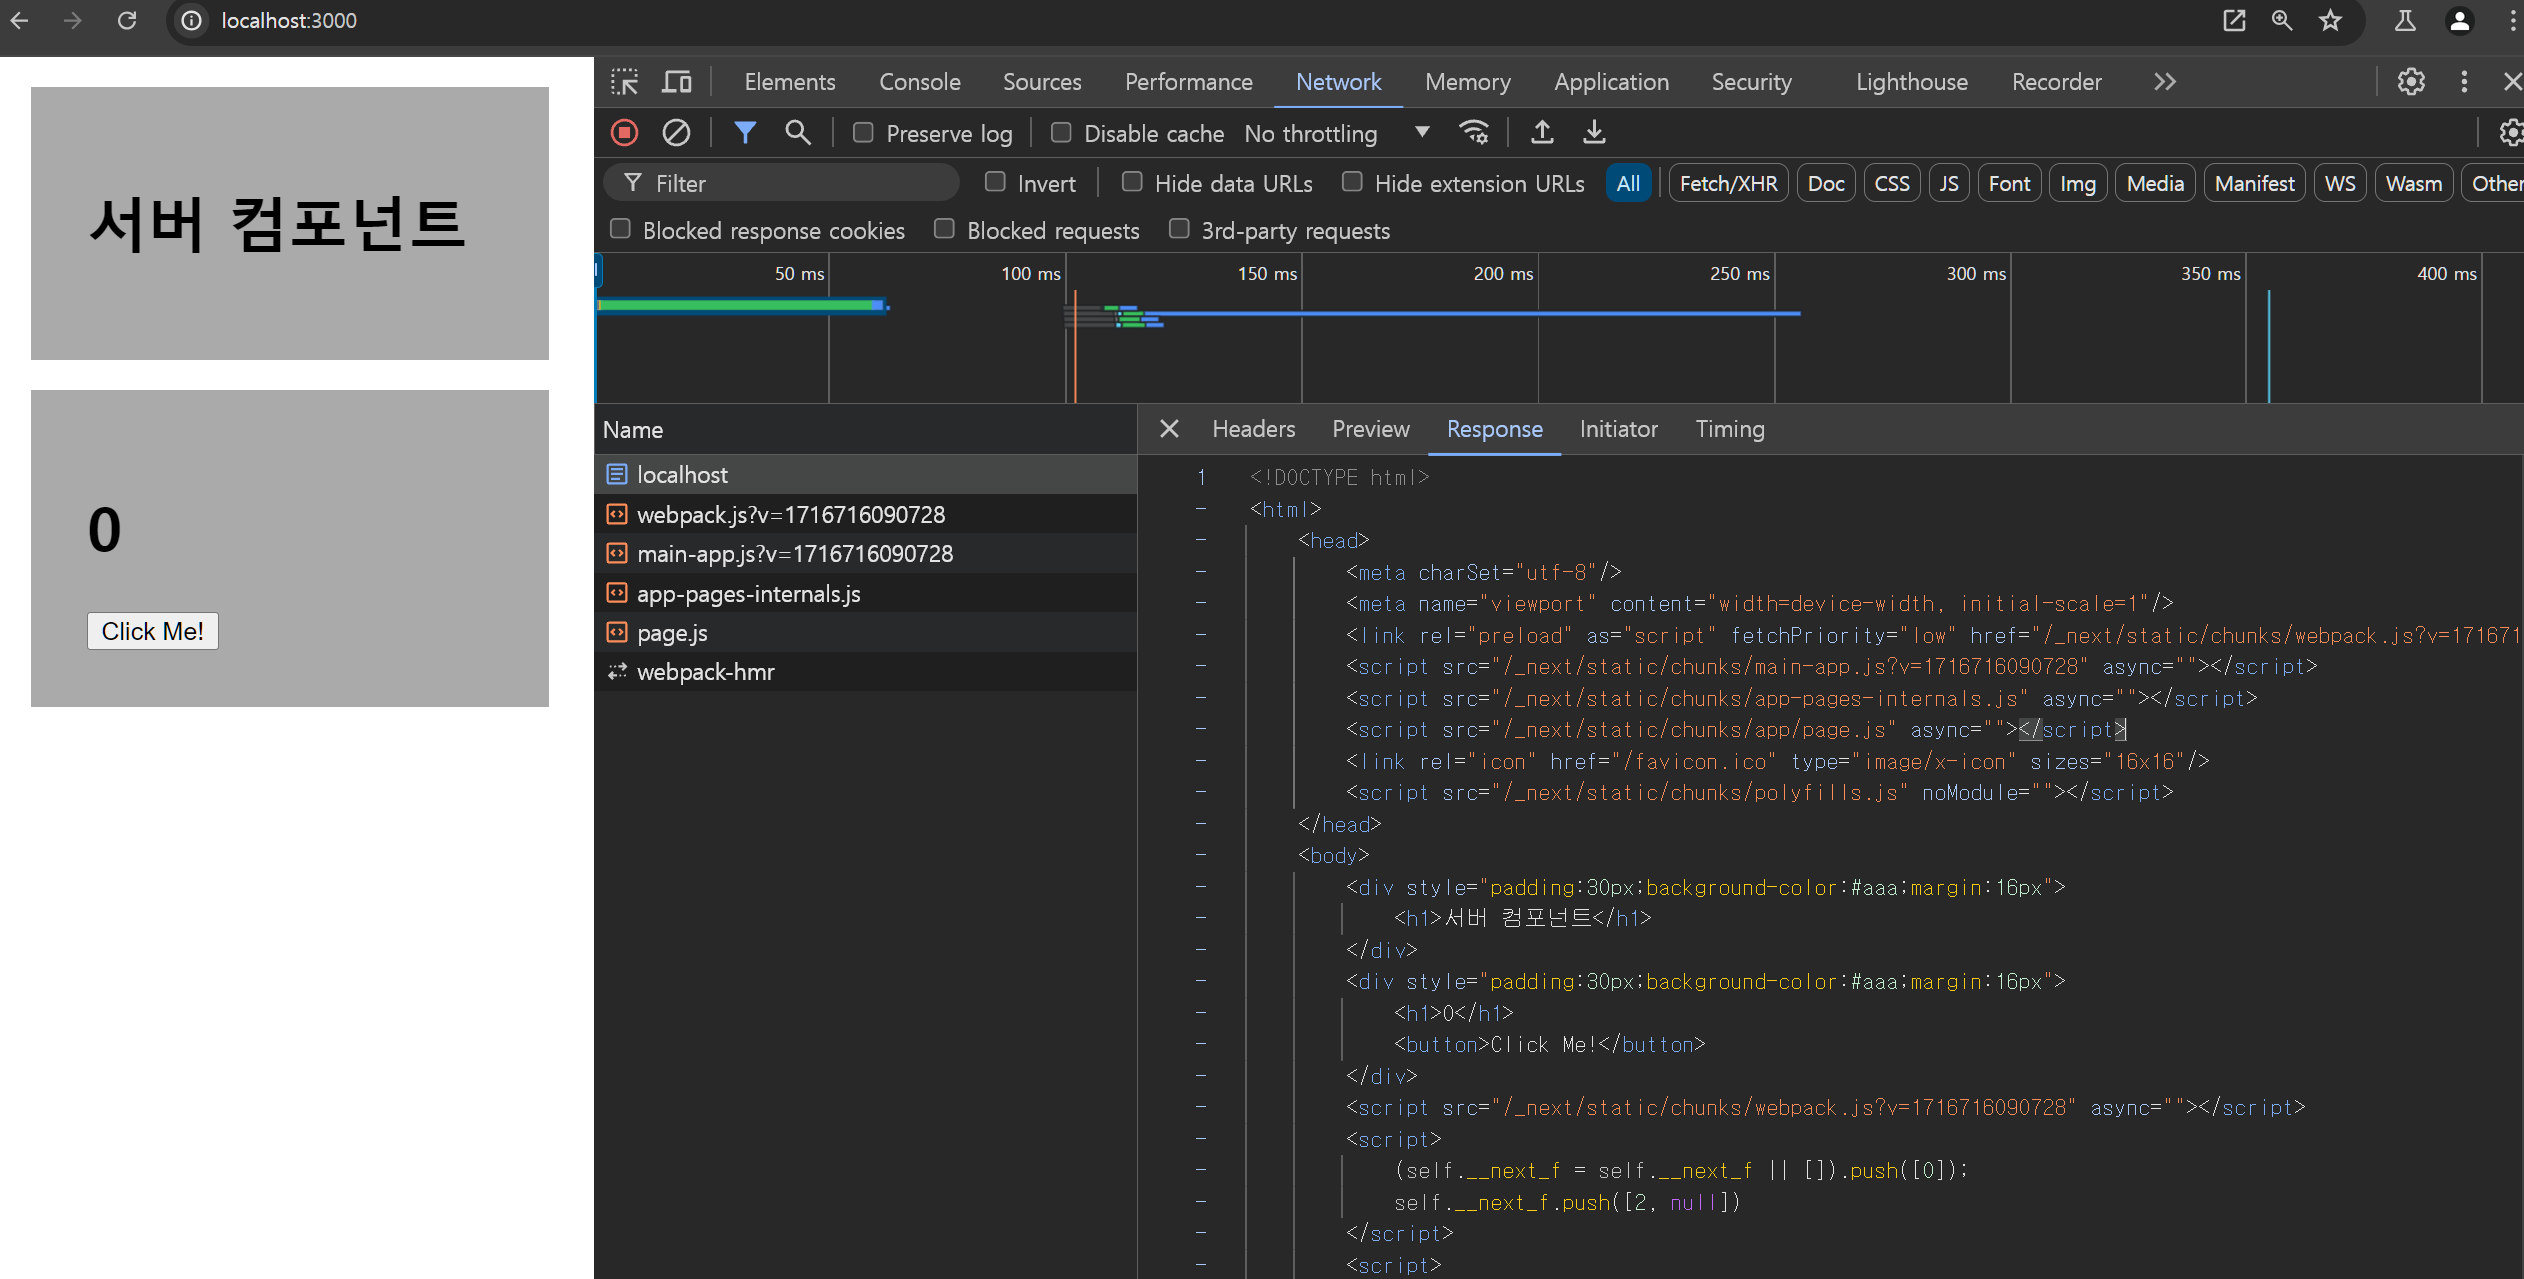
파일을 살펴보면 html 파일은 서버컴포넌트, 클라이언트 컴포넌트 모두 상관 없이 작성되어 있는 모습을 볼 수 있다.
이는 클라이언트 컴포넌트도 모두 서버 단에서 Pre - Render 된다는 것을 의미한다.
좀 더 스크롤을 내려 script 태그들을 살펴보자
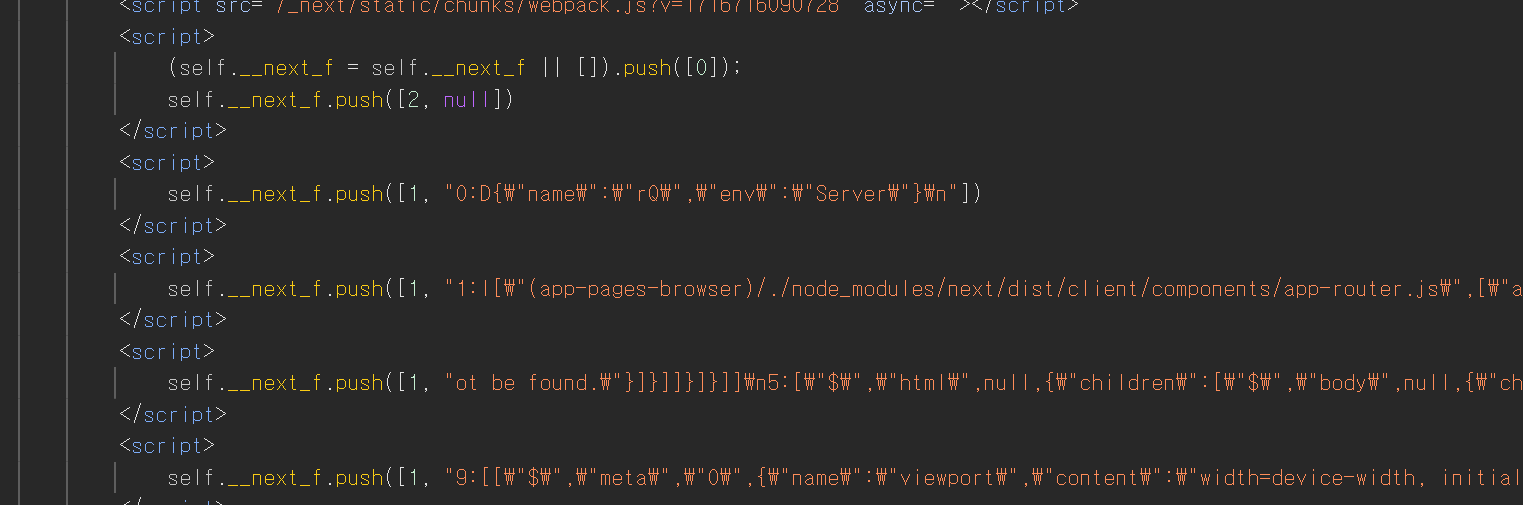
script 태그들을 살펴보면 self.__next_f.push 와 함께 직렬화된 문자열을 볼 수 있다.
바로 이 문자열들이 RSC Payload 들로 Client Component 들이 hydrate 되기 위한 로직들을 의미한다.
처음 html 파일들이 parsing 되어 hydrate 되기 전의 파일들이 브라우저에서 렌더링 된 후
script 태그들이 실행되며 Client Component 들이 hydrate 되어 interative UI 를 구성한다.
RSC Payload 에 담겨있는 로직들
결국 Client Component 는 RSC Payload 가 실행되면서 Interactive UI 로 hydrate 되는 것임을 알 수 있었다.
그럼 RSC Payload 엔 어떤 것들이 담겨있을까 ?
컴포넌트의 메타데이터 및 환경정보
[
  {
    name: '',
    env: 'Server',
  },
  {
    name: 'RootLayer',
    env: 'Server',
  },
  {
    name: '',
    env: 'Server',
  },
];
직렬화된 RSC Payload 를 병렬화 하면 다음과 같이 컴포넌트들의 메타데이터와 env 를 통해 환경을 확인 할 수 있다.
컴포넌트의 상태와 props
[
  {
    "name": "NotFound",
    "env": "Server"
  },
  {
    "name": "NotFound",
    "env": "Server",
    "props": {
      "children": [
        {
          "tag": "title",
          "props": {
            "children": "404: This page could not be found."
          }
        },
        {
          "tag": "div",
          "props": {
            "style": {
              "fontFamily": "system-ui,Segoe UI,Roboto,Helvetica,Arial,sans-serif,Apple Color Emoji,Segoe UI Emoji",
              "height": "100vh",
              "textAlign": "center",
              "display": "flex",
              "flexDirection": "column",
              "alignItems": "center",
              "justifyContent": "center"
            },
            "children": [
              {
                "tag": "div",
                "props": {
                  "children": [
                    {
                      "tag": "style",
                      "props": {
                        "dangerouslySetInnerHTML": {
                          "__html": "body{color:#000;background:#fff;margin:0}.next-error-h1{border-right:1px solid rgba(0,0,0,.3)}@media (prefers-color-scheme:dark){body{color:#fff;background:#000}.next-error-h1{border-right:1px solid rgba(255,255,255,.3)}}"
                        }
                      }
                    },
                    {
                      "tag": "h1",
                      "props": {
                        "className": "next-error-h1",
                        "style": {
                          "display": "inline-block",
                          "margin": "0 20px 0 0",
                          "padding": "0 23px 0 0",
                          "fontSize": 24,
                          "fontWeight": 500,
                          "verticalAlign": "top",
                          "lineHeight": "49px"
                        },
                        "children": "404"
                      }
                    },
                    {
                      "tag": "div",
                      "props": {
                        "style": {
                          "display": "inline-block"
                        },
                        "children": [
                          {
                            "tag": "h2",
                            "props": {
                              "style": {
                                "fontSize": 14,
                                "fontWeight": 400,
                                "lineHeight": "49px",
                                "margin": 0
                              },
                              "children": "This page could not be found."
                            }
                          }
                        ]
                      }
                    }
                  ]
                }
              }
            ]
          }
        }
      ]
    }
  }
]
다음과 같은 계층 구조로 컴포넌트들이 가지는 정보들을 담은 문서이다.
컴포넌트의 계층 구조
[
  {
    "name": "App",
    "children": [
      {
        "name": "Header"
      },
      {
        "name": "Main",
        "children": [
          {
            "name": "Sidebar"
          },
          {
            "name": "Content"
          }
        ]
      }
    ]
  }
]
각 컴포넌트들의 이름과 children 을 통해 계층 구조를 표현한다.
클라이언트 사이드 이벤트 핸들러
[
  {
    name: 'ButtonComponent',
    env: 'Client',
    events: {
      onClick: 'handleClick',
    },
  },
];
다음과 같이 컴포넌트의 이름과 환경 , 장착할 이벤트 핸들러 정보를 담은 payload 도 존재한다.
스타일 및 스크립트 로딩 정보
[
  {
    "styles": [
      "/_next/static/css/main.css"
    ],
    "scripts": [
      "/_next/static/js/main.js"
    ]
  }
]
라우터 정보
[
  {
    "currentRoute": "/profile",
    "query": {
      "userId": "123"
    }
  }
]
컴포넌트에 대한 정보 뿐 아니라 라우팅 될 라우터의 정보도 RSC Payload 에 존재한다.
이러한 RSC Payload 를 통해 hydrate 가 진행되고 라우팅 기능이 존재하는 인터렉티브한 웹 앱을 생성 할 수 있다.
RSC Payload 를 이용해 hyrate 되는 과정
NextJS 에서도 React 의 hydrate 를 이용한다고 이야기 한다.
React 의 hydrate 를 먼저 살펴보자
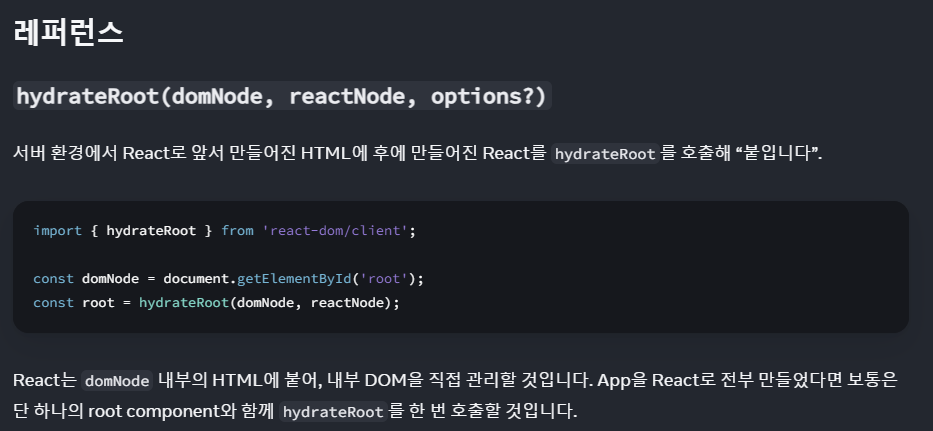
hyrateRoot 는 Actual DOM 에 존재하는 node 를 Virtual DOM 의 root Node 로 선택한 후 Virtual DOM 들을 부착시키는 형태이다.
예시를 통해 살펴보자
<!DOCTYPE html>
<html>
  <head>
    <title>My Next.js App</title>
  </head>
  <body>
    <div id="__next">
      <div>
        <h1>Welcome to My App</h1>
        <div id="content">
          <p>Loading...</p>
        </div>
      </div>
    </div>
    <script>
      window.__NEXT_DATA__ = {
        props: {
          pageProps: {
            initialData: 'Hello, world!',
            initialCount: 5,
          },
        },
        page: '/',
        query: {},
        buildId: 'development',
        assetPrefix: '',
        isFallback: false,
        gssp: true,
        appGip: false,
        scriptLoader: [],
      };
    </script>
    <script>
      self.__next_f.push([
        1,
        '0:D{"name":"WelcomeComponent","env":"Server"}\n1:D{"name":"CounterComponent","env":"Client","initialState":{"count":5}}\n2:D{"name":"FooterComponent","env":"Server"}\n',
      ]);
    </script>
  </body>
</html>
다음과 같은 html 파일과 RSC Payload 들이 담긴 html 파일을 받았다고 가정했을 때
우선적으로 html 의 문서를 토대로 FCP 가 일어나게 된다.
이후 RSC Payload 를 파싱하여 Virtual DOM 을 생성하게 된다.
// 클라이언트 사이드 코드 (React 컴포넌트)
import React, { useState } from 'react';
import ReactDOM from 'react-dom';

const WelcomeComponent = ({ message }) => <h1>{message}</h1>; // 서버 컴포넌트

const CounterComponent = ({ initialCount }) => {
  // 클라이언트 컴포넌트
  const [count, setCount] = useState(initialCount);

  return (
    <div>
      <p>Count: {count}</p>
      <button onClick={() => setCount(count + 1)}>Increment</button>
    </div>
  );
};

const FooterComponent = () => <footer>Footer content here</footer>;
다음과 같이 서버 컴포넌트와 클라이언트 사이드 컴포넌트들이 혼재하여 존재한다고 했을 때
RSC Payload 를 파싱한 브라우저는 RSC Payload 에 존재하는 정보들을 전역 객체인 window 에 저장하게 된다.
// 초기 데이터
const initialData = window.__NEXT_DATA__.props.pageProps.initialData;
const initialCount = window.__NEXT_DATA__.props.pageProps.initialCount;

hydrateRoot(
  document.getElementById('__next'),
  <div>
    <WelcomeComponent message='Welcome to My App' />
    <CounterComponent initialCount={initialCount} />
    <FooterComponent />
  </div>,
);
이후 저장되어 있는 데이터들을 가지고 와 hydrateRoot 를 이용해 Virtual DOM 을 생성한다.
이 때
Virtual DOM을 생성하기 위해Server Component들도 초기에 한 번은 렌더링 된다. 하지만 이후엔stateless한 컴포넌트들이기 때문에re-rendering이 일어나지 않는다.
Client Component이하에 존재하는 모든 컴포넌트는Client Component가 되는boundary를 갖는다고 했던 것을 기억 할 수 있다.
이는Virtual DOM에서Client Component가 리렌더링 되면 하위에 존재하는 모든 컴포넌트가 리렌더링 되기 때문이다.
이런 hyrate 과정을 통해 html 태그에서 Pre-render 된 태그들은 Virtual DOM 에서 hydrate 된 컴포넌트와 1:1 매칭이 되기 때문에 인터렉티브한 컴포넌트가 될 수 있다.