우리가 보내는 모든 Packet Structure는
Header와 Payload로 이뤄져 있습니다.

실제 데이터는 당연히 Payload로 이동되지만,
이 데이터가 '어디로' 향해야 할지, 아니면 데이터가 '몇 byte'인지 등의 추가적, 부수적인 정보는 전부 Header가 담고 있죠.
Header에는
- Physical Header (물리 계층)
- MAC Header (DLL 계층)
- LLC Header (DLL 계층 상위)
- IP Header (네트워크 계층)
- TCP Header (전송 계층)
등이 있습니다.
Header Class
당연히 ns3에도 Header가 구현되어 있습니다.
그런 의문 가진 적 없나요?
UdpEchoServer같은 경우는 설정을 Port만 담아서 설정하는데,
어떻게 받는 패킷을 Client에게 그대로 Echo-back 해줄까?
그게 다 Header 덕분입니다.
ns3에서 header는 ns3::Header class에 구현되어 있습니다.
각 Header class는 필수적으로 일부 method를 Override 해야 합니다.
가령,
Serialize(): 헤더를 Byte Stream으로 변환Deserialize(): Byte Stream을 다시 헤더로 변환Print(): 디버깅용 출력 메서드
등등 입니다.
또, 패킷에 AddHeader(), RemoveHeader() 등의 메서드로 헤더를 붙이고 떼는 등,
Packet class와 쌍을 이뤄 작동합니다.
Methods of Header Class
이제 헤더 클래스가 담고 있는 method들을 알아봅시다.
TypeId Header::GetTypeId(void)
헤더도 TypeId가 존재합니다.
당연히, 그걸 가져오기 위한 Getter 메서드가 필요하죠.
TypeId Header::GetTypeId(void) {
	static TypeId tid = TypeId ("ns3::Header")
    .SetParent<Chunk> ()
    .SetGroupName("Network")
    ;
    return tid;
}
다음과 같이 구현되어 있습니다.
virtual void Header::Print(std::ostream& os) const
Packet::Print에서 Header의 내용을 ascii data로 출력할 수 있게 쓰입니다.
virtual void Header::Serialize(Buffer::iterator start) const
Packet::AddHeader가 Packet의 Byte Buffer에 헤더를 저장하게 하도록 쓰입니다.
헤더는 Byte Stream으로 바뀌어 Byte Buffer에 저장됩니다.
start는 Buffer::Iterator 타입으로, 버퍼 내에서 헤더를 쓸 위치를 가르키는 포인터입니다.
이 함수는 필드 값을 Byte 단위로 변환해서, start 위치에 쓰며,
WriteHtonU32()는 32-bit 정수 값으로, Big-Endian 방식으로 쓴다는 뜻이고,
WriteHtonU64()는 64-bit 정수 값으로 쓰겠다는 뜻입니다.
Hton은 Host to Network의 줄임말이래요.
virtual uint32_t Header::GetSerializedSize(void) const
Packet::AddHeader에서 쓰고,
Serialize할 때 필요한 Byte 수를 반환합니다.
Buffer를 얼마나 확보해야 할지 알기 위해 필요하죠.
위에서 WriteHtonU32를 썼는지, WriteHtonU64를 썼는지에 따라 반환값이 다릅니다.
virtual uint32_t Header::Deserialize(Buffer::Iterator start)
Packet::RemoveHeader에서 사용합니다.
패킷의 Byte Buffer로부터 헤더를 뽑아냅니다.
start는 Buffer::Iterator 타입으로 헤더가 저장된 시작 위치를 가르키구요.
읽어낸 Buffer의 byte 수를 반환합니다.
가령 버퍼에서 읽을 때, ReadU8(), ReadNtohU32(), ReadNtohU64() 등 여러가지
함수를 써서 읽을 수 있는데,
거기에 따라 반환값이 달라지겠죠.
앞서 확인한 Serialize, Deserialize, GetSerializedSize는 전부
가상 함수입니다. 가상 함수라는 건, 추상 클래스이고,
틀만 잡아줄 테니 나머지는 자식들이 구현하렴.
이라는 뜻이에요.
즉? 전부 우리가 다 구현해야 한다는 뜻이죠.
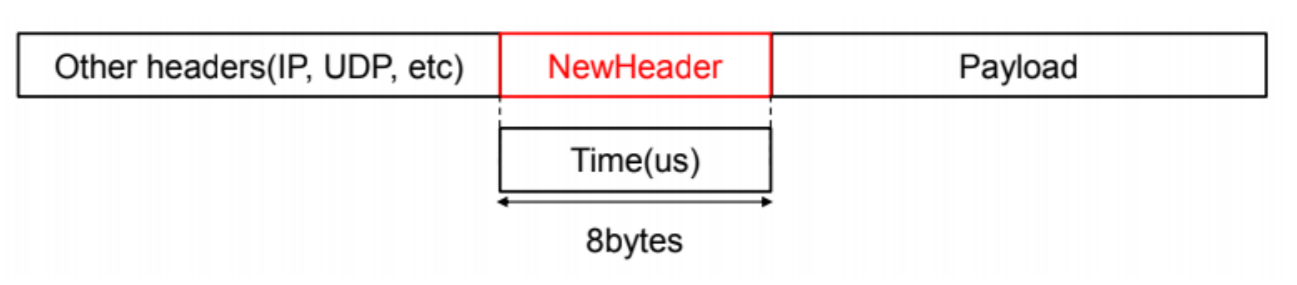
Let's Make our New Header!
New Application을 만들어봤듯, New Header도 하나 만들어볼까요?
Application Header이고, payload 이전에 current time을 붙여서,
end-to-end delay를 시간의 차이로 하여금 측정할 수 있게 도와주는 헤더를
붙여봅시다.
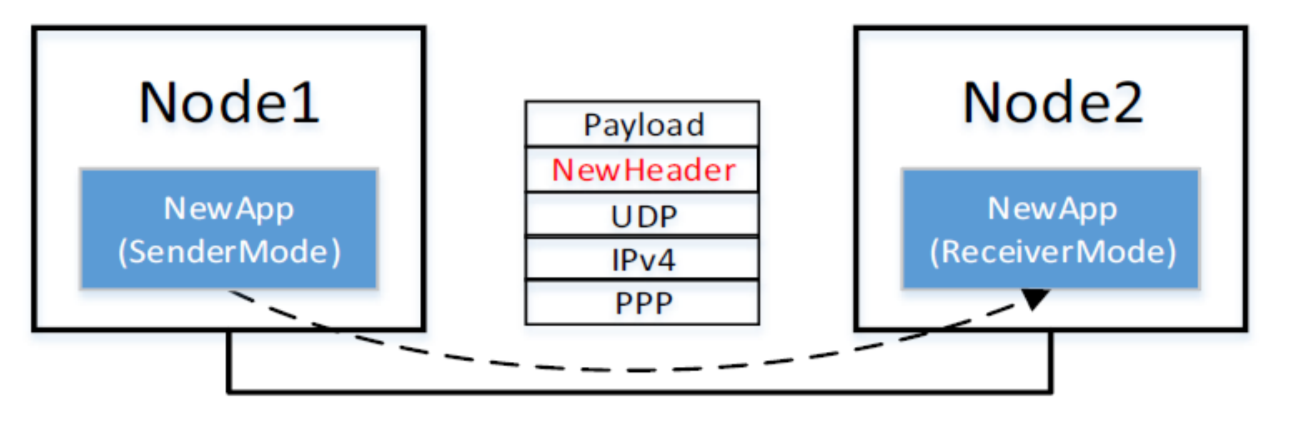
앞서 만든 NewApp에서 해당 헤더를 쓸 수 있게끔 해볼거에요.
헤더를 직접 만들어서 집어넣기만 하면 작동하는게 아니라,
그 전에 Dependency를 좀 건드릴 필요가 있습니다.
ns3가 빌드를 할 때, 어디서 어떤 파일들을 뽑아서 빌드해라, 라는걸 자기가 알아서 할 수는 없잖아요?
그걸 적어놓은 wscript라는 파일이 있는데, 거길 먼저 만져줘야 합니다.
new-header.h
#ifndef NEW_HEADER_H
#define NEW_HEADER_H

#include "ns3/header.h"
#include "ns3/nstime.h"
#include "ns3/simulator.h"

namespace ns3
{

    class NewHeader : public Header
    {
    public:
        static TypeId GetTypeId(void);
        virtual TypeId GetInstanceTypeId(void) const;

        virtual void Print(std::ostream &os) const;
        virtual uint32_t GetSerializedSize(void) const;
        virtual void Serialize(Buffer::Iterator start) const;
        virtual uint32_t Deserialize(Buffer::Iterator start);

        void SetTime(void);
        uint64_t GetTime(void) const;

    private:
        uint64_t m_time;
    };
}

#endif
앞서 언급했던, Header class라면 반드시 갖춰야 할 함수들이 다 보이죠.
Print, GetSerializedSize, Serialize, Deserialize가 보입니다.
그 외에 ns3객체라면 거의 필수로 있어야 하는 GetTypeId나 GetInstanceTypeId도 보입니다.
나머지는 커스텀 필드용 method들이겠네요.
new-header.cc
    TypeId NewHeader::GetTypeId(void) {
        static TypeId tid = TypeId("ns3::NewHeader")
        .SetParent<Header>()
        .AddConstructor<NewHeader> ();
        return tid;
    }
    TypeId NewHeader::GetInstanceTypeId(void) const {
        return GetTypeId();
}TypeId를 반환하는 평범한 GetTypeId 함수입니다.
고유 식별자가 ns3::NewHeader이고, Header를 상속받으며, 생성자를 만든 정도가 보이네요.
    void NewHeader::SetTime(void) {
        m_time = Simulator::Now().GetMicroSeconds();
    }
    uint64_t NewHeader::GetTime(void) const {
        return m_time;
    }
이제 우리 헤더가 하는 일인 SetTime과 GetTime입니다.
이 함수가 불린 그 시간을 m_time 멤버변수에 저장합니다.
    uint32_t NewHeader::GetSerializedSize(void) const {
        return 8;
    }
    void NewHeader::Serialize(Buffer::Iterator start) const {
        start.WriteHtonU64(m_time);
    }
    uint32_t NewHeader::Deserialize (Buffer::Iterator start) {
        Buffer::Iterator i = start;
        m_time = i.ReadNtohU64();
        return i.GetDistanceFrom(start);
    }
Serialize 3형제, Serialize, Deserialize, GetSerializedSize입니다.
지금은 WriteHtonU64와 ReadNtohU64를 쓰고 있기 때문에,
GetSerializedSize의 반환치로 8을 주고 있는 모습이에요.
애초에 맨 처음에 정의하기로도 우리 헤더를 8byte어치로 정의하기도 했구요.
    void NewHeader::Print (std::ostream &os) const {
        os << "m_time = " << m_time << "\n";
    }
마지막으로 Print입니다.
어느 stream으로 입력이 들어올지 모르니, os <<로 출력하는 모습입니다.
Let's Apply our New Header!
이제 이 간단한 New Header를 적용해봅시다.
#include ...
#include "udp-echo-client.h"

#include "ns3/new-header.h"
기존의 udp-echo-client.cc에 적용을 해봅시다.
새 헤더를 가져오고,
기존의 udp-echo-client.cc에서 패킷을 전송할 때 이런저런 헤더를 다 붙여서 전송할거아니에요?
거기 뒤에 살포시 우리 헤더를 얹어줍시다.
// UdpEchoClient::Send()
  NewHeader hdr;
  hdr.SetTime();
  hdr.Print(std::cout);
  p->AddHeader(hdr);
보내는 쪽에선 알아서 잘 보낼테니,
받는 쪽에서도 New Header 관련 작업을 넣어줘야 겠죠.
udp-echo-server.cc로 가줍시다. (Client가 보내면 Server가 받잖아요.)
똑같이 #include를 해주고,
받는 쪽에 살포시
// UdpEchoServer::HandleRead()

      NewHeader hdr;
      packet->RemoveHeader(hdr);
      uint64_t hdr_time = hdr.GetTime();
      std::cout << "Header Time at rx = " << hdr_time << std::endl;
를 추가해주면?
평범한 UDP Echo 애플리케이션을 실행했을 때,
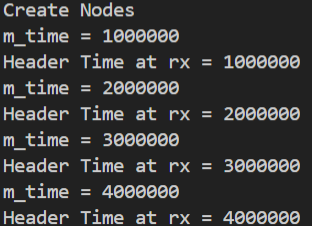
다음과 같이 헤더가 붙은 시간이 잘 출력되는 걸 볼 수 있습니다.
우리 헤더가 한 작업이에요!
Can Headers be modified?
헤더를 중간에 바꿀 수 있을까요?
가령, Switch를 생각해봅시다.
A->B->C를 거쳐 가야 하는데, B가 Router라면,
A에서 보낸 패킷은 일단 목적지를 B로 잡아야겠죠?
그럼 B는 그 후에 패킷의 header를 다시 고쳐줘야겠죠?
이런 일련의 과정을 생각해보면 필수로 들어가야 하는 feature라고 볼 수 있습니다.
그래서, ns3에서도 Switch Node에서는 Header의 일부 value를 수정할 수 있습니다.
가령 number of hop이나, Priority, Drop Rate같은 건 수정이 필요하죠.
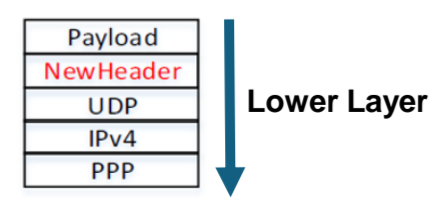
헤더들은 기본적으로 Encapsulize되어 있기 때문에,
특정 Header를 고치고 싶으면 그 앞의 Header들을 순차적으로 제거한 후,
수정하고,
다시 순차적으로 복구하는 작업이 필수불가결합니다.
Then Let's Do it!
PointToPointNetDevice::Receive()에서 UDP Header의 값을 확인해봅시다.
Switch Node의 ID는 1로 가정합니다.
(실제였다면 node.h/cc 내의 Set/GetNodeType 메서드를 이용해 ID를 얻어야겠지만요)
void
PointToPointNetDevice::Receive (Ptr<Packet> packet)
{
  NS_LOG_FUNCTION (this << packet);
  uint16_t protocol = 0;

  if (m_receiveErrorModel && m_receiveErrorModel->IsCorrupt (packet) )
    {
      //
      // If we have an error model and it indicates that it is time to lose a
      // corrupted packet, don't forward this packet up, let it go.
      //
      m_phyRxDropTrace (packet);
    }
  else
    {
      //
      // Hit the trace hooks.  All of these hooks are in the same place in this
      // device because it is so simple, but this is not usually the case in
      // more complicated devices.
      //
      m_snifferTrace (packet);
      m_promiscSnifferTrace (packet);
      m_phyRxEndTrace (packet);

      //
      // Trace sinks will expect complete packets, not packets without some of the
      // headers.
      //
      Ptr<Packet> originalPacket = packet->Copy ();

      // --- week7
      if (m_node -> GetNApplications() == 0) {
        Ptr<Packet> testPacket = packet->Copy();
        PppHeader ppp;
        testPacket->RemoveHeader(ppp);

        Ipv4Header ip;
        testPacket->RemoveHeader(ip);

        UdpHeader udp;
        testPacket->RemoveHeader(udp);

        std::cout << "Node ID: " << m_node->GetId() << " UDP Src Port: " << udp.GetSourcePort() << " UDP Dst Port: " << udp.GetDestinationPort() << std::endl;
      }

      //
      // Strip off the point-to-point protocol header and forward this packet
      // up the protocol stack.  Since this is a simple point-to-point link,
      // there is no difference in what the promisc callback sees and what the
      // normal receive callback sees.
      //
      ProcessHeader (packet, protocol);

      if (!m_promiscCallback.IsNull ())
        {
          m_macPromiscRxTrace (originalPacket);
          m_promiscCallback (this, packet, protocol, GetRemote (), GetAddress (), NetDevice::PACKET_HOST);
        }

      m_macRxTrace (originalPacket);
      m_rxCallback (this, packet, protocol, GetRemote ());
    }
}
코드를 보면,
원본 패킷을 복사한 후, (testPacket)
순서대로 PPP, IP, UDP 헤더가 위에 붙어있을테니,
Ppp 헤더를 제거하고,
Ip 헤더를 제거하고,
Udp 헤더를 제거합니다.
그리고 콜백을 걸죠.
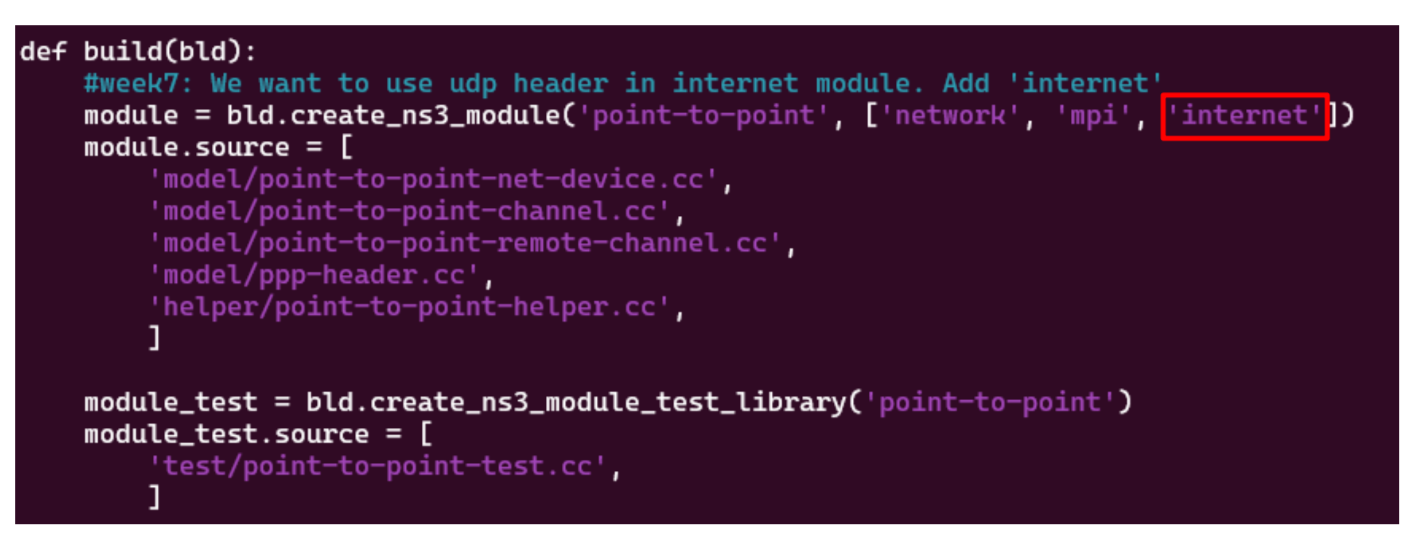
물론 저 코드를 추가하기 위해 ipv4, udp의 헤더를 추가했기 때문에
wscript에 또 의존성을 추가해야 합니다.

그러고나면 다음과 같이 Port 출력을 성공적으로 할 수 있습니다.